_GOTOBOTTOM
Early Aviation
Discuss World War I and the early years of aviation thru 1934.
Roden 1:32 Pfalz D.III
Rogga
_VISITCOMMUNITY
Östergötland, Sweden
Joined: November 21, 2005
KitMaker: 80 posts
AeroScale: 80 posts
Posted: Tuesday, March 24, 2009 - 06:39 AM UTC
Hello

I have started with a realy beautiful aircraft , the Pfalz D.III


It has been a lot of work on this one , many bits and pices that should go in betwene the fuselagehalfs.and here are the most of them


And the fuselagehalfs and the bottomwing


Now it looks like it is time to glue the pices together

Finaly a question , in Parts instructionsheet in picture G there are two handels that shold be mounted at the left fuselageside , i have not been able to find anything about them in my limited referensematerial , anyone who knowes if they should be there or not ?


More to come


thegirl
_VISITCOMMUNITY
Alberta, Canada
Joined: January 19, 2008
KitMaker: 6,743 posts
AeroScale: 6,151 posts
Posted: Tuesday, March 24, 2009 - 08:41 AM UTC
Hi Roger , I'm looking at the Windsock data file of the Pfalz D.III and on page ten it really doesn't show those intems all that well . One would be the throttle lever the other one not so sure . it really doesn't say . it only shows the one .

I'm glad you ask this question cause I would like to know myself now .
thegirl
_VISITCOMMUNITY
Alberta, Canada
Joined: January 19, 2008
KitMaker: 6,743 posts
AeroScale: 6,151 posts
Posted: Tuesday, March 24, 2009 - 09:10 AM UTC
I checked more of my refs and it's states some thing different but no name for it . I'll do some more digging .
Repainted
_VISITCOMMUNITY
Östergötland, Sweden
Joined: April 04, 2006
KitMaker: 1,058 posts
AeroScale: 1,004 posts
Posted: Wednesday, March 25, 2009 - 05:14 AM UTC
Hm
nice Rogga. I like to see this one when it´s finished..
good work


Larsa Q
Rogga
_VISITCOMMUNITY
Östergötland, Sweden
Joined: November 21, 2005
KitMaker: 80 posts
AeroScale: 80 posts
Posted: Friday, March 27, 2009 - 10:47 PM UTC
It toke some days to get the parts together but here are the "sections " of the interior


And here they are just lied in place without any glue yet


Now the scary things are to come , try to get everything together

Comments and tips are welcome

Regards
Rogga
TuomasH
_VISITCOMMUNITY
Turku ja Pori, Finland
Joined: September 10, 2008
KitMaker: 470 posts
AeroScale: 279 posts
Posted: Friday, March 27, 2009 - 11:58 PM UTC
Hey Rogga,
Looks very nice, I especially like your engine and wooden parts. How do you paint those wooden parts?
thegirl
_VISITCOMMUNITY
Alberta, Canada
Joined: January 19, 2008
KitMaker: 6,743 posts
AeroScale: 6,151 posts
Posted: Saturday, March 28, 2009 - 12:55 AM UTC
Very , very nice Roger . The wood grain is excellect ! The guns are a little to much on the silver side . They should be black then lighty dry brushed silver to bring out the details .

In all Roger , you have done one fantastic job on the build so far . Your attention to the details and painting is top notch . That engine is super !!!! Looking forward to the next run of progress pics .
Kalt
_VISITCOMMUNITY
Mendoza, Argentina
Joined: June 14, 2006
KitMaker: 222 posts
AeroScale: 219 posts
Posted: Saturday, March 28, 2009 - 01:33 AM UTC
Looking Good, Rogga! your "wood effect" is really nice but Terri is right about the guns: All Spandau and Parabellum machine guns left the factory covered with a baked on black enamel paint.

Cheers,

Claudio
Kornbeef
_VISITCOMMUNITY
England - South East, United Kingdom
Joined: November 06, 2005
KitMaker: 1,667 posts
AeroScale: 1,551 posts
Posted: Saturday, March 28, 2009 - 10:10 PM UTC
beautiful work, I eye your woodwork with great envy

looks wonderful already, tempting to buy one but I still have acute albifever at the moment.

Keith.
Rogga
_VISITCOMMUNITY
Östergötland, Sweden
Joined: November 21, 2005
KitMaker: 80 posts
AeroScale: 80 posts
Posted: Sunday, March 29, 2009 - 05:37 AM UTC
Hello Tuomas

Glad you like my work , about the wooden parts then .
I have tryed to immitate two different types of wood , one at the fuselagesides and one for the rest. In both cases i have sprayed Gunzes collors at first , fuselage H67 and the rest is H37 then a spray of gloss coat , when dried i used Winton artistoils , the fuselage is burnt sienna and the rest is yellow ochre . Put a layer of artistoil at the surfess and brush of paint with a quite used brush until desired result . After that has dried another spray with gloss coat , then some weathering and last a layer matt varnish.

Hope this can be to some help
Rogga
_VISITCOMMUNITY
Östergötland, Sweden
Joined: November 21, 2005
KitMaker: 80 posts
AeroScale: 80 posts
Posted: Sunday, March 29, 2009 - 05:45 AM UTC
Thank´s Lasse , Terri , Claudio and Kieth for your kind cheerings , it makes it easier and funnier to continue with the model
About the mashineguns i just have som odd and highly individual feeling that a mashinegun has to have a mettalic look , i really know it´s not right but i can´t help myself painting them this way , but it´s not to late to change yet , i might drybrush som black on them later

thegirl
_VISITCOMMUNITY
Alberta, Canada
Joined: January 19, 2008
KitMaker: 6,743 posts
AeroScale: 6,151 posts
Posted: Monday, March 30, 2009 - 07:56 AM UTC
What markings are you going with for this build ?
Rogga
_VISITCOMMUNITY
Östergötland, Sweden
Joined: November 21, 2005
KitMaker: 80 posts
AeroScale: 80 posts
Posted: Wednesday, April 01, 2009 - 02:55 AM UTC
Yes , what marking will it be ? , to be hounest i´m not so sure now. When i started this one out i was 100% dessided i would do the red and blue mashin on the boxart , paint for it is already bought ,but now i´m not that convinced anymore
The number 2 mashine among Rodens verssions , the alu-yellow-black one from jasta 10 looks also really good , one of the things i really like with this ww1-airplanes are their collorful paintshemes .
To make things even more comfusing for myself i opend the Eduard combobox to se what paintalternetives was there and ofcourse i found two more nice ones from jasta 10


With some cutting in Rodens decalshett the aircraftnumbers will be able to get right .
It would be really fun to do a mashin that´s not from the kit itself so the one with green tail is higest on the list , for the moment , i guess

Maybe it would be some of you fellow modellers out ther who will make the dessision because i have another question now

If there is someone who have and can upload or tell me where to find a authentic photo of some of these four mashines , i have a idé for my shelf to have a photo from that time of the planes i build.
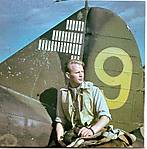
I managed to find one for my Fokker i reasently made and it became this way


I know it might be to much to wish for , but it would be realy nice i think.

More progresspictures to come

TuomasH
_VISITCOMMUNITY
Turku ja Pori, Finland
Joined: September 10, 2008
KitMaker: 470 posts
AeroScale: 279 posts
Posted: Wednesday, April 01, 2009 - 03:28 AM UTC

Quoted Text

Hello Tuomas

Glad you like my work , about the wooden parts then .
I have tryed to immitate two different types of wood , one at the fuselagesides and one for the rest. In both cases i have sprayed Gunzes collors at first , fuselage H67 and the rest is H37 then a spray of gloss coat , when dried i used Winton artistoils , the fuselage is burnt sienna and the rest is yellow ochre . Put a layer of artistoil at the surfess and brush of paint with a quite used brush until desired result . After that has dried another spray with gloss coat , then some weathering and last a layer matt varnish.

Hope this can be to some help


Tack, det var bra ! (Did this go right?)

In other words, thanks for info!
thegirl
_VISITCOMMUNITY
Alberta, Canada
Joined: January 19, 2008
KitMaker: 6,743 posts
AeroScale: 6,151 posts
Posted: Wednesday, April 01, 2009 - 04:39 AM UTC
Roger , I'll go through my books and see what I can turn up for you . Just might be able to help out a bit .

I like the red and white stripe tail . It stands out very well , but then again I have a thing for stripes !
Rogga
_VISITCOMMUNITY
Östergötland, Sweden
Joined: November 21, 2005
KitMaker: 80 posts
AeroScale: 80 posts
Posted: Friday, April 03, 2009 - 06:16 AM UTC
Varsĺgod Tuomas , ja det blev helt rätt

In outher words , Yes it did go right
thegirl
_VISITCOMMUNITY
Alberta, Canada
Joined: January 19, 2008
KitMaker: 6,743 posts
AeroScale: 6,151 posts
Posted: Friday, April 10, 2009 - 02:31 AM UTC
How goes the build Roger ?
Rogga
_VISITCOMMUNITY
Östergötland, Sweden
Joined: November 21, 2005
KitMaker: 80 posts
AeroScale: 80 posts
Posted: Monday, April 13, 2009 - 05:37 PM UTC
The build goes slow , very slow
Not that my inspirattion are low , i really would love to do some work on the mashine , but there is not time enoughe at the moment . I´m moving from my appartment in the town to a house a bit outside the town and that house is in some need of repairs before i will copleatly move and start to live there . Also that has to be done before the last of June , that´s when i have to be away from my apartment.
So just now that has to be number one priorety but every little time there are some minutes over i do some small steps foreward on my build
Repainted
_VISITCOMMUNITY
Östergötland, Sweden
Joined: April 04, 2006
KitMaker: 1,058 posts
AeroScale: 1,004 posts
Posted: Thursday, April 16, 2009 - 06:18 AM UTC
this is good news for me, I have my work in the garden for the moment so I have time to wait for you´r next update Rogga.
Cheers
Larsa Q
Dwaynewilly
_VISITCOMMUNITY
New York, United States
Joined: December 15, 2006
KitMaker: 365 posts
AeroScale: 344 posts
Posted: Saturday, April 18, 2009 - 08:41 PM UTC
Roger,

Excellent work so far, I really like your wood grain method. Outstanding work. Good luck on your new place, I have quite a bit of Spring clean up myself, but at least I don't need a snow shovel like Stephen might!

Looking forward to more of your work, Dwayne
Rogga
_VISITCOMMUNITY
Östergötland, Sweden
Joined: November 21, 2005
KitMaker: 80 posts
AeroScale: 80 posts
Posted: Monday, April 20, 2009 - 04:07 AM UTC
Thank you Dwayne

Glad you like my work , by now i have closed the fuselage up and also glued the bottomwing in place , and at the moment trying to get all those pe-parts in place on the outeside of the fuselage and the wings , so some more pictures will probebly come soon.

Repainted
_VISITCOMMUNITY
Östergötland, Sweden
Joined: April 04, 2006
KitMaker: 1,058 posts
AeroScale: 1,004 posts
Posted: Monday, April 20, 2009 - 08:44 AM UTC
can´t wait too see this one live my friend


Larsa Q
Rogga
_VISITCOMMUNITY
Östergötland, Sweden
Joined: November 21, 2005
KitMaker: 80 posts
AeroScale: 80 posts
Posted: Monday, April 20, 2009 - 05:48 PM UTC
Well Lasse , sad to say you have to wait , my plan was to have this one finished to the competition in Motala in July but it doesn´t look like it would happen i´m afraid .

Rogga
_VISITCOMMUNITY
Östergötland, Sweden
Joined: November 21, 2005
KitMaker: 80 posts
AeroScale: 80 posts
Posted: Sunday, May 03, 2009 - 05:54 PM UTC
Hello

The progress is not fast now but it is not a complete standstill , the fuselage has been glued together and here are some last pictures before that. As you can see there are quite a lot of sanding to bee done around the engine to bee able to get things together.


A bit moor work done , the bottomwing in place , filler and sanding done , new hings to the controllsurfaces ( they really was not good original ) and all the pe-parts in place.


Kornbeef
_VISITCOMMUNITY
England - South East, United Kingdom
Joined: November 06, 2005
KitMaker: 1,667 posts
AeroScale: 1,551 posts
Posted: Sunday, May 03, 2009 - 09:04 PM UTC
Excellent work so far Roger, such attention to detail.....alll those control wires look good. I think this is going to look A class once the paint is on.


Keith
 _GOTOTOP