General Aircraft
This forum is for general aircraft modelling discussions.
Hosted by Jim Starkweather
FEATURE
Wood Grain For DummiesPosted: Friday, September 18, 2009 - 09:14 PM UTC
Terri Werner explains her quick and easy technique for depicting wood grain using acrylic paints.
Link to Item
If you have comments or questions please post them here.
Thanks!
guitarlute101
West Virginia, United States
Joined: December 18, 2006
KitMaker: 1,121 posts
AeroScale: 1,063 posts
Joined: December 18, 2006
KitMaker: 1,121 posts
AeroScale: 1,063 posts
Posted: Saturday, September 19, 2009 - 01:42 AM UTC
Terri,
Very nice tutorial! This will be a very nice reference thread. Great work!
Mark
TacFireGuru
Colorado, United States
Joined: December 25, 2004
KitMaker: 3,770 posts
AeroScale: 201 posts
Joined: December 25, 2004
KitMaker: 3,770 posts
AeroScale: 201 posts
Posted: Saturday, September 19, 2009 - 02:51 AM UTC
Hey Terri,
Very useful techniques yuo've written up. Your method will easily span across the entire KitMaker network.
Well done!
Mike
Very useful techniques yuo've written up. Your method will easily span across the entire KitMaker network.
Well done!
Mike
thegirl
Alberta, Canada
Joined: January 19, 2008
KitMaker: 6,743 posts
AeroScale: 6,151 posts
Joined: January 19, 2008
KitMaker: 6,743 posts
AeroScale: 6,151 posts
Posted: Saturday, September 19, 2009 - 05:41 PM UTC
Thanks Mark and Mike !
Posted: Saturday, September 19, 2009 - 10:13 PM UTC
Many thanks Terri!
though I had expected a bit more (tongue firmly in cheek ) ... sort of a "Wunderwaffe for Wood graining" This is basically a combination of drybrushing and filters .. but perfect for Dummies (like myself)
all the best
Steffen
though I had expected a bit more (tongue firmly in cheek ) ... sort of a "Wunderwaffe for Wood graining" This is basically a combination of drybrushing and filters .. but perfect for Dummies (like myself)
all the best
Steffen
Mecenas
Joined: December 23, 2007
KitMaker: 1,596 posts
AeroScale: 1,275 posts
KitMaker: 1,596 posts
AeroScale: 1,275 posts
Posted: Saturday, September 19, 2009 - 11:32 PM UTC
"Keep things simple" - good job Terri!
drabslab
European Union
Joined: September 28, 2004
KitMaker: 2,186 posts
AeroScale: 1,587 posts
Joined: September 28, 2004
KitMaker: 2,186 posts
AeroScale: 1,587 posts
Posted: Monday, September 21, 2009 - 01:24 AM UTC
Well done
this will help me a lot when I fionally get through my stack of modern fighters and start building WWI
thegirl
Alberta, Canada
Joined: January 19, 2008
KitMaker: 6,743 posts
AeroScale: 6,151 posts
Joined: January 19, 2008
KitMaker: 6,743 posts
AeroScale: 6,151 posts
Posted: Monday, September 21, 2009 - 01:38 AM UTC
Thanks guy's , glad that it will help out the people who have a hard time with wood graining .
I keep it simple so any one who wants to try it will have an easy go at it with out it being all complicated and causing discouargment .
It took longer to type it all out and snapping pic's with the up loading then it did to actually do the wood graining !
I keep it simple so any one who wants to try it will have an easy go at it with out it being all complicated and causing discouargment .
It took longer to type it all out and snapping pic's with the up loading then it did to actually do the wood graining !
Posted: Tuesday, September 22, 2009 - 09:17 AM UTC
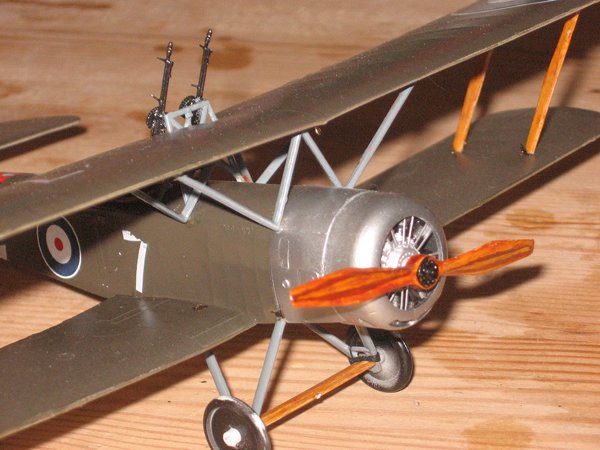
Nice write up Terri, use much the same method with one twist worth mentioning. Wood propellors are almost always laminated from planks of wood and often different woods are used in each layer. Once carved these often give stripes along the propellor.
These stripes become wider along the prop as the pitch angle of the blades reduces towards the tip. I used the same technique as Terri before using a fine brush almost dry to add the "laminations". One this prop I used Tamiya paints, buff, dry brushed hull red and flat earth, laminations in NATO brown, dry brush buff, top coat, clear orange.
thegirl
Alberta, Canada
Joined: January 19, 2008
KitMaker: 6,743 posts
AeroScale: 6,151 posts
Joined: January 19, 2008
KitMaker: 6,743 posts
AeroScale: 6,151 posts
Posted: Wednesday, September 23, 2009 - 02:11 AM UTC
Thanks Andrew . I will be covering prop and sturts in part 2 .
Nice job on your props , but the strutter doesn't have any rigging
Posted: Sunday, September 27, 2009 - 11:12 AM UTC
Hi Terri, it didn't when that pic was taken, it does now, I've finally regained some momentum and should finish it in the next few days
Posted: Monday, September 28, 2009 - 07:24 AM UTC
Nicely done Terri, thanks for sharing
IDFPaul
Canada
Joined: April 01, 2008
KitMaker: 43 posts
AeroScale: 1 posts
Joined: April 01, 2008
KitMaker: 43 posts
AeroScale: 1 posts
Posted: Saturday, May 15, 2010 - 11:33 AM UTC
Nice tutorial. I will have to try this ASAP. Thanks for the lesson!!