_GOTOBOTTOM
Modern (1975-today): USA
Modern aircraft of the United States.
Lockheed F-22A Raptor - 1/48 Academy
alpha_tango
_VISITCOMMUNITY
Germany
Joined: September 07, 2005
KitMaker: 5,609 posts
AeroScale: 5,231 posts
Posted: Saturday, September 19, 2009 - 12:27 AM UTC
Hi all

Well, I finished my Fokker E.V and now it is time for another project. I am fondling this kit for quite a whil, but I always felt it was too large for my bench. To behonest: it is, but it is mainly a matter of organising things .. on not organising at all ...

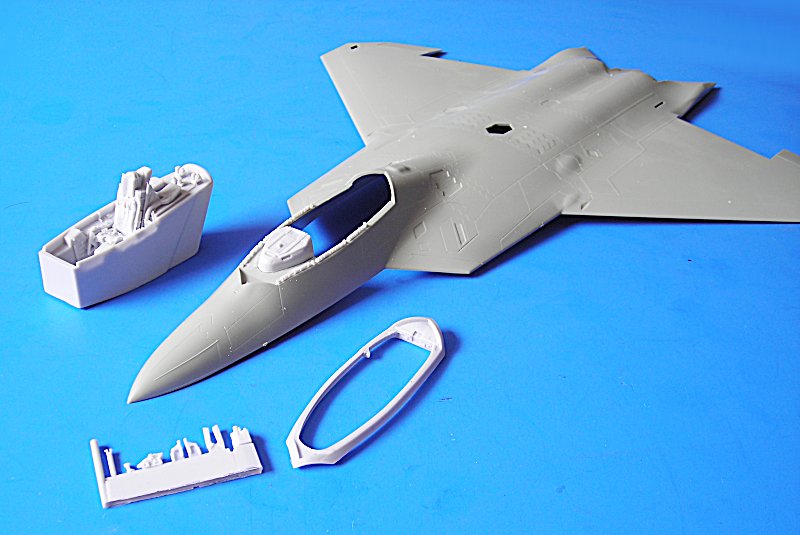
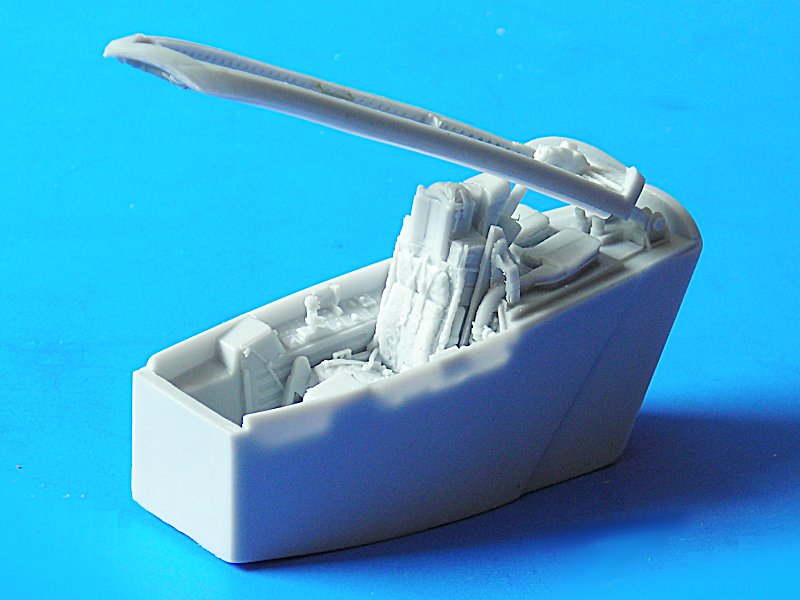
Well, recently I finally got the decals for the test shot I have and now I just want to finish it do get the large box out of my room (I did not get the kits box but one of these lt. brown things). As I had some time while I waited for the decals and instructions I bought Wolfpacks cockpit and nozzle sets. There also is or will be a weapon bay set, but I want to do it all buttoned up with just the pit open and the ladder (eduard) attached. Eduard also has a lot of external structures, I am not sure if these are needed or just a matter of gaining money .. I will just go OOB for the rest of the kit.

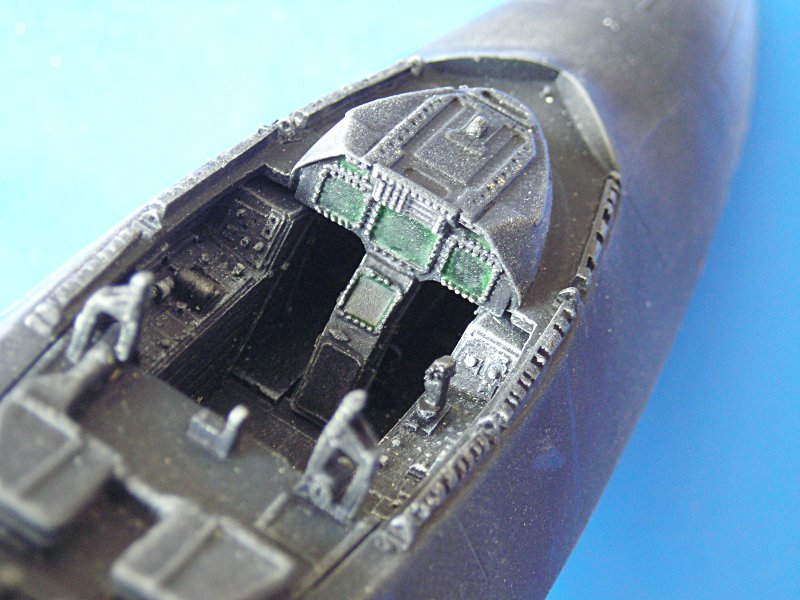
As all so often it starts with the cockpit which is quite a simple affair (few parts) but nicely detailed in the Wolfpack set. You have to cut the kits instrument cover, which was easy. I then attached the small parts around the cockpit opening ... parts of the locking/sealing mechanism I guess (You see I just have a slight idea about the real thing ... if it bothers you just switch the channel, or give me hints ).


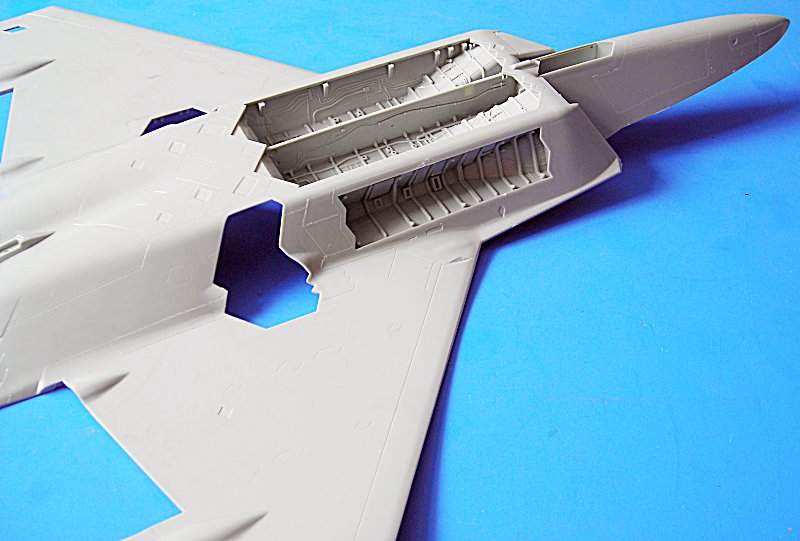
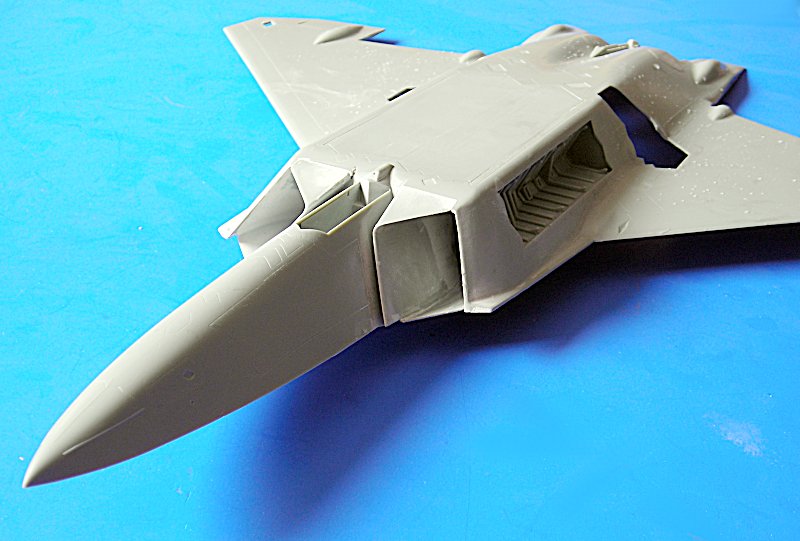
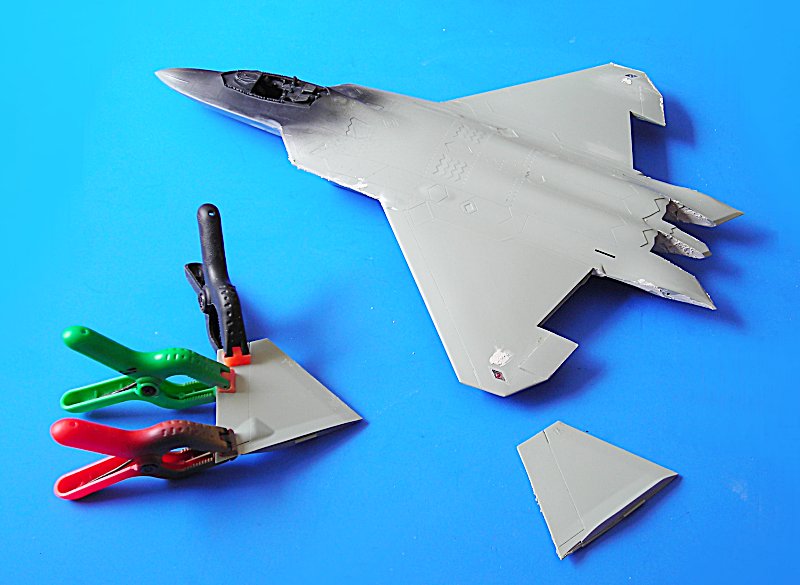
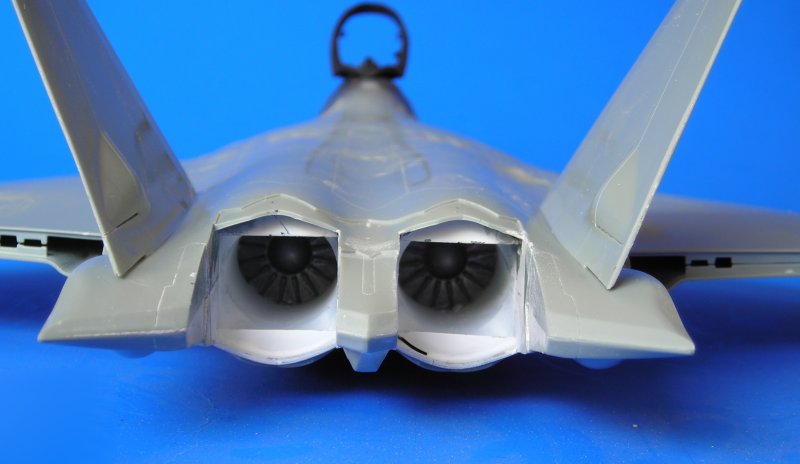
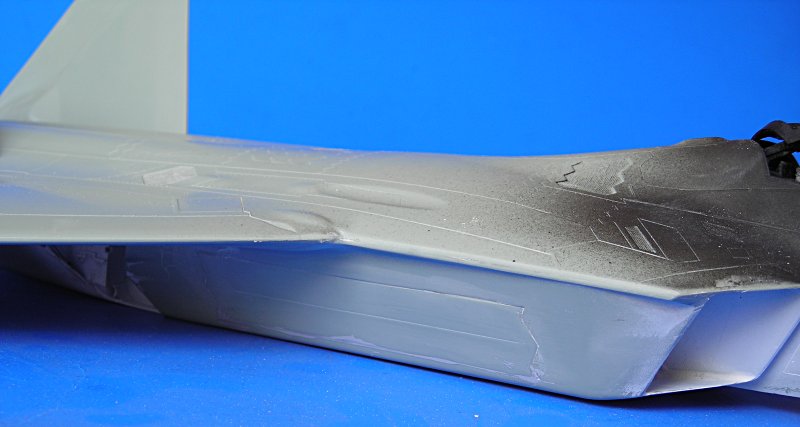
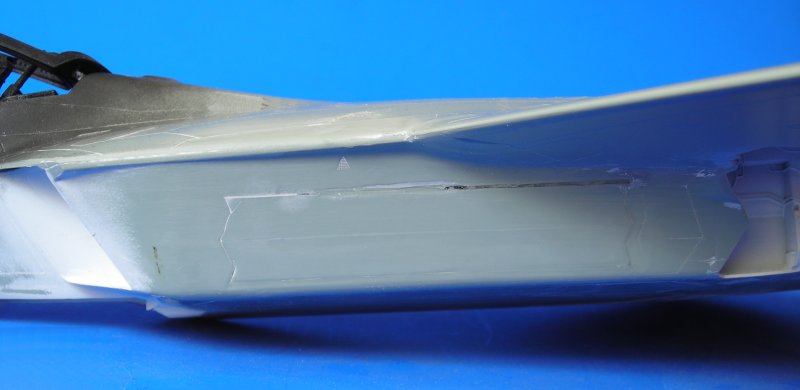
Now it would be time for paint --- which is like the old Henry Ford supposedly said: "You can have any color you want as long as it is black.". As I wanted to take a picture of this state i had to do something different yesterday evening. So I started the lower fuselage. The boxed fit quite well and were easily installed. There is no alignment help so you will have to use a bit of common sense to slide the parts in the right positions (it is logical as you want to have smooth transitions and no steps or holes) .. but this is essential as the intake ducts will use the upper part of the lower weapons bay as lower intake wall! I installed one of the intakes, but as I needed some clamps to hold the parts in the proper position I did not assemble the other one. Watch the position of the nose when glueing!


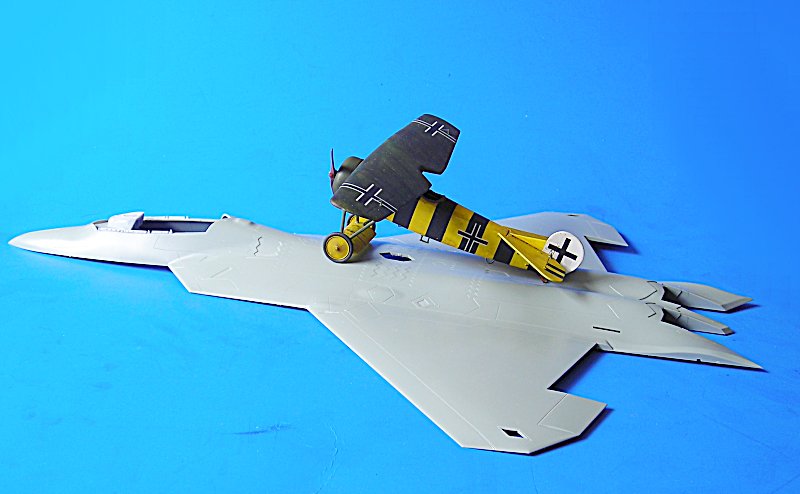
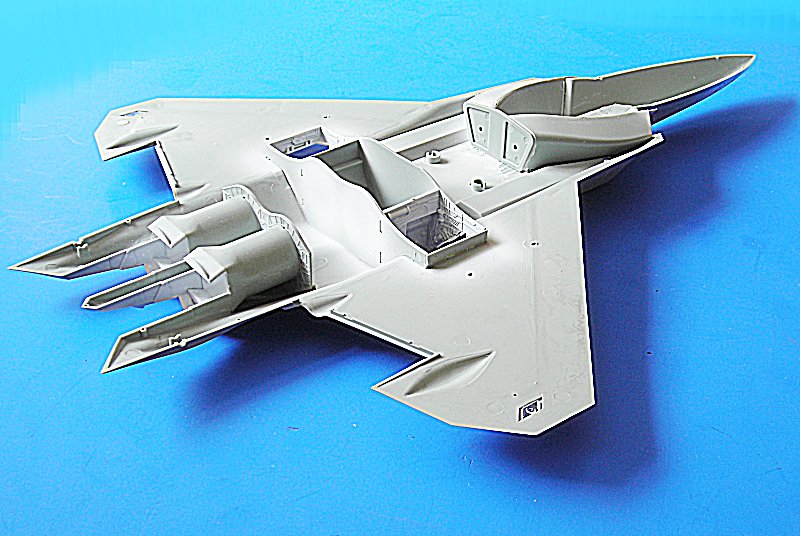
When you have installed the duct the whole lower hull has much more strength and feels a lot better than after removing the part from the sprue. Here is a size comparison with my recent build:


As always: comments welcome (no matter what - I'll tell you when I am fedup )


all the best

Steffen
jaypee
_VISITCOMMUNITY
Scotland, United Kingdom
Joined: February 07, 2008
KitMaker: 1,699 posts
AeroScale: 1,384 posts
Posted: Saturday, September 19, 2009 - 12:46 AM UTC
fantasy mistel!
From 1918 to present day. No-one cab accuse you of too narow a focus. Not a jet fan but as ever I'll be
peeking over your shoulder. Keep it up Steffen.
Mecenas
Joined: December 23, 2007
KitMaker: 1,596 posts
AeroScale: 1,275 posts
Posted: Saturday, September 19, 2009 - 12:47 AM UTC
Request permission to get on board and watch your work Master Steffen.
alpha_tango
_VISITCOMMUNITY
Germany
Joined: September 07, 2005
KitMaker: 5,609 posts
AeroScale: 5,231 posts
Posted: Saturday, September 19, 2009 - 01:02 AM UTC
Hello John-Paul and Michal

good to have you on board because it is not much fun to post for it's own sake ...

@J-P .. I will be back at ww2 when I finished the Super Etendard or F-22A (depending on when i will get the dash for the French bird) ... I have the strong urge to do a Stuka ...

as for focus .. always edge of technology when designed

@Michal: welcome aboard ... but I do not like being called "master" .. have you followed my builds? .. lots of mistakes on every, you just pointed out something on my Fokker.. so nothing to do with mastership ....

all the best

Steffen
Mecenas
Joined: December 23, 2007
KitMaker: 1,596 posts
AeroScale: 1,275 posts
Posted: Saturday, September 19, 2009 - 11:19 PM UTC

Quoted Text


@Michal: welcome aboard ... but I do not like being called "master" .. have you followed my builds? .. lots of mistakes on every, you just pointed out something on my Fokker.. so nothing to do with mastership ....


As you wish Steffen but I really like your builds and enjoy reading your blogs.

It wasn't my intention to finger you any mistake in the Fokker, just asked about something I didn't know and undestand and accidentaly I found the "sensitive spot". I should have check the literature first before asking...
alpha_tango
_VISITCOMMUNITY
Germany
Joined: September 07, 2005
KitMaker: 5,609 posts
AeroScale: 5,231 posts
Posted: Saturday, September 19, 2009 - 11:35 PM UTC
Hi Michal

no problem at all! It is just that such mistakes pester myself but I know I will always have these. I try my best, but I am just an average modeller and problems, mistakes and mishaps are part of the game in this "class" ..thus there is no master on this end of the monitor! Thats all.

I could not build yesterday as my back hurt really bad and I could not sit, stand or lie for a longer time. it got better but still hurts ... so no update today, sorry.

all the best

Steffen

jaypee
_VISITCOMMUNITY
Scotland, United Kingdom
Joined: February 07, 2008
KitMaker: 1,699 posts
AeroScale: 1,384 posts
Posted: Sunday, September 20, 2009 - 05:36 AM UTC

Quoted Text


I could not build yesterday as my back hurt really bad and I could not sit, stand or lie for a longer time. it got better but still hurts ... so no update today, sorry.


If it keeps recurring get down to a back specailist (I can't spell chiropractor, or specialist!) I had a bad back for ages and a few visits to them folks sorted it. Don't suffer it. All the best JP
alpha_tango
_VISITCOMMUNITY
Germany
Joined: September 07, 2005
KitMaker: 5,609 posts
AeroScale: 5,231 posts
Posted: Sunday, September 20, 2009 - 09:01 AM UTC
Thanks J-P!

I had problems in the past, but having lost 50+ kg over the past 11 months has helped. This was just a bad move or pinched nerve or something similar ... painful, but nothing serious. Hope to get back at the bench tomorrow for some work. got my website updated today, so you see it really got better ....

all the best

Steffen
Tojo72
_VISITCOMMUNITY
North Carolina, United States
Joined: June 06, 2006
KitMaker: 4,691 posts
AeroScale: 238 posts
Posted: Monday, September 21, 2009 - 03:56 AM UTC
Thanks for the build log + photos,I am considering this kit,and your build will be helpful,looks good so far.
alpha_tango
_VISITCOMMUNITY
Germany
Joined: September 07, 2005
KitMaker: 5,609 posts
AeroScale: 5,231 posts
Posted: Monday, September 21, 2009 - 05:14 AM UTC
Thank you Anthony!

Today I could do a bit more stuff .. though not much. I got all the stuff in the pit together, which was quite difficult, as the Wolfpack instructions are not very clear, but in the end the margin to be wrong is quite narrow but you have to invest some time and thought. (the canopy stuff is not glued yet)


I also added the 2nd intake duct .. quite a hustle, but I must add that I deviated pretty much from the instruchtions (I wanted to have both ends open for sanding and painting). I then added some putty at the joints which were o.k. but there were some larger gaps that I wanted (half way) smooth. i also had a small step outside, but again this can be my fault not following the instructions. Then i closed the main weapons bay .. IMO the bird will look better all closed up .. and it saves me some assembly time


Holding the parts together I will have a slight problem near the canopy .. but I will just remove the locator pin .. Not to forget it already looks enough like a Raptor for a small flight display in my room

all the best

Steffen
alpha_tango
_VISITCOMMUNITY
Germany
Joined: September 07, 2005
KitMaker: 5,609 posts
AeroScale: 5,231 posts
Posted: Tuesday, September 22, 2009 - 03:28 AM UTC
Hi all

a it of progress .. I better let the pix speak for themselves, but if there are questions, just ask! BTW the side weapon bay covers have a very poor fit!!


Just a few adjustments befor i can close it. BTW anyone have an ider about the position lights. Should they be coloured from the inside or are they see through, clear, red, blue, green? (the instructions are pretty bad here)

all the best

Steffen
alpha_tango
_VISITCOMMUNITY
Germany
Joined: September 07, 2005
KitMaker: 5,609 posts
AeroScale: 5,231 posts
Posted: Thursday, September 24, 2009 - 12:25 AM UTC
Hi all

the bad fit of the sid WB covers is really annoying .. had I have the slightest idea i would have fit them without the bay installed and have added it later (I just put these in for structural strength as the lower fuselage is rather flimsy when you cut it from the sprue ... I am not done filling the huge gaps, but I had no fun in the sanding orgy today, so I put the fuselage together.

The fit is not bad, but it needs some persuasion here and there which is difficult because of all the curves and angles ... thus it looks pretty bad in the pic, but again: for such a large aircraft the fit is o.k.


all the best

Steffen
AussieReg
Staff MemberAssociate Editor
AUTOMODELER
#007
_VISITCOMMUNITY
Victoria, Australia
Joined: June 09, 2009
KitMaker: 8,156 posts
AeroScale: 3,756 posts
Posted: Thursday, September 24, 2009 - 10:55 AM UTC
Looking good Steffen.

As with the guys above I am not a big jet fan, but I always follow your builds and you never fail to give me a few hints and tips for my own projects.

Keep up the good work, and I hope your back is better now.

Cheers, D
alpha_tango
_VISITCOMMUNITY
Germany
Joined: September 07, 2005
KitMaker: 5,609 posts
AeroScale: 5,231 posts
Posted: Friday, September 25, 2009 - 02:38 AM UTC
Thank you Damian! I hope my build is/will be worth it. .. and yes my back is halfway o.k. since yesterday (actually it got better each day)

Today I put on a bit of putty. Pretty much at the tail els it is just fixing some stuff that I might have caused myself. On the wings are two small sink marks .. now that I write it, i 'll have to check the lower side too.

One thing you might consider on your build: thin down the trailig edges .. these are really heavy on my model (which is a test shot) ... it is too late for the ailerons, but I did on the rudders (thus the clamps). the leading edge will also need a bit of filler while the LE of the wing is very nice. Had no look at the elevators yet .. else I am pretty happy so far. Now it is time to look for proper colours ... guess I'll go for Xtracrylics (no mixing) ...


all the best

Steffen
stugiiif
_VISITCOMMUNITY
Virginia, United States
Joined: December 13, 2002
KitMaker: 1,434 posts
AeroScale: 403 posts
Posted: Friday, September 25, 2009 - 03:29 AM UTC
Steffen, I keep forgetting this is a test shot. the reveiws I've seen they fixed alot of the issue you have shown us. I'm amazed at your patients as most test shot don't get built. BTW what markings are you doing any chance one of the birds from Langley AFB in Virginia?

Steve
alpha_tango
_VISITCOMMUNITY
Germany
Joined: September 07, 2005
KitMaker: 5,609 posts
AeroScale: 5,231 posts
Posted: Friday, September 25, 2009 - 03:39 AM UTC
Thanks Steve!

Well, I guess this is a final shot (or at least close to that one) .. no short shots, good detail, no flash .. I have seen much worse ... only two things really bad so far: fit of the side weapon bay covers and thick trailing edges.

As for the markings: no idea yet .. luckily I got the whole set from the kit. As I have no info about pilots and such, I would be happy about a hint or wish ...

all the best

Steffen
Gorizont
_VISITCOMMUNITY
Sachsen, Germany
Joined: November 28, 2007
KitMaker: 1,462 posts
AeroScale: 27 posts
Posted: Friday, September 25, 2009 - 08:35 AM UTC
Hi Steffen, I like the comparison with the Fokker-plane with the Raptor!
I´ve seen a view like this on photo of an real MiG-29 on which was painted the silhouette of a MiG-3 fighter.

greetings...
Soeren
alpha_tango
_VISITCOMMUNITY
Germany
Joined: September 07, 2005
KitMaker: 5,609 posts
AeroScale: 5,231 posts
Posted: Friday, September 25, 2009 - 10:28 AM UTC
Hi Sören

was machst du denn hier? .. bist du irgendwo falsch abgebogen .... Beim Foto gings vor allem um den Größenvergleich und der kommt noch nicht mal richtig raus ...

Many thanks for your comment! This comparison markings you mentioned are not new. There is or was this Begian F-16 with a Spitfire and some more birds (IIRC French, US .... )

viele Grüße

Steffen
Gorizont
_VISITCOMMUNITY
Sachsen, Germany
Joined: November 28, 2007
KitMaker: 1,462 posts
AeroScale: 27 posts
Posted: Friday, September 25, 2009 - 10:58 PM UTC

Quoted Text

Hi Sören
was machst du denn hier? .. bist du irgendwo falsch abgebogen .... Beim Foto gings vor allem um den Größenvergleich und der kommt noch nicht mal richtig raus ...

Many thanks for your comment! This comparison markings you mentioned are not new. There is or was this Begian F-16 with a Spitfire and some more birds (IIRC French, US .... )

viele Grüße
Steffen


Hi Steffen, no I´m not wrong on this forum. But I´m not an "aircraft-builder"; these times are over. But perhaps I will turn into this again.
I´m also interested in aircraft and other flying things (including very big insects) and perhaps I will see and buy one interesting kit on the event (next weekend) in my city.
(Modell-Hobby-Spiel)

The size-comparison on the "big MiG" which I meant, can be found here.
http://www.airplane-pictures.net/image22034.html
Edit: As I saw, the small plane, which is painted on the MiG-29 seems to be Yakovlev or Lavochkin-based one.

greetings...
Sören (or Soeren, that´s the same and writeable for all)
alpha_tango
_VISITCOMMUNITY
Germany
Joined: September 07, 2005
KitMaker: 5,609 posts
AeroScale: 5,231 posts
Posted: Friday, September 25, 2009 - 11:28 PM UTC


Hi Sören

that's a cool pic .. a Soviet/Russian aircraft in Hungarian markings with an Italian aircraft in old Hungarian markings on it (it is a probably Reggiane Re2000) .. also the grey camo on the MiG is cool

Sadly it is a bit faar from Ettlingen to Leipzig .. i was there twice, but it was no fun as exhibitor the first time (loong weekend between a superglue booth, some craft tool stands and a doll house (nee, nicht das leichte Gewerbe, sondern wirklich Puppen) ... most boring weekend. 2nd time I was there just as a visitor ... much more fun, still I prefer slightly smaller shows (except Telford which is the biggest overkill on modelling you can imagine ... hope to make it there again ... one day)

all the best

Steffen

VonCuda
_VISITCOMMUNITY
North Carolina, United States
Joined: November 28, 2005
KitMaker: 2,216 posts
AeroScale: 1,080 posts
Posted: Saturday, September 26, 2009 - 03:46 PM UTC
Never fear Steffen,
As with all your builds, I am watching.

Hermon
alpha_tango
_VISITCOMMUNITY
Germany
Joined: September 07, 2005
KitMaker: 5,609 posts
AeroScale: 5,231 posts
Posted: Saturday, October 03, 2009 - 03:24 AM UTC
Thank you hermon ... seems there is not much interest in Jets here ..

Well, anyway, I do build on the kit but it is a bit more tedious and timeconsuming than I had thought. I am through filling and sanding and now I have to rescribe that darn weapon bay .. something I do not like and that I am not very familiar with. .... Here are a few pix of the present state:


also broke the control stick inside the pit dont know when and how but it is gone. Will have to check the kit if I can use this part. Also it seems i need some parts of the kit for the resin pit as there is no HUD or activation handles for the bang seat in the Wolfpack set (also not a single hint in the "instructions") ... progress is slow.

all the best

Steffen

Tojo72
_VISITCOMMUNITY
North Carolina, United States
Joined: June 06, 2006
KitMaker: 4,691 posts
AeroScale: 238 posts
Posted: Saturday, October 03, 2009 - 09:46 AM UTC
Very nice build going on and educational,but a lot of patience you are showing,and the results are looking good.We had an earlier discussion about the coming Hasegawa kit,and with all the filling and sanding and fit difficulties you are having,I think I will wait and check that one out,because I know I wouldn't have the patience to deal with this kit.Best wishes and looking foward to more progress.
alpha_tango
_VISITCOMMUNITY
Germany
Joined: September 07, 2005
KitMaker: 5,609 posts
AeroScale: 5,231 posts
Posted: Saturday, October 03, 2009 - 10:16 AM UTC
Hi Anthony

Well, i am not sure how much of my problems are due to the kit being a test shot. If you want to build the weapon bays open, you will also have very few problens.

Still I understand your hesitation ... we'll see how much better the Hasegawa can be. I have sprayed on a first coat of primer and I will have to smooth the side bays a bit more .... maybe i will not rescribe them but just use a pencil to simulate the panel lines ...

"never give up, never surrender" Cmdr. Peter Quincy Taggart

BTW just today there is a pretty nice Academy model on Modelversium ... all open and sadly just pix and not a full build report ...

cheers

Steffen
VonCuda
_VISITCOMMUNITY
North Carolina, United States
Joined: November 28, 2005
KitMaker: 2,216 posts
AeroScale: 1,080 posts
Posted: Saturday, October 03, 2009 - 02:49 PM UTC

Quoted Text

Thank you hermon ... seems there is not much interest in Jets here ..


Not true my friend. I have a whole stash of jets that I'm waiting to build. My problem is that I"m signed up for too darn many campaigns and NONE of them are for jets.

BTW, it looks as if the exhausts are not designed to be adjustable. I wonder if any of the other kits will offer the option of displaying them open or closed? Just a thought. A bit more detail on the arse end of this bird would be nice.


Hermon
 _GOTOTOP