Albatros D.V - 1/48 Eduard (80xx series)
Germany
Joined: September 07, 2005
KitMaker: 5,609 posts
AeroScale: 5,231 posts
Posted: Wednesday, September 23, 2009 - 06:41 AM UTC
Hi all you knowledgeable WWI maniacs
I decided to build/restore my old Albatros along with other projects as there is quite a lot of waiting time involved. I picked this kit as it is pretty much done in the interior (though very bad for my present standard) .. did I mention it is a very old project ... well, I degress.
I remember there was a big problem with the wings of Eduards old Albatros edition ... but the details escape me.
Are ther any pitfalls or major inaccuracies with this kit? Any help appreciated.
Not sure if i could/should start a build log for this as this will be rather long term and not really built from the beginning ...
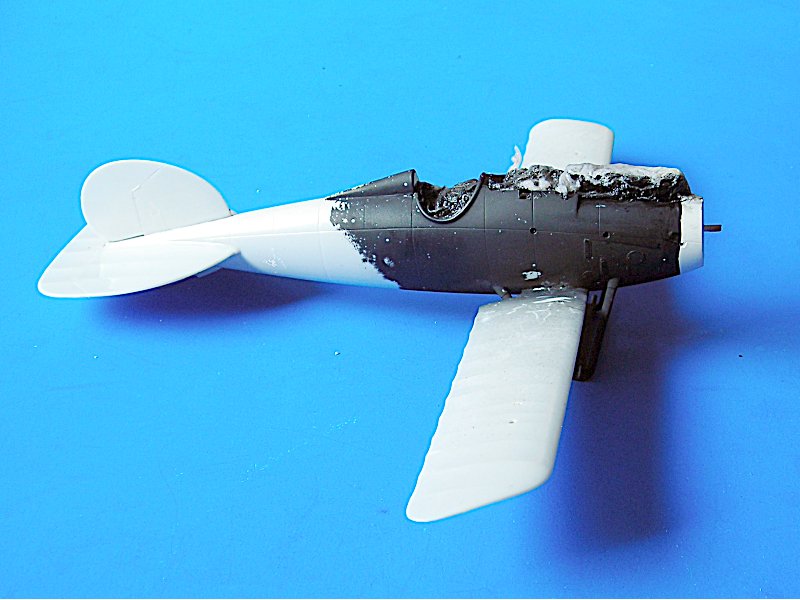
Here is a first pic, but I decided to remove all colour .. which worked out (it is too dark now to take more pictures)
all the best
Steffen
DULCE ET DECORUM EST PRO HOBBY MORI
Colorado, United States
Joined: January 25, 2004
KitMaker: 11,669 posts
AeroScale: 11,011 posts
Posted: Wednesday, September 23, 2009 - 11:38 AM UTC
There are several areas of minor concern on the early issue kits (#80xx series).
1. Wing tips too raked. Very minor
2. landing all 4 gear legs 3mm too short. I replace with bent and cut Strutz from Aeroclub.
3. The kit wheels are not the right diameter. Replace or not. Minor concern.
4. Horizontal tail section needs careful fitting and minor sanding.
5. No radiator plumbing.
6. PE long cocking handles should only be used on 1918 Fokker D types.
". . .The most important thing is to know why you build and then get the most that you can out of building." via D.D.
Alberta, Canada
Joined: January 19, 2008
KitMaker: 6,743 posts
AeroScale: 6,151 posts
Posted: Wednesday, September 23, 2009 - 01:36 PM UTC
Hi Steffen !
Wow another WW1 thingie

Pretty much what stephen wrote , but I have also read on the Areodrome that the lower wing is two far forward and needs to come back about 2 mm , I'm not sure if this is correct for it was the only sources that I read it at . And the Windsock plans seem to be right on when compared to them .
Do a blog , it will be great to see your take on this build

Germany
Joined: September 07, 2005
KitMaker: 5,609 posts
AeroScale: 5,231 posts
Posted: Wednesday, September 23, 2009 - 08:21 PM UTC
Many thanks Stephen and Terri!
Except for the wheel legs (and maybe wheels) this mistakes do not worry me too much. I want this (basically) to be a rigging exercise. But I want the look to be close.
This is kit 8013 and I want to do Göring. Thogh I am not a big fan of the person, he always had nice aircraft. Stephen I checked the legs against those from my "Richthofen"-box and they are the same length!!! ,, does that mean the new kits are wrong too? .. sadly I do not have the Datafile (just ordered some, but mainly for some new kits (Roland D.VI Albatross D.I-II, Fokker E.I-II). The wheels are very different though.
So when you approve a build log for such a "rescue mission" I will ask Rowan to change that.
all the best
Steffen
DULCE ET DECORUM EST PRO HOBBY MORI
Colorado, United States
Joined: January 25, 2004
KitMaker: 11,669 posts
AeroScale: 11,011 posts
Posted: Wednesday, September 23, 2009 - 11:42 PM UTC
Quoted Text
". . .Stephen I checked the legs against those from my "Richthofen"-box and they are the same length!!! ,, does that mean the new kits are wrong too?. . .all the best Steffen
Yes they are wrong and the propeller stem / hub is molded on the wrong side of the new kit and the foot step is molded in the wrong place on the new mold and . . .I better stop there.
". . .The most important thing is to know why you build and then get the most that you can out of building." via D.D.
Germany
Joined: September 07, 2005
KitMaker: 5,609 posts
AeroScale: 5,231 posts
Posted: Thursday, September 24, 2009 - 12:13 AM UTC
Oh my....
thanks for the info Stephen ... are there aftermarket replacements? .. IIRC I have seen corrected wheels somewhere .. but the struts? ... really i do not care to much about a mm here or there but 3 mm in the u/c alter the look very much. Sadly on this model the u/c is already attached, so I think twice if I really should change it ..
Also I do not see how I could get a stable extension. As I wrote in the Fokker E.V thread the sheet /strip stuff is not as stable as injection moulded struts
BTW for my MvR Albatros i would really like to know the shortcommings of the new kit .. do you have a construction feature here (or such a nice list as for the old kit)?
again many thaks for your invaluable help!!
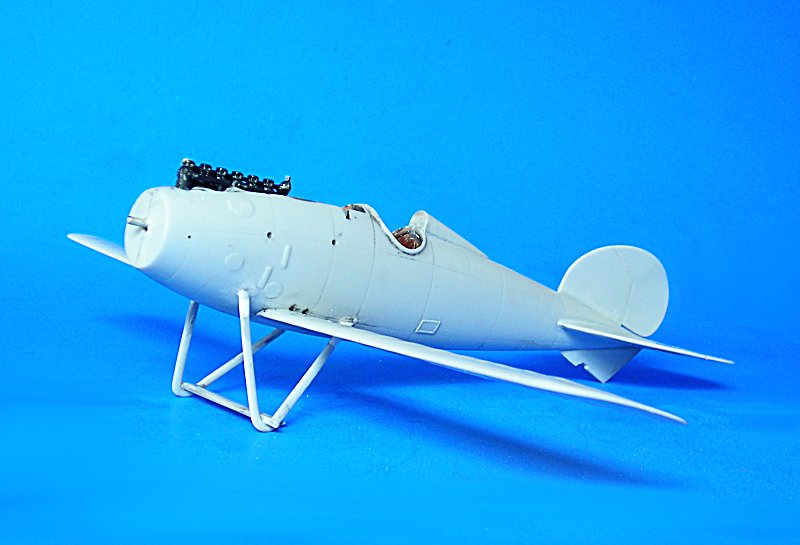
BTW I smoothed all seams at the tail and along the fuselage seam. not much to photograph. but here are 2 photos:


all the best
Steffen
DULCE ET DECORUM EST PRO HOBBY MORI
Alberta, Canada
Joined: January 19, 2008
KitMaker: 6,743 posts
AeroScale: 6,151 posts
Posted: Thursday, September 24, 2009 - 01:48 AM UTC
You can get replacement wheels from Aires ( ?) as well as control surfaces . For the struts you will have build them from scratch using contail strut manterial with comes in either plastic or brass , brass is better and can be gotten from areoclub or roll models .
Also on the main wing flight controls there should be five hinges on each , access hatchs are also in the wrong place Basiclly Steffen even in the new kit there is alot of small issues most of them are minor like Stephen said and are liveble . If you need any info give a holler , I have all of the windsock datafiles on the Albatros D series .
Germany
Joined: September 07, 2005
KitMaker: 5,609 posts
AeroScale: 5,231 posts
Posted: Thursday, September 24, 2009 - 01:59 AM UTC
Hi Terri
Yes I thought I had seen wheels somewhere .. IIRC the Aires are still too small I rather thought Cooper Details or a similar small manufacturer had good ones (from what I have read).
For this build I do not care much about some hatches or misplaced details. I had read somwhere that there was an issue with the wing (dehedral or length of struts or something in that range .. but this is obviuosly not the case so it was probably just an error on my side).
Still the u/c issue bothers me and cutting them off the model plus finding a way to lengthen them is a bit frightening. I think I will use some wire insert to get something that will hold the model.
i would need a good rigging diagram as I am not sure where I should drill the holes and where I need wires .. I found a few dots that I drilled, but still miss some ...
all the best
Steffen
DULCE ET DECORUM EST PRO HOBBY MORI
Alberta, Canada
Joined: January 19, 2008
KitMaker: 6,743 posts
AeroScale: 6,151 posts
Posted: Thursday, September 24, 2009 - 02:24 AM UTC
I forgot about cooper details , which are better then the Aries set .
I don't have time this morning , but will be home early this afternoon after my doc appointment and can e-mail you a rigging diagram . I will also re take a few pic's of the build I did of the rigging and post that as well . But I'm sure Stephen will beat me to the punch . What also might help out as well is Marks Miller 3D drawings on the D.V , just type it in your web browser .
Germany
Joined: September 07, 2005
KitMaker: 5,609 posts
AeroScale: 5,231 posts
Posted: Friday, September 25, 2009 - 12:24 AM UTC
Many thanks again to Terri for the rigging diagram!!
Yesterday i cut the u/c from the kit with my Trytool PE Saw (very thin cuts) then i glued in some 3mm pieces of strip styrene. (all with Tamiya glue).
This morning I cut a groove in the legs with my motor tool and added steel wire fixed with CA glue. One leg got loose, but without damage. Then I sanded the leg to shape and added a bit of Mr. Surfacer 500 which will be sanded when it is dry tomorow, The other leg in the photo still needs to be done.


BTW I did not find an Aires set for the wheels and i fear i did not buy the cooper parts when I had the chance --- doh. BUT I found the set from Black Dog for the D.I-II which includes wheels. Anyone know if these are large enough?
all the best
Steffen
DULCE ET DECORUM EST PRO HOBBY MORI
Alberta, Canada
Joined: January 19, 2008
KitMaker: 6,743 posts
AeroScale: 6,151 posts
Posted: Friday, September 25, 2009 - 01:16 AM UTC
Nice fix on adding the extra 3mm to the under carriage .
I'm not familar with Black dog , but the wheel covers differ from the D1, 2 to the D.V . Size of them should be about right so if you are happy with that then go for them . I didn't use the kit wheels when I built my and robbed some from another kit , just can't remember which one .
Even still they aren't correct but they were the right size which I was happy with the out come . Would be nice to see what the Black Dog ones are like , there is 4 D.III in the stash which all need wheel replacements .
Germany
Joined: September 07, 2005
KitMaker: 5,609 posts
AeroScale: 5,231 posts
Posted: Friday, September 25, 2009 - 01:22 AM UTC
Thanks Terri. here is a pic from BD's site:

cheers
Steffen
DULCE ET DECORUM EST PRO HOBBY MORI
Colorado, United States
Joined: January 25, 2004
KitMaker: 11,669 posts
AeroScale: 11,011 posts
Posted: Friday, September 25, 2009 - 01:59 AM UTC
I don't have the black dog set but if you have the Eduard new mold (81xx series) those wheels should be close.
". . .The most important thing is to know why you build and then get the most that you can out of building." via D.D.
Germany
Joined: September 07, 2005
KitMaker: 5,609 posts
AeroScale: 5,231 posts
Posted: Friday, September 25, 2009 - 02:06 AM UTC
Thank you Stephen, Maybe i try to copy those ....
all the best
Steffen
DULCE ET DECORUM EST PRO HOBBY MORI
Germany
Joined: September 07, 2005
KitMaker: 5,609 posts
AeroScale: 5,231 posts
Posted: Friday, September 25, 2009 - 06:07 AM UTC
Hi all
Well, Stephen's hint was so good that I gave it a try. I had some RTV silicone left from my tries a few years ago.
I started by cleaning the kit parts (I had a quite hefty tool misalignment). then I glued these to a thin strip plastic card then a thicker one and finally a pouring block. I do not intend to go mass production ,so I do not have to care too much how well the parts come from the mould.
Then I glued it to a plastic sheet and built a box around it. All glued with Tamiya Extra Thin as CA will react with the silicone stuff. Then I mixed it and poured it in .. maybe a bit too fast, but I put it in my ultra-sonic cleaner and a lot of small air bubbles came out .. so I hope that the parts are clear off those. Sadly I have no resin to test it.
I only have some pix after it cured .. but it is like re-engineering and I think you will get the idea:


all the best
Steffen
DULCE ET DECORUM EST PRO HOBBY MORI
Alberta, Canada
Joined: January 19, 2008
KitMaker: 6,743 posts
AeroScale: 6,151 posts
Posted: Friday, September 25, 2009 - 01:35 PM UTC
Not a bad idea at all ! Something which I will have to give a try in the future .
Colorado, United States
Joined: January 25, 2004
KitMaker: 11,669 posts
AeroScale: 11,011 posts
Posted: Friday, September 25, 2009 - 05:45 PM UTC
Most impressive work Steffen!
". . .The most important thing is to know why you build and then get the most that you can out of building." via D.D.
Germany
Joined: September 07, 2005
KitMaker: 5,609 posts
AeroScale: 5,231 posts
Posted: Friday, September 25, 2009 - 09:39 PM UTC
Well, I made a 2nd mold but I also had not much success .. guess the resin I found is just too old ... I think I have at least two good wheels so once I got some resin I'll be fine (I purposely molded both wheels in case one might have bubbles or other blemishes) ...
here are my meagre trys with the old resin I found .. not much success but I think mold two is o.k (though it still has a few bulbbles in the mold)

all the best
Steffen
DULCE ET DECORUM EST PRO HOBBY MORI
Germany
Joined: September 07, 2005
KitMaker: 5,609 posts
AeroScale: 5,231 posts
Posted: Tuesday, September 29, 2009 - 05:31 AM UTC
Hi all
yes i still build model, but i had to focus on my website and some other projects fo a few days. So the progress is rather marginal, but i added the u/c struts to the model again worked out o.k. but not sure if it looks better now .. probably depends on the larger wheels, but I still need new resin ... also i still did not figure 100% where exactly that darn rigging has to go. I will need to fill the holes at the wingroot (no idea what I drilled them for) ...
all the best
Steffen
DULCE ET DECORUM EST PRO HOBBY MORI
Colorado, United States
Joined: January 25, 2004
KitMaker: 11,669 posts
AeroScale: 11,011 posts
Posted: Tuesday, September 29, 2009 - 09:06 AM UTC
Greetings Steffen,
here is the work of Brad cancian on the Eduard 81xx series kit. Landing gear lengthened as mentioned.


From the masterful work of Mark Miller (used with his kind permission.)


". . .The most important thing is to know why you build and then get the most that you can out of building." via D.D.
Germany
Joined: September 07, 2005
KitMaker: 5,609 posts
AeroScale: 5,231 posts
Posted: Tuesday, September 29, 2009 - 09:26 AM UTC
Many thanks Stephen
Totally forgot to check Mark Millers website .. .even though Terri reminded me. Should help me to find the anchor points for the wires ...
all the best
Steffen
DULCE ET DECORUM EST PRO HOBBY MORI
Alberta, Canada
Joined: January 19, 2008
KitMaker: 6,743 posts
AeroScale: 6,151 posts
Posted: Wednesday, September 30, 2009 - 01:48 AM UTC
Excellent job on the landing gear Steffen !
I did snap pic's of the builds I have done to show you the rigging points , but the batteries in the camera decided not to give any more juice . Wasn't able to post the rest of the pic's for my Fokker build

Sorry if the info I sent you wasn't clear enough , so maybe this will help you out as well .
Starting with the V struts on the lower wing just in front of the attachment poit for the strurt , drill one small hole about 1mm away from it . Lower wing to fuslage join there should be four holes needed . Make your first two holes 1 mm away from the fuselage . spaceing between these to holes are about 2 mm apart . Two more holes are needed just in front of these two but closer together . ( these two are for the V strut rigging and the two closer to the fuselage are for the cab/struts . Hope this makes sence .....
Germany
Joined: September 07, 2005
KitMaker: 5,609 posts
AeroScale: 5,231 posts
Posted: Wednesday, September 30, 2009 - 02:17 AM UTC
Hi Terri
many thanks for the additional explanation .. this whole rigging thing is kind of a miracle to me because I have problems to see the logic in fixing a wire in the "middle of a wing" so to speak.
Somehow I also have problems to translate the 2d drawings you sent me in a 3d model (I was once very good at this, but it is probably the same problem I just mentioned: I do not understand the logic behind it) So haveing a closer look at the 3d art might help me a bit .....
all the best
Steffen
DULCE ET DECORUM EST PRO HOBBY MORI
Scotland, United Kingdom
Joined: February 07, 2008
KitMaker: 1,699 posts
AeroScale: 1,384 posts
Posted: Wednesday, September 30, 2009 - 02:49 AM UTC
Thinking on the wheels you could try this method. Wheels seem like prime candidates for it.
http://plamo.outthere.info/forum/showthread.php?tid=38&page=1All you need is some milliput and talc.
Germany
Joined: September 07, 2005
KitMaker: 5,609 posts
AeroScale: 5,231 posts
Posted: Wednesday, September 30, 2009 - 04:37 AM UTC
Thanks J-P!
But actually i like working with RTV rubber and resin. It is just that I do not need that much of it and thus the stuff I buy will get old. The hardener part is no longer good in my resin ... Also I did not have much luck with this 2 part Epoxy putty as it is much more difficult to mix right than with liquids (except "Green Stuff", which OTOH is not of the right consistency for the method in your article) .... also IIRC I have 4 old Eduard kits, so having a mold is not that bad
anyway, the wheels do not bother me much at the moment but rather the rigging and drilling the right holes. After that I will start with colours. Which brings me to another problem. When I first started the kit (or the 2nd time .. do not remember) I also asked at the Aerodrome for some hints and I got a plan from someone there. It mentions Olive and Mauve. I will probably use RLM 71 for the olive green but what shall I use for the Mauve? any hints, maybe in the Gunze line? (I know this colour is debateable, but I would like to have some guidance ...)
Also I am not quite sure how to read the plan, should it be green-mauve-green or mauve-green-mauve ..
I am sorry for all the typos .. seems my brain takes a break or the transport crew to the fingers is on strike (I tried to correct them but I sure missed some)
all the best
Steffen
DULCE ET DECORUM EST PRO HOBBY MORI


