1:48 Mirage Halberstadt CL.II
Merlin
 Senior Editor
#017
United Kingdom
Joined: June 11, 2003
KitMaker: 17,582 posts
AeroScale: 12,795 posts
Posted: Wednesday, October 07, 2009 - 07:26 AM UTC
Hi there
Well, I promised I tackled this beauty, so here goes! I'll start off with a pic that won't mean much to anyone else, but you've no idea how great it looks to me! After over 2 months being unable to do any model building while I packed up everything to move home, I
finally have a little workspace again!

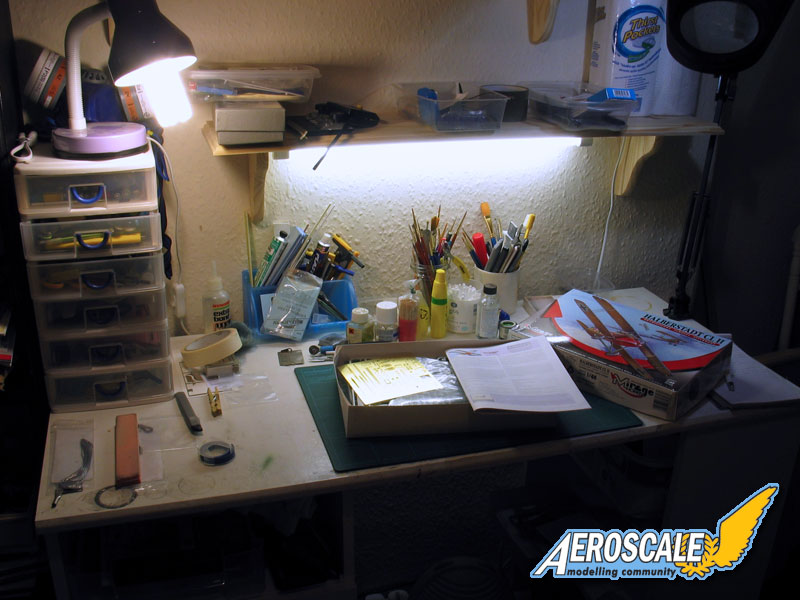
Hopefully, I'll get something better set up in due course, but it's just such a relief to be back and building! And, on that note, I'd better shut up and get started! Ohh look! There's the Halberstadt there on the desk, all ready and waiting...

All the best
Rowan

BEWARE OF THE FEW...
As I grow older, I regret to say that a detestable habit of thinking seems to be getting a hold of me. - H. Rider Haggard
Germany
Joined: September 07, 2005
KitMaker: 5,609 posts
AeroScale: 5,231 posts
Posted: Wednesday, October 07, 2009 - 07:37 AM UTC
optimist

DULCE ET DECORUM EST PRO HOBBY MORI
Merlin
Senior Editor #017
United Kingdom
Joined: June 11, 2003
KitMaker: 17,582 posts
AeroScale: 12,795 posts
Posted: Wednesday, October 07, 2009 - 08:20 AM UTC
Quoted Text
optimist
Hi Steffen

Yep! Always!

Anyway, I've made a start(!). The engine seems to be going together OK:
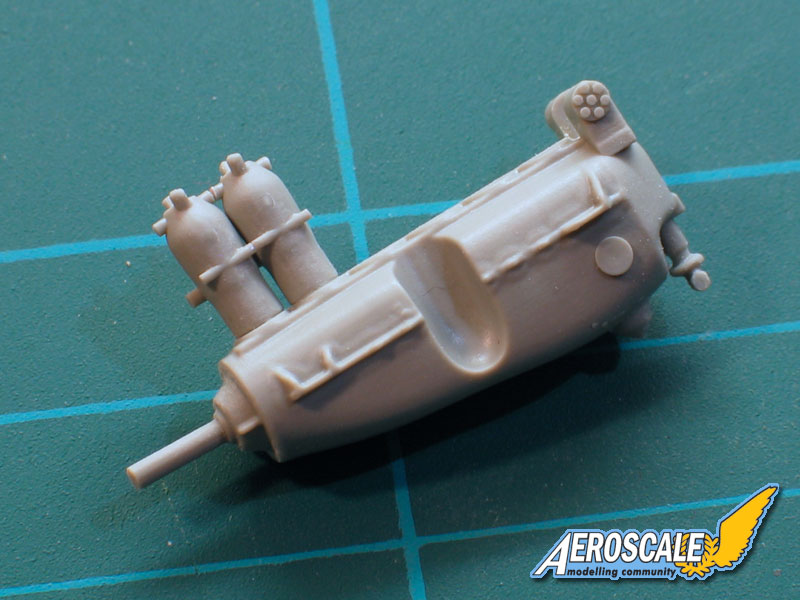
A couple of points to watch, though:
1.The propeller spindle has no firm mount - it just wobbles about.
2. The cylinders aren't moulded on the sprue in the order in which they attach to the crankcase. To be honest, I don't know if it actually matters - it could be the sort of thing where you only realise it did after it's all gone wrong...

The sprue attachments for the cylinders aren't well placed - they clash with two small raised details, and by the time you've cleaned them up it's actually easier to shave them off and replace them later.
All the best
Rowan
BEWARE OF THE FEW...
As I grow older, I regret to say that a detestable habit of thinking seems to be getting a hold of me. - H. Rider Haggard
Colorado, United States
Joined: January 25, 2004
KitMaker: 11,669 posts
AeroScale: 11,011 posts
Posted: Wednesday, October 07, 2009 - 09:28 AM UTC
Rowan's is modeling again! Everyone to the cybercafe for burgers and brats! Conga line!
". . .The most important thing is to know why you build and then get the most that you can out of building." via D.D.
Merlin
Senior Editor #017
United Kingdom
Joined: June 11, 2003
KitMaker: 17,582 posts
AeroScale: 12,795 posts
Posted: Wednesday, October 07, 2009 - 09:56 AM UTC
Cheers Stephen
I'm afraid you may have to put up with regular cries for help on this one, so you might end up wishing I wasn't back building again!
All the best
Rowan
BEWARE OF THE FEW...
As I grow older, I regret to say that a detestable habit of thinking seems to be getting a hold of me. - H. Rider Haggard
Moselle, France
Joined: May 15, 2005
KitMaker: 5,653 posts
AeroScale: 4,347 posts
Posted: Wednesday, October 07, 2009 - 09:59 AM UTC
Hi Rowan,
Hmmmm... I haven't decided yet, socks or shorts...
Jokes aside, that's great news and I wish you won't get distracted.
Jean-Luc

Better think one hour and build five minutes...
Than think five minutes and build an hour!
Merlin
Senior Editor #017
United Kingdom
Joined: June 11, 2003
KitMaker: 17,582 posts
AeroScale: 12,795 posts
Posted: Wednesday, October 07, 2009 - 10:06 AM UTC
Thanks Jean-Luc
I just can't understand why anyone could possibly doubt that I'l finish this...

All the best
Rowan
BEWARE OF THE FEW...
As I grow older, I regret to say that a detestable habit of thinking seems to be getting a hold of me. - H. Rider Haggard
Merlin
Senior Editor #017
United Kingdom
Joined: June 11, 2003
KitMaker: 17,582 posts
AeroScale: 12,795 posts
Posted: Wednesday, October 07, 2009 - 11:22 AM UTC
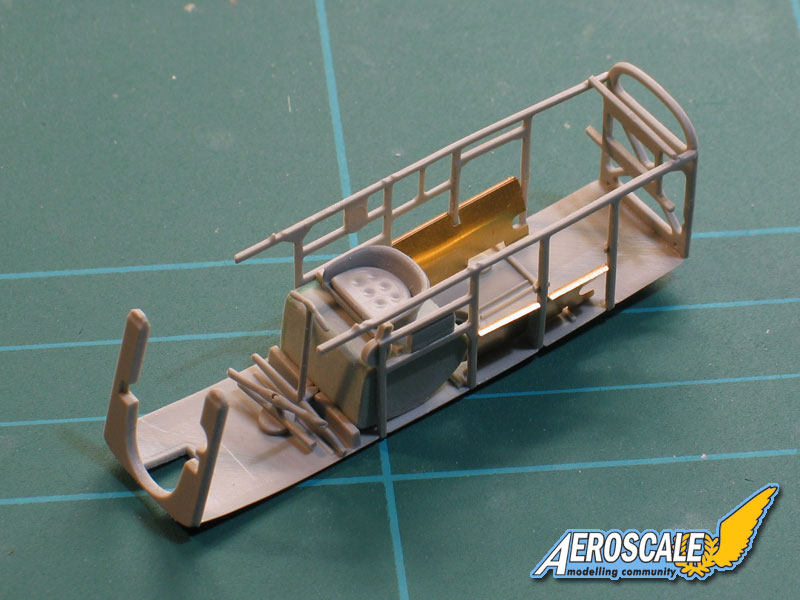
Hi again
Well, the engine is basically together:
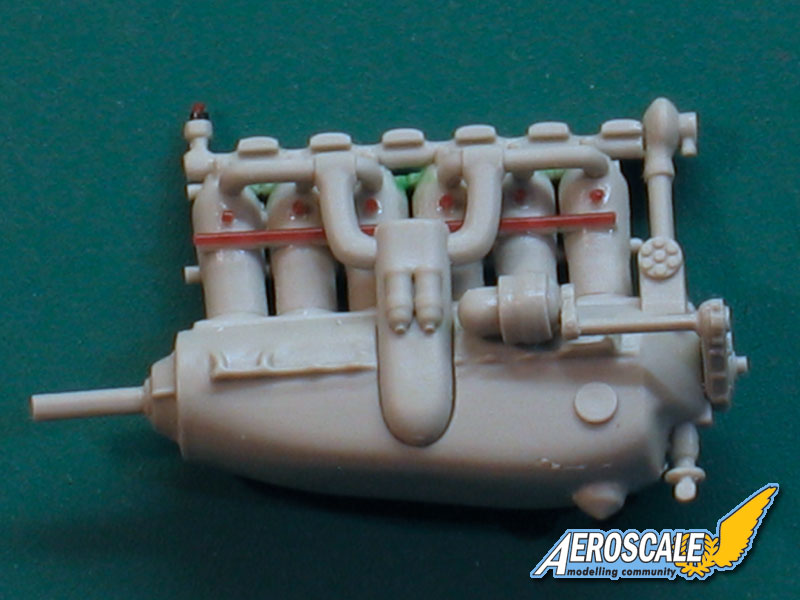
There's still a bit of tidying up to do, as you can see. The fit of parts is a little vague in places, and a word of caution: the styrene is pretty soft and even a "gentle" liquid cement like Humbrol really chews it up.
I'll try to unpack the airbrush tomorrow...
All the best
Rowan
BEWARE OF THE FEW...
As I grow older, I regret to say that a detestable habit of thinking seems to be getting a hold of me. - H. Rider Haggard
Alberta, Canada
Joined: January 19, 2008
KitMaker: 6,743 posts
AeroScale: 6,151 posts
Posted: Wednesday, October 07, 2009 - 12:58 PM UTC
Great to see you back at the bench again Rowan

and with an interesting subject !!!
I'm sure we are all pulling for you on the completion of the kit and look forward to watching it come together
Merlin
Senior Editor #017
United Kingdom
Joined: June 11, 2003
KitMaker: 17,582 posts
AeroScale: 12,795 posts
Posted: Wednesday, October 07, 2009 - 10:51 PM UTC
Thanks Terri
With a fresh start in a new home, it's 'll definitely my rather late "Mid-Year's Resolution" to make a real effort to actually finish the kits I start.
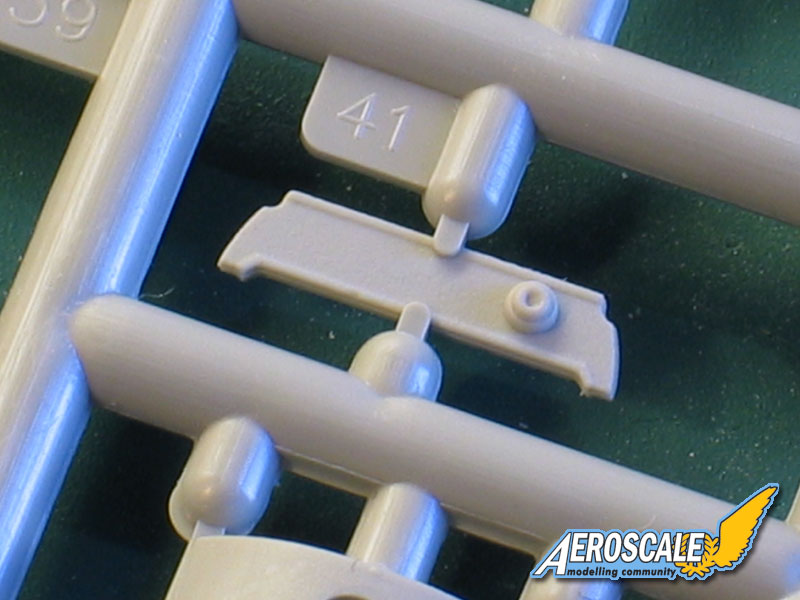
I've moved on to the cockpit and I've found one really annoying thing cropping up again and again. The sprue attachments all too often project onto the front surface of parts, sometimes interfering with moulded details:
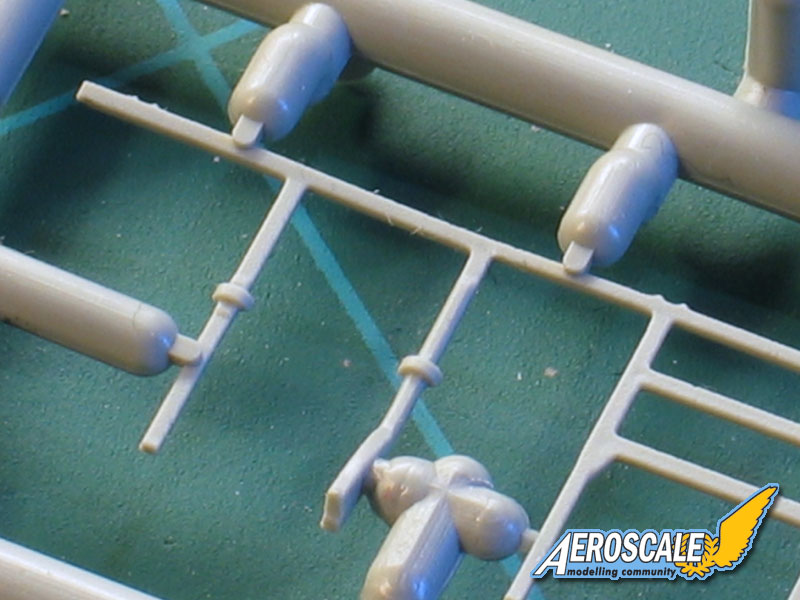
It's definitely going to mean extra time preparing parts for assembly, and it's something that could have been avoided with a bit more consideration from the designers of the sprues (as against the actual parts).
(I remember years ago reading that it's a mistake to assume that the people who get kits ready for moulding actually build kits themselves - hence sprue attachments and ejector pin marks in the worst possible places etc. )
All the best
Rowan
BEWARE OF THE FEW...
As I grow older, I regret to say that a detestable habit of thinking seems to be getting a hold of me. - H. Rider Haggard
Germany
Joined: September 07, 2005
KitMaker: 5,609 posts
AeroScale: 5,231 posts
Posted: Wednesday, October 07, 2009 - 11:08 PM UTC
Hi Rowan
Nice progress so far!
IMO you should remove the parts with a razor or PE saw .. you can also get rid of the over hang by cutting it flush to the part.
As for the tool design: I think it is rather a problem of getting enough material to the delicate parts with as few pressure as possible and as fast as possible as the tool is cooled. And you don't like short shot either, do you? Often ejectors are added after the tool is ready, when real life shows that the projected pins are not enough or too small to get the sprue out of the mold in an appropriate way and/or time. Annoying i know, but not much you can do.
all the best
Steffen
DULCE ET DECORUM EST PRO HOBBY MORI
Moselle, France
Joined: May 15, 2005
KitMaker: 5,653 posts
AeroScale: 4,347 posts
Posted: Wednesday, October 07, 2009 - 11:20 PM UTC
Hi Rowan,
Quoted Text
The sprue attachments all too often project onto the front surface of parts, sometimes interfering with moulded details
This is something even Tamiya does in their recent releases, even the new Spitfire Mk.IX. I wonder if it has something to do with new moulding technologies. Maybe these "new style" attachment points make the delicate parts easier to get out of the mold? I don't know. Only a specialist can tell I suppose...
I'm looking forward to the next update!
Jean-Luc
Better think one hour and build five minutes...
Than think five minutes and build an hour!
Moselle, France
Joined: May 15, 2005
KitMaker: 5,653 posts
AeroScale: 4,347 posts
Posted: Wednesday, October 07, 2009 - 11:22 PM UTC
Quoted Text
Only a specialist can tell I suppose...
Thanks for the extra explanation Steffen...

Jean-Luc
Better think one hour and build five minutes...
Than think five minutes and build an hour!
Germany
Joined: September 07, 2005
KitMaker: 5,609 posts
AeroScale: 5,231 posts
Posted: Wednesday, October 07, 2009 - 11:39 PM UTC
Hi J-L
as for Tamiya doing this: It is for another reason. Tamiya put these attachment points on the gluing surfaces and not sideways on the part (most helpful for e.g. clear parts) so you do not need to sand on the part, but on joints and places not to be seen later .. I find this very helpful and it is a real improvement in mold design IMHO.
But this maybe does not count for the part that Rowan showed so I gave another (possible) explanation. Having seen two recent examples where the manufacturer apparently had much problems getting parts/sprues out of the mold (AFV SdLKfz. 251 and Techmod FF33). BTW Wojtek just sent me his NL .. Adalbertus selling it for 25 Euro ....
cheers
Steffen
DULCE ET DECORUM EST PRO HOBBY MORI
Merlin
Senior Editor #017
United Kingdom
Joined: June 11, 2003
KitMaker: 17,582 posts
AeroScale: 12,795 posts
Posted: Thursday, October 08, 2009 - 12:07 AM UTC
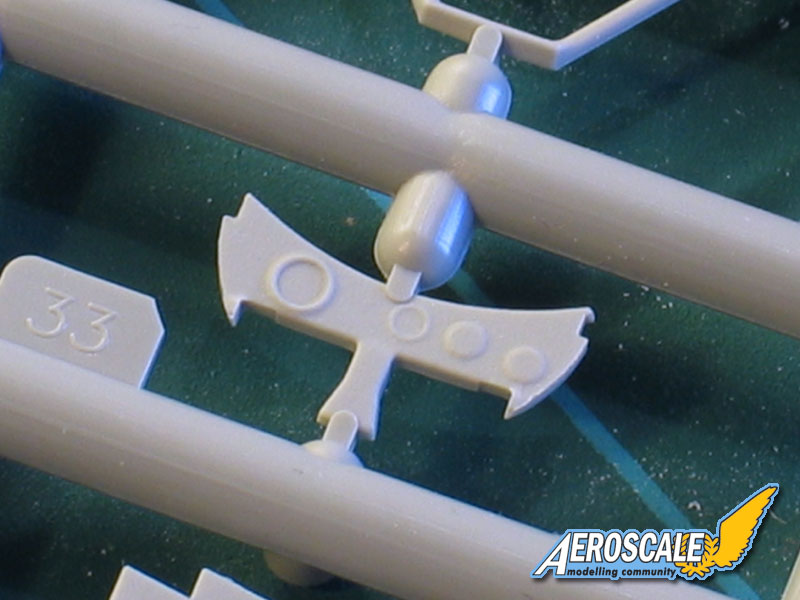
Hi Steffen and Jean-Luc
Yes, I'm using a etched razor saw to remove all the parts.
Sprue attachments projecting unto a gluing surface (rather than a butt-joint) have been common for a while and I quite agree they have real benefits for clear parts etc.
Not when it's done like this though:
All the best
Rowan
BEWARE OF THE FEW...
As I grow older, I regret to say that a detestable habit of thinking seems to be getting a hold of me. - H. Rider Haggard
Germany
Joined: September 07, 2005
KitMaker: 5,609 posts
AeroScale: 5,231 posts
Posted: Thursday, October 08, 2009 - 12:17 AM UTC
Hello Rowan
Eek .. Now I see the problem much clearer .. very annoying and I agree it is probably a design fault.
all the best
Steffen
DULCE ET DECORUM EST PRO HOBBY MORI
Alberta, Canada
Joined: January 19, 2008
KitMaker: 6,743 posts
AeroScale: 6,151 posts
Posted: Thursday, October 08, 2009 - 01:27 AM UTC
Hi Rowan , the whole kit is like that which will make clean up a nightmare losing detail on some of the parts . Reminds me of the limited run kits which Eduard first started producing and Bluemax with their injector points . I've made a list of the parts which will be made from srcatch instead . Be easier then trying to do some of the clean up .
Merlin
Senior Editor #017
United Kingdom
Joined: June 11, 2003
KitMaker: 17,582 posts
AeroScale: 12,795 posts
Posted: Thursday, October 08, 2009 - 10:33 AM UTC
Hi again
Not at much progress as I'd have liked today, but just to show I haven't given up already:
So... tomorrow I'll have another try at wading through all the packing cases to find some paints and an airbrush!

All the best
Rowan
BEWARE OF THE FEW...
As I grow older, I regret to say that a detestable habit of thinking seems to be getting a hold of me. - H. Rider Haggard
Alberta, Canada
Joined: January 19, 2008
KitMaker: 6,743 posts
AeroScale: 6,151 posts
Posted: Friday, October 09, 2009 - 02:19 AM UTC
Hi Rowan , are you going to apply the lozenge to the top framing or just have it in it's wooden from ?
Merlin
Senior Editor #017
United Kingdom
Joined: June 11, 2003
KitMaker: 17,582 posts
AeroScale: 12,795 posts
Posted: Friday, October 09, 2009 - 02:52 AM UTC
Hi Terri
I'm going to paint a faux lozenge pattern - by the time it's weathered a bit, I think messing about with decals on it will have been a waste of time...
I've spent the morning sorting through a mountain of boxes and just about got the bits together to do some airbrushing, so now I just need to clear a space where I can work safely.
All the best
Rowan
BEWARE OF THE FEW...
As I grow older, I regret to say that a detestable habit of thinking seems to be getting a hold of me. - H. Rider Haggard
betheyn
Senior Editor #019
England - South East, United Kingdom
Joined: October 14, 2004
KitMaker: 4,560 posts
AeroScale: 2,225 posts
Posted: Friday, October 09, 2009 - 07:40 AM UTC
Way to go Rowan.
Looks like a pretty nice kit apart from the sprue attachment points.
Now get back to your bench, and no slacking off
.
Andy
It's not the same, better, but not the same...
Merlin
Senior Editor #017
United Kingdom
Joined: June 11, 2003
KitMaker: 17,582 posts
AeroScale: 12,795 posts
Posted: Friday, October 09, 2009 - 10:28 AM UTC
Cheers Andy
No progress at all today - two days at the workbench and I'm worn out!
But seriously - hopefully, having sorted out a way to do some painting, I've got the basics in place to crack on a bit from now...
All the best
Rowan
BEWARE OF THE FEW...
As I grow older, I regret to say that a detestable habit of thinking seems to be getting a hold of me. - H. Rider Haggard
United Kingdom
Joined: March 08, 2009
KitMaker: 719 posts
AeroScale: 691 posts
Posted: Friday, October 09, 2009 - 08:53 PM UTC
Hi Rowan, great to see you building.
I'm guessing the red rod on the engine is your own addition? What material is it?
Good luck with the build!
Merlin
Senior Editor #017
United Kingdom
Joined: June 11, 2003
KitMaker: 17,582 posts
AeroScale: 12,795 posts
Posted: Friday, October 09, 2009 - 09:36 PM UTC
Cheers Ben
Believe me, it's great to
be building again!
The red stuff is some ancient plastic rod - probably well over 25 years old now. It might be Slaters, Plastruct or Contrail - the packet is long lost. To be honest, it's starting to go a bit brittle with age, but I keep it because the diameters are slightly different to all the styrene stock I've bought more recently.
All the best
Rowan
BEWARE OF THE FEW...
As I grow older, I regret to say that a detestable habit of thinking seems to be getting a hold of me. - H. Rider Haggard
Merlin
Senior Editor #017
United Kingdom
Joined: June 11, 2003
KitMaker: 17,582 posts
AeroScale: 12,795 posts
Posted: Monday, October 12, 2009 - 10:42 PM UTC
Hi again
Just a quick update to expain the lack of, well, updates!
I've got an undercoat on the interior, but I'm taking a short break to work on a Campaign build that I'd forgotten all about. In the meantime, I've ordered some Microsculpt lozenge decals. I was going to use the Eagle Strike or Pegasus sheets that I've had stashed away for years, but this seemed a perfect opportunity to try out Microsculpt for the first time. Hopefully, they'll arrive before long.
All the best
Rowan
BEWARE OF THE FEW...
As I grow older, I regret to say that a detestable habit of thinking seems to be getting a hold of me. - H. Rider Haggard


