1/72 Airfix Spitfire pair - IX and XIX!
Roma, Italy
Joined: January 28, 2006
KitMaker: 1,368 posts
AeroScale: 377 posts
Posted: Friday, January 22, 2010 - 05:46 AM UTC
Other question!

Does the PRXIX have the left side cockpit port as well as in the other Spits?
Stockholm, Sweden
Joined: May 02, 2006
KitMaker: 1,953 posts
AeroScale: 1,902 posts
Posted: Friday, January 22, 2010 - 05:52 AM UTC
Quoted Text
Other question!
Does the PRXIX have the left side cockpit port as well as in the other Spits?
Nope, it doesn't! None of the Spitfires with pressurised cockpits had the door.

Magnus
Press banner to the right to follow my trail to the new forums!
Roma, Italy
Joined: January 28, 2006
KitMaker: 1,368 posts
AeroScale: 377 posts
Posted: Friday, January 22, 2010 - 09:06 PM UTC
Stockholm, Sweden
Joined: May 02, 2006
KitMaker: 1,953 posts
AeroScale: 1,902 posts
Posted: Saturday, January 23, 2010 - 09:19 AM UTC
Neil! I saw your two Spitfires over
here! Nice ones, you've been really fast!
I've had a very good evening in the modelling corner. Canopies are masked and on and first layer of paint sprayed!
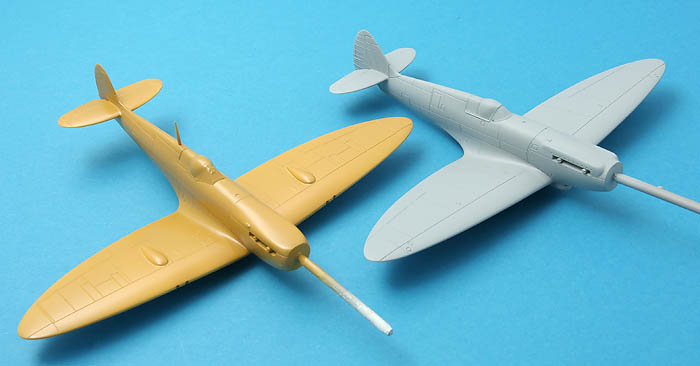
Brown is Gunze H71 Mid Stone "out of the bottle" and grey is the old Aeromaster Warbid Acrylic Medium Sea Grey with a drop of PRU Blue to turn it more blueish!
Magnus
Press banner to the right to follow my trail to the new forums!
Roma, Italy
Joined: January 28, 2006
KitMaker: 1,368 posts
AeroScale: 377 posts
Posted: Saturday, January 23, 2010 - 08:07 PM UTC
Good job, they both look very clean and crisp. Looking forward to further updates!
United Kingdom
Joined: March 08, 2009
KitMaker: 719 posts
AeroScale: 691 posts
Posted: Saturday, January 23, 2010 - 09:18 PM UTC
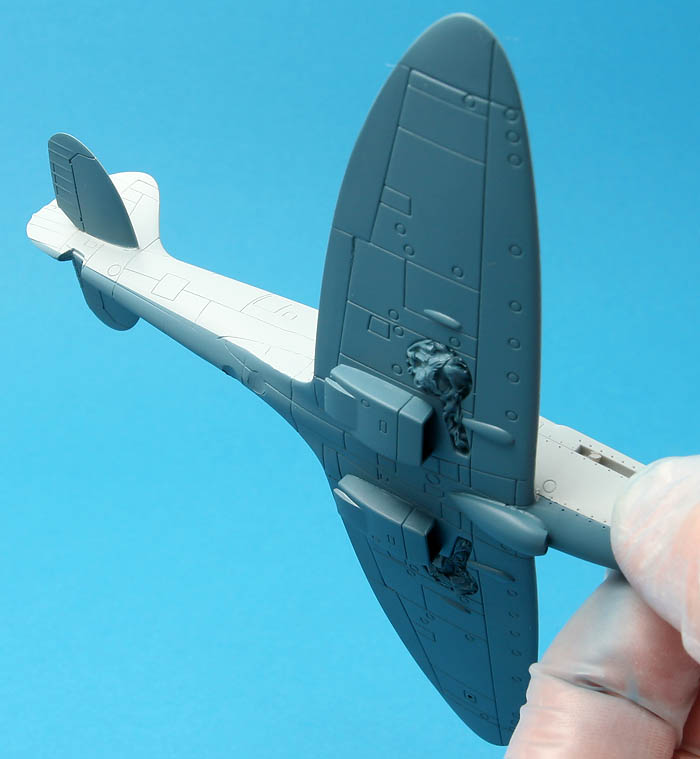
Good progress Magnus! Can I ask what the round pieces of plastic where the exhausts will go are for?
Stockholm, Sweden
Joined: May 02, 2006
KitMaker: 1,953 posts
AeroScale: 1,902 posts
Posted: Saturday, January 23, 2010 - 10:17 PM UTC
Quoted Text
Good progress Magnus! Can I ask what the round pieces of plastic where the exhausts will go are for?
No you can't since they aren't plastic

!
Seriously: they are toothpicks and I have put them there so that the spray doesn't leak inte the fuselage and end up on the inside of the canopy. I might be a bit paranoid when it comes to that but I have a bad track record for canopies fogging from the inside after they have been glued securely to the model!
Magnus
Press banner to the right to follow my trail to the new forums!
Roma, Italy
Joined: January 28, 2006
KitMaker: 1,368 posts
AeroScale: 377 posts
Posted: Saturday, January 23, 2010 - 10:23 PM UTC
Stockholm, Sweden
Joined: May 02, 2006
KitMaker: 1,953 posts
AeroScale: 1,902 posts
Posted: Sunday, January 24, 2010 - 08:12 AM UTC
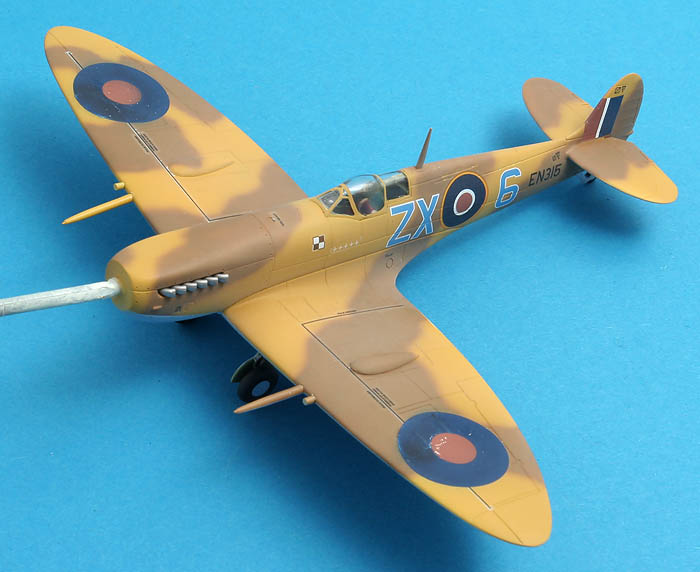
Another hour of work with the airbrush!
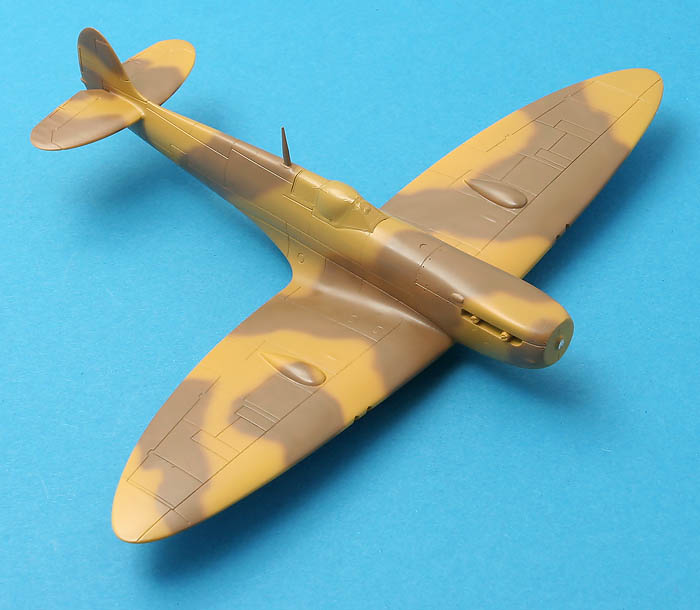
Dark Earth is Gunze H72 sprayed freehand.
Magnus
Press banner to the right to follow my trail to the new forums!
AussieReg
 Associate Editor
#007
Victoria, Australia
Joined: June 09, 2009
KitMaker: 8,156 posts
AeroScale: 3,756 posts
Posted: Sunday, January 24, 2010 - 09:04 AM UTC
Gotta love freehand, beautiful work Magnus. Your builds here are great, and full of really usefull tips as usual !!
Cheers, D
ON the bench
Revell 1/24 '53 Corvette (building as '54)
Revell 1/24 BMW 507 Coupe and Cabrio
Italeri 1/48 Me262 B-1a/U1 Nightfighter
Monogram 1/24 '57 Chevy Nomad
Dragon 1/350 USS Frank Knox DD-742
Västra Götaland, Sweden
Joined: February 23, 2005
KitMaker: 820 posts
AeroScale: 629 posts
Posted: Sunday, January 24, 2010 - 10:07 AM UTC
Great freehand, Magnus! Love the desert colours! Starting to look really good now!
Cheers! // PolarBear

Alberta, Canada
Joined: January 19, 2008
KitMaker: 6,743 posts
AeroScale: 6,151 posts
Posted: Sunday, January 24, 2010 - 04:24 PM UTC
Very lovely work indeed !
Tennessee, United States
Joined: September 20, 2005
KitMaker: 1,747 posts
AeroScale: 1,673 posts
Posted: Sunday, January 24, 2010 - 05:34 PM UTC
Great airbrush control Magnus! Really nice work there. Russell
To Thine Own Self Be True
Siderius
A.K.A., RTA
Roma, Italy
Joined: January 28, 2006
KitMaker: 1,368 posts
AeroScale: 377 posts
Posted: Sunday, January 24, 2010 - 07:26 PM UTC
Stockholm, Sweden
Joined: May 02, 2006
KitMaker: 1,953 posts
AeroScale: 1,902 posts
Posted: Monday, January 25, 2010 - 09:28 AM UTC
Thank you all for kind words and encouragement!
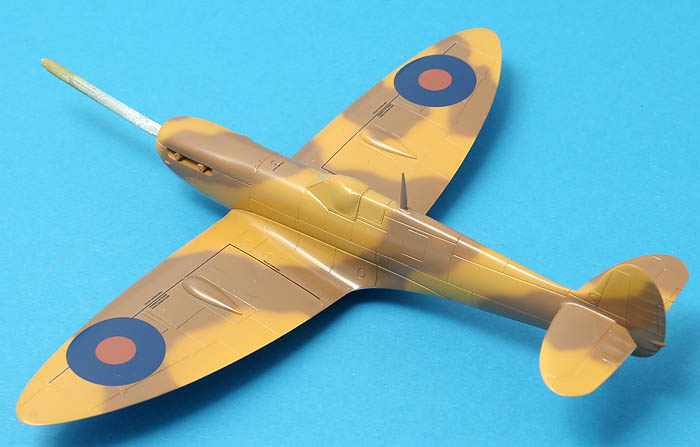
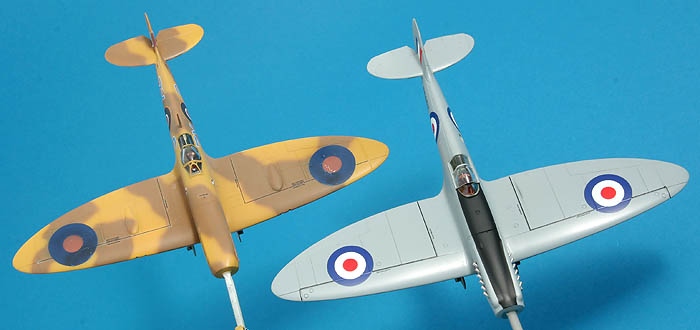
I couldn't avoid masking altogether! Anyway, now the basic camo is finished on the Mk IX!

Azur is Aeromaster Acrylic.
Magnus
Press banner to the right to follow my trail to the new forums!
Stockholm, Sweden
Joined: May 02, 2006
KitMaker: 1,953 posts
AeroScale: 1,902 posts
Posted: Tuesday, January 26, 2010 - 09:28 AM UTC
And now the Mk XIX as well!
PRU blue is Aeromaster Acrylic with a drop of RLM24 to make it bluer! (Does the word "bluer" really exist? Anyway, you know what I mean!)
Magnus
Press banner to the right to follow my trail to the new forums!
Roma, Italy
Joined: January 28, 2006
KitMaker: 1,368 posts
AeroScale: 377 posts
Posted: Tuesday, January 26, 2010 - 07:49 PM UTC
Will you paint the RAF livery shown on the boxart?
Stockholm, Sweden
Joined: May 02, 2006
KitMaker: 1,953 posts
AeroScale: 1,902 posts
Posted: Thursday, January 28, 2010 - 09:26 PM UTC
Giacomo! I won't use the scheme from the box on the Mk XIX, I will use one of the Xtradecal options for an aircraft from Kai Tak in 1953.
Decalling has started on both aircraft.
I bought a sheet of rub-down stencil transfers at Telford from Korean manufacturer
HobbyDecal. A nice alternative to ordinary decals!
The Mk IX will use most of the decals from the Airfix sheet. Stencilling and roundels have been added to the wings!
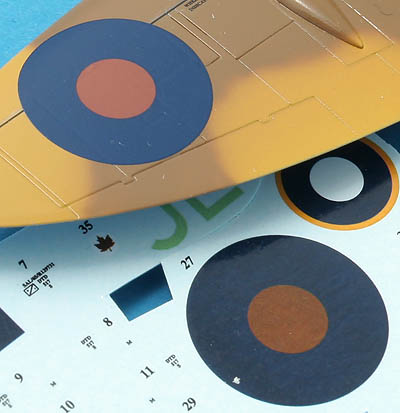
Wing roundels were pilfered from an Iliad Design sheet that I had in stock. I found the red of the Airfix decals a bit too brown for my taste. If I hadn't had an alternative I would have been prepared to live with the problem, it is not that bad, but since lack of spare decals isn't one of the major problems around here I could as well exchange them for something more in my taste!
Magnus
Press banner to the right to follow my trail to the new forums!
Roma, Italy
Joined: January 28, 2006
KitMaker: 1,368 posts
AeroScale: 377 posts
Posted: Friday, January 29, 2010 - 08:43 PM UTC
So c'mon!
The most of the job is done! Looking forward to the rest!
Stockholm, Sweden
Joined: May 02, 2006
KitMaker: 1,953 posts
AeroScale: 1,902 posts
Posted: Saturday, January 30, 2010 - 10:04 AM UTC
Giacomo! No worries! I am working steadily!
A few more decals!
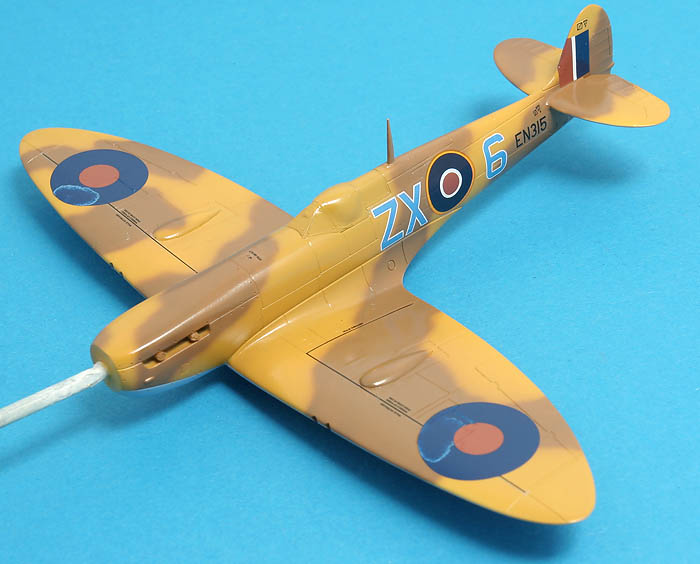
Airfix decals behave well, thankfully... Only a few more stencils and the Polish chessboards left to add... The milky residue on the wing roundels came after I had used Super Sol on them to make them snuggle into the panel lines. And it won't go away... I can always touch up with paint. I shall write a piece on modelling and chemistry one day, or rather on the subject of incompatible modelling chemistry!
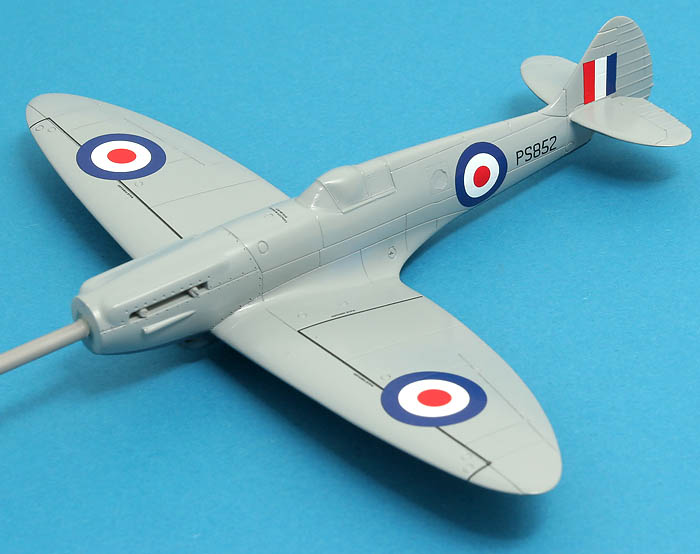
Decalling the Mk XIX was a breeze! Xtradecal are always a joy to use!
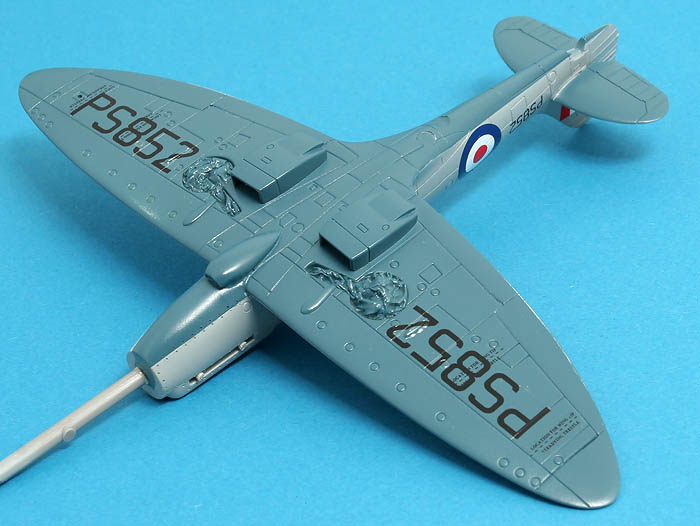
There has been some debate regarding the underwing serials; some think they are white, some think they are black... Since other aircraft with blue lower wing surfaces have black serials I opted for black on mine as well, both options are included on the decal sheet.
Magnus
Press banner to the right to follow my trail to the new forums!
Stockholm, Sweden
Joined: May 02, 2006
KitMaker: 1,953 posts
AeroScale: 1,902 posts
Posted: Wednesday, February 10, 2010 - 09:17 AM UTC
Finally nearing completion!
Only missing the prop! I'll keep the sprue section until I am finished with the weathering. One of the cannons look a bit saggy, I'll be bore sighting them before I glue them in place! I got quite a bit of silvering beneath the walkway decals on the wings... I'll have to figure out some other way of doing them in the future!
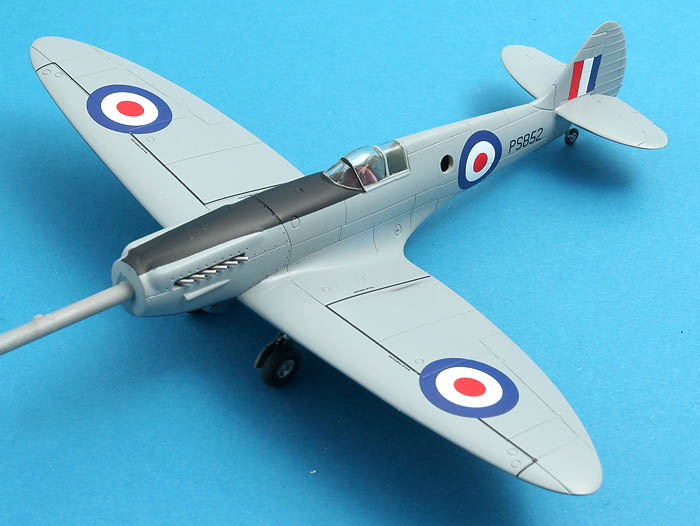
I realised I'll have to add the Rebecca aerial beneath the fuselage. I wonder if half a pea might do the trick, I remember an aerodynamic experiment using split peas. If that was on a Spitfire I don't remember though! I'll probably go for a piece of sprue anyway
Magnus
Press banner to the right to follow my trail to the new forums!
Roma, Italy
Joined: January 28, 2006
KitMaker: 1,368 posts
AeroScale: 377 posts
Posted: Thursday, February 11, 2010 - 12:54 AM UTC
Very well done!
What did you use to mask the canopies?
California, United States
Joined: November 28, 2007
KitMaker: 817 posts
AeroScale: 729 posts
Posted: Thursday, February 11, 2010 - 03:44 AM UTC
Very pretty, Magnus-
cheers!
chuk
[url]http://chukw.blogspot.com/[/url]
#029
England - East Midlands, United Kingdom
Joined: December 23, 2005
KitMaker: 6,249 posts
AeroScale: 3,270 posts
Posted: Thursday, February 11, 2010 - 03:55 AM UTC
What a great looking pair of Spits!
It must be a refreshing change after your battle with the AZ one?
Quoted Text
I wonder if half a pea might do the trick, I remember an aerodynamic experiment using split peas. If that was on a Spitfire I don't remember though!
This was carried out on the Spitfire prototype K5054
Quoted text from a Spitfire site
The matter of manufacturing brought up another question. K5054 had been put together entirely with flush riveting, so that the surface was completely smooth. This method was more expensive than dome-headed rivets, however. To test where the cheaper rivets could be used without significant losses in performance, the company glued split peas to the flush rivets in various locations, then tested the resulting change in speed. As a result of these tests, rounded rivets were used in fore and aft rows attaching the fuselage plates.
Nige

It's not the same, better, but not the same...
Stockholm, Sweden
Joined: May 02, 2006
KitMaker: 1,953 posts
AeroScale: 1,902 posts
Posted: Saturday, February 13, 2010 - 03:38 AM UTC
Giacomo! On most occasions I use bare metal foil for masking canopies. I rub it down carefully with a Q-tip, then I cut along the frames with a fresh scalpel blade. For very bulbous/irregular canopies I mask and cut along the frames using thin strips of foil, then I fill in the rest of the clear areas using Maskol. The great advantages of the foil are that it is very thin, making it easy to see where to cut, and also that it seals effectively against the canopy minimizing the risk of paint seeping in below the masks. There is a small risk of glue residue but this is easily removed using a mild solvent like lighter fluid of Humbrol thinner. A long story about a thin material
...
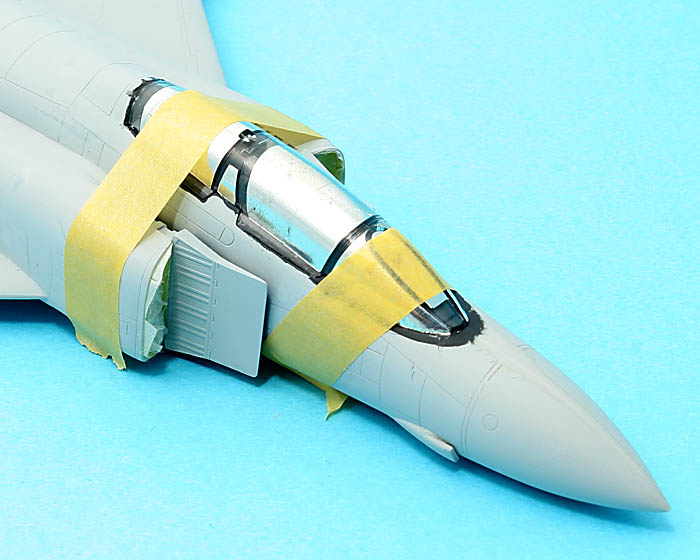
Not many Spitfires in this photo but it does show a canopy masked using foil!
Chuck! Thanks!
Nigel! Thanks for sorting out the peas! Were they of the green or the yellow variety
?
Magnus
Press banner to the right to follow my trail to the new forums!


