1:32 Tamiya Spitfire Mk.IX
Merlin
 Senior Editor
#017
United Kingdom
Joined: June 11, 2003
KitMaker: 17,582 posts
AeroScale: 12,795 posts
Posted: Sunday, December 06, 2009 - 10:16 PM UTC
Hi there
Right! The Review's safely published, so it's time to get cracking and build the beauty! I've put my other current projects on the back-burner, which is just as well because... I think I need a bigger workbench!


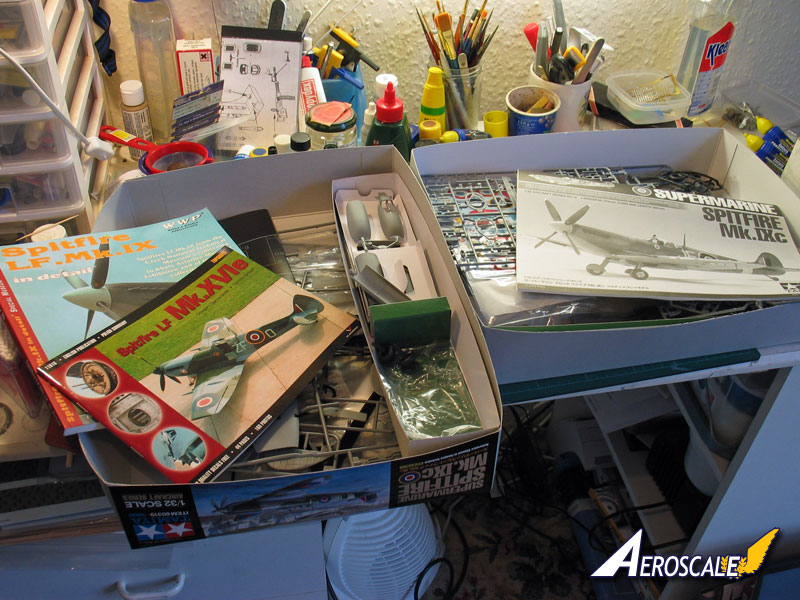
I'll hopefully have some progress pics to show by end of play today.

All the best
Rowan

BEWARE OF THE FEW...
As I grow older, I regret to say that a detestable habit of thinking seems to be getting a hold of me. - H. Rider Haggard
Germany
Joined: September 07, 2005
KitMaker: 5,609 posts
AeroScale: 5,231 posts
Posted: Sunday, December 06, 2009 - 10:36 PM UTC
You do it again!!!! this is the first and last warning ....
How is your Late coming along? and the La-5FN? lw46 stuff (whatever you do for that campaign)? Halberstadt?
Use your good mood to finish something!!!! .. pleeeeeezzzz!
Who is in for a 1 year campaign where Rowan has to finish one of his old projects every month?
really Rowan, you should focus a bit more...
nonetheless good luck and much fun with this project.
all the best
Steffen
DULCE ET DECORUM EST PRO HOBBY MORI
Merlin
 Senior Editor
#017
United Kingdom
Joined: June 11, 2003
KitMaker: 17,582 posts
AeroScale: 12,795 posts
Posted: Sunday, December 06, 2009 - 11:11 PM UTC
Hi Steffen

I've made it perfectly clear that important sample-builds like this will always take precedence over my other projects.

And just to really freak you out, there are most likely a couple more to come soon.

All the best
Rowan

BEWARE OF THE FEW...
As I grow older, I regret to say that a detestable habit of thinking seems to be getting a hold of me. - H. Rider Haggard
Merlin
 Senior Editor
#017
United Kingdom
Joined: June 11, 2003
KitMaker: 17,582 posts
AeroScale: 12,795 posts
Posted: Monday, December 07, 2009 - 12:10 AM UTC
Hi again
Construction starts by adding the separate rear fuselage sections. It's pretty obvious that Tamiya have a retractable tail wheel planned at some point (I wonder if that will be moveable, or interchangeable after assembly like the main gear), but trying to produce extra versions from the same basic parts is often a recipe for a poor fit:
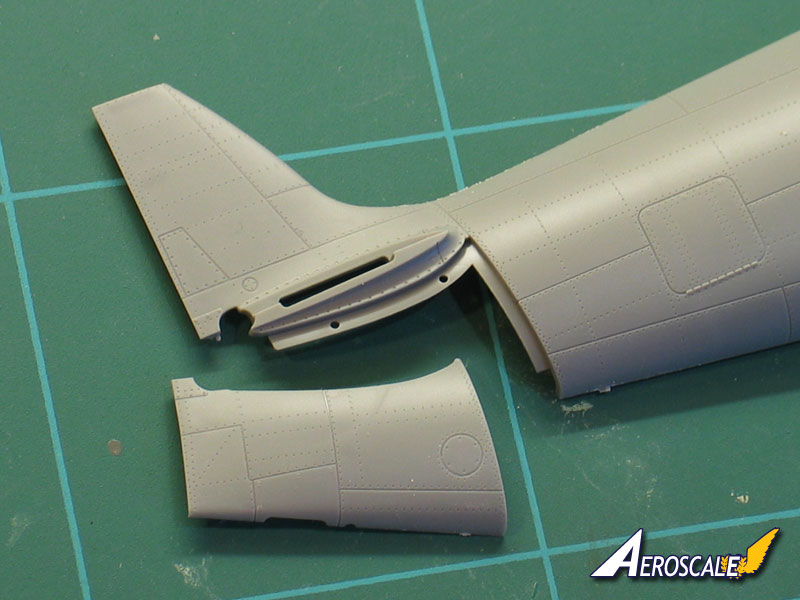
That's certainly not the case here! The fit is so precise, the joint is indistinguishable from the surrounding panel lines:
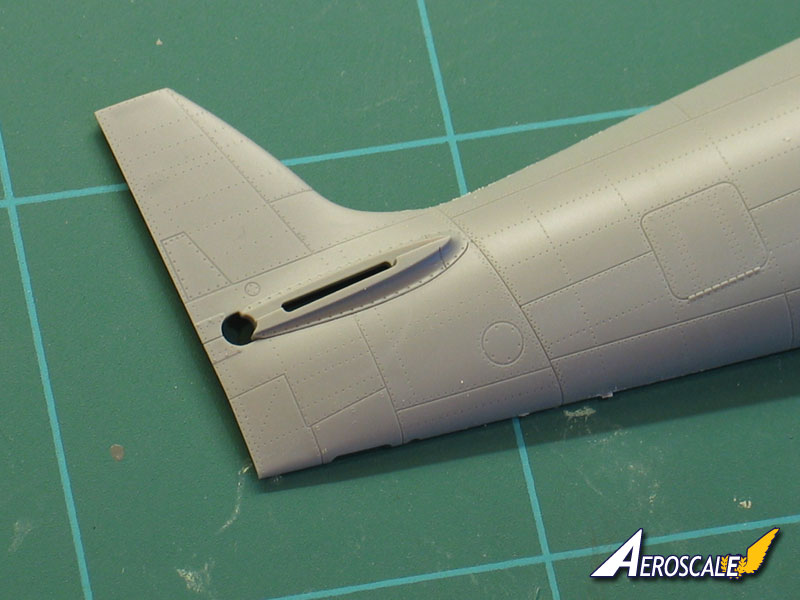
I'm intending to build Tamiya's Spitfire pretty much OOB, and I won't be using any detail sets from other manufacturers. However, I will add some simple details of my own where I find obvious ommissions in the kit. The first will be some cables on the control column, which is otherwise nicely done with a separate grip:
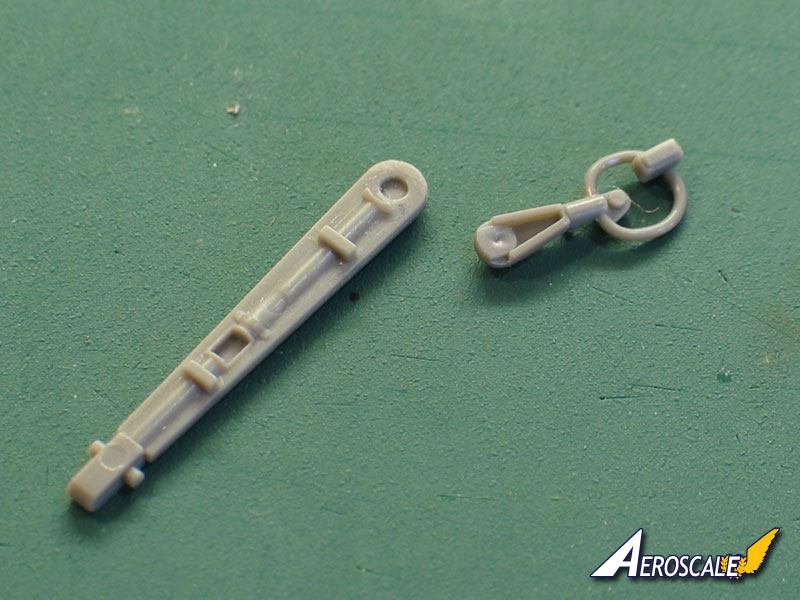
Oddly, the prominent cables have been removed from the preserved Spitfire that Tamiya show in their reference booklet, so perhaps that's why they've missed them.
The seat is nicely done in three parts - but is the first real encounter with ejector pin marks. There are definitely more of these to come...
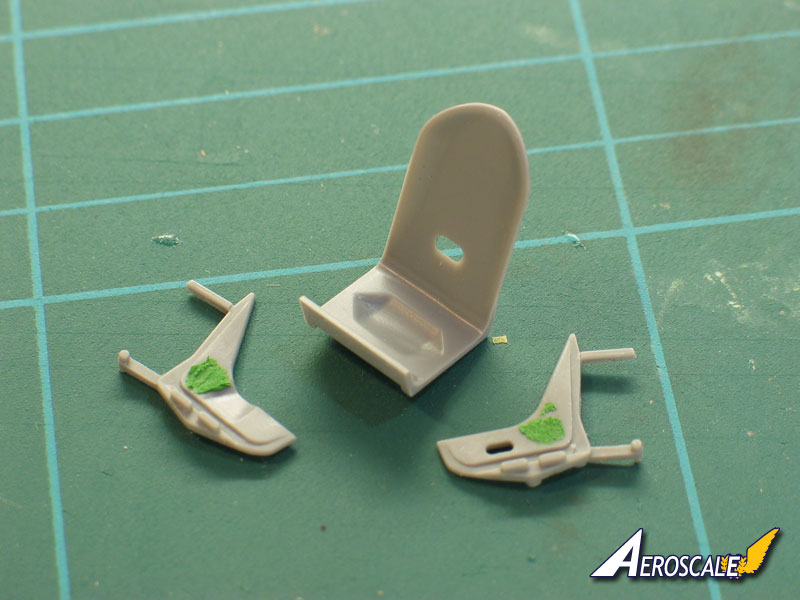
All the best
Rowan

BEWARE OF THE FEW...
As I grow older, I regret to say that a detestable habit of thinking seems to be getting a hold of me. - H. Rider Haggard
Holdfast
 President
#056
England - South West, United Kingdom
Joined: September 30, 2002
KitMaker: 8,581 posts
AeroScale: 4,913 posts
Posted: Monday, December 07, 2009 - 06:36 AM UTC
I'm eagerly watching this Rowan

The fit of that rear section is first class. It is odd that Tamiya missed the cables but I guess if they weren't on the machine that they took those details from I suppose that you can't blame them. Not everyone knows that they exist

Anyway that is one area of detail which will look better using wire than moulded in half relief.
I'm very interested as to how the engine panels are held on by magnets, (particularly as you said that Jean-Luc said that it didn't work too well), as we use magnets at work to hold the roof of one of our locos on. That works very well.
No slacking now Rowan, remember that there are 24 hours in a day

MAL the MASK
BULLDOG # 6 (President)
BEWARE OF THE FEW
Sappers: First in, last out. (UBIQUE)
It's not the same, better, but not the same.
Germany
Joined: September 07, 2005
KitMaker: 5,609 posts
AeroScale: 5,231 posts
Posted: Monday, December 07, 2009 - 06:39 AM UTC
Quoted Text
... remember that there are 24 hours in a day 
and then there is also the night


cheers
Steffen
DULCE ET DECORUM EST PRO HOBBY MORI
Uusimaa, Finland
Joined: March 30, 2004
KitMaker: 2,845 posts
AeroScale: 1,564 posts
Posted: Monday, December 07, 2009 - 07:09 AM UTC
Looks like a great start on quite a stunning kit.

You might have noticed them already, but talking of ejector pin marks and looking at the pic quoted above, I noticed a couple on the control stick. One on the very bottom, another along the middle, on the raised semi-circular ridge.
Also, I might be mistaken, but isn't that a sink mark on the bottom of the grip part?

PS. Btw, have you made any decisions about what markings you're going to do?
Moselle, France
Joined: May 15, 2005
KitMaker: 5,653 posts
AeroScale: 4,347 posts
Posted: Monday, December 07, 2009 - 07:11 AM UTC
Quoted Text
(particularly as you said that Jean-Luc said that it didn't work too well)
Did I said that?

The fit of the various optional parts is really first class in this kit. I've never built anything like this!

Rowan, if you do a photo of every step you will finish your build in 2012... wait that's the end of the world!

Good luck for your build (not that you will need some)...

Jean-Luc

Better think one hour and build five minutes...
Than think five minutes and build an hour!
Merlin
 Senior Editor
#017
United Kingdom
Joined: June 11, 2003
KitMaker: 17,582 posts
AeroScale: 12,795 posts
Posted: Monday, December 07, 2009 - 07:16 AM UTC
Hi Eetu
Don't worry - I haven't missed them.

These ones are taken care of (and the wires will essentially hide them anyway), but there are plenty more of the pesky little things - some raised, some recessed. I'm tinkering away, sanding and filling.

The markings? No firm decision yet, but let's just say Mal and I are discussing what might be fun...

All the best
Rowan

BEWARE OF THE FEW...
As I grow older, I regret to say that a detestable habit of thinking seems to be getting a hold of me. - H. Rider Haggard
Merlin
 Senior Editor
#017
United Kingdom
Joined: June 11, 2003
KitMaker: 17,582 posts
AeroScale: 12,795 posts
Posted: Monday, December 07, 2009 - 07:27 AM UTC
Hi Jean-Luc
2012? Knowing the speed I normally build, that would be a bit on the optimistic side. But as you say, that's supposed to be when the world's coming to an end, so I'll try to break the habit of a lifetime and work a bit faster!

All the best
Rowan

BEWARE OF THE FEW...
As I grow older, I regret to say that a detestable habit of thinking seems to be getting a hold of me. - H. Rider Haggard
Wellington, New Zealand
Joined: March 15, 2005
KitMaker: 169 posts
AeroScale: 132 posts
Posted: Monday, December 07, 2009 - 08:16 AM UTC
Looking good Rowen!
I just started building one last night too! but I had to start with the Merlin of course!
Merlin
 Senior Editor
#017
United Kingdom
Joined: June 11, 2003
KitMaker: 17,582 posts
AeroScale: 12,795 posts
Posted: Monday, December 07, 2009 - 08:24 AM UTC
Nice one David!
We'll meet somewhere in the middle!

All the best
Rowan

BEWARE OF THE FEW...
As I grow older, I regret to say that a detestable habit of thinking seems to be getting a hold of me. - H. Rider Haggard
Merlin
 Senior Editor
#017
United Kingdom
Joined: June 11, 2003
KitMaker: 17,582 posts
AeroScale: 12,795 posts
Posted: Monday, December 07, 2009 - 09:44 AM UTC
Hi again
This does risk making the pin marks look worse than they are, but I've filled the ones in the cockpit area with thinned Mr. Surfacer:
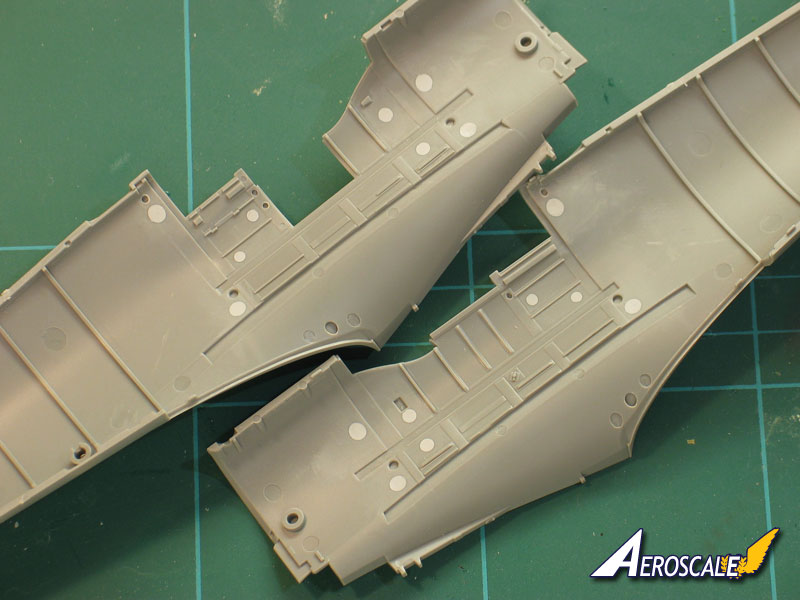
To be honest, it's probably overkill; the ones furthest from the cockpit definitely won't be visible, and the curve of the fuselage may well hide some of the others. But it's one of those jobs that you find hard to stop once you've started - and I think it's worth doing to be on the safe side.

All the best
Rowan

BEWARE OF THE FEW...
As I grow older, I regret to say that a detestable habit of thinking seems to be getting a hold of me. - H. Rider Haggard
Joined: January 25, 2003
KitMaker: 39 posts
AeroScale: 1 posts
Posted: Monday, December 07, 2009 - 02:04 PM UTC
I'm not sure since I only looked through my sprues but I believe the cockpit knockout holes get covered by other pieces going over them. I may be wrong though.
Owen
Georgia, United States
Joined: August 22, 2005
KitMaker: 331 posts
AeroScale: 135 posts
Posted: Monday, December 07, 2009 - 04:43 PM UTC
One of the locals is building one and it looks like it will just fall together. He had the fuselage taped together and there was no fit problem and probably no need for filler either. All of the other pieces seem to fit with little trouble or filler.
Support your Local Hobby Store.
Still boycotting Dragon Sytrene tracks. Ick-poo!
Current project:
Looking for my mind, I lost it somewhere.
Moselle, France
Joined: May 15, 2005
KitMaker: 5,653 posts
AeroScale: 4,347 posts
Posted: Monday, December 07, 2009 - 06:44 PM UTC
Hi all,
The ejector pin marks in red would remain visible in any case. The other still in white will be hidden.

This makes four in each inside of the fuselage, so 8 in total. Let's start the official "Tamiya 1:32 scale Spitfire Mk.IX ejector pin marks to fill" count!

Jean-Luc

Better think one hour and build five minutes...
Than think five minutes and build an hour!
Merlin
 Senior Editor
#017
United Kingdom
Joined: June 11, 2003
KitMaker: 17,582 posts
AeroScale: 12,795 posts
Posted: Monday, December 07, 2009 - 09:17 PM UTC
Hi there
I'll bow to Jean-Luc on this one, because he's actually finished the kit.

But to give you an idea of the extent to which the pin marks are visible, here's a few more pieces test-fitted:
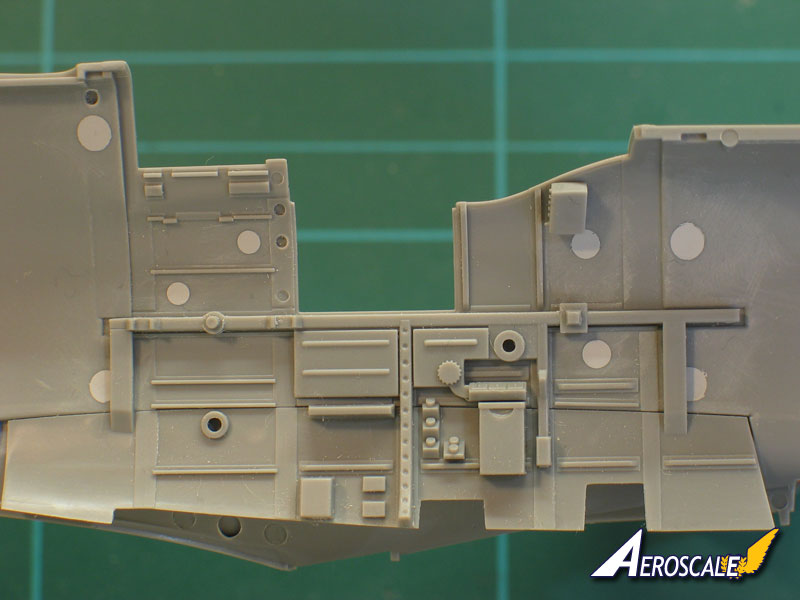
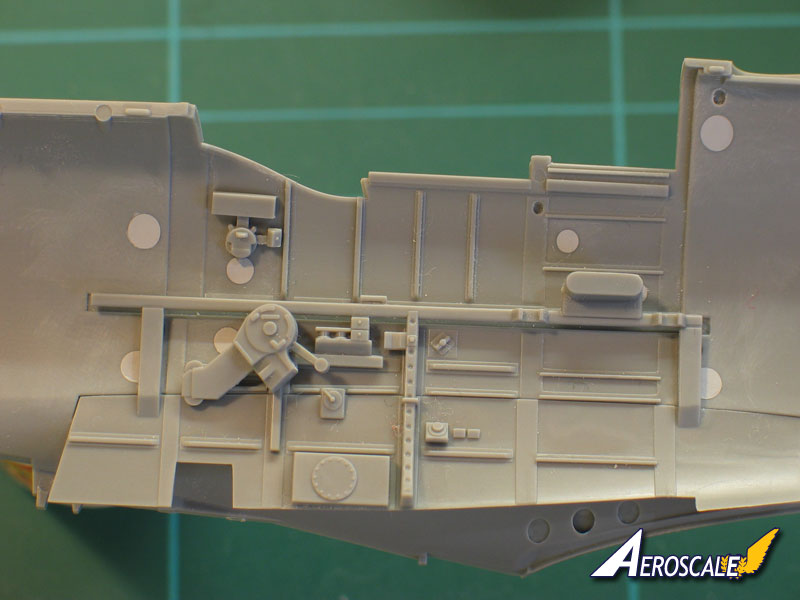
I think it's worth doing - after all, Tamiya's cockpit is so tasty, it's bound to get peered into rather a lot. I'll start getting some basic painting done today.

Quoted Text
One of the locals is building one and it looks like it will just fall together. He had the fuselage taped together and there was no fit problem and probably no need for filler either. All of the other pieces seem to fit with little trouble or filler.
Hi Joe. Definitely true. While the Mr. Surfacer was drying, I quickly tinkered with the wings; the fit at the roots is just amazing - like the tail, the joint looks just like surrounding panel lines.
All the best
Rowan

BEWARE OF THE FEW...
As I grow older, I regret to say that a detestable habit of thinking seems to be getting a hold of me. - H. Rider Haggard
Merlin
 Senior Editor
#017
United Kingdom
Joined: June 11, 2003
KitMaker: 17,582 posts
AeroScale: 12,795 posts
Posted: Tuesday, December 08, 2009 - 12:20 AM UTC
Hi again
Tamiya have depicted the lightening holes in the fuselage frames as shallow holes, which is a perfectly reasonable compromise. However, it's definitely worth taking a minute or two to open up the top few by the cockpit access door, because these will be clearly visible if you pose the door open (and I can't imaginine many people won't want to display the cockpit

):
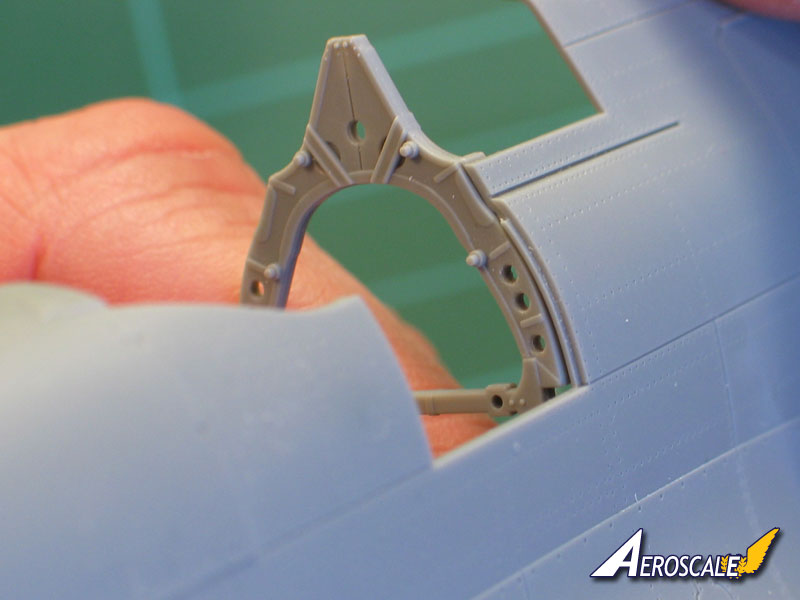
All the best
Rowan

BEWARE OF THE FEW...
As I grow older, I regret to say that a detestable habit of thinking seems to be getting a hold of me. - H. Rider Haggard
Attica, Greece / Ελλάδα
Joined: May 01, 2008
KitMaker: 1,437 posts
AeroScale: 1,241 posts
Posted: Tuesday, December 08, 2009 - 12:43 AM UTC
Alberta, Canada
Joined: January 19, 2008
KitMaker: 6,743 posts
AeroScale: 6,151 posts
Posted: Tuesday, December 08, 2009 - 02:19 AM UTC
Will be following your build here with much interest to see if you get her done !


The detail looks great so far on the parts . looking forward to more of your progress !
Joined: December 23, 2007
KitMaker: 1,596 posts
AeroScale: 1,275 posts
Posted: Tuesday, December 08, 2009 - 07:55 PM UTC
Hi Rowan,
do the same in 1:72 and I will congratuate you... ;P Now I know why you chanaged a house: to accomodate many Tamiya 1:32 Spitfires.
(already submitted this theme)
England - South East, United Kingdom
Joined: March 07, 2005
KitMaker: 868 posts
AeroScale: 690 posts
Posted: Tuesday, December 08, 2009 - 10:40 PM UTC
Quoted Text
Will be following your build here with much interest to see if you get her done ! 

..I was having similar thoughts Terri, but with my Brit reserve was too diplomatic to express them..

..have fun Rowan !
Merlin
 Senior Editor
#017
United Kingdom
Joined: June 11, 2003
KitMaker: 17,582 posts
AeroScale: 12,795 posts
Posted: Tuesday, December 08, 2009 - 11:27 PM UTC
Hi Terri and Neil
Don't worry - I'm tinkering away steadily at this beauty whenever there's a free moment. The basic colours are on, so I can really get going on the cockpit. I couldn't resist jumping ahead to the propeller and engine last night - they are both beautifully moulded. More to follow soon.

All the best
Rowan

BEWARE OF THE FEW...
As I grow older, I regret to say that a detestable habit of thinking seems to be getting a hold of me. - H. Rider Haggard
Holdfast
 President
#056
England - South West, United Kingdom
Joined: September 30, 2002
KitMaker: 8,581 posts
AeroScale: 4,913 posts
Posted: Wednesday, December 09, 2009 - 06:38 AM UTC
Sorry Jean-Luc I was sure that Rowan mentioned it in a PM, but could have been the age thing

I personally don't mind all the ejector pin marks, if that's what it takes to produce a kit of this quality, and they don't look too serious.
keep it up Rowan, no slacking. I'm going away on the 22nd so you need to be at the painting stage before then and therefor having made up your mind about the markings

MAL the MASK
BULLDOG # 6 (President)
BEWARE OF THE FEW
Sappers: First in, last out. (UBIQUE)
It's not the same, better, but not the same.
Moselle, France
Joined: May 15, 2005
KitMaker: 5,653 posts
AeroScale: 4,347 posts
Posted: Wednesday, December 09, 2009 - 07:16 AM UTC
Hi Mal,
Quoted Text
Sorry Jean-Luc I was sure that Rowan mentioned it in a PM, but could have been the age thing 
Don't worry, you are not senile (yet), in fact I did said that...

Jean-Luc

Better think one hour and build five minutes...
Than think five minutes and build an hour!


