_GOTOBOTTOM
Early Aviation
Discuss World War I and the early years of aviation thru 1934.
WNW GB 2009 -10 Junkers J.I Des
wombat58
_VISITCOMMUNITY
New South Wales, Australia
Joined: March 26, 2009
KitMaker: 366 posts
AeroScale: 309 posts
Posted: Monday, January 11, 2010 - 03:12 PM UTC
This is my build of the Junkers J.1, the 1:32 scale kit by Wingnut Wings. I would like to enter this build in the WNW GB 09 - 10.

I completed this model late last year so the build photos are all here. It is a great kit to build, easy fit of parts and well detailed, there is scope for an enormous amount of more detail if so desired. The only major flaw is the 3mm gap on the top wing at the end of the aileron, but it is easily fixed. WNW can be complimented for producing such a wonderful kit. Here is my build.

The Benz BZ4 engine is a kit on it's own and builds up to be a nice looking engine. I added valve springs, rocker arm supports, push rods, additional plumbing, throttle linkage, plug leads and plug lead conduit. Still to add are the magneto with leads.


Magneto has been fitted with leads attached. The valve springs and rocker gear have been repainted.


This is the completed engine with exhaust stack added. I think the added detail makes the engine look good.


wombat58
_VISITCOMMUNITY
New South Wales, Australia
Joined: March 26, 2009
KitMaker: 366 posts
AeroScale: 309 posts
Posted: Monday, January 11, 2010 - 03:27 PM UTC
These photos show the fuselage and cockpit areas, most of the cockpit has been completed, still needs seat belts and a bit of weathering. I made the the instruments from brass tube and fitted them in place of the kit items.


More photos of the interior this time with the engine sitting in position, just to see how it will look.


I have started the painting, the fuselage is almost done as is the opper surface of the bottom wing. I'm doing this one as 134/17 Flieger Abteilung (A) 263 hence the two tone green on the fuselage. The rudder is painted gloss white ready for the decals, it will then be painted matt clear.


To repair the 3mm gap in the top wing at the ailerons I extended the outer wing attachment panels. It is probably not correct but it is an easy fix and looks the part, it matches the bottom wing.

wombat58
_VISITCOMMUNITY
New South Wales, Australia
Joined: March 26, 2009
KitMaker: 366 posts
AeroScale: 309 posts
Posted: Monday, January 11, 2010 - 03:52 PM UTC
The bottom wing has now been fitted along with the undercarriage and engine. the fuselage is closed up, everything fitted extremely well with very little hassle. The tolerances are very close with the fit of parts so in most cases all paint has to be removed to make the fit of patrs easy.


The decals went on beautifully, even settled down well over the stitching. The tailplane and rudder are now fixed in position. The gun is there just for photo purposes.


These are the engine cowls which I will be leaving in the open position so as to display the engine. I have added the internal bracing and drilled holes in the strengthening frames. I also removed the plastic hinges and replaced them with metal.


These pictures show a dry fit of the top wing using only 4 of the 8 struts. Control cables are also fitted to the elevators and rudder. Top wing is complete apart from the radiator and a coat of matt clear to the under surface.


wombat58
_VISITCOMMUNITY
New South Wales, Australia
Joined: March 26, 2009
KitMaker: 366 posts
AeroScale: 309 posts
Posted: Monday, January 11, 2010 - 04:02 PM UTC
Here is the completed model. It has been a very enjoyable build with the quality of the kit being excellent. I did not encounter any major problems with the build and the decals are superb. It ends up a large model with a wing span of 50cm, but it does not look out of place among my other 1:32 scale WW1 aircraft models. The addition of some figures would compliment the overall appearance so I am looking forward to the release of the WNW figure sets.

Des.


thegirl
_VISITCOMMUNITY
Alberta, Canada
Joined: January 19, 2008
KitMaker: 6,743 posts
AeroScale: 6,151 posts
Posted: Monday, January 11, 2010 - 04:06 PM UTC
Des , it's great to see you inclued this build in the GB . Nice to have a recap on an excellent build !
Pulpinator
_VISITCOMMUNITY
Stockholm, Sweden
Joined: March 25, 2007
KitMaker: 78 posts
AeroScale: 53 posts
Posted: Thursday, January 14, 2010 - 09:26 AM UTC
Great stuff Des!
You're not planning on any weathering of the aircraft?
wombat58
_VISITCOMMUNITY
New South Wales, Australia
Joined: March 26, 2009
KitMaker: 366 posts
AeroScale: 309 posts
Posted: Thursday, January 14, 2010 - 10:02 AM UTC
Thanks Terri for your comments.

Thanks Hans. No, I will not be adding any weathering, she will stay a factory finish.
Weathering looks great if applied correctly, I am not confident enough to tackle it, my weathering techniques still need a lot of work.

Des.
FigureMad
_VISITCOMMUNITY
England - South East, United Kingdom
Joined: May 09, 2006
KitMaker: 118 posts
AeroScale: 89 posts
Posted: Thursday, January 14, 2010 - 10:12 AM UTC
Great finish to a lovely kit

Dave
CaptainA
_VISITCOMMUNITY
Indiana, United States
Joined: May 14, 2007
KitMaker: 3,117 posts
AeroScale: 2,270 posts
Posted: Thursday, January 14, 2010 - 12:27 PM UTC
Fantastic build. How did you do the interior wood? And can you explain how you did the brass instruments as well?
wombat58
_VISITCOMMUNITY
New South Wales, Australia
Joined: March 26, 2009
KitMaker: 366 posts
AeroScale: 309 posts
Posted: Thursday, January 14, 2010 - 01:54 PM UTC
Thanks guys for your kind words.

The wood grain inside the fuselage was achieved by firstly painting two coats of Gunze Radome. Once this was fully dry I used a combination of Burnt Sienna, Burnt Umber and Raw Sienna artists oil paints. Using a small stiff brush I dragged the paint down making sure not to add too much paint at one time. Keep going over your work until you have achieved the desired look. I don't drag the brush in straight lines, I think it looks better if the grain is a little wavy. If the paint is on a little thick in some spots, simply wipe your brush on a paper towel and drag over the area that needs thinning, it's a lot of trial and error but oils are so forgiving, if you don't like the result just wipe it off and start again.
To make the knots, get a very small brush and dab the area you want the knot, wipe the brush to stop a build up of paint. Once you have a tiny spot which is a different colour to the rest of the panel (nearly back to the base coat), drag your stiff brush down and go around the area you have been dabbing, you should end up with a knot.
Let the oil paint dry for at least 4 days then overcoat with a clear finish, I use Humbrol Matt Cote, The one in the bottle not the tinlet.
The colour of the wood you want to simulate depends entirely on the base coat and the oil coat, on my latest build, the WNW Bristol, I needed a much lighter colour for the cockpit floor and instrument panel so I base coated again with Gunze Radome but this time I used very thinned Raw Sienna oil paint, the result is a totally different colour to the Junkers.
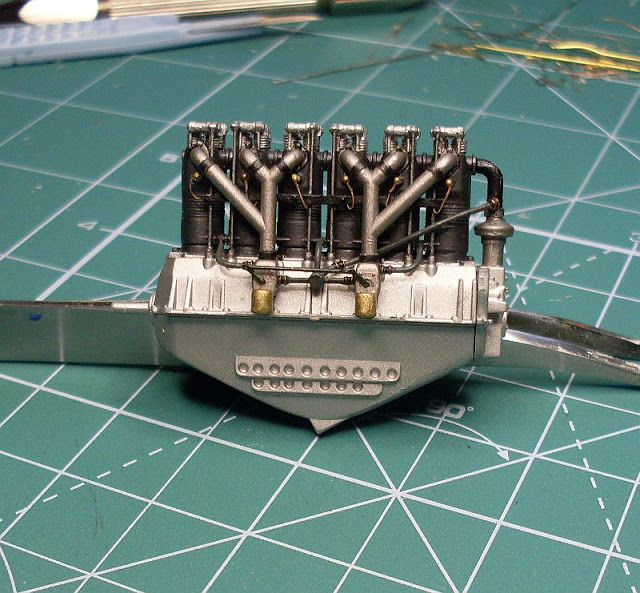
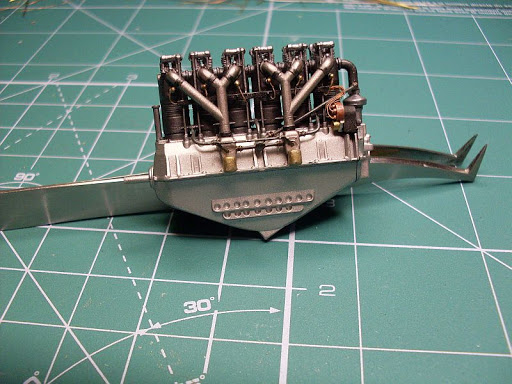
I use the same technique for doing the struts and props, also the tail skids. Drying time is the biggest issue with oils but I always have plenty of other things to go on with while the paint is drying.

To make the brass instruments, I use brass tube of different diameters. I cut the tube to short lengths then find one the correct size for the outside of the instrument. I then slide another cut tube which is a neat fit inside the first tube, I push it through until it is just a little further then the first tube creating a small lip, a drop of CA holds it all together. Lightly sand the edges of the cut brass tube to give it a slightly rounded look. I then find a piece of plastic rod which fits neatly inside the second tube, push it in (from the back) but only about half way, this allows your instrument decal to be recessed, again, a drop of CA then trim the back of the instrument of any excess plastic rod. Cut your instrument decal to fit inside the brass tube (I normally file a piece of the brass tube to make a wad punch, I use it to cut the decal which makes for a perfecr fit inside the tube), once dry, add a few drops of Futures to simulate the instrument glass. It might all sound a bit complicated but in practice it is very easy.

Hope this gives you a few ideas.

Des.
JackFlash
_VISITCOMMUNITY
Colorado, United States
Joined: January 25, 2004
KitMaker: 11,669 posts
AeroScale: 11,011 posts
Posted: Thursday, January 14, 2010 - 04:04 PM UTC
She is a fine build Des.
edoardo
_VISITCOMMUNITY
Milano, Italy
Joined: November 30, 2007
KitMaker: 642 posts
AeroScale: 382 posts
Posted: Thursday, January 14, 2010 - 09:57 PM UTC
Hey Des!
your work is really stunning!

Also your description of the wood grain and instrument panel is quite instructive!
by the way, do you have some detail pic of the brass instrument?

ciao
Edo
wombat58
_VISITCOMMUNITY
New South Wales, Australia
Joined: March 26, 2009
KitMaker: 366 posts
AeroScale: 309 posts
Posted: Thursday, January 14, 2010 - 11:31 PM UTC
Thanks Stephen and Edo for your kind words.

Sorry Edo, I don't have any close up pics of the instruments, it is something I forgot to do when I was doing my build record.

Des.
 _GOTOTOP