_GOTOBOTTOM
World War II: USA
Aircraft of the United States in WWII.
Hosted by Rowan Baylis
1:48 Cessna UC-78 Czech Model
TedMamere
_VISITCOMMUNITY
Moselle, France
Joined: May 15, 2005
KitMaker: 5,653 posts
AeroScale: 4,347 posts
Posted: Wednesday, January 13, 2010 - 10:50 AM UTC
Hi all,

I have started my build for the Aluminium Campaign. My entry is the 1:48 scale Czech Model Cessna UC-78 Bobcat (see review here). I will do "Uncle Tom's Cabin" (n°42-32072) a hack aircraft which belonged to the 361st FG in England...


The machine is all aluminium with black anti glare panels and yellow engine cowlings. Unfortunately the rest of the plane isn't visible on the picture so the overall decoration will be pretty much guesswork.

I started the build with the wings. They are composed of two parts that must be glued together, but the trailing edges need to be thinned down before for a more realistic appearance. The engine firewall for each wing has been glued in place as well...


The kit is pretty simple except for the interior which will benefit much from the accompanying photo etched frets later. Since I want to display the cabin door in the opened position on the finished model, I've replaced the pilot and passenger seats with scratchbuilt items to enhance realism. The original plastic parts may look alright if the access door is closed but they are too simplified if you allow the viewer to take a closer look inside...


The long rectangular patches are hiding the wing Karman hollows inside each fuselage halves. The kit provides photo etched parts for that but I opted for plastic sheets because they are easier to glue in place. Some plasticard was also used to scratchbuilt a frame for the two pilot seats. At the rear of the cabin, the structure made with evergreen stripes will act as support for the scratchbuilt passenger's seats. The latter, as well as the pilot seats, were made with wire bent to shape to replicate the tubular frame and self adhesive aluminium foil to represent the canvas. The floor was covered with fine sanding paper to represent what I assume was an anti slip revetement.

Jean-Luc
TedMamere
_VISITCOMMUNITY
Moselle, France
Joined: May 15, 2005
KitMaker: 5,653 posts
AeroScale: 4,347 posts
Posted: Thursday, January 14, 2010 - 08:07 AM UTC
Hi all,

The instrument panel is made of two layers of PE parts glued on the optional plastic version of the kit. Of course, the latter was sanded smooth before receiving the metal parts. The instructions ask you to choose between the PE parts and the Styrene part but I found it more practical to use both. I assume the whole assembly will be stronger and easier to glue in place later. The levers are really small and, as always, a real pain to put in place. They received some PVA glue on their ends for a more realistic appearance. I'm not sure about their color though. Note on the picture the "Cessna" logos on the PE rudder pedals...


Once painted, the scratchbuilt seats look more convincing than the plastic ones. Seatbelts are provided in the kit's and are pre-colored. The cushions for the pilots are made of Tamiya Epoxy Putty. The radio rack on the back is made with the photo etched parts present in the kit. Only some cables were added (made from fine lead wire) to match the photos I found of the real aircraft's interior...


Jean-Luc
alpha_tango
_VISITCOMMUNITY
Germany
Joined: September 07, 2005
KitMaker: 5,609 posts
AeroScale: 5,231 posts
Posted: Thursday, January 14, 2010 - 09:03 AM UTC
Hi Jean-Luc

very cool!!

Did you testfit the engine nacelles and under carriage. Someone over at HS PT had some problems with them and the u/c ... just a heads up.

all the best

Steffen

Merlin
Staff MemberSenior Editor
AEROSCALE
#017
_VISITCOMMUNITY
United Kingdom
Joined: June 11, 2003
KitMaker: 17,582 posts
AeroScale: 12,795 posts
Posted: Thursday, January 14, 2010 - 09:11 AM UTC
Hi Jean-Luc

Really nice! I'll be following this build with interest because it such an attractive subject. The new seats look superb. The photo-etched instruments and pedals are excellent.

All the best

Rowan
TedMamere
_VISITCOMMUNITY
Moselle, France
Joined: May 15, 2005
KitMaker: 5,653 posts
AeroScale: 4,347 posts
Posted: Thursday, January 14, 2010 - 10:03 AM UTC
Hi Steffen and Rowan,

Thanks for the kind words,

Yes, I know the problems with the engine nacelles and the undercarriage: there is not enough space to get the legs at the right angle because the plastic is too thick. The simple solution is to grind away as much plastic as possible inside each nacelle halves. I used a dremel tool for that...


Czech Model simply forgot that 1mm thick plastic makes about 5cm in real. This means that almost 10cm of room would be missing on the real aircraft for the gear legs! But this problem is typical of short run kits and not really something to worry about.

Jean-Luc
alpha_tango
_VISITCOMMUNITY
Germany
Joined: September 07, 2005
KitMaker: 5,609 posts
AeroScale: 5,231 posts
Posted: Friday, January 15, 2010 - 01:13 AM UTC
Hi Jean-Luc

you do it again!!!!! You make such "terrible" kits look easy builds

... really, the guy had some fit troubles with the nacelle to the wing. Might be a side problem of not taking care of the u/c early on but better test fit it before you take out the glue ....

all the best

Steffen
TedMamere
_VISITCOMMUNITY
Moselle, France
Joined: May 15, 2005
KitMaker: 5,653 posts
AeroScale: 4,347 posts
Posted: Friday, January 15, 2010 - 08:45 AM UTC
Hi Steffen,


Quoted Text

better test fit it before you take out the glue ....


You don't seem to know me very well. Remember my signature:
"Better think one hour and build five minutes...
Than think five minutes and build an hour!"

Do you have a link to the guy's build thread? I would be interested to take a look.

Jean-Luc
alpha_tango
_VISITCOMMUNITY
Germany
Joined: September 07, 2005
KitMaker: 5,609 posts
AeroScale: 5,231 posts
Posted: Friday, January 15, 2010 - 08:56 AM UTC
Hi Jean-Luc

Well, I think I know you good enough, but better point out "the obvious" earlier than later. There is no single thread on Plastic pix but spread over several. looking at the pix I rather think it can be all blamed on the u/c armour plates, so you should have little problems


http://www.network54.com/Forum/47751/search?searchterm=UC-78&sort=match

greets

Steffen

TedMamere
_VISITCOMMUNITY
Moselle, France
Joined: May 15, 2005
KitMaker: 5,653 posts
AeroScale: 4,347 posts
Posted: Friday, January 15, 2010 - 11:15 AM UTC
Hi Steffen,

Wow, people like it to do the hard way! I like the "Putty smash and sanding" comment!

You really just have to thin down the inside of the engine nacelles to make room for the landing gear legs and the problem is solved. After this treatment the nacelle to wing fit is very good.

Jean-Luc
Merlin
Staff MemberSenior Editor
AEROSCALE
#017
_VISITCOMMUNITY
United Kingdom
Joined: June 11, 2003
KitMaker: 17,582 posts
AeroScale: 12,795 posts
Posted: Friday, January 15, 2010 - 11:26 AM UTC
Hi Steffen

Wow! If there ever was a picture almost designed to make a kit look bad! I can't be bothered to trawl through a bunch of threads over on HS, but has the chap ever built a limited run kit before? I almost take it for granted that I'll have to thin edges and adjust openings for a correct fit. It's part of the fun and the challenge of building something a bit unusual... (It looks like he could have thinned the trailing edges of the wings down a bit too... )

All the best

Rowan
alpha_tango
_VISITCOMMUNITY
Germany
Joined: September 07, 2005
KitMaker: 5,609 posts
AeroScale: 5,231 posts
Posted: Friday, January 15, 2010 - 07:29 PM UTC
Hi Rowan and Jean-Luc

Well, I think he did a good job and did not want to make it look bad. He did finish it! (Rowan ...) I have made such mistakes in the past and probably will do in the days to come. Sometimes one thinks just the wrong way round. I only posted the photo to show others had problems and that there are things to think about, nothing more. (BTW might be that not all of his posts show in the search I posted above)

all the best

Steffen
Biffer
_VISITCOMMUNITY
Canada
Joined: January 14, 2010
KitMaker: 2 posts
AeroScale: 1 posts
Posted: Saturday, January 16, 2010 - 01:21 AM UTC

Quoted Text

Hi Steffen

Wow! If there ever was a picture almost designed to make a kit look bad! I can't be bothered to trawl through a bunch of threads over on HS, but has the chap ever built a limited run kit before? I almost take it for granted that I'll have to thin edges and adjust openings for a correct fit. It's part of the fun and the challenge of building something a bit unusual... (It looks like he could have thinned the trailing edges of the wings down a bit too... )

All the best

Rowan

TedMamere
_VISITCOMMUNITY
Moselle, France
Joined: May 15, 2005
KitMaker: 5,653 posts
AeroScale: 4,347 posts
Posted: Saturday, January 16, 2010 - 02:21 AM UTC
Hi Steffen,


Quoted Text

Well, I think he did a good job and did not want to make it look bad.


It wasn't my intention neither. The guy certainly didn't made a bad job. The finished model looks good and very clean.

It's just that I found the advices of the other guys inappropriate to overcome the problem. The picture with the engine nacelles is terrible for the kit and not representative of it's overall quality in my opinion. It is certainly not that bad and well within what is "normal" for a short run kit. I'm not at that point of the build myself though, so I will see if my method was successful later.

I have finished the cockpit interior and I must say that the photo etched part really add to the overall level of detail. Without them I would have said the kit is basic but with them the interior looks reasonably busy...


While I think it is a nice kit, Czech Model's Cessna Bobcat doesn't builds itself. Of course one has to help a little. For example, I had to adjust the cockpit floor and the rear bulkhead to achieve a decent fit when joining both fuselage halves together. However, when test fitting the windscreen I've noticed that it was wider than the fuselage. This is why I have added some stripes of plastic in the front and aft of the cockpit opening. Indeed, it is easier to widen the fuselage than reduce the width of the clear part...


The picture above looks like a modern piece of sculpture! To glue the instrument panel I've used the following method: I first glued the sub assembly on one fuselage side using plastic cement (remember, I've fixed the PE parts on the styrene version provided in the kit). Then I left it to dry for a couple of days. Finally, when I glued both fuselage sides together, I've also glued the other side of the instrument panel. It worked like a charm.

Jean-Luc
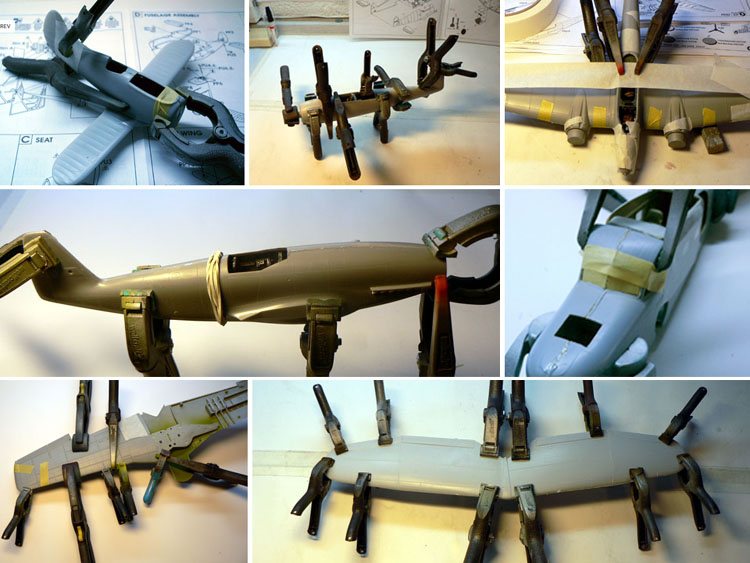
Merlin
Staff MemberSenior Editor
AEROSCALE
#017
_VISITCOMMUNITY
United Kingdom
Joined: June 11, 2003
KitMaker: 17,582 posts
AeroScale: 12,795 posts
Posted: Saturday, January 16, 2010 - 03:36 AM UTC


Hi there

:D Wow! If there ever was a picture almost designed to make a kit... LOL! Sorry - I couldn't resist it!

Seriously - the interior looks great, Jean-Luc. The etched parts really make it look busy, as you say, and the extra wiring for the radio gear is a very nice touch. The only thing I wonder is whether the pilot and co-pilot's seat cushions are too thick? I hasten to add that I don't have any refs to go by, but they do look a bit big. Your crew obviously travelled in comfort!

All the best

Rowan
TedMamere
_VISITCOMMUNITY
Moselle, France
Joined: May 15, 2005
KitMaker: 5,653 posts
AeroScale: 4,347 posts
Posted: Saturday, January 16, 2010 - 07:51 AM UTC
Hi Rowan,


Quoted Text

Wow! If there ever was a picture almost designed to make a kit... LOL! Sorry - I couldn't resist it!


I can add it to my "clamps" collection!


But, again, it's really not that bad. I have smeared the fuselage with putty but since the whole airframe is canvas covered, there are no panel lines to take care off so sanding won't be a problem.


Quoted Text

The only thing I wonder is whether the pilot and co-pilot's seat cushions are too thick? I hasten to add that I don't have any refs to go by, but they do look a bit big. Your crew obviously travelled in comfort!


Maybe I have exaggerated a little bit but the Cessna pilots indeed had some advantages over the fighter pilots obviously...


I can try to "extract" them from the cockpit to make them finer. What do you think?

Jean-Luc
Automaton
_VISITCOMMUNITY
United States
Joined: August 12, 2007
KitMaker: 153 posts
AeroScale: 139 posts
Posted: Saturday, January 16, 2010 - 08:59 AM UTC

Quoted Text


...Maybe I have exaggerated a little bit but the Cessna pilots indeed had some advantages over the fighter pilots obviously...


I can try to "extract" them from the cockpit to make them finer. What do you think?


Personally, if I were you I'd leave them as they are. The cushions may indeed be a tad too thick or "tall", but since the fuselage is closed up, they will only be viewable from above through the glass, not from the side. I believe the miniscule improvement wouldn't be worth the time (and risk) that trying to remove them for a rework would entail.

It's looking great, by the way. And I've gotta say, either I'm very slow at building limited runs, or you're very fast!

Regards;

Automaton
Merlin
Staff MemberSenior Editor
AEROSCALE
#017
_VISITCOMMUNITY
United Kingdom
Joined: June 11, 2003
KitMaker: 17,582 posts
AeroScale: 12,795 posts
Posted: Saturday, January 16, 2010 - 09:05 AM UTC
Hi again

I agree with Automaton - leave them be. They may be a little bit big but, BLIMEY!, the originals were whoppers, weren't they!

All the best

Rowan
TedMamere
_VISITCOMMUNITY
Moselle, France
Joined: May 15, 2005
KitMaker: 5,653 posts
AeroScale: 4,347 posts
Posted: Sunday, January 17, 2010 - 05:00 AM UTC
Hi guys,

Alright then, I will leave the cushions like they are, as an homage to the excellent comfort of the Cessna Bobcat...

I have glued the undercarriage and test fitted the engine nacelles. I'm happy to report that the fit is excellent! On the picture below, the nacelles haven't been glued in place, just dry fitted on the wings...


As I've said above, one only has to thin down the inside of the engine nacelles to achieve a good fit. It is necessary to align both landing gears very carefully though, to be sure that their angle is the same. Otherwise the sit of the aircraft will look weird on the finished model. Below is a picture which shows my putty smears on the fuselage...


It looks bad but I must sat that I have applied more filler than needed because there are no panel lines to take care of. Sanding the seams will be very easy.

Jean-Luc
alpha_tango
_VISITCOMMUNITY
Germany
Joined: September 07, 2005
KitMaker: 5,609 posts
AeroScale: 5,231 posts
Posted: Sunday, January 17, 2010 - 09:42 AM UTC
Du bist wirklich ein Künstler!!!

und dabei sieht bei dir alles so leicht aus ...

Vielleicht kannst du die "Kiste" ja am 5. mitbringen?

viele Grüße

Steffen
TedMamere
_VISITCOMMUNITY
Moselle, France
Joined: May 15, 2005
KitMaker: 5,653 posts
AeroScale: 4,347 posts
Posted: Sunday, January 17, 2010 - 05:28 PM UTC
Hi Steffen,


Quoted Text

Vielleicht kannst du die "Kiste" ja am 5. mitbringen?


Yes, I might be able to take the model with me. Size isn't a problem because the Cessna is smaller than a P-47!

Jean-Luc
TedMamere
_VISITCOMMUNITY
Moselle, France
Joined: May 15, 2005
KitMaker: 5,653 posts
AeroScale: 4,347 posts
Posted: Monday, January 18, 2010 - 08:10 AM UTC
Hi all,

Little progress today. But I have sanded the putty smears away on the fuselage and dry fitted the cockpit glazings. These are made of two parts: windshield and roof. Two variants of the latter are provided in the kit, one for the civilian version and one for the military one. The fit is not bad at all... of course if you add the extra plastic stripes to widden the fuselage a little!


The horizontal and vertical tailplanes have been fitted as well. Nothing particular to report. Fit is not perfect but again within what is acceptable I think...


Here is a picture of the complete fuselage. It looks more like a dolphin than an aircraft!


Jean-Luc
alpha_tango
_VISITCOMMUNITY
Germany
Joined: September 07, 2005
KitMaker: 5,609 posts
AeroScale: 5,231 posts
Posted: Monday, January 18, 2010 - 08:28 AM UTC
Fabulous!!

I actually do not see Flipper there but I am not good at such things ...I started to build the Predator today but IMO it looks more like Alien...


cheers

Steffen
mtnflyer
_VISITCOMMUNITY
Alberta, Canada
Joined: March 08, 2009
KitMaker: 394 posts
AeroScale: 360 posts
Posted: Monday, January 18, 2010 - 09:01 AM UTC
Jean-Luc

You are a true artist. I am humbled by your masterful ability. It's a joy to follow your post's. My own abilities are dismal compared to your wonderful effort, and I'm proud to be an apprentice of your work and learn what I can. I congradulate you on being a champion.
Merlin
Staff MemberSenior Editor
AEROSCALE
#017
_VISITCOMMUNITY
United Kingdom
Joined: June 11, 2003
KitMaker: 17,582 posts
AeroScale: 12,795 posts
Posted: Monday, January 18, 2010 - 09:13 AM UTC
Hi Jean-Luc

Lovely work, as ever! The kit's fabric effect on the fuselage sides appears to be nice and subtle, but looking at the tail, it'd definitely be worth reducing the ribs a bit (well, a lot really...) - they do look very heavy and "stuck on" as moulded.

All the best

Rowan
chukw1
_VISITCOMMUNITY
California, United States
Joined: November 28, 2007
KitMaker: 817 posts
AeroScale: 729 posts
Posted: Monday, January 18, 2010 - 01:05 PM UTC
It's a joy to watch you model, Jean-Luc! The fit of the canopy is testimony to your fine judgement and skill in whipping that fuselage into shape. The seats look great to me as they are- excellent use of foil!

Cheers!
chuk
 _GOTOTOP