_GOTOBOTTOM
Early Aviation
Discuss World War I and the early years of aviation thru 1934.
Two Seater Campaign WNW LVG Mark K.
eclarson
_VISITCOMMUNITY
Ohio, United States
Joined: February 22, 2010
KitMaker: 171 posts
AeroScale: 166 posts
Posted: Thursday, February 25, 2010 - 06:08 AM UTC

Quoted Text

... Eric; I was scoping out your build pages and I am going to take your lead and rig the inboard lower wing before installing the upper wing. I noticed that there is dihedral in the actual a/c, but with the weight of the wing, a lot of the finished models I have seen have "anhedral". I set it in the box to serve as a jig to generate enough opposite force to provide some dihedral. ...


Hi Mark,

Yes, those are some serious slabs of plastic hanging out there! Fortunately, Wingut's excellent design provides for very solid wing attachment. I can't remember if I propped up the lower wings when I started rigging them but I figured by doing those inboard wires first, it would help keep things aligned. Also, I tried to do as much as possible before I put the top wing on so it would be easier to reach everything! I did find that I got some sagging in different areas as I progressed but I would just use a heated knife blade to tighten the offending lines. Just got to be careful not to touch a wire with the hot blade!

I look forward to seeing your continued progress. I hope it all goes smoothly for you.

Cheers,
Eric
CaptainA
_VISITCOMMUNITY
Indiana, United States
Joined: May 14, 2007
KitMaker: 3,117 posts
AeroScale: 2,270 posts
Posted: Thursday, February 25, 2010 - 06:29 AM UTC
I set mine up on the wings to get a little anhedral. I am glad I did. Well engineered, but the plastic spars really can't generate enough force to compensate for all the wing weight.
Mgunns
_VISITCOMMUNITY
Arizona, United States
Joined: December 12, 2008
KitMaker: 1,423 posts
AeroScale: 1,319 posts
Posted: Friday, February 26, 2010 - 01:30 AM UTC
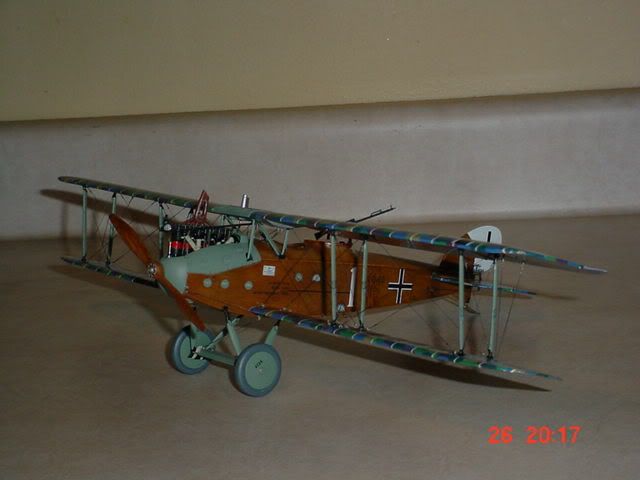
Okay Folks: I am nearly finished with this great kit. I have the wings on, and partially rigged. I just had to post these pics before it is complete. Note the absence of the observer ring. I purposely left this off until last so I wouldn't ruin it in handling. Also a note of caution here. There is a reason why WNW has the modeler install the upper radiator feed pipe after the upper wing is located, because if you do it before; as I did, the fitting end slips into the wing root fairing, and has to be gingerly sawn out, which I did. It pays to follow the instructions. Other than that, the fit of the upper wings was a little tight, had to trim a little off, but it went smoothly. Here they are:


I am using EZ line fine for most of the rigging. To provide support I used brown invisible thread for the upper inboard to wing flying wires. EZline is nice to work with as it stretches, but because it stretches it dosn't give a lot of support.
edoardo
_VISITCOMMUNITY
Milano, Italy
Joined: November 30, 2007
KitMaker: 642 posts
AeroScale: 382 posts
Posted: Friday, February 26, 2010 - 01:51 AM UTC
Mark!
it is a real beauty!
Very, Very well done!

md72
#439
_VISITCOMMUNITY
Washington, United States
Joined: November 05, 2005
KitMaker: 4,950 posts
AeroScale: 3,192 posts
Posted: Friday, February 26, 2010 - 02:43 AM UTC
looks really good Mark.

One really deep question: If the thread is invisible, how do you know that it's brown?
Mgunns
_VISITCOMMUNITY
Arizona, United States
Joined: December 12, 2008
KitMaker: 1,423 posts
AeroScale: 1,319 posts
Posted: Friday, February 26, 2010 - 03:06 AM UTC

Quoted Text

looks really good Mark.

One really deep question: If the thread is invisible, how do you know that it's brown?


;) I have special glasses that I received during a visitation.

This is a real nice kit to work with. If you are thinking of doing WNW WWI Subject, I would recommend this kit.
CaptainA
_VISITCOMMUNITY
Indiana, United States
Joined: May 14, 2007
KitMaker: 3,117 posts
AeroScale: 2,270 posts
Posted: Friday, February 26, 2010 - 06:23 AM UTC
I bet a whole lot of kits are being shipped from Fort Wingnut because of the builds we are doing here. And I must applaud your fine build, Mark. You have done a fantastic job.
eclarson
_VISITCOMMUNITY
Ohio, United States
Joined: February 22, 2010
KitMaker: 171 posts
AeroScale: 166 posts
Posted: Friday, February 26, 2010 - 06:55 AM UTC
Mark, your LVG is shaping up beautifully! Looking very good.

I too left the observers ring off until the last. It's almost a press-fit but I did tack mine in place with a couple drops of white glue.

I also had to do some sanding on both the upper wing tabs and the slots in the radiator housing so the fit would not be too tight. The engineering on these kits has virtually zero tolerance. Precise fit everywhere! That is one of the few challenges of building these kits.

You mention the radiator feed pipe. I didn't have any problem with mine but I did have a little difficulty with the fuel line piece. That little forked pipe that goes between the tank under the upper wing and the fuselage. Mine seemed a tad too long and if you look closely, it ended up having a slight curve from forcing the ends into their respective holes. Of course, the real ones probably weren't perfectly straight either so I didn't worry about it!

Looks like you'll have it wrapped up soon. Just in time for the next batch of WNW kits!

Cheers,
Eric
Mgunns
_VISITCOMMUNITY
Arizona, United States
Joined: December 12, 2008
KitMaker: 1,423 posts
AeroScale: 1,319 posts
Posted: Friday, February 26, 2010 - 08:21 AM UTC

Quoted Text

I bet a whole lot of kits are being shipped from Fort Wingnut because of the builds we are doing here. And I must applaud your fine build, Mark. You have done a fantastic job.


Thanks Carl: If it weren't for this website, I doubt I would ever have tackled this or any of their kits or any WWI model for that matter. Seeing your work, and others inspired me to go ahead with these kits and push my abilities and skills to the next level. I would hope that Fort Wingnut is having a hard time keeping their shelves stocked. I just broke down and ordered the BRISFIT. As they are limited, I figure I better get it. Now how to tell the Girlfriend.
Mgunns
_VISITCOMMUNITY
Arizona, United States
Joined: December 12, 2008
KitMaker: 1,423 posts
AeroScale: 1,319 posts
Posted: Friday, February 26, 2010 - 08:26 AM UTC

Quoted Text

Mark, your LVG is shaping up beautifully! Looking very good.

You mention the radiator feed pipe. I didn't have any problem with mine but I did have a little difficulty with the fuel line piece. That little forked pipe that goes between the tank under the upper wing and the fuselage. Mine seemed a tad too long and if you look closely, it ended up having a slight curve from forcing the ends into their respective holes. Of course, the real ones probably weren't perfectly straight either so I didn't worry about it!

Looks like you'll have it wrapped up soon. Just in time for the next batch of WNW kits!

Cheers,
Eric


Thanks Eric: I know what you mean about the fuel line piece. I tried to guide into it's locating hole, but after numerous trys, left it alone. I don't want to break it or handle the model that much. It looks fine where it is. I do have two other WNW kits on the shelf, and one on the way. Now the hard part is to figure out which one to do next.

CaptainA
_VISITCOMMUNITY
Indiana, United States
Joined: May 14, 2007
KitMaker: 3,117 posts
AeroScale: 2,270 posts
Posted: Friday, February 26, 2010 - 10:34 AM UTC

Quoted Text

I just broke down and ordered the BRISFIT. As they are limited, I figure I better get it. Now how to tell the Girlfriend.


I reviewed the Bristol. It is a fantastic kit. The detail is even better than the LVG. Be preparred to do some majoe rigging.


Quoted Text

Now how to tell the Girlfriend.


Easier to ask for forgiveness than permission.

Mgunns
_VISITCOMMUNITY
Arizona, United States
Joined: December 12, 2008
KitMaker: 1,423 posts
AeroScale: 1,319 posts
Posted: Friday, February 26, 2010 - 01:47 PM UTC
She is very forgiving, hopefully no worries there. I just finished up the LVG. I am going to replace the gun later with a PE jacketed version but for now this will fill the bill. After Major Decaling, Major rigging might not seem so bad. I rather enjoy the rigging aspect of it.
Mgunns
_VISITCOMMUNITY
Arizona, United States
Joined: December 12, 2008
KitMaker: 1,423 posts
AeroScale: 1,319 posts
Posted: Friday, February 26, 2010 - 02:57 PM UTC
Okay Folks: It is done! As I mentioned earlier, I am going to replace the machine gun, as I broke the site, but for all intents and purposes it is finished. Terri: I don't know what you do now, but my model for the two seater campaign is finished. Whadya Think?


In Conclusion: I would build another one of these in a few weeks. It was a very enjoyable build, and I learned a lot from the friendly folks here on Aeroscale.

Thanks to Terri Werner "The Girl" for ram rodding this group build, and thanks to Wing Nut Wings for their excellent model.
Thanks to all who responded with their comments and tips and words of encouragement, wisdom and wit, it is all appreciated. You are all a great bunch of people, modelers and enthusiasts without the joy sucker attitude that can be found elsewhere.
I look forward to the WNW SE5a. for the WNW group build and get back on track on that project.
As our "Fearless Leader" would say: "Model On"!
JackFlash
_VISITCOMMUNITY
Colorado, United States
Joined: January 25, 2004
KitMaker: 11,669 posts
AeroScale: 11,011 posts
Posted: Friday, February 26, 2010 - 03:43 PM UTC
Nicely Done!
Mgunns
_VISITCOMMUNITY
Arizona, United States
Joined: December 12, 2008
KitMaker: 1,423 posts
AeroScale: 1,319 posts
Posted: Friday, February 26, 2010 - 03:58 PM UTC
Thanks Stephen: Now on to the WNW Build!
md72
#439
_VISITCOMMUNITY
Washington, United States
Joined: November 05, 2005
KitMaker: 4,950 posts
AeroScale: 3,192 posts
Posted: Friday, February 26, 2010 - 04:13 PM UTC
Mike, Looks very good. BZ!
thegirl
_VISITCOMMUNITY
Alberta, Canada
Joined: January 19, 2008
KitMaker: 6,743 posts
AeroScale: 6,151 posts
Posted: Saturday, February 27, 2010 - 01:31 AM UTC
Very well done indeed Mark !

You did a fantastic job on this build form start to finish , nice clean build . Thanks for taking part in the campaign and hope to see you sign up for more in the future


Mark just a side note , you need to post your finish build in the two seater campaign thread in order to get your ribbon .
gajouette
_VISITCOMMUNITY
Texas, United States
Joined: February 01, 2007
KitMaker: 365 posts
AeroScale: 356 posts
Posted: Saturday, February 27, 2010 - 02:21 AM UTC
Mark,
To use a term I know you'll understand and appreciate, Outstanding and Well Done! Beautiful project my friend,absulutely beautiful.
Highest Regards,
Gregory Jouette
Mgunns
_VISITCOMMUNITY
Arizona, United States
Joined: December 12, 2008
KitMaker: 1,423 posts
AeroScale: 1,319 posts
Posted: Saturday, February 27, 2010 - 06:21 AM UTC
Thanks Terry and Gregory: It turned out pretty good I have to admit. Now for the fun part. Terri: Where do I go to post the picture? I went to the Two Seater Campaign thread but didn't see anything that would allow a posting of a picture.
thegirl
_VISITCOMMUNITY
Alberta, Canada
Joined: January 19, 2008
KitMaker: 6,743 posts
AeroScale: 6,151 posts
Posted: Sunday, February 28, 2010 - 02:00 PM UTC

Quoted Text

Thanks Terry and Gregory: It turned out pretty good I have to admit. Now for the fun part. Terri: Where do I go to post the picture? I went to the Two Seater Campaign thread but didn't see anything that would allow a posting of a picture.


Mark , when you are on the forum page scroll down to the air campaigns and it is there under offical two seater campaign thread . Just post some pic's in that thread
CaptainA
_VISITCOMMUNITY
Indiana, United States
Joined: May 14, 2007
KitMaker: 3,117 posts
AeroScale: 2,270 posts
Posted: Monday, March 01, 2010 - 11:00 AM UTC

Quoted Text


Looks like it came in for a landing on the landing.

Next.
Mgunns
_VISITCOMMUNITY
Arizona, United States
Joined: December 12, 2008
KitMaker: 1,423 posts
AeroScale: 1,319 posts
Posted: Tuesday, March 02, 2010 - 01:23 AM UTC

Quoted Text

Looks like it came in for a landing on the landing. Next.


:-H Actually it is on the kitchen counter. I think it was Keith who recommended taking pictures on a white or single color surface as the camera would focus on the object vice other objects.
I am presently working on the WNW SE.5a, the second go around on this one. It's a good kit, but the problem lies in the lay out of the instrutcions and the construction sequence. After melting the front of the last one, I am approaching this one with caution and a lot of test fitting etc. A little trimming here and there, but no major fit problems. I would recommend to WNW that they adjust the lay out of the instruction sheet, and maybe offer a note or two regarding some of the assembly sequences. After that it will be either the Encore Albatros DII in Boelcke's markings or the Junkers J1.
 _GOTOTOP