Östergötland, Sweden
Joined: April 04, 2006
KitMaker: 1,058 posts
AeroScale: 1,004 posts
Posted: Monday, February 15, 2010 - 06:39 AM UTC
Hi Folks
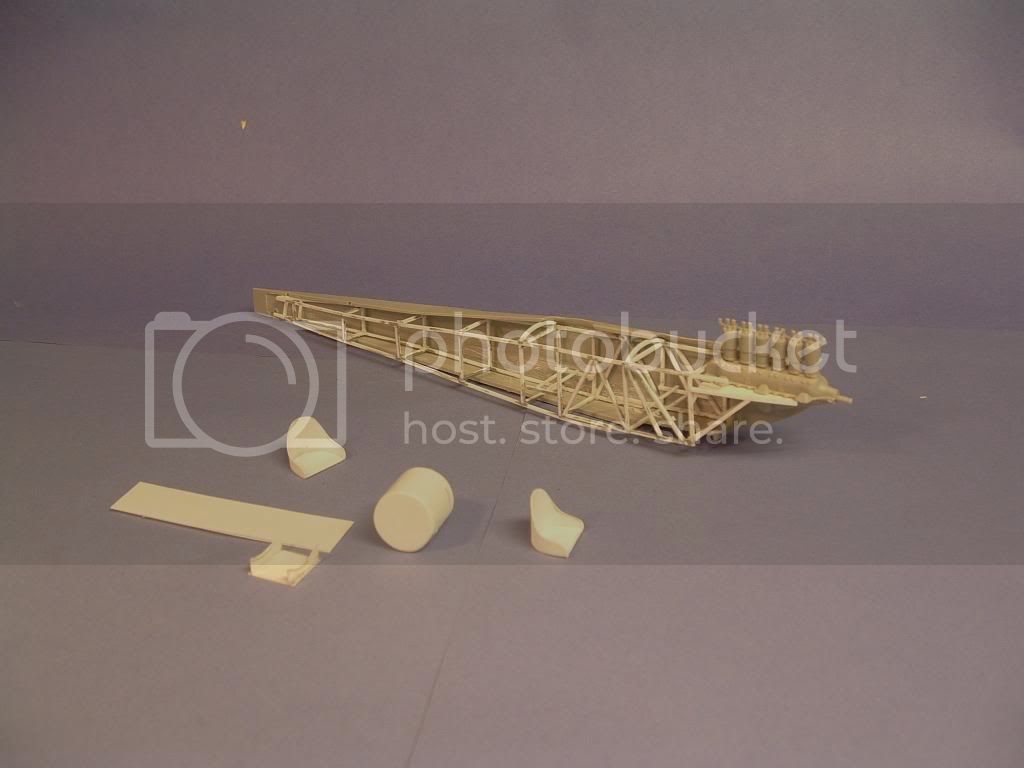
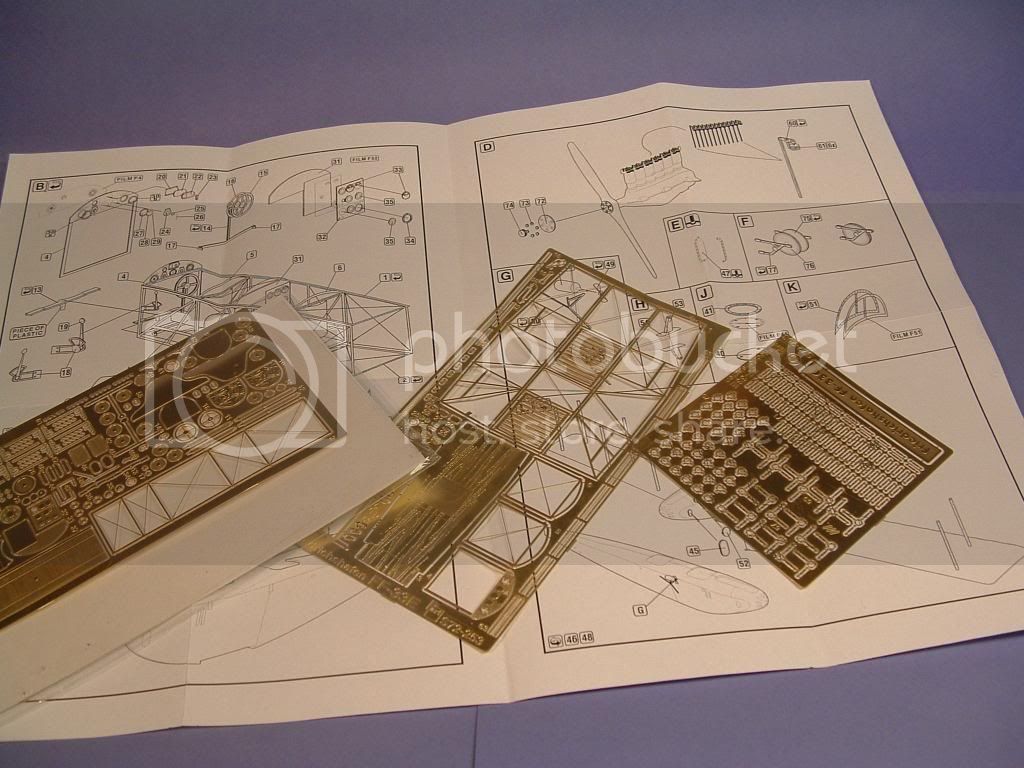
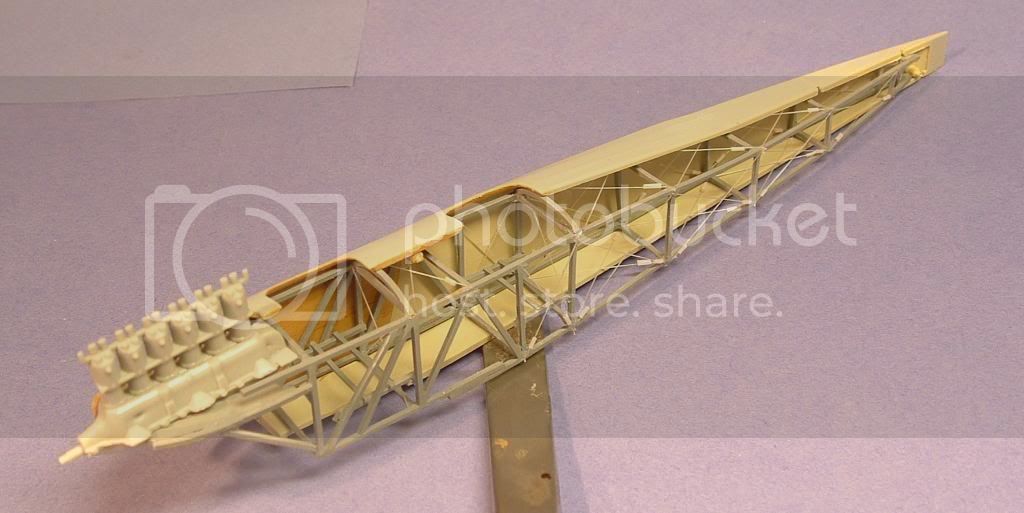
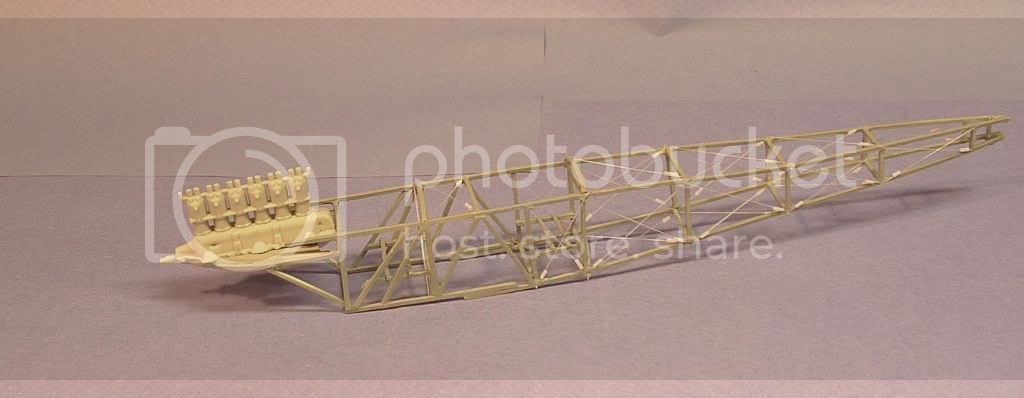
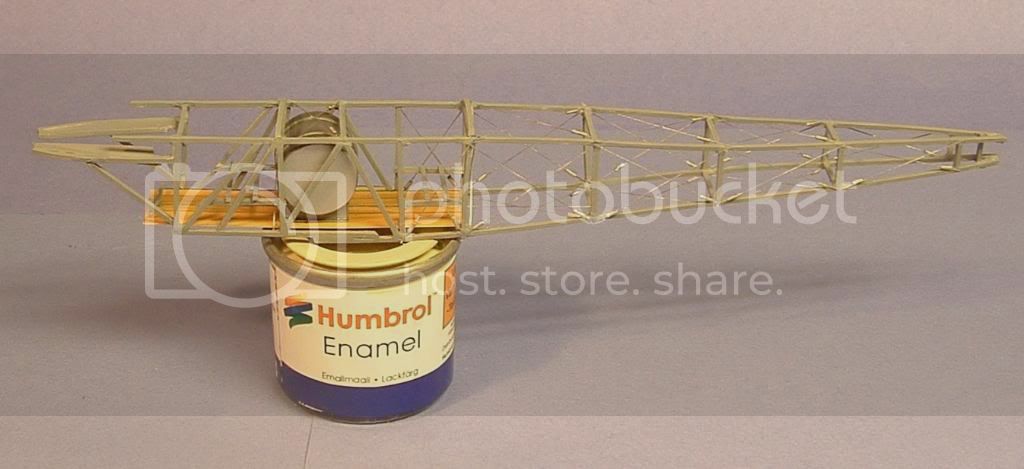
I just had to start up this one. It will be a slow build so do u not think I´ll going to rush this one off.Got the etch from Jadar and recommend it.Awsome stuff.
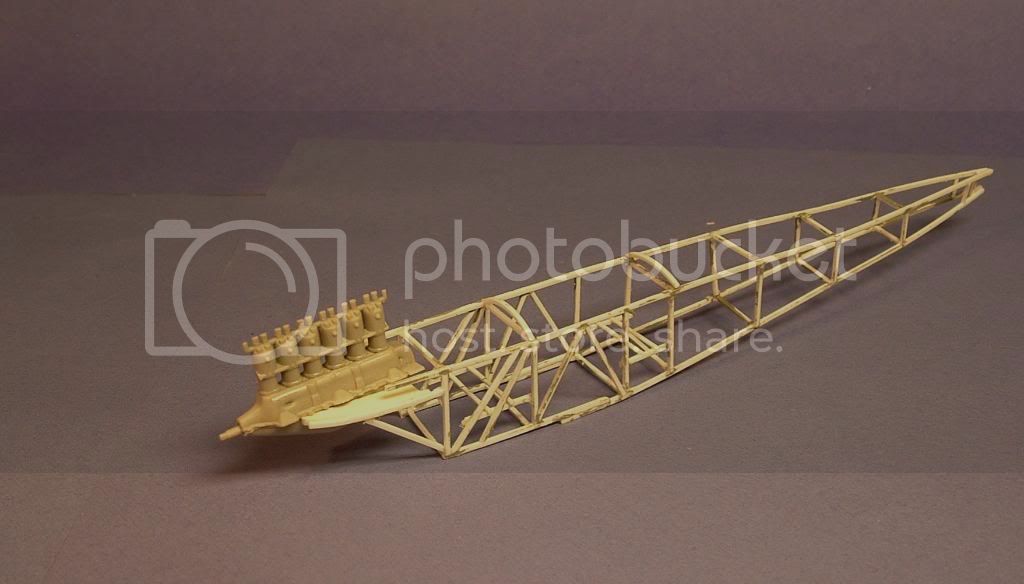
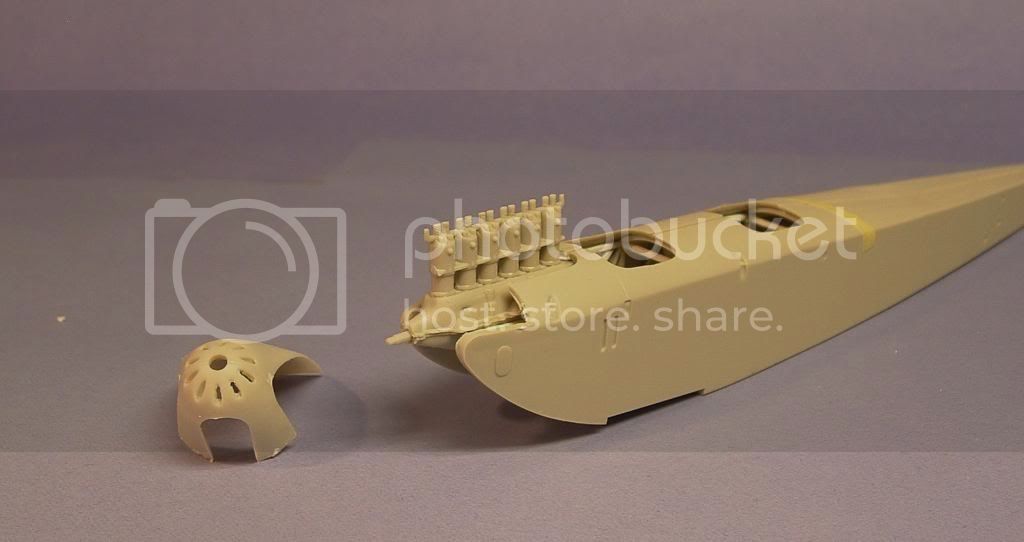
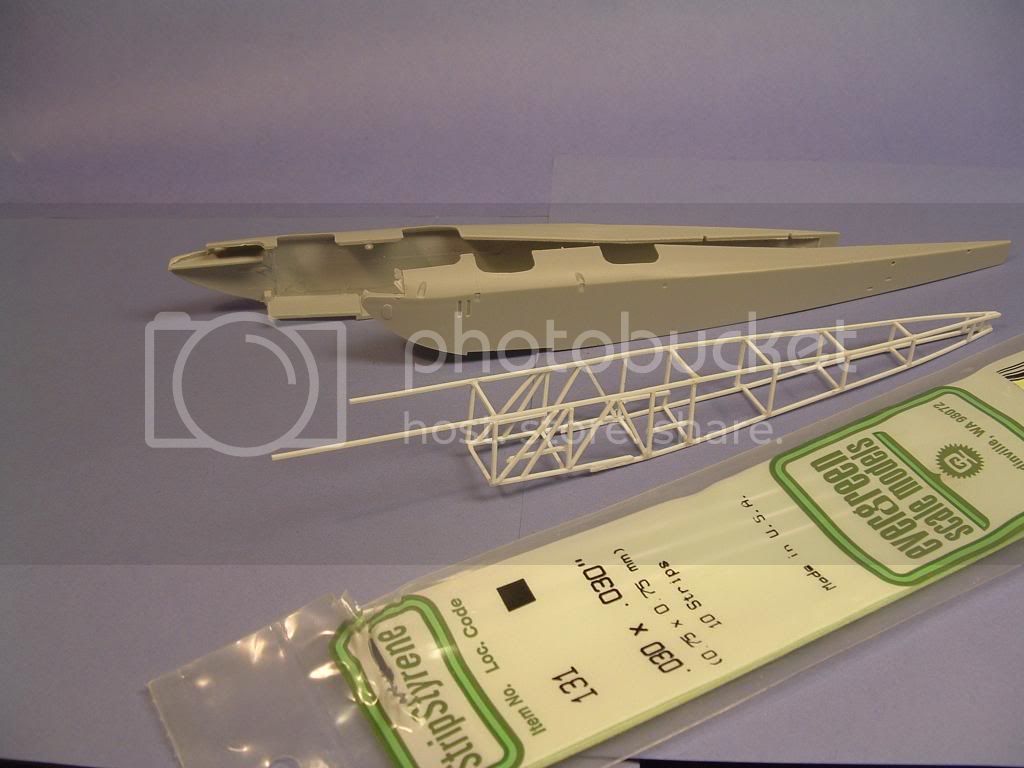
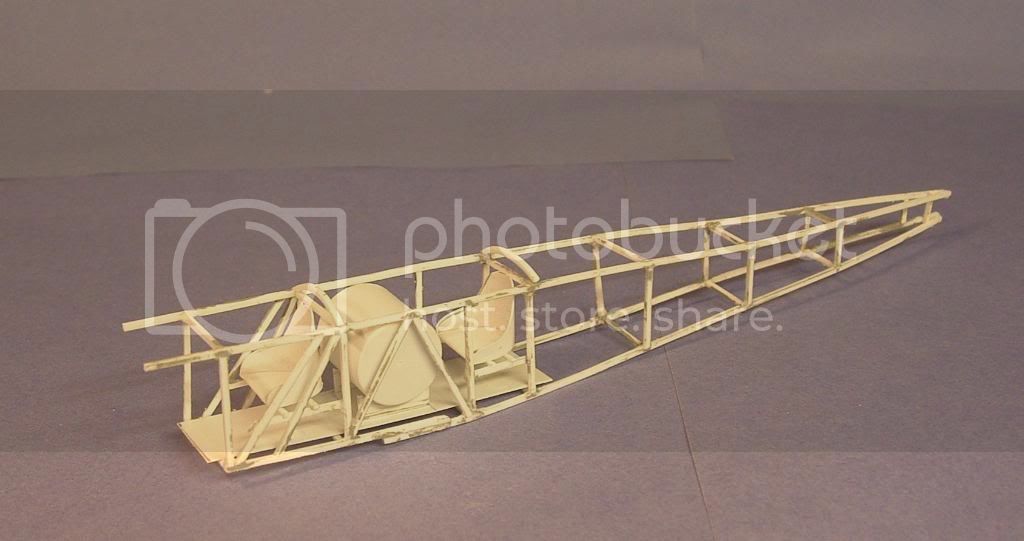
Never been succesful with the etched interiorframe, I´ll started up one from Evergreen strips, used 030-030. After cleaning up the inside off the fuselage and used some filler one the zinkmarks the new interiorframe was glued up.
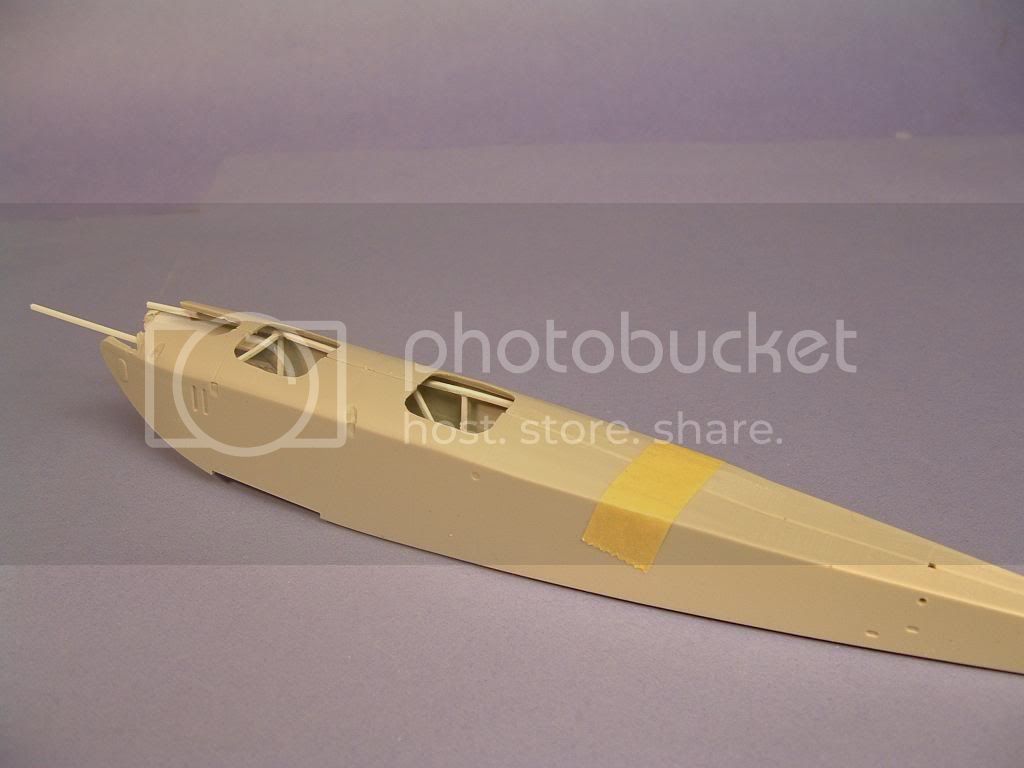
Alot of dryfitting the frame into the fuselage,checking,triming,checking.

The fuselagehalves going together just nice and easy after alot off dryfitting.
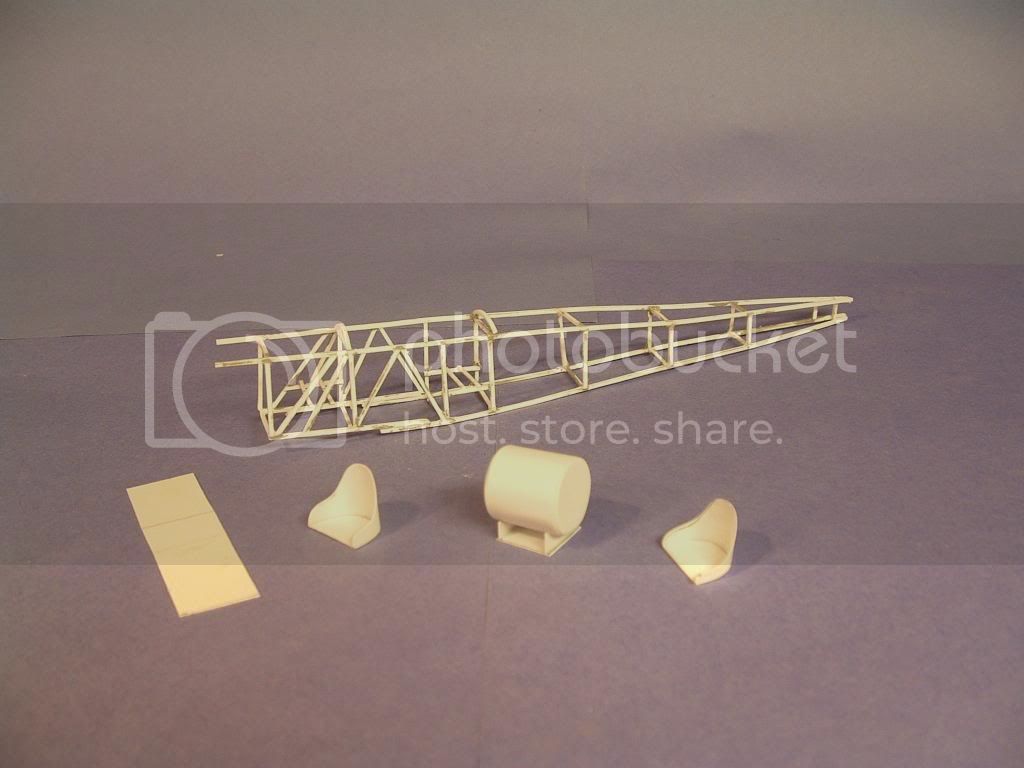
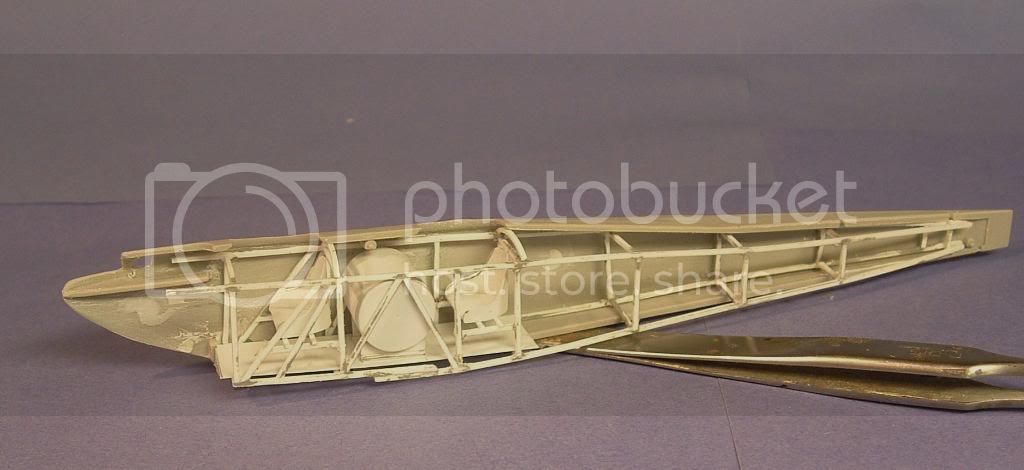
Next thing was to make two new seats from plasticard and a new fueltank. Yes there´s one in the etch but I can handle plastic better than brass

(sorry for the bad quality off this pic)
A new floor was fixed also and with all thing dryfitted.


Larsa Q
Alberta, Canada
Joined: January 19, 2008
KitMaker: 6,743 posts
AeroScale: 6,151 posts
Posted: Monday, February 15, 2010 - 08:37 AM UTC
This is right up my alley Lars

Very nice job on the framing . This is not an easy task getting it plum and square , excellent job !
PS , nice to see you back in action
Östergötland, Sweden
Joined: April 04, 2006
KitMaker: 1,058 posts
AeroScale: 1,004 posts
Posted: Monday, February 15, 2010 - 08:44 AM UTC
Thank´s Terri
This kit is a gem and I will go slow and try to make to a gem when finished. I will choise a Swedish marking before Sweden had the Airforce. We had a couple off this in our country placed in the Marines( they was the first to get planes in Sweden. The Airforce started in 1926)so u will see just another Swedish one here on the forum. My first was the Thulin, years ago
Larsa Q
Colorado, United States
Joined: January 25, 2004
KitMaker: 11,669 posts
AeroScale: 11,011 posts
Posted: Monday, February 15, 2010 - 09:09 AM UTC
". . .The most important thing is to know why you build and then get the most that you can out of building." via D.D.
Bas-Rhin, France
Joined: May 21, 2006
KitMaker: 472 posts
AeroScale: 471 posts
Posted: Tuesday, February 16, 2010 - 07:10 AM UTC
West Virginia, United States
Joined: December 18, 2006
KitMaker: 1,121 posts
AeroScale: 1,063 posts
Posted: Tuesday, February 16, 2010 - 09:10 AM UTC
Mendoza, Argentina
Joined: June 14, 2006
KitMaker: 222 posts
AeroScale: 219 posts
Posted: Tuesday, February 16, 2010 - 05:56 PM UTC
Great start!
I have always imagined that Paradise will be a kind of library.
Siempre imagine que el paraíso sería algún tipo de biblioteca.
Jorge Luis Borges
England - East Anglia, United Kingdom
Joined: November 16, 2009
KitMaker: 79 posts
AeroScale: 75 posts
Posted: Tuesday, February 16, 2010 - 08:06 PM UTC
Wow! the framing is spot on, and can't wait to see the rest, if i can work out how you post an image will post some of my scratch built one i did a few years back, its had a few knocks since
Milano, Italy
Joined: November 30, 2007
KitMaker: 642 posts
AeroScale: 382 posts
Posted: Wednesday, February 17, 2010 - 02:16 AM UTC
Very well done Larsa!
Which sale is it?
But, come on, how many building are you doing? Aren't you getting yourself too buisy? I cannot handle more than one at the time and I still lack fucus...
Anyway, on my side it is very interesting to have so many builds to follow!
so, plese, keep un posting!!
ciao
Edo
Östergötland, Sweden
Joined: April 04, 2006
KitMaker: 1,058 posts
AeroScale: 1,004 posts
Posted: Wednesday, February 17, 2010 - 06:22 AM UTC
Arizona, United States
Joined: December 12, 2008
KitMaker: 1,423 posts
AeroScale: 1,319 posts
Posted: Wednesday, February 17, 2010 - 12:25 PM UTC

Hello again Larsa: This is really coming along nicely. How do find the motivation to do two builds at once? Your interior work on this is really nice.
Looking forward to more photos.
Best
Mark
We few, we happy few........
Östergötland, Sweden
Joined: April 04, 2006
KitMaker: 1,058 posts
AeroScale: 1,004 posts
Posted: Friday, February 19, 2010 - 04:13 AM UTC
Quoted Text
Hello again Larsa: This is really coming along nicely. How do find the motivation to do two builds at once? Your interior work on this is really nice.
Looking forward to more photos.
Best
Mark
it calls Olypic games and terrorise my TV, whern they break a m,uscle or two,I´m building one or two

Larsa Q
Östergötland, Sweden
Joined: April 04, 2006
KitMaker: 1,058 posts
AeroScale: 1,004 posts
Posted: Sunday, February 21, 2010 - 01:47 AM UTC
Hi
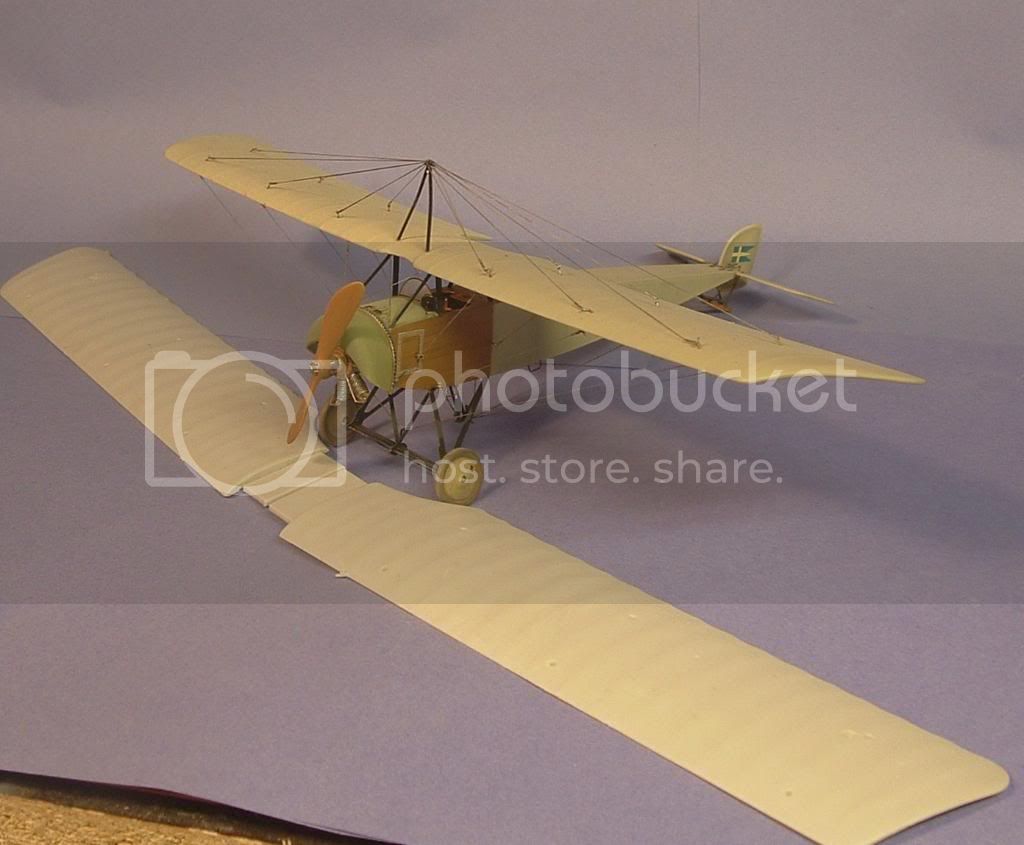
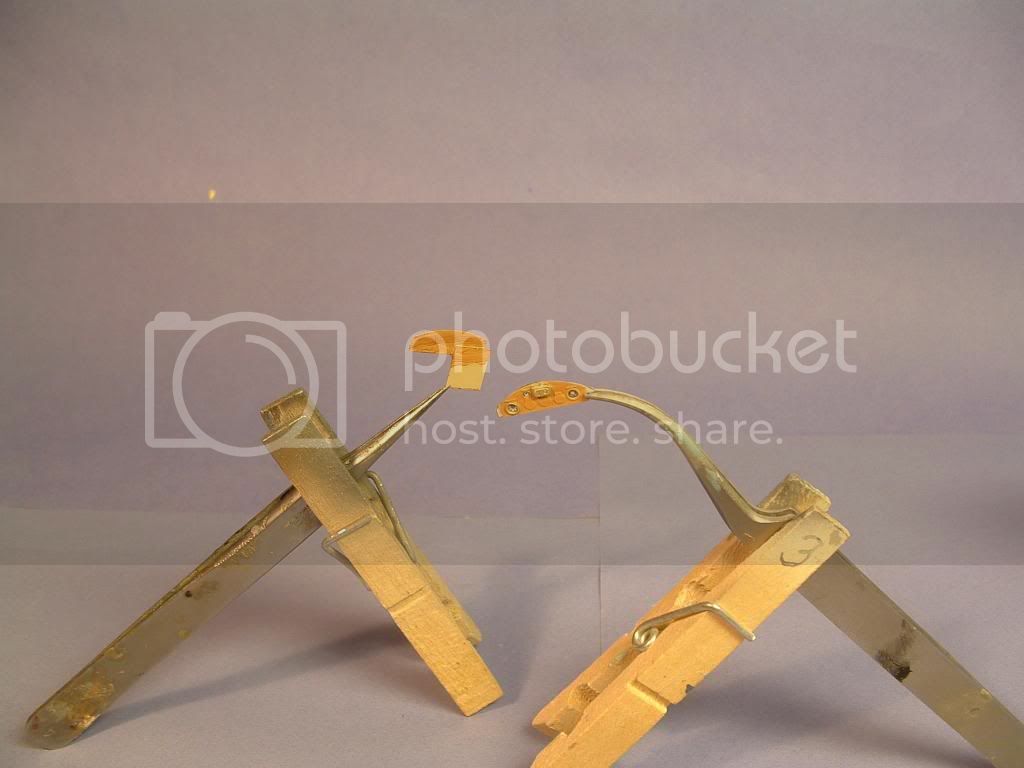
I got some lines in the frame this weekend. Also some paint got on
. I used Gold-Zack thread and heatstretched Q-tips for the wires in the frame, these are not painted yet.The gastank got it´s first coat off paint.
Larsa
Alberta, Canada
Joined: January 19, 2008
KitMaker: 6,743 posts
AeroScale: 6,151 posts
Posted: Sunday, February 21, 2010 - 02:05 AM UTC
Excellent Lar's ! Long live the q-tip !
Östergötland, Sweden
Joined: April 04, 2006
KitMaker: 1,058 posts
AeroScale: 1,004 posts
Posted: Sunday, February 21, 2010 - 07:48 AM UTC
Thessaloniki, Greece / Ελλάδα
Joined: April 15, 2008
KitMaker: 90 posts
AeroScale: 89 posts
Posted: Sunday, February 21, 2010 - 11:08 AM UTC
Excellent work Larsa, I will watch very carefully and I have it as a reference for my F33.
Keep up the good job my friend.
Dimitris.
http://www.facebook.com/pages/Agioplanes/353328611448659
Milano, Italy
Joined: November 30, 2007
KitMaker: 642 posts
AeroScale: 382 posts
Posted: Sunday, February 21, 2010 - 08:54 PM UTC
Hi Lars!
very good job indeed!
how do you fix the rigging to the poles? Do you drill through them?
ciao
Östergötland, Sweden
Joined: April 04, 2006
KitMaker: 1,058 posts
AeroScale: 1,004 posts
Posted: Monday, February 22, 2010 - 05:12 AM UTC
Hi Edoardo
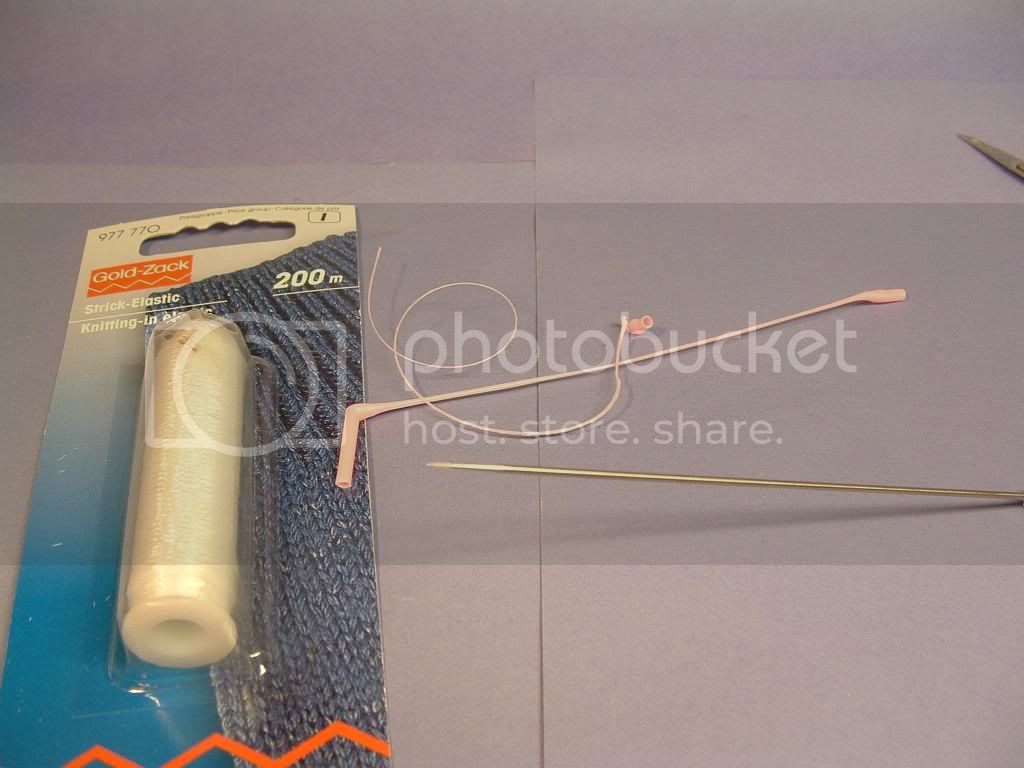
I construct the frame from 030-030 evergreen strips. I used superglue and an activator. The strips was just too thin to drill throw, I did test that and the strips did break instantly, so I putted a tiny drop of superglue at each corner on the frames outside and stretched the Gold-Zack thread with the tiny Q-tip tube sliding free on the thread. When the glue was set I just cut of the excess thread with the hobbyknife. Finally the Q-tip tube was slide in position and glued in place.
Larsa
Texas, United States
Joined: February 01, 2007
KitMaker: 365 posts
AeroScale: 356 posts
Posted: Monday, February 22, 2010 - 09:41 AM UTC
Lars,
Beautiful work my friend.Your airframe is outstanding.This is going to be one great project,looking forward to your next update.
One question though,How many Q-tips gave their all for this project to date? Maybe we all need to conceder a mass buy of Q-tips.
Regards,
Gregory Jouette
Who's still climbing a steep learning curve on this whole Q-tip thing.
Milano, Italy
Joined: November 30, 2007
KitMaker: 642 posts
AeroScale: 382 posts
Posted: Monday, February 22, 2010 - 08:47 PM UTC
Hi Lars!
Thank you for the tip on the Q-tip !
Yes, the learning curve is steep indeed... for me the most difficult part is to strech the Q-tip evenly and, also, doing it consistently...
This is the main reason why I am now experimenting with brass micro-pipes...
ciao
Edo
Östergötland, Sweden
Joined: April 04, 2006
KitMaker: 1,058 posts
AeroScale: 1,004 posts
Posted: Saturday, February 27, 2010 - 06:22 AM UTC
Hi
Yes Edo working with Q-tips has its problem, no space age technology, but a low-priced and the Q-tips are easy to get more off. I´m Just coming home from the supermarket with a new stash. 300 p of Tips and 600 meter of new Gold-Zack thread.
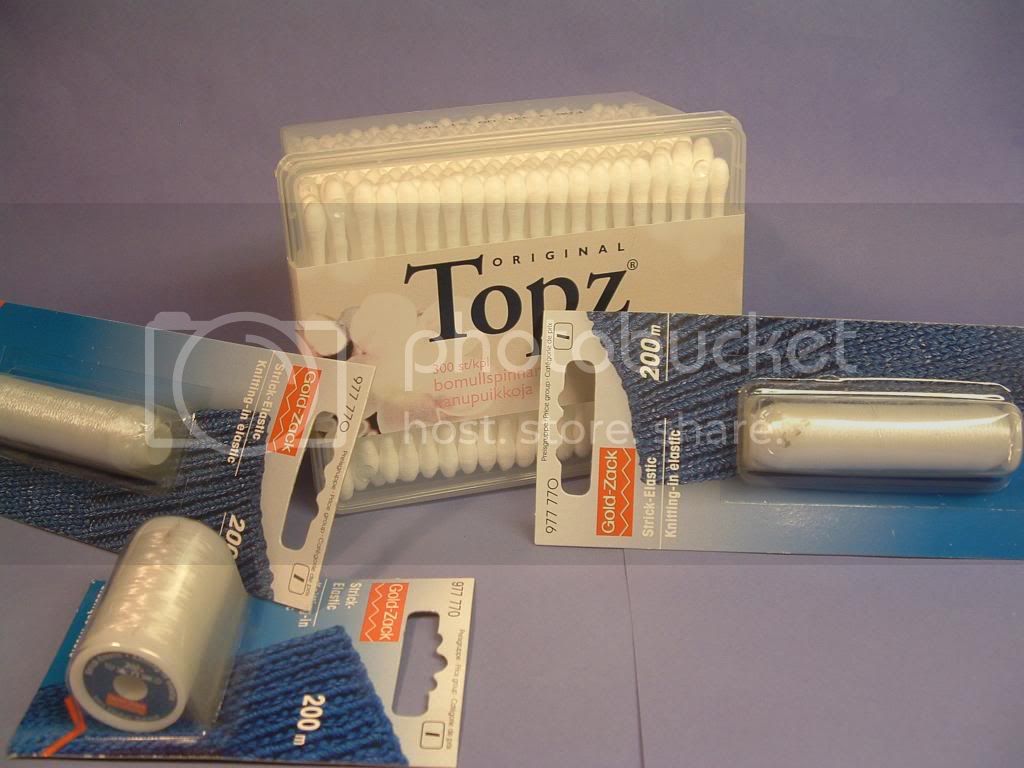
The thing is to pick the bits from the heatstreched tube that is of the same diameter as you want and use an old airbrush needle to get them tubish after heating.
Stephen have his own thread around here saying the Beauty is in the detail. For me there´s never so-I always tell people that the Devil is in the details. So for the moment I´m just putting the paint on the frame and watching it dry. The Devil rules I guess.
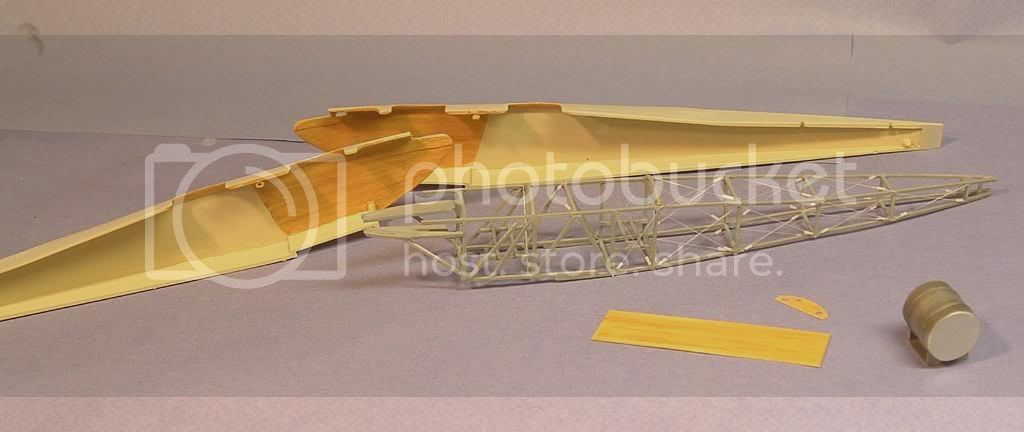
Just the first coat of paint on the seats. After airbrushing I noticed that they need some mor sanding on the edges. I used Magic sculp for the cusions.

The instrumentpanels is just graine dup with some oils and the forward one having it´s first details.
Hey Who looks on when the paint dryes, not me I have more to do
Larsa
Colorado, United States
Joined: January 25, 2004
KitMaker: 11,669 posts
AeroScale: 11,011 posts
Posted: Saturday, February 27, 2010 - 10:06 AM UTC
Larsa it looks like the 1:48 side of my desk I have similar pile of 1:32 kits at the other end.
". . .The most important thing is to know why you build and then get the most that you can out of building." via D.D.
United Kingdom
Joined: February 26, 2010
KitMaker: 74 posts
AeroScale: 71 posts
Posted: Saturday, February 27, 2010 - 11:00 AM UTC
Hi Larsa,I've been hungrly watching your progress,as i have a kit and Part etched bits on the way,looking forward to learning more,
Great stuff!
England - East Anglia, United Kingdom
Joined: November 16, 2009
KitMaker: 79 posts
AeroScale: 75 posts
Posted: Saturday, February 27, 2010 - 11:58 AM UTC
That is looking fantastic, Lars, can't wait to see you get around to the outer part of the aircraft, if this is how good you do the inside.
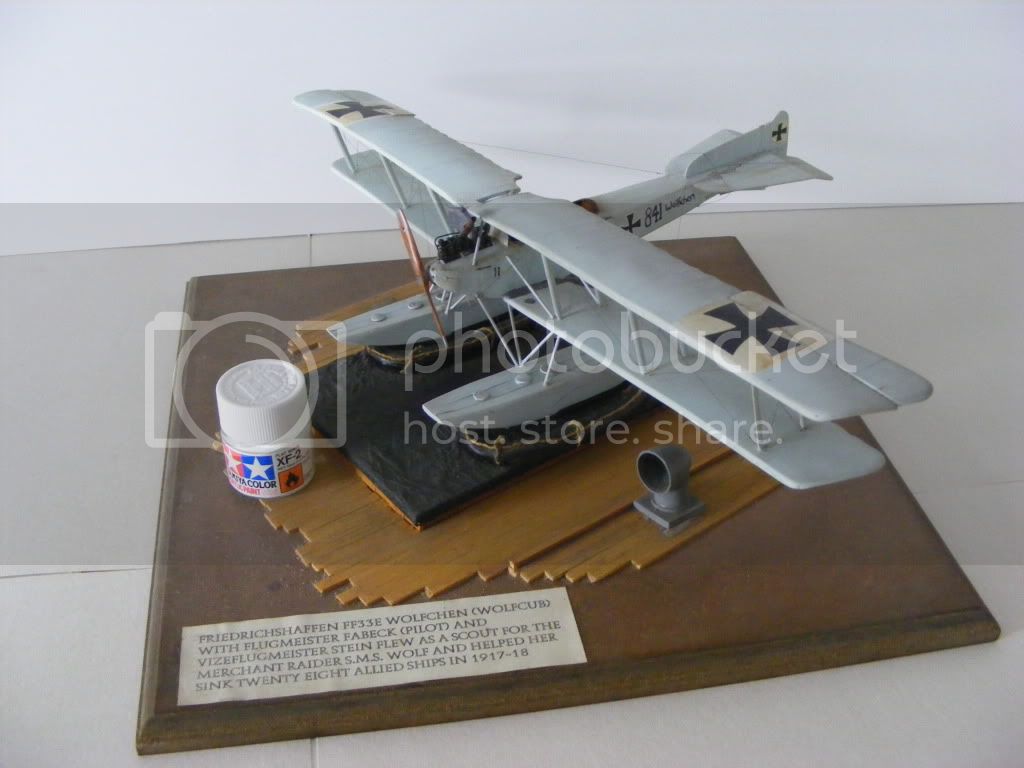
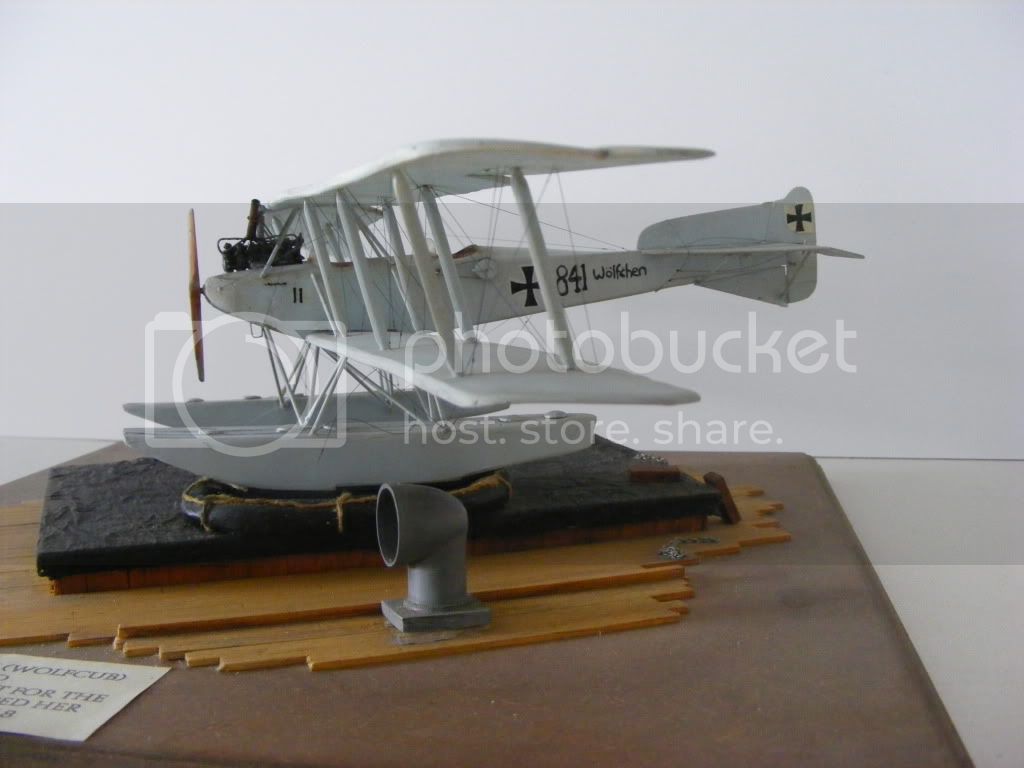
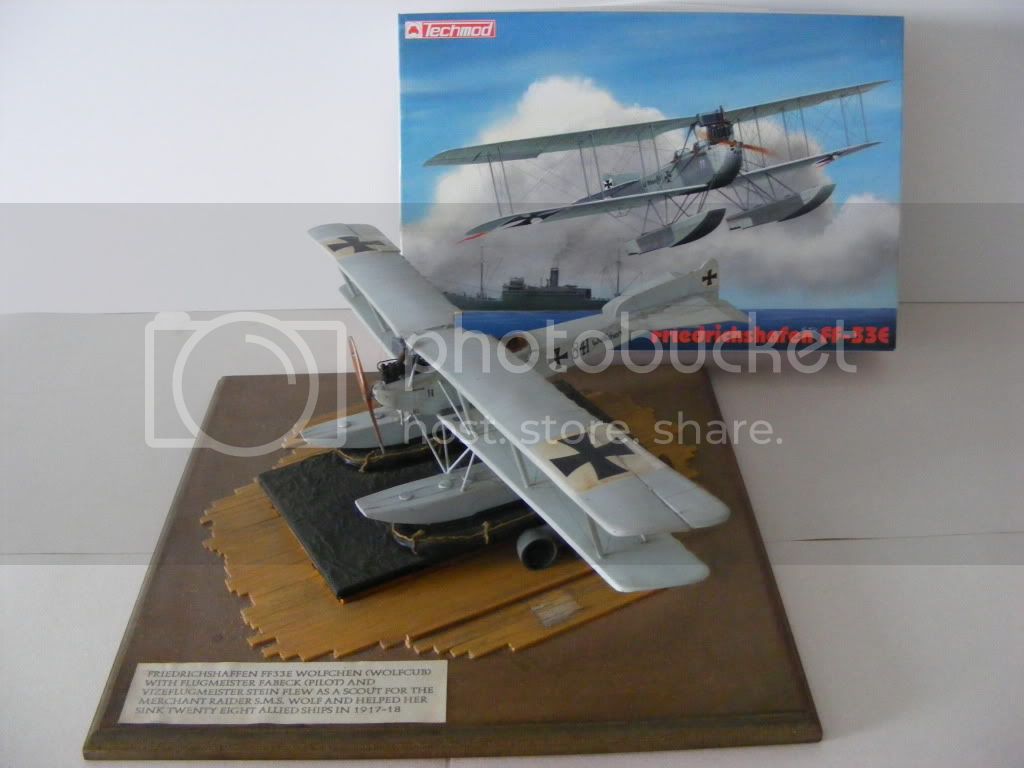
This is a few photos of my Wolfcub which i built a few years back, this was my first scratched built model, its mostly plastic card, metal engine, and brassrod for the float struts, its looking a little sad these days, its been dropped , knocked and some of the rigging has broke, may need a make over.
Alberta, Canada
Joined: January 19, 2008
KitMaker: 6,743 posts
AeroScale: 6,151 posts
Posted: Saturday, February 27, 2010 - 02:06 PM UTC
Lar's well done so far ! With the amount that I have on the go I'm surprised I get anything done !