

Hosted by Rowan Baylis
P 51D campaign build

SellSword

Joined: February 15, 2010
KitMaker: 167 posts
AeroScale: 141 posts
Posted: Thursday, March 25, 2010 - 12:12 PM UTC
So, after many years of modeling other things ( tanks, Warhammer and 40K armies, and various kits ) I'm back to trying my hand at planes. I'm finding it to be very challenging and at times daunting and unforgiving, but I'm still quite motivated, not without the inspiration I've gotten from many of the builds I've checked out right here. Anyways, I've decided to build this P51-D and participate in not just one, but two campaigns with this single build. I hope to display both the Aluminium and Pin-up awards after completing this build. I'll keep you updated on my progress!

md72

#439
Joined: November 05, 2005
KitMaker: 4,950 posts
AeroScale: 3,192 posts

Posted: Thursday, March 25, 2010 - 03:07 PM UTC
Which kit?


AussieReg

#007

Joined: June 09, 2009
KitMaker: 8,156 posts
AeroScale: 3,756 posts
Posted: Thursday, March 25, 2010 - 03:15 PM UTC
Quoted Text
Anyways, I've decided to build this P51-D and participate in not just one, but two campaigns with this single build. I hope to display both the Aluminium and Pin-up awards after completing this build. I'll keep you updated on my progress!
Welcome back to the wonderful world of Wingy-Thingy's Ray, you'll get a lot of help from the guys here. Unfortunately you can only enter your P-51 in one campaign (I aksed about that a while back), so you only have one choice, BUILD 2 !!!

I'm looking forward to seeing your progress, and as Campaign Leader of the Aluminium Campaign, I think you should enter this build there. There's only about a month to go, and then you can make Justin (Keeperofsouls2099) happy and enter a build for his Pin-Ups Campaign.
Cheers, D


thegirl

Joined: January 19, 2008
KitMaker: 6,743 posts
AeroScale: 6,151 posts
Posted: Thursday, March 25, 2010 - 04:09 PM UTC
Hi Ray
Nice to see you full of ambition and diving right in , but I'm affaird Damian is correct . You can't enter one build for two campaign's . The P-51 campaign doesn't start until June 1 / 10 so you have Lot's of time to be able to do another one . There are many other campign's on which Damian has point out . Have a peek you won't be dissapointed .
Would like to see you keep up with this build though , kinda like a warm up for the big one !
SellSword
Joined: February 15, 2010
KitMaker: 167 posts
AeroScale: 141 posts
Posted: Thursday, March 25, 2010 - 10:09 PM UTC
Ahhhh! Well that's okay... I actually think it may be a blessing in disguise that I can only have a single campaign. My original intent was to recreate a bird called "Glamorous Gal", a vintage P51-D that I've found several pictures of on the net... The kit I'm working on is Testors' 1/48, and although I can't really complain because I got it for 5$, it really does lack some detail. So, the new plan will be to build this OOB and concentrate on the NMF and earn my aluminium award, and then I'll use what I learn from this build on a better kit ( any suggestions, maybe even a 1/32) to build a custom "Gal" . Sound like a plan?
Thanks for the input!
Thanks for the input!
SellSword
Joined: February 15, 2010
KitMaker: 167 posts
AeroScale: 141 posts
Posted: Saturday, March 27, 2010 - 12:12 PM UTC
okay, so I read the thread about "reading" the seam, and I have to say it was exactly what I needed! So I've been using what I learned, although I modified the part about misting the seam with a light paint... for some reason I can discern the flaws in my joins much easier if I use a darker paint. But this build is moving along nicely, as I said before, since this isn't the most precise kit, I'm going to be concentrating more on the finish than on things like cockpit accuracy, I found a decal set for a plane named Man O' War at my local Hobbytown, so that's what it's going to be.
md72
#439
Joined: November 05, 2005
KitMaker: 4,950 posts
AeroScale: 3,192 posts
Posted: Saturday, March 27, 2010 - 04:42 PM UTC
Looking good.
I'm thinking of building this kit for the P-51 Heaven Campaign. So please share any tricky points you find.
When reading the seams, I use a Testors silver paint pen, it shows flaws mercilessly and it's easy to apply and clean up.
I'm thinking of building this kit for the P-51 Heaven Campaign. So please share any tricky points you find.
When reading the seams, I use a Testors silver paint pen, it shows flaws mercilessly and it's easy to apply and clean up.
SellSword
Joined: February 15, 2010
KitMaker: 167 posts
AeroScale: 141 posts
Posted: Sunday, March 28, 2010 - 01:41 AM UTC
Thanks Mark! Are you planning on using the Testors kit? Because if you're looking for an accurate kit, this is not the one to go for! I'm going to look at some other kit for my next Mustang for sure, but this is a perfect kit for me to get some practice on because it was such a cheapy! I built planes back when I was a little kid up until about middle school, but most of my modeling skills come from painting and modding mini armies for WH and WH40k, I did some armor models while I was in the army and actually drove M1A1s! It's awesome to get your references up close and personal! But anyhoo, I built a Corsair kit OOB a few weeks ago, and now I'm hooked again! I went to an IPMS show last week, and now I have a stack of styrene treasures!
SellSword
Joined: February 15, 2010
KitMaker: 167 posts
AeroScale: 141 posts
Posted: Sunday, March 28, 2010 - 02:09 AM UTC

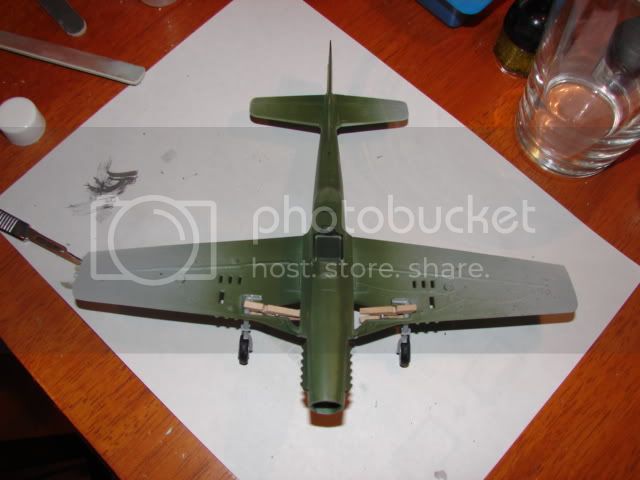
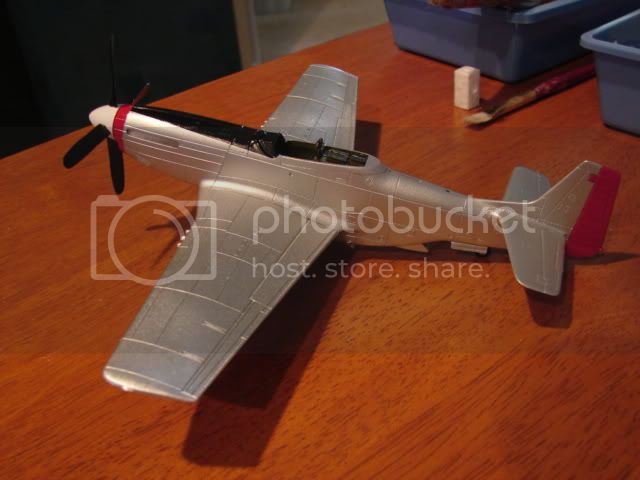
okay, so the fsulage joins were kind of a pain, and in the future I will take a lot more care in getting those seams lined up better, the belly was much easier to fix than the upper nose. One thing I notice that helped me out is that the panel lines on the fuselage are scribed, and I think its easier to rescribe than to restore raised panel lines. Although for another strange reason the lines on the wings are raised, and since the underwing stores in this kit are absolutely horrible and I wont be installing them, I will need to fill some holes and ad some missing panel line in one segment.
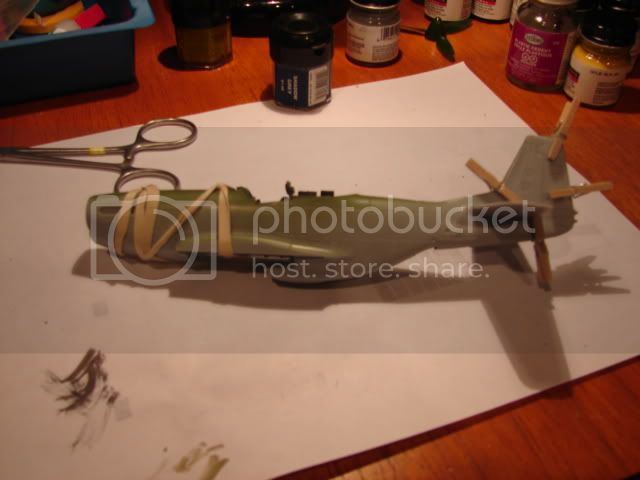
Okay, so the landing gear is in, and I've place the upper portion of the wings, mini clothes pins are my friend! and I'm using the rubber bands to lever the wings so I get a nice tight join at the wing roots. I really hate the joins at the wing and stabilizer roots! If anyone has any tips on these tough spots I'd love to hear them. This build kit has wonderful wing roots though! The stabilizer joins absolutely suck though!!! HA HA! I'm really learning as I progress though! and all-in-all really enjoying getting back into planes!
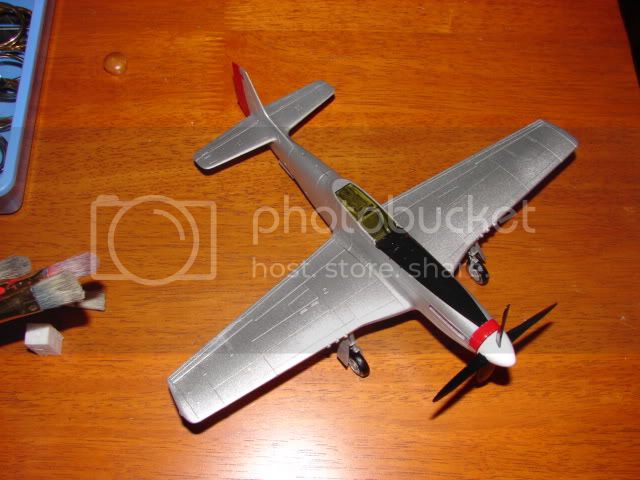
Not to hijack my own thread, but here's also a couple shots of the Corsair I built, be kind! It's my first aircraft in over 20 years!


ShawnM
Joined: November 24, 2008
KitMaker: 564 posts
AeroScale: 510 posts

Posted: Monday, March 29, 2010 - 08:06 AM UTC
weather the markings to match, it look the part
md72
#439
Joined: November 05, 2005
KitMaker: 4,950 posts
AeroScale: 3,192 posts
Posted: Monday, March 29, 2010 - 08:41 AM UTC
I picked the Testors first of all because I already have it in the stash. I want to try a NMF finish so, if it gets round filed, no great financial loss. The only other P-51's in the stash are a half started Arii/ Otaki 1/48 P-51D and a Model News 1/72 NA-73 that may take a lot of effort to be buildable.
SellSword
Joined: February 15, 2010
KitMaker: 167 posts
AeroScale: 141 posts
Posted: Monday, March 29, 2010 - 10:48 AM UTC
You're right Shawn! duh!!! It looks like it been beat to hell and then had brand new insignias painted! See, I told you guys I'm learning!
I think this kit is perfect for what we have planned for it! just concentrating on the NMF...
Good luck with your build Mark, and let me check out how it goes!
I think this kit is perfect for what we have planned for it! just concentrating on the NMF...
Good luck with your build Mark, and let me check out how it goes!
AussieReg
#007
Joined: June 09, 2009
KitMaker: 8,156 posts
AeroScale: 3,756 posts
Posted: Monday, March 29, 2010 - 01:11 PM UTC
Quoted Text
You're right Shawn! duh!!! It looks like it been beat to hell and then had brand new insignias painted! See, I told you guys I'm learning!
I think this kit is perfect for what we have planned for it! just concentrating on the NMF...
Good luck with your build Mark, and let me check out how it goes!
While you're at it, smash the props around a bit !!
Otherwise it looks great.
Cheers, D
md72
#439
Joined: November 05, 2005
KitMaker: 4,950 posts
AeroScale: 3,192 posts
Posted: Monday, March 29, 2010 - 01:59 PM UTC
Quoted Text
While you're at it, smash the props around a bit !!
Whoa, Damien, it's not a jet, it's supposed to have a prop.

Now if by smashing, you mean adding some 'chipped' paint and sand blasting on the blades, then we're probably in sync...
SellSword
Joined: February 15, 2010
KitMaker: 167 posts
AeroScale: 141 posts
Posted: Monday, March 29, 2010 - 02:07 PM UTC
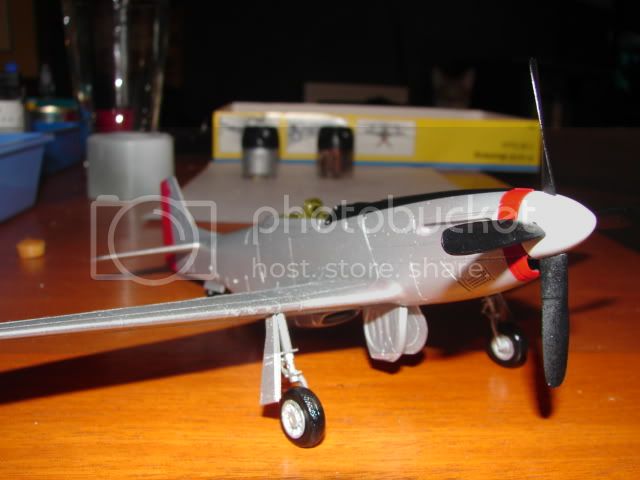
i get what he's saying though... the props look a bit pristine for a battered bird... I think it's because I approached the build in sub assemblies, and didnt weather the plane as a whole subject... prolly a bit of silver dry brush along the leading edges should do the trick... I'm gonna hit the thread about weathering when I get the 51 done...
AussieReg
#007
Joined: June 09, 2009
KitMaker: 8,156 posts
AeroScale: 3,756 posts
Posted: Tuesday, March 30, 2010 - 12:20 AM UTC
Quoted Text
i get what he's saying though... the props look a bit pristine for a battered bird... ... prolly a bit of silver dry brush along the leading edges should do the trick...
SellSword
Joined: February 15, 2010
KitMaker: 167 posts
AeroScale: 141 posts
Posted: Monday, April 05, 2010 - 12:24 PM UTC
Hi guys! Quick update for ya... Hope you all had a nice holiday! Anyhoo, with the weekend spent with the family and hurling season impending, I haven't had a lot of time to work on my mustang... but I'm back at it! I discover yet another noob mistake I made  and Mark if you're going to leave off the drop tanks and rocket launchers here's some advice... I should have filled those damned holes under the wings before I even put them together!!! It's a real pain in the butt getting these fixed now, I probably could have done it in half the time... Oh well! Lesson learned for my next build...
and Mark if you're going to leave off the drop tanks and rocket launchers here's some advice... I should have filled those damned holes under the wings before I even put them together!!! It's a real pain in the butt getting these fixed now, I probably could have done it in half the time... Oh well! Lesson learned for my next build...md72
#439
Joined: November 05, 2005
KitMaker: 4,950 posts
AeroScale: 3,192 posts
Posted: Monday, April 05, 2010 - 04:21 PM UTC
Bummer. Looks like the drop tanks are the big problem I've filled square holes with lengths of strip stock with some success before. Rod stock should be an easy fix for the rocket launchers. 
SellSword
Joined: February 15, 2010
KitMaker: 167 posts
AeroScale: 141 posts
Posted: Thursday, April 08, 2010 - 02:01 PM UTC
In a few simple words... I'm an idiot!!! HaHa!  After many years of painting minis and building a few larger models for my armies I considered myself a somewhat accomplished "modeler"... Well I must admit that what I truly am is a really great "painter" of models! I squeezed a bit of gel CA into the holes, let it harden, and then killed myself trying to achieve a smooth surface!!! I am learning the HARD WAY!!! Good thing my first models are some real cheap o's!!! But, what the hell!!! Ya know what? I'm having a blast getting into planes! I'm reading books and magazines, I'm surfing the net like a fiend for reference pics, I'm learning more about history, and I've even made some new friends! So, if my mustang isn't gonna be displayed at a museum that's fine with me, but you better believe my next one's gonna be awesome! ( or maybe like my fifth one will be really cool...)
After many years of painting minis and building a few larger models for my armies I considered myself a somewhat accomplished "modeler"... Well I must admit that what I truly am is a really great "painter" of models! I squeezed a bit of gel CA into the holes, let it harden, and then killed myself trying to achieve a smooth surface!!! I am learning the HARD WAY!!! Good thing my first models are some real cheap o's!!! But, what the hell!!! Ya know what? I'm having a blast getting into planes! I'm reading books and magazines, I'm surfing the net like a fiend for reference pics, I'm learning more about history, and I've even made some new friends! So, if my mustang isn't gonna be displayed at a museum that's fine with me, but you better believe my next one's gonna be awesome! ( or maybe like my fifth one will be really cool...)md72
#439
Joined: November 05, 2005
KitMaker: 4,950 posts
AeroScale: 3,192 posts
Posted: Thursday, April 08, 2010 - 04:13 PM UTC
Need to sand the CA before it cures (10-60 min after application) otherwise it dries harder than a rock. I also use Mr. Surfacer 500 for a filler on small gaps. it usually sands out nicely,
SellSword
Joined: February 15, 2010
KitMaker: 167 posts
AeroScale: 141 posts
Posted: Saturday, April 10, 2010 - 06:09 AM UTC

okay, so I got the underside smoothed out, and since I want to learn to scribe, but don't quite trust myself just yet, I restored some of the panel lines I obliterated with .010 plastruct. I think it'll look just fine! Gonna fire up the airbrush in a few, and start working on that NMF!
SellSword
Joined: February 15, 2010
KitMaker: 167 posts
AeroScale: 141 posts
Posted: Monday, April 12, 2010 - 12:45 PM UTC

Soooo, the horrible hard work is mostly done, now comes the fun part, getting some paint on this bird, I think it's gonna look pretty good, and I'm looking forward to another mustang build with all the knowledge I gained off of this one!
SellSword
Joined: February 15, 2010
KitMaker: 167 posts
AeroScale: 141 posts
Posted: Friday, April 16, 2010 - 10:23 AM UTC
Hi guys, so I've got my paint on, and after all the frustration with this build so far I really think it's turning out pretty nice, I'm going to get the decals on, and give it a sludgeing, and I should definetly make the cut-off for the campaign deadline. I was worried for a bit because my 15 year old Badger finally died on me
 So my generous wife bought me a brand new Iwata Eclipse and I got myself a Ninja Jet to go along with it!!!
Don't you just love new toys!
md72
#439
Joined: November 05, 2005
KitMaker: 4,950 posts
AeroScale: 3,192 posts
Posted: Friday, April 16, 2010 - 10:58 AM UTC
Lucky guy. I'm still using the Badger 200 mywife bought me over 30 years ago, just one new tip later.
Plane's looking good too. Only a month and a half to go before I start mine for P-51 Heaven. Looks like the old Testors (Hawk?) bird can still be finished off nice.
Plane's looking good too. Only a month and a half to go before I start mine for P-51 Heaven. Looks like the old Testors (Hawk?) bird can still be finished off nice.
SellSword
Joined: February 15, 2010
KitMaker: 167 posts
AeroScale: 141 posts
Posted: Saturday, April 17, 2010 - 04:01 AM UTC
Hey Mark! What you have to do is strike a deal... My wife told me she was going to buy me a new lawnmower, but I told her if she bought me a new air brush I'd pick up the lawnmower myself, that way she thinks she's getting a deal, when in reality she's getting me something she would have probably deemed unnecessary! Haha!
and if she ever sees this post, I'm a dead man!!! Haha!
Anyhoo... You seem to be the only one following this thread... prolly because there's not a whole lot to learn from watching me build only my 2nd bird after almost twenty years away!
but for those of you looking for some new tricks, check this out...
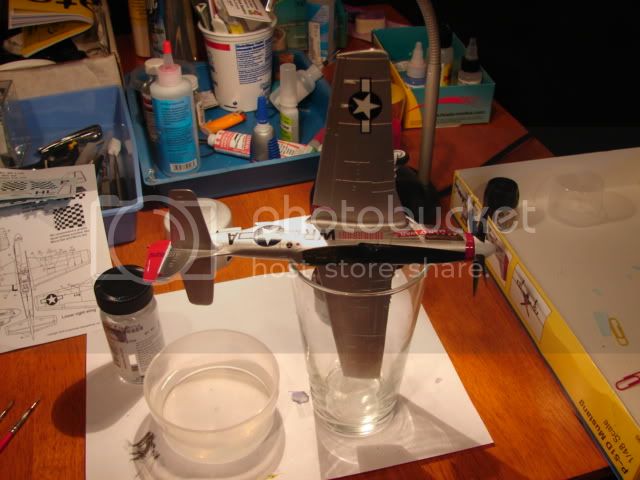
I don't know if anyone else has figured this out, and I did purely by coincidence ( I like to drink a beer or two while building ) but a pint glass makes an awesome stand for hands free work!!!
and here's a shot after all the port side decals have been placed...
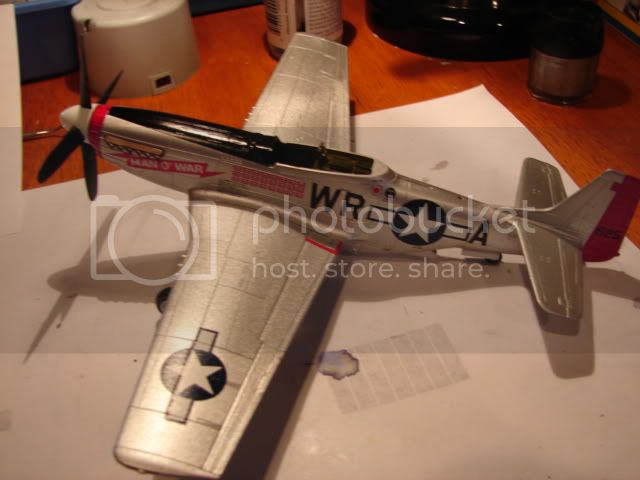
it's actually turning out way better than I expected!
and if she ever sees this post, I'm a dead man!!! Haha!
Anyhoo... You seem to be the only one following this thread... prolly because there's not a whole lot to learn from watching me build only my 2nd bird after almost twenty years away!
but for those of you looking for some new tricks, check this out...
I don't know if anyone else has figured this out, and I did purely by coincidence ( I like to drink a beer or two while building
) but a pint glass makes an awesome stand for hands free work!!!and here's a shot after all the port side decals have been placed...
it's actually turning out way better than I expected!
 |

WEB HOSTING BY


Copyright ©2021 AeroScale and Kitmaker Network, a subsidiary of Silver Star Enterprises
All Rights Reserved. Please read our Conditions of Use and Privacy Policy.
All Rights Reserved. Please read our Conditions of Use and Privacy Policy.