WNW GB 2009 - 10 SE5a & Pup robw
Auckland, New Zealand
Joined: December 09, 2005
KitMaker: 17 posts
AeroScale: 16 posts
Posted: Tuesday, April 20, 2010 - 02:28 PM UTC
Hi all
Not sure if I'm posting this correctly but I signed up to the WNW GB (possibly unwisely based on the calibre of some of the work already posted...). Anyway, I started the SE5a last year not long after the kits first came out. I have the all the other kits so far, including a couple of double-ups - whether I get to them or not remains to be seen!
Unfortunately I didn't take any in progress shots of the interior of the SE5a before buttoning it up so here it is as it stands:
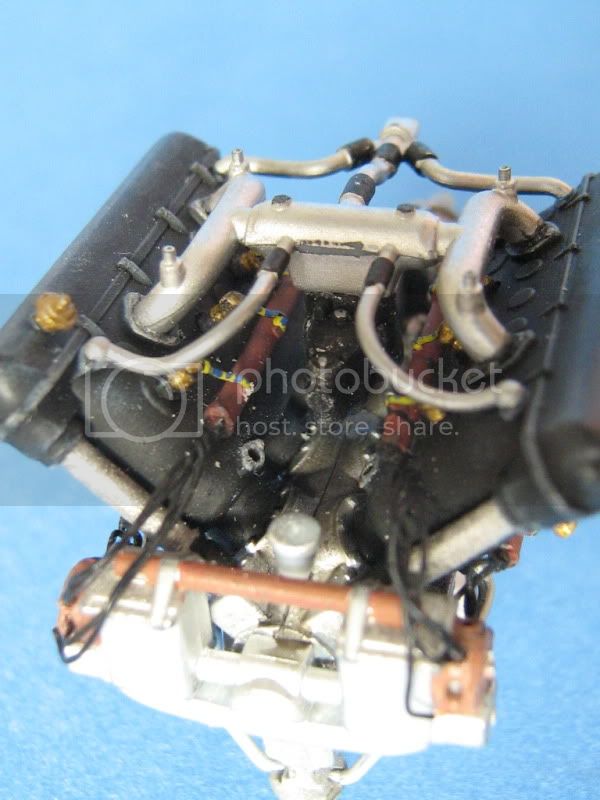
Here is the engine (it looks better from a distance - damn macro shows up all the mistakes and dust and seams and paint blobs.... douh!)

So onto the Pup - not too much to see so far - a bit of wood and the main components. The wood will receive either another coat of oil paint and/or clear/orange coats to complete:


Cheers
Rob
England - South East, United Kingdom
Joined: November 06, 2005
KitMaker: 1,667 posts
AeroScale: 1,551 posts
Posted: Tuesday, April 20, 2010 - 07:51 PM UTC
Hi there Robert, welcome to the group build of the year

We're all pretty friendly, you wont get flamed, advice help and opinions given yes but No one should or would critisise your standard of build. We all build to the best of our ability and some of the builds turned out here are truly awesome. I too felt very aprehensive of posting my work on line but you could'nt wish for a better bunch than you will find here. I do love the woodgrain, judging by that I look forward to your progress shots.
Keith
Still can't cure the AMS even with sausage finger implants & olde eyes.
Colorado, United States
Joined: January 25, 2004
KitMaker: 11,669 posts
AeroScale: 11,011 posts
Posted: Tuesday, April 20, 2010 - 08:52 PM UTC
Keith, Could not have said it better myself.
". . .The most important thing is to know why you build and then get the most that you can out of building." via D.D.
Milano, Italy
Joined: November 30, 2007
KitMaker: 642 posts
AeroScale: 382 posts
Posted: Tuesday, April 20, 2010 - 09:01 PM UTC
Hi Robert!
The engine seems very well done to me, and also the wood grain is very good!
Keep on posting!
Ciao
Edo
Alberta, Canada
Joined: January 19, 2008
KitMaker: 6,743 posts
AeroScale: 6,151 posts
Posted: Wednesday, April 21, 2010 - 02:59 AM UTC
Welcome to the GB Robert

Have to agree with Keith . We are here to share and have fun while learning something new from the tips and encouragement from the kinder folks . So no worries on being dissed here , you won't find that .
Nice job on both kits so far , your wood effect looks great

Looking forward to more progress !
Arizona, United States
Joined: December 12, 2008
KitMaker: 1,423 posts
AeroScale: 1,319 posts
Posted: Wednesday, April 21, 2010 - 03:15 AM UTC

Hi Robert and welcome:
Yes, I too was apprehensive about joining the build, as I hadn't touched a WWI subject in over 30 years, but as mentioned, and I will echo the sentiments of all who have posted; a great bunch of folks, lots of information, encouragement, tips, pointers reference you name it is all here in an "all source fusion center".
I like the work on your engine for the SE5.a; are you planning on displaying it with the cowling off? I am looking forward to your progress as you move through the build.
Best wishes
Mark
We few, we happy few........
Auckland, New Zealand
Joined: December 09, 2005
KitMaker: 17 posts
AeroScale: 16 posts
Posted: Wednesday, April 21, 2010 - 11:56 AM UTC
Hi all
Thanks for all the comments and welcomes - most appreciated.
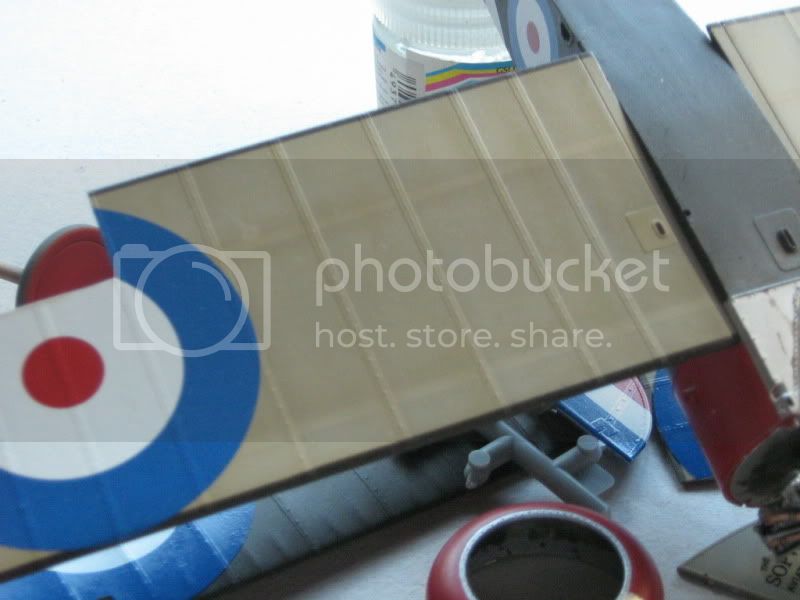
I did the wood grain using the tried and true method of spraying a base coat of Tamiya Flesh and then applying oil (I think burnt sienna) over the top. I use a rough old brush to apply the oil as evenly as possible and then use a set of very fine wide brushes to remove the excess, wiping the excess off in one stroke then cleaning the brush on a paper towel until the brush is overloaded with oil. I then change to a new clean brush and continue until i'm happy. Of course dust is a big thing - the pieces have been in a plastic container for a few days while drying but I note that the macro on my camera highlights the bits I missed. I plan to do another coat of oil on some bits (prop for that laminated look and the curved pieces of the internal framing on the pup) for contrast. Then a coat or two of clear orange and clear coat to finish.
I may make some mods to the SE5a engine as I've noticed that the spark plug leads from the magneto are one colour and then another colour from the conduit to the plug... douh! I did have to modify it originally as the outer spark plugs caught on the fuselage (the panel just below the exhaust pipe) - I thinned this immensely but still had to chop the plugs off and shorten the length of them. Of course I didn't check any of this until after I had glued the fuselage so thinning the panels was tricky...
Mark - yes I plan to display the cowl off - I've looked at it and it looks like it's hinged in the middle (centreline of the fuselage) so I considered displaying it with either side propped up (like an old style car bonnet) but haven't found any pics supporting this.
I'll be doing the doped linen this weekend so should have pics late Sunday.
Cheers
Rob
Indiana, United States
Joined: May 14, 2007
KitMaker: 3,117 posts
AeroScale: 2,270 posts
Posted: Wednesday, April 21, 2010 - 03:42 PM UTC
Welcome to the build. We are here to help you if you need it. However, it looks like you are doing fine. The engine looks fine. Eduard has a really nice PE set for this kit. One of their finest. The pup looks to be coming along also. You might want to do one thread for each build, but that is up to you. Be sure to check out the other threads of completed and inprogress WNW builds. They will give you some tips that might save you a few gray hairs. If you need help, we are only a few electrons away.
"Treat 'em Rough", Current Builds--Wingnut Rumpler
I am frequently seen with blood shot eyes from staying up past my nap time to get the right colour scheme on my latest WWI model?
Auckland, New Zealand
Joined: December 09, 2005
KitMaker: 17 posts
AeroScale: 16 posts
Posted: Saturday, April 24, 2010 - 07:38 PM UTC
Hi all
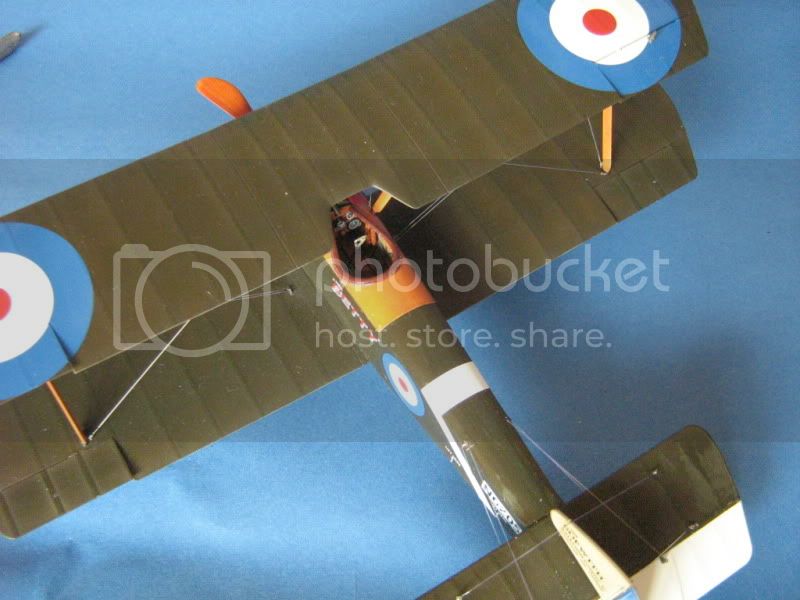
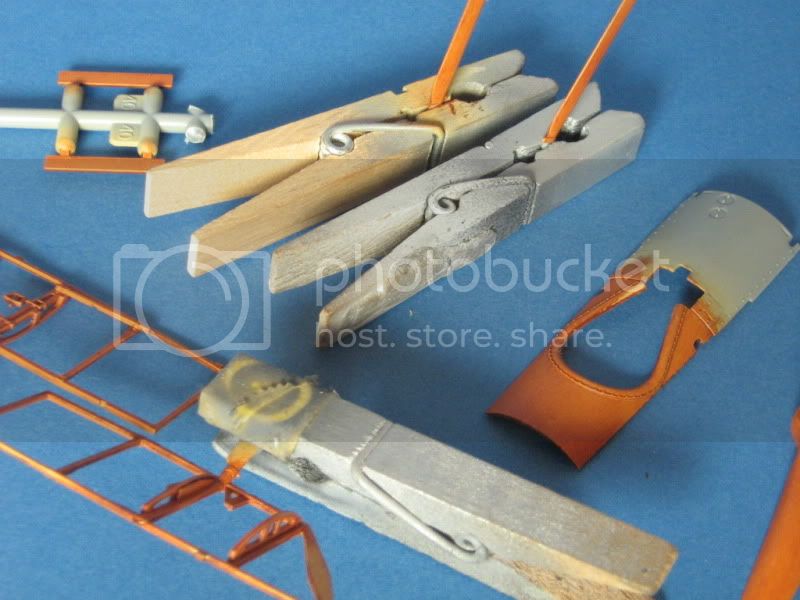
A small update on the Pup today with a few bad photos - first up some pics of the cockpit:

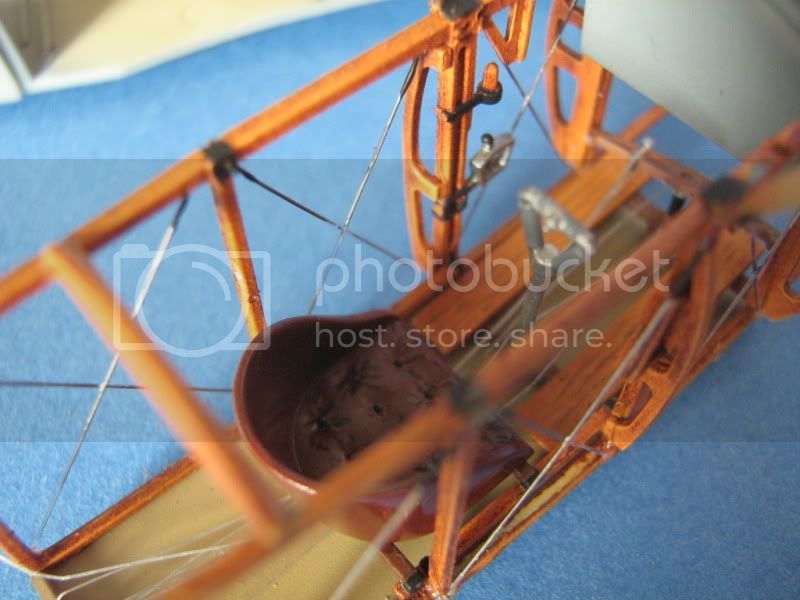
I forgot to take pics of the instrument panel and have now joined the fuselage halves. I had some issues trying to get it all to fit due to the extras I added - the bracing wires and control cables for example. I had to remove a little plastic on either side of the inside lower wing surface and the small tabs on either side that the fuselage floor sits on to make allowance for the superglue used on the cables (made from .2mm monofilament). I then decided to glue the interior assembly to the lower wing first and then attach one side of the fuselage to the wing/interior assembly, and then the other half - sorry no pics - but it's all together now and looks ok.
I have added the tank, instrument panel and seat belts prior to buttoning up the fuselage....
I also mucked around with shading of the ribs on the lower surfaces. The undersides have been painted with Gunze sail colour. Ribs and spars then shaded with a slightly darkened mix. I'll then be masking the ribs and cleaning up the edges with a light overspray of the base colour. I mix the Gunze acrylic with Mr Color acrylic lacquer thinner for this final coat - this makes the paint slightly translucent allowing a slower build up of colour. Unfortunately I won't get around to spraying this until next weekend....
And a partial family photo:

Cheers
Rob
England - South East, United Kingdom
Joined: November 06, 2005
KitMaker: 1,667 posts
AeroScale: 1,551 posts
Posted: Saturday, April 24, 2010 - 08:49 PM UTC
Lovely work...and not helping my weakening resolve against buying a pup...
Watch the fitment of the engine, its critical to getting everything in the front to line up..(I wont say how I had to butcher it to get a fit, my fault for not paying attention till too late)
.and the spark plugs...hmmm once the exhaust is on you cant hardly see them at all.
Keith
Still can't cure the AMS even with sausage finger implants & olde eyes.
Alberta, Canada
Joined: January 19, 2008
KitMaker: 6,743 posts
AeroScale: 6,151 posts
Posted: Sunday, April 25, 2010 - 01:45 AM UTC
Very nice progress on the Pup . The shading on the lower part of the wings turned out great
looking forward to seeing them with the finish coats on .
Indiana, United States
Joined: May 14, 2007
KitMaker: 3,117 posts
AeroScale: 2,270 posts
Posted: Sunday, April 25, 2010 - 01:47 AM UTC
It looks great.
I have a question for Pup experts. Is the pilots seat a bit low? It seems like the pilot would not be able to look out of the cockpit, would have his knees in his chin, his feet higher than his butt, and would have to reach up above his shoulders to hold the joystick.
"Treat 'em Rough", Current Builds--Wingnut Rumpler
I am frequently seen with blood shot eyes from staying up past my nap time to get the right colour scheme on my latest WWI model?
England - South East, United Kingdom
Joined: November 06, 2005
KitMaker: 1,667 posts
AeroScale: 1,551 posts
Posted: Sunday, April 25, 2010 - 05:54 AM UTC
Carl well spotted, something must be amiss...runs off to check the other pup posts
Still can't cure the AMS even with sausage finger implants & olde eyes.
Indiana, United States
Joined: May 14, 2007
KitMaker: 3,117 posts
AeroScale: 2,270 posts
Posted: Sunday, April 25, 2010 - 10:41 AM UTC
I checked the other posts before I posted here. I also checked the WNW site. Apparently, they all are the same. It would be interesting if somebody could superimpose a pilot figure into the seat.
Sorry about hi-jacking your thread.
"Treat 'em Rough", Current Builds--Wingnut Rumpler
I am frequently seen with blood shot eyes from staying up past my nap time to get the right colour scheme on my latest WWI model?
Auckland, New Zealand
Joined: December 09, 2005
KitMaker: 17 posts
AeroScale: 16 posts
Posted: Sunday, April 25, 2010 - 07:43 PM UTC
Hi all
Yes I spotted that as well - but looking at the reference pics of the Pup under-going restoration in the WNW instructions I couldn't quite decide - the model matches the real thing in this respect - mind you, it goes with the hugely over-size seat belts - or should I say seat blankets....
But as the kits are so gorgeous, designed in NZ, with me being a proud Kiwi and not wanting to sound like a member of another forum beginning with H who like to slam any new kit moulded outside of the US, I decided to let it go....
Cheers
Rob
England - South East, United Kingdom
Joined: November 06, 2005
KitMaker: 1,667 posts
AeroScale: 1,551 posts
Posted: Sunday, April 25, 2010 - 09:10 PM UTC
Nicely put rob, I too checked other refs and found them all the same, hopefully someone can cast light on this. But in all aspects peering down the open cockpit , it won't look amiss even if it is to low.
I look forward to coming installments of Puppiness
Still can't cure the AMS even with sausage finger implants & olde eyes.
Indiana, United States
Joined: May 14, 2007
KitMaker: 3,117 posts
AeroScale: 2,270 posts
Posted: Tuesday, April 27, 2010 - 12:58 AM UTC
Robert, I am not trying to disparage the kit. I see a few of them in my future. To me, it looks like the seat should sit a bit higher in the framework. It would probably be an easy thing to move it up in the framework. It might just be that two dimensional picture thing. But sadly, I know almost nothing about this fantastic little Pup. I was just hoping to get somebody with a bit more knowledge to set me on track. I really don't think WNW got it wrong. But my personality traits won't let me progress on a build that my engineering brain can't figure out.

"Treat 'em Rough", Current Builds--Wingnut Rumpler
I am frequently seen with blood shot eyes from staying up past my nap time to get the right colour scheme on my latest WWI model?
Auckland, New Zealand
Joined: December 09, 2005
KitMaker: 17 posts
AeroScale: 16 posts
Posted: Sunday, May 02, 2010 - 11:57 AM UTC
Hi all
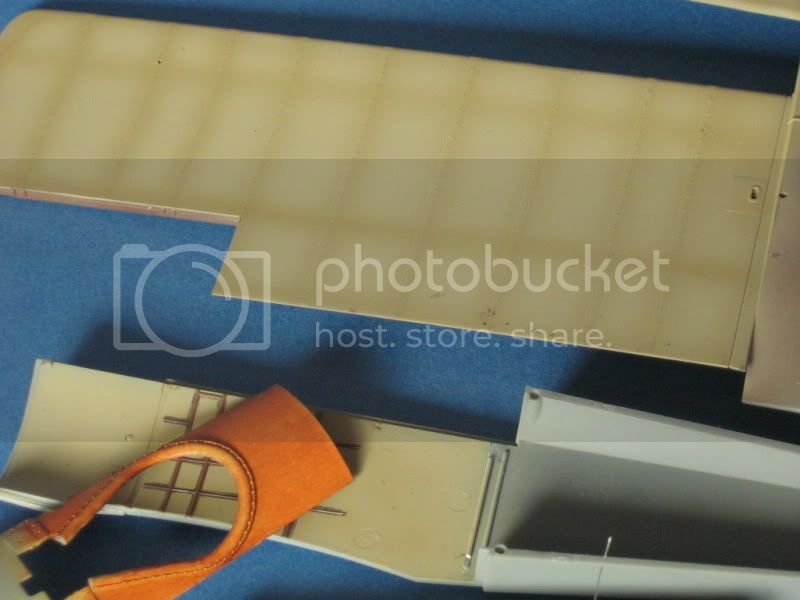
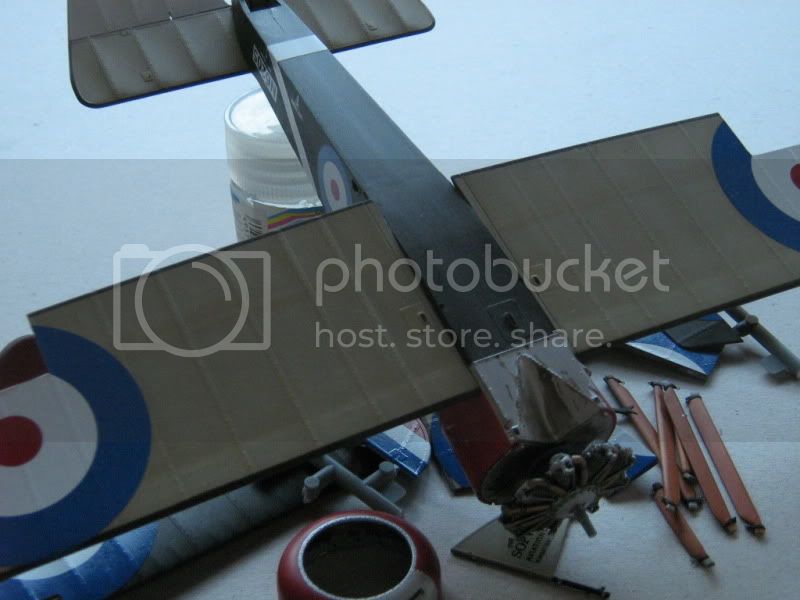
Slow progress on the Pup so far due to other committments and unfortunately some rubbish pics. I'm not entirely happy with the finish of the underside of the wing so have decided to mask and highlight the rib structure. So after a few nights of squinting at the rib tapes and 1mm wide strips of masking tape, I'm ready to highlight with a very thin mix of Tamiya XF-19 grey:
And yes I got a bit heavy handed with the filler on the lower seam - my own fault as I wasn't concentrating when joining the fuselage halves!
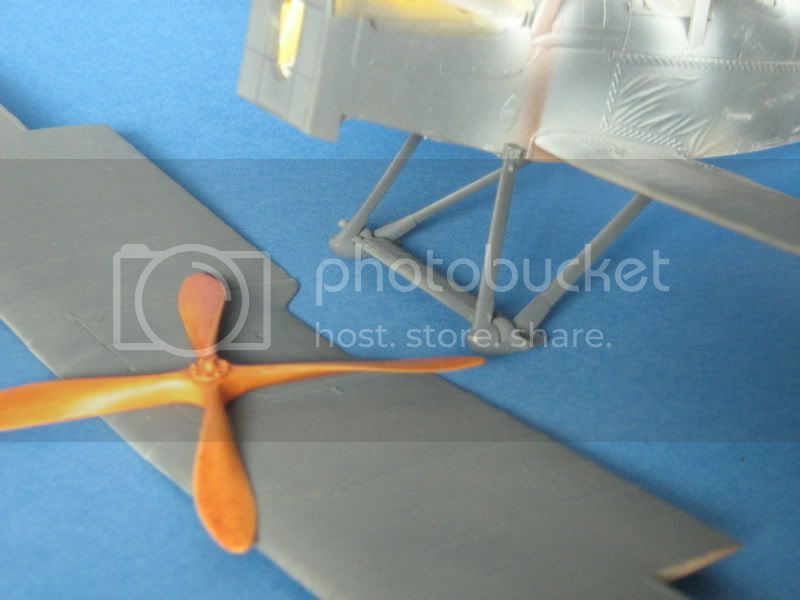
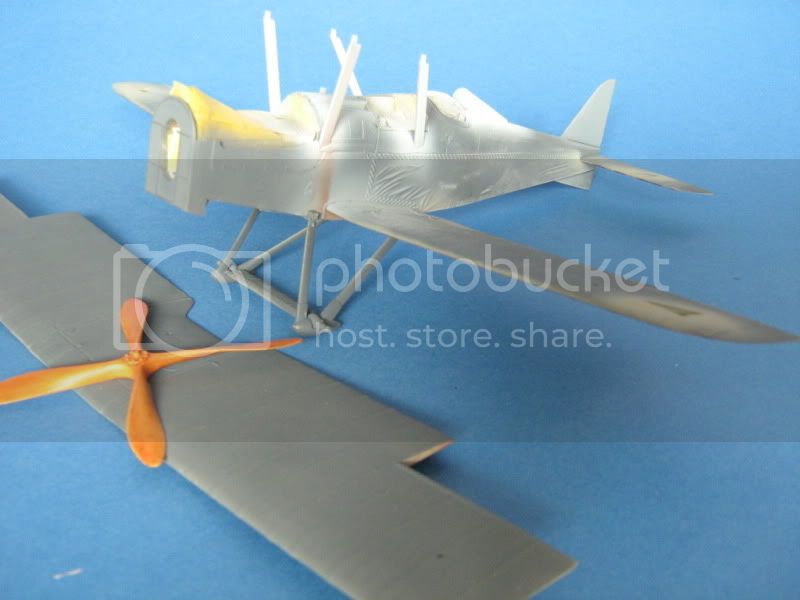
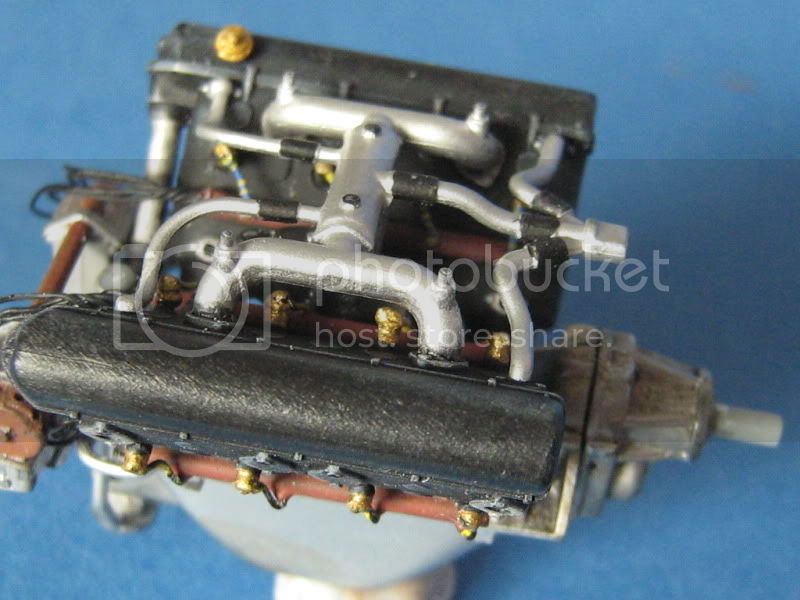
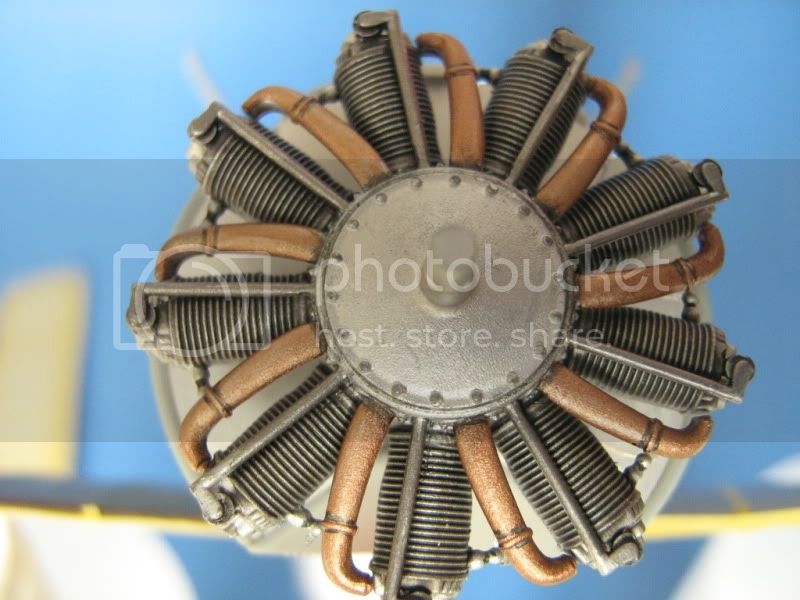
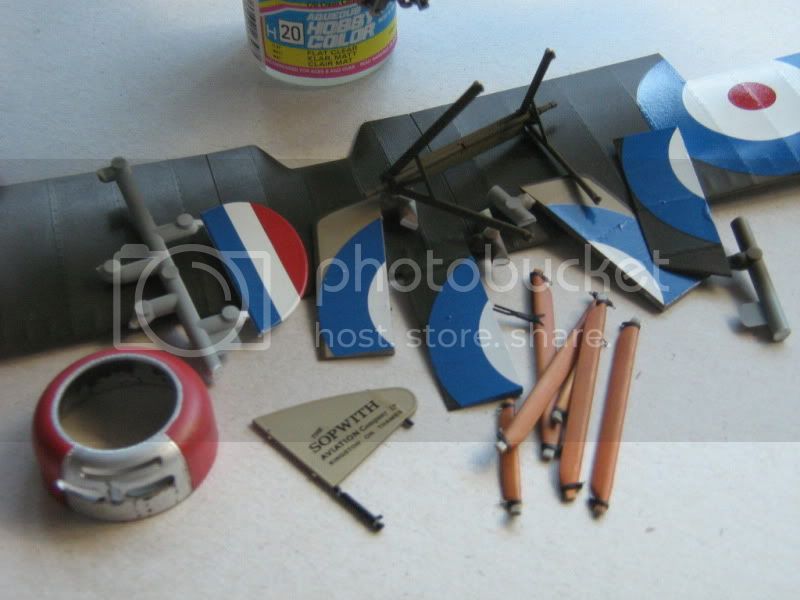
I also spent some time pottering with the engine. I've added the ignition leads but wasn't entirely happy with the result - and of course didn't photograph them... I'll tackle that during the week along with the machine gun and a few other bits that are to be added (prop, wheels, etc). Painted with Model Master Aluminium Plate, hand painted copper and highlights, wash with Citadel Badal Black and a touch of Devlan Mud, pushrod tubes with Games Workshop Chainmail and dry brushing with Games Workshop Boltgun Metal- gotta love those crazy gamer guys and their paints .... Still want to highlight the bolt heads on the front cover and give the engine and bulkhead a light weathering with a the airbrush.
Here is the front of the engine and test fitting into the cowel:
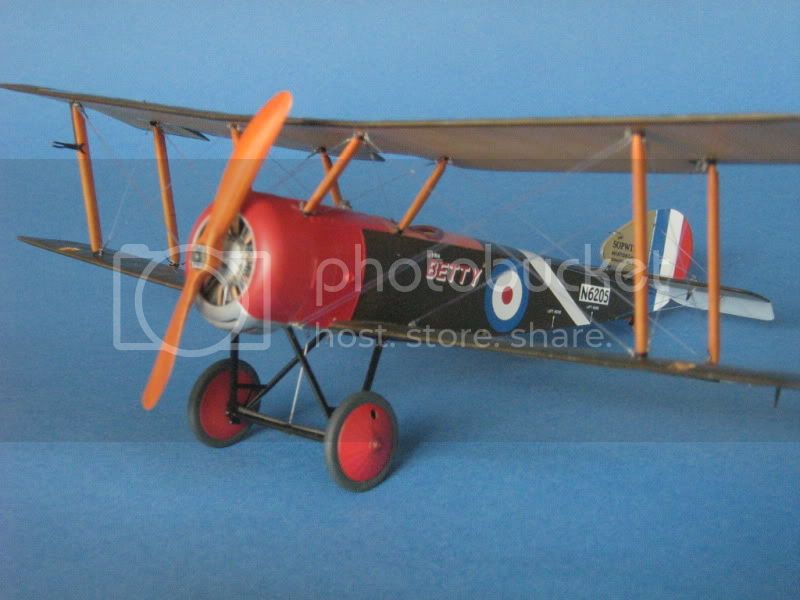
Out of interest I'm doing the 'Betty' scheme - as my wifes middle name is Betty.... - the white cowel is a base coat for the red to follow.
Cheers
Rob
Alberta, Canada
Joined: January 19, 2008
KitMaker: 6,743 posts
AeroScale: 6,151 posts
Posted: Monday, May 03, 2010 - 02:26 AM UTC
Looking good so far Rob ! Your project is coming along very nicely .
Auckland, New Zealand
Joined: December 09, 2005
KitMaker: 17 posts
AeroScale: 16 posts
Posted: Tuesday, July 27, 2010 - 12:28 AM UTC
Hi all
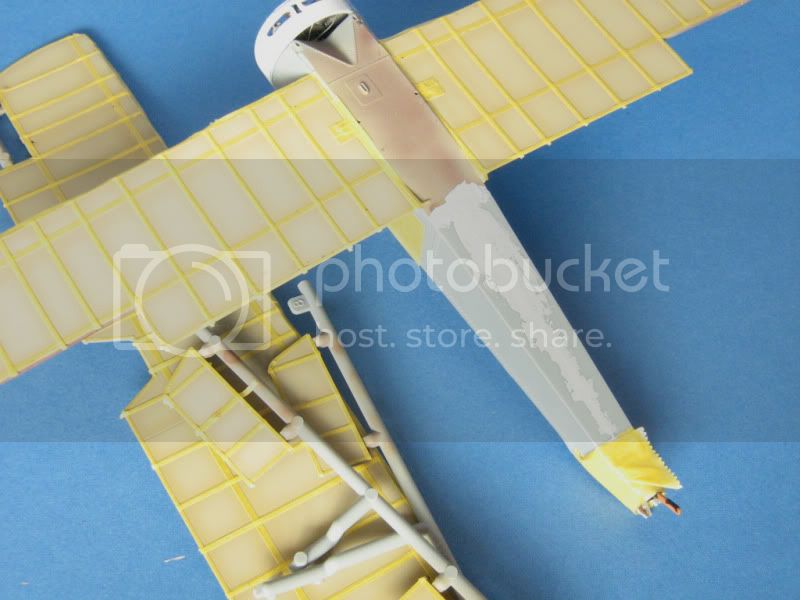
Well finally got off my butt and completed the underside shading and the upper colouring and shading - not entirely happy with the result as the colour looks a bit green - shown up very below in the pics taken with the flash. However I'm pressing on as I can't bring myself to re-mask and re-paint - I'm hoping that final matt coats and some filters will lighten the colour and 'brown' it up a wee bit.
Apologies for the pics - my billy-basic digi camera can't alter the depth of field....
First up the Pup - the engine weathering looks terrible this close up....

And the green under the harsh flash...
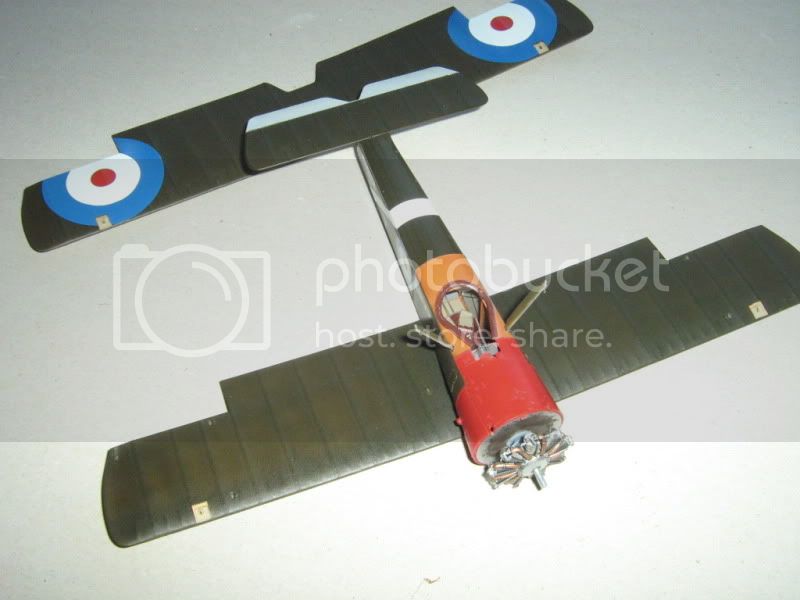
And some underside detail:
And some of the bits:
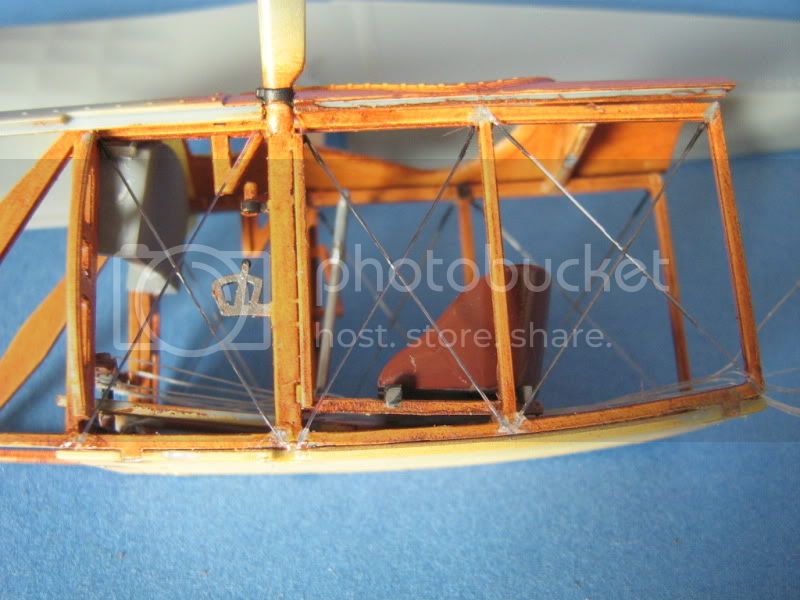
Next a few pics of a very green SE5a under flash:

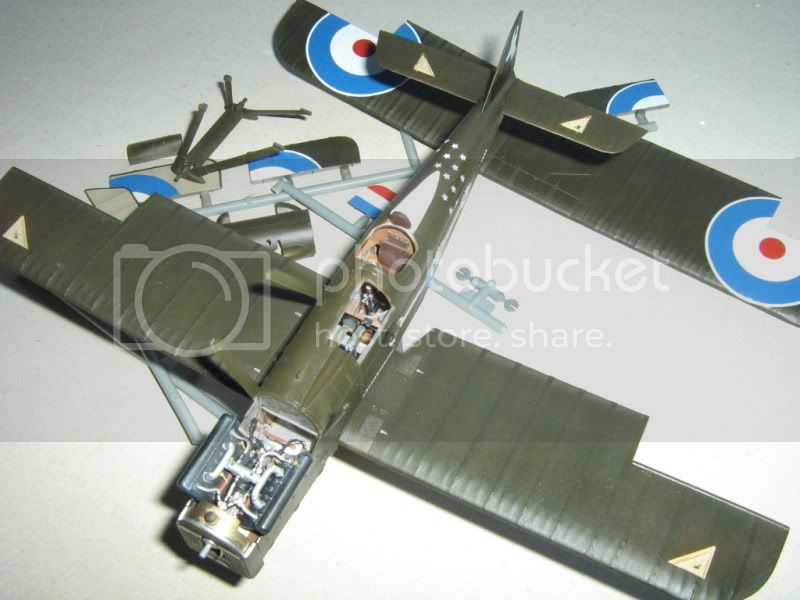
Better without the flash, but still too green...
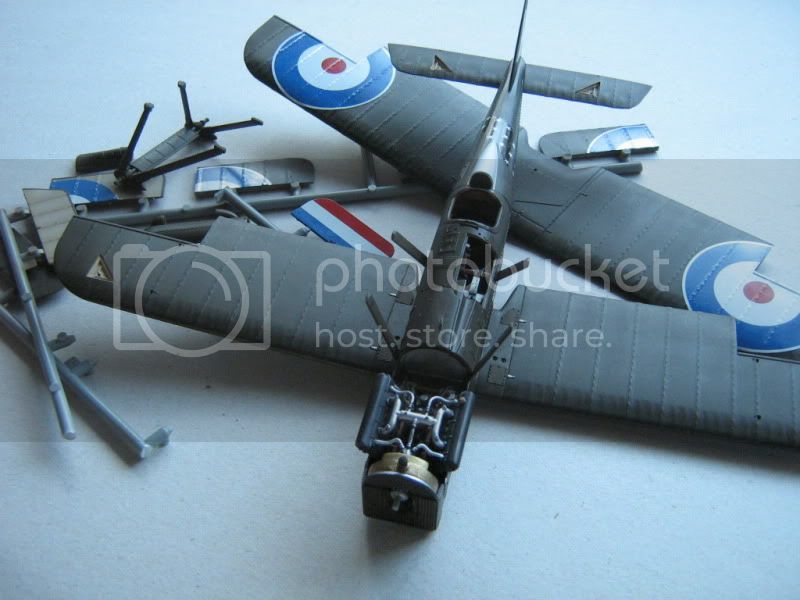
I've made a little more progress since the pics - masked and sprayed the tyres, and made lots of tiny wire ringlets for the rigging - which should be interesting. I'll put a matt coat on both this weekend as I've finished the decals and a little bit of shading on the rib detail that the decals have covered.
Cheers
Rob
Arizona, United States
Joined: December 12, 2008
KitMaker: 1,423 posts
AeroScale: 1,319 posts
Posted: Tuesday, July 27, 2010 - 02:38 AM UTC
Hi Rob:
Looking good so far. I am not sure about the too green appearance, apparently you can't be too dogmatic about PC10. Mine turned out a bit too brown for my tastes, but I am happy with it.
Looking forward to more pictures.
Take care
Mark
We few, we happy few........
Alberta, Canada
Joined: January 19, 2008
KitMaker: 6,743 posts
AeroScale: 6,151 posts
Posted: Wednesday, July 28, 2010 - 06:08 AM UTC
Both projects are coming along very nicely . Nothing wrong with your shade of PC 10 . I like it . It is one colour which is hard to produce and many different opinions on what it should or shouldn't be . As long as you are happy with it thats all that counts !
Looking forward to your next up-date
Auckland, New Zealand
Joined: December 09, 2005
KitMaker: 17 posts
AeroScale: 16 posts
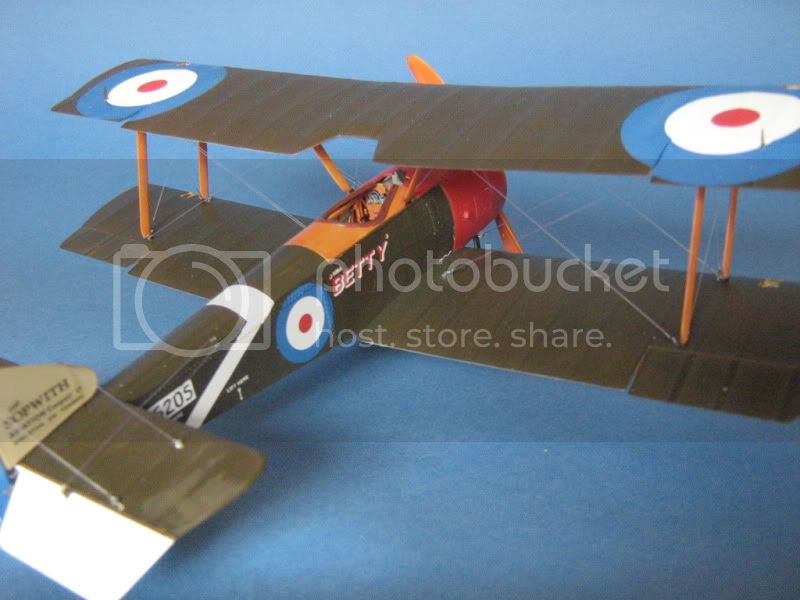
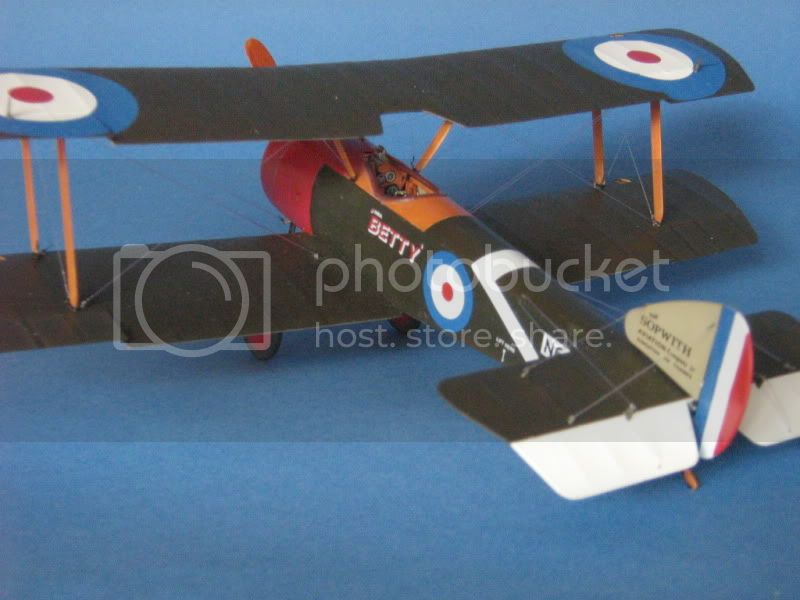
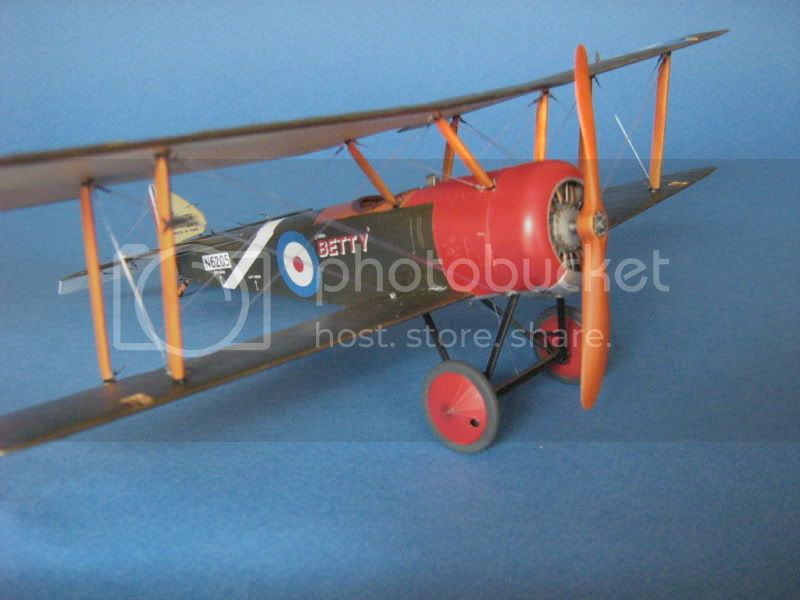
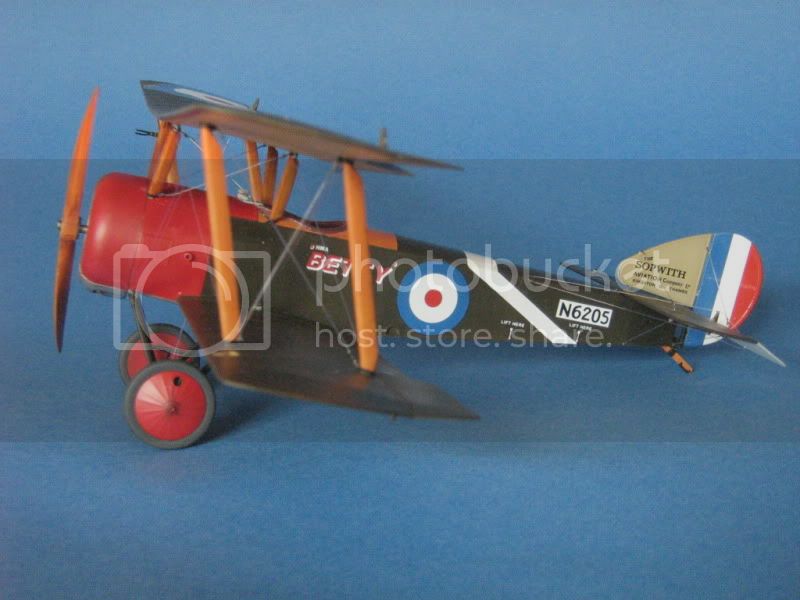
Posted: Friday, August 27, 2010 - 05:09 PM UTC
England - South East, United Kingdom
Joined: November 06, 2005
KitMaker: 1,667 posts
AeroScale: 1,551 posts
Posted: Friday, August 27, 2010 - 06:51 PM UTC
Looking really very sweet. I love the subtle way you've shown the wing structure. Not to over dirtied and the tail....just a field repair, those damn clumsy groundcrew.
Keith
Still can't cure the AMS even with sausage finger implants & olde eyes.
North Carolina, United States
Joined: June 19, 2007
KitMaker: 604 posts
AeroScale: 600 posts
Posted: Sunday, August 29, 2010 - 09:53 AM UTC
Rob,
Both of your builds are looking great! I like the Pup a little better than the SE, Perhaps because it is finished.( Or virtually finished)
RAGIII