

OUCH! Mark put it away for awhile then come back with a fresh outlook.
Bob
World War II
Discuss WWII and the era directly before and after the war from 1935-1949.
Discuss WWII and the era directly before and after the war from 1935-1949.
Hosted by Rowan Baylis
Heller 1/72 P-40

Bigrip74

Joined: February 22, 2008
KitMaker: 5,026 posts
AeroScale: 2,811 posts

Posted: Monday, June 14, 2010 - 06:16 AM UTC

md72

#439
Joined: November 05, 2005
KitMaker: 4,950 posts
AeroScale: 3,192 posts

Posted: Wednesday, June 16, 2010 - 03:39 AM UTC
 Thanks Bob, I looked around the bench last night and found 3 stalled wingy thingies and one wheeled thingie. So I popped open the Tamiya 1/35 Ford GPA. It's been in the box for a while since the last move. I thought I had a problem with some white paint work for an ID stripe, turns out the stripes are on the decal sheet.
  I noticed that it was rattling, so I cut a hole in the bottom to try and pull out the rattle. Didn't work, it was trapped in the other end of the chassis. So I opened up another hole and found an inch long piece of rod stock. I'm sure it was part of something but I have no idea why it was in there. So now I have two holes to patch and maybe this ones ready for the paint shop.

md72
#439
Joined: November 05, 2005
KitMaker: 4,950 posts
AeroScale: 3,192 posts
Posted: Thursday, July 01, 2010 - 04:03 AM UTC
Got a little while to actually glue parts together last night. Got the stabs on, they look right (straight, no di or an hedrial), but now the port wing seems to have too much dihedrial. 
Spent most of the last 2 weeks sanding out the wing steps and dealing with real life.
Spent most of the last 2 weeks sanding out the wing steps and dealing with real life.
md72
#439
Joined: November 05, 2005
KitMaker: 4,950 posts
AeroScale: 3,192 posts
Posted: Monday, July 12, 2010 - 05:30 PM UTC
got some thing done.
Bigrip74
Joined: February 22, 2008
KitMaker: 5,026 posts
AeroScale: 2,811 posts
Posted: Monday, July 12, 2010 - 05:35 PM UTC
Looking good Mark, how much putty is that in the pic?
Bob
Bob
md72
#439
Joined: November 05, 2005
KitMaker: 4,950 posts
AeroScale: 3,192 posts
Posted: Tuesday, July 13, 2010 - 03:50 AM UTC
In theory, there's no putty But there's a bunch of Mr. Surfacer 500, especially under the wings. I used stretched sprue and sheet stock to fill the side to side gaps before I added the Surfacer. I should have also added shims to the wing trailing edges since the worst mismatch was at the back edge of the wing. There was also a tough contour near the front of the wing that took a lot of filling.
I showed it off (as it was?) at the last NWSM meeting. Just happened to have the local Airfix Humbrol rep in the room (thanks for the paint Jason!). He nodded agreement when I stated that even if it was in Heller's box, I was sure it was from Airfix's tooling.
But there's a bunch of Mr. Surfacer 500, especially under the wings. I used stretched sprue and sheet stock to fill the side to side gaps before I added the Surfacer. I should have also added shims to the wing trailing edges since the worst mismatch was at the back edge of the wing. There was also a tough contour near the front of the wing that took a lot of filling.I showed it off (as it was?) at the last NWSM meeting. Just happened to have the local Airfix Humbrol rep in the room (thanks for the paint Jason!). He nodded agreement when I stated that even if it was in Heller's box, I was sure it was from Airfix's tooling.

JPTRR

#051

Joined: December 21, 2002
KitMaker: 7,772 posts
AeroScale: 3,175 posts
Posted: Tuesday, July 13, 2010 - 03:53 PM UTC
Mark,
Awesome work! The screen, the CAD, all the interior work, you are creating an impressive P-40!
Gen. Scott would no doubt be pleased.
Awesome work! The screen, the CAD, all the interior work, you are creating an impressive P-40!
Gen. Scott would no doubt be pleased.

md72
#439
Joined: November 05, 2005
KitMaker: 4,950 posts
AeroScale: 3,192 posts
Posted: Tuesday, July 13, 2010 - 04:10 PM UTC
Thanks Fredrick, but I think the description exceeds the quality of my work.
md72
#439
Joined: November 05, 2005
KitMaker: 4,950 posts
AeroScale: 3,192 posts
Posted: Thursday, August 12, 2010 - 09:27 AM UTC
Wow, it's been a month since my last update.
I've actually made progress, just don't have a camera to prove it.
Called the wings good enough to move on.
Good a good coat of MM Neutral gray on the bottom.
Realized that I didn't finish the drop tank.
Drilled out the drop tank to get the revised brackets in place.
laid it on the fuselage to locate the new mouning holes. I had filled in the mounting slots earlier. As I located and drilled the holes, I noticed that the lower fuselage seam had opened up.
Got it glued back together and created a slight bead to sand off. Dry fitted the tank to the fuselage while I glued the brackets to the tank.
Finished up the sanding and shot NG on the tank and fuselage.
Masked the canopy and fuselage and shot MM Olive Drab (ANA reference). demarcation line on fwd fuselage is a bear
Noticed that my masking had shadowed a piece of the fuselage and maybe I didn't get a solid coat of paint on one of the wing tips.
Test fitted the canopy, there's a .02 gap between the canopy and the rear bulkhead when the canopy mates with the cockpit.
Traced out a shim and got it glued in place to cover the gap. Now I just have to carve it to shape with out destroying santhing.
I guess that's more good than bad and it looks alittle like a P-40.
I've actually made progress, just don't have a camera to prove it.
Called the wings good enough to move on.
Good a good coat of MM Neutral gray on the bottom.
Realized that I didn't finish the drop tank.
Drilled out the drop tank to get the revised brackets in place.
laid it on the fuselage to locate the new mouning holes.
I had filled in the mounting slots earlier. As I located and drilled the holes, I noticed that the lower fuselage seam had opened up. Got it glued back together and created a slight bead to sand off. Dry fitted the tank to the fuselage while I glued the brackets to the tank.
Finished up the sanding and shot NG on the tank and fuselage.
Masked the canopy
and fuselage and shot MM Olive Drab (ANA reference). demarcation line on fwd fuselage is a bear Noticed that my masking had shadowed a piece of the fuselage and maybe I didn't get a solid coat of paint on one of the wing tips.
Test fitted the canopy, there's a .02 gap between the canopy and the rear bulkhead when the canopy mates with the cockpit.
Traced out a shim and got it glued in place to cover the gap. Now I just have to carve it to shape with out destroying santhing.
I guess that's more good than bad and it looks alittle like a P-40.
Bigrip74
Joined: February 22, 2008
KitMaker: 5,026 posts
AeroScale: 2,811 posts
Posted: Thursday, August 12, 2010 - 02:09 PM UTC
Mark it looks like you are starting to move as slow as me  I have done nothing since early July.
Bob
I have done nothing since early July.Bob
md72
#439
Joined: November 05, 2005
KitMaker: 4,950 posts
AeroScale: 3,192 posts
Posted: Thursday, August 12, 2010 - 06:32 PM UTC
It's that accounting thing. I've spent at least half my evenings trying to get Quick Books up and running for my wife's business. The two folks with business degrees are struggling with the back office stuff, so an engineer has to to step in and try to make heads or tails of it.
I did get some photos, now I have to find a reader for my CF card.
I did get some photos, now I have to find a reader for my CF card.
md72
#439
Joined: November 05, 2005
KitMaker: 4,950 posts
AeroScale: 3,192 posts
Posted: Friday, August 13, 2010 - 02:55 PM UTC
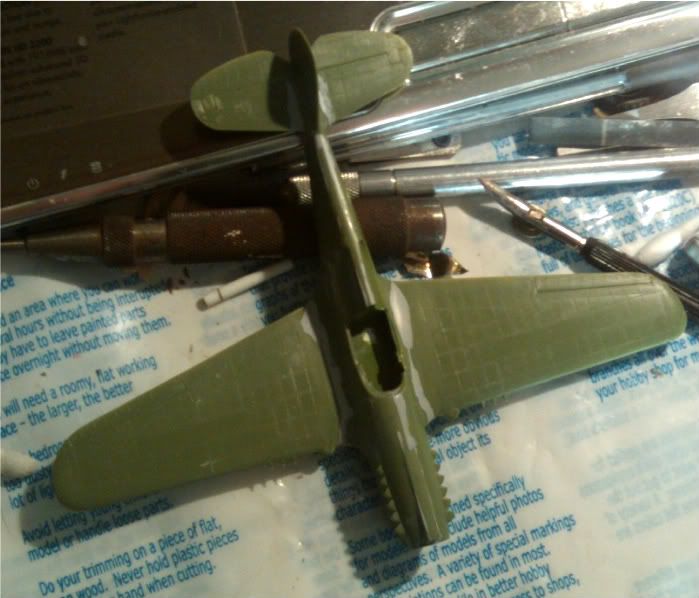
Photos!!!

Topside with new shim for the rear covkpit pit issues

Bottom with drop tank and canopy.
Topside with new shim for the rear covkpit pit issues
Bottom with drop tank and canopy.
Bigrip74
Joined: February 22, 2008
KitMaker: 5,026 posts
AeroScale: 2,811 posts
Posted: Saturday, August 14, 2010 - 08:54 AM UTC
OK! Mark, some paint on and now it takes shape. Waiting for the finished pic.
Bob
Bob
md72
#439
Joined: November 05, 2005
KitMaker: 4,950 posts
AeroScale: 3,192 posts
Posted: Monday, August 23, 2010 - 08:57 AM UTC
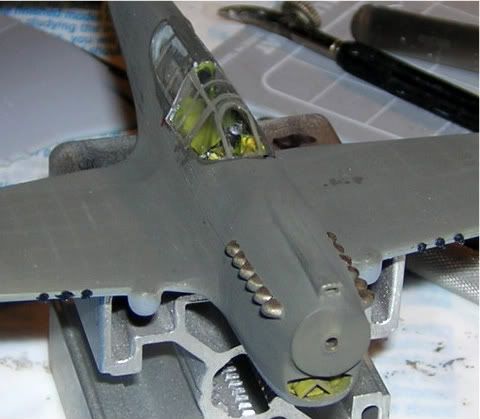
Progress & Photos!
Got the control panel, lighted gunsight, seat, stick and head rest installed.

Got a little detail painting done for the fuel filler caps and the LG warning horn.

And no, that's not some killer new technique for adding scuff marks to the paint, it's lint from a paper towel.
Got the control panel, lighted gunsight, seat, stick and head rest installed.
Got a little detail painting done for the fuel filler caps and the LG warning horn.
And no, that's not some killer new technique for adding scuff marks to the paint, it's lint from a paper towel.
Bigrip74
Joined: February 22, 2008
KitMaker: 5,026 posts
AeroScale: 2,811 posts
Posted: Monday, August 23, 2010 - 09:49 AM UTC
Mark I just had an idea, spray the paper towel aluminium and then let the lent attach itself to he a/c 
 . I like the instrument panel, is that the kit or your modification where the gap is located?
Bob
. I like the instrument panel, is that the kit or your modification where the gap is located?Bob
md72
#439
Joined: November 05, 2005
KitMaker: 4,950 posts
AeroScale: 3,192 posts
Posted: Monday, August 23, 2010 - 09:53 AM UTC
I'm assuming that you mean the gap forward of the instrument panel. That's all me and not strictly to scale. In real life, there should be some kind of cowling there, but I saw a photo somewhere (museuem piece?) where it was missing and decided to follow suit so I could show off the instrument cluster. Almost worked.
md72
#439
Joined: November 05, 2005
KitMaker: 4,950 posts
AeroScale: 3,192 posts
Posted: Wednesday, August 25, 2010 - 07:12 AM UTC
Glass installed! Used Testors canopy glue (PVA?) still drying in the rear panels. Hope I don't have to take them off and re-do it.
Looks like the gunsight worked and the instruments don't look all that bad.
Looks like the gunsight worked and the instruments don't look all that bad.
md72
#439
Joined: November 05, 2005
KitMaker: 4,950 posts
AeroScale: 3,192 posts
Posted: Monday, September 13, 2010 - 06:06 PM UTC
Well, it's been a while, but I did get some work done.

Propeller and spinner mount into a brass tube so its easier to transport. If it had just glued up straight I also managed to get the wing tip to rudder antennas in place. Wheels and decals next.
Propeller and spinner mount into a brass tube so its easier to transport. If it had just glued up straight
I also managed to get the wing tip to rudder antennas in place. Wheels and decals next. md72
#439
Joined: November 05, 2005
KitMaker: 4,950 posts
AeroScale: 3,192 posts
Posted: Monday, October 04, 2010 - 10:46 AM UTC
It's been awhile, but I'm almost done.


Just need to clean up water spots from the decals, Clean up the CA mess at the antenna ends, maybe straighten out the antenna and clean up the MLG axles.
Just need to clean up water spots from the decals, Clean up the CA mess at the antenna ends, maybe straighten out the antenna and clean up the MLG axles.
md72
#439
Joined: November 05, 2005
KitMaker: 4,950 posts
AeroScale: 3,192 posts
Posted: Thursday, October 07, 2010 - 09:56 AM UTC
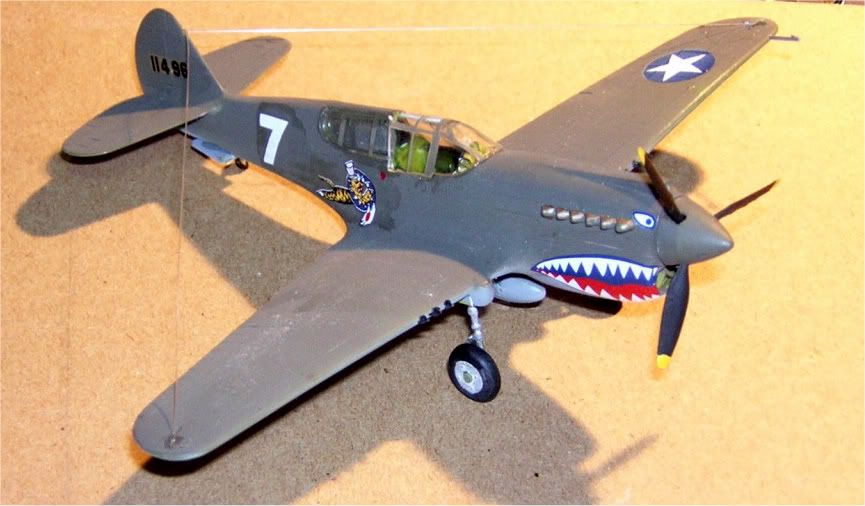
I'm calling it DONE!
I tried an ink wash to highlight the control surface edges and I think it just made the paint darker, didn't collect in the seams.
So here it is:

Thanks for looking in. I'll see ya in a different thread.
I tried an ink wash to highlight the control surface edges and I think it just made the paint darker, didn't collect in the seams.
So here it is:
Thanks for looking in. I'll see ya in a different thread.
NickZour

Joined: May 01, 2008
KitMaker: 1,437 posts
AeroScale: 1,241 posts
Posted: Friday, October 08, 2010 - 12:56 AM UTC
Well
It's a nice model but....
There are stains in the surfaces
The Antenna is too thick
And I don't like the wash
Sorry if I was too "rough"
Cheers Nick
It's a nice model but....
There are stains in the surfaces
The Antenna is too thick
And I don't like the wash
Sorry if I was too "rough"
Cheers Nick
 |

WEB HOSTING BY


Copyright ©2021 AeroScale and Kitmaker Network, a subsidiary of Silver Star Enterprises
All Rights Reserved. Please read our Conditions of Use and Privacy Policy.
All Rights Reserved. Please read our Conditions of Use and Privacy Policy.