_GOTOBOTTOM
Cold War (1950-1974)
Discuss the aircraft modeling subjects during the Cold War period.
Hosted by Tim Hatton
F-105G build
Red4
_VISITCOMMUNITY
California, United States
Joined: April 01, 2002
KitMaker: 4,287 posts
AeroScale: 1,164 posts
Posted: Thursday, May 20, 2010 - 01:20 PM UTC
Howdy all. Just thought I would share my build of Monograms venerable F-105G with the group. While a more recent release has made an appearance in the modeling world, I still feel the Monogram kit is better. For its age the Monogram kit holds its own quite well. Your mileage may vary.
Thus far I have assembled and painted the instrument panels and most of the consoles for the pilot and his weps officer. I detailed out the seat a bit more than what comes in the box by adding some additional material to the belts, and some wiring along the sides and back of the seats. This still needs to be painted in my pictures. Also added the oxygen hoses using fine copper wire wrapped around a smaller piece of wire and bent to shape. Everything you see in regards to the instrument panel are the kit parts. Compared with my references, these are about as close to the real deal as one could get. Extremely accurate.
Painting was accomplised using Model Master aircraft gray overall with the details being picked out with Vallejo acrylics and a fine brush. Still plenty to of painting do as yet. Thanks for following along and stay tuned for more.
"Q"


md72
#439
_VISITCOMMUNITY
Washington, United States
Joined: November 05, 2005
KitMaker: 4,950 posts
AeroScale: 3,192 posts
Posted: Thursday, May 20, 2010 - 01:32 PM UTC
Nice start. I've got that one and an Airfix 1/72 F-105G waiting patiently in the stash.
magnusf
_VISITCOMMUNITY
Stockholm, Sweden
Joined: May 02, 2006
KitMaker: 1,953 posts
AeroScale: 1,902 posts
Posted: Thursday, May 20, 2010 - 07:55 PM UTC
I can see your point regarding the Monogram kits! When I started modelling as a kid in the early 80s, Monogram kits were state-of-the-art without much competition really. I was a cockpit-freak then and when it came to that part of a model they really delivered, every time! The same goes for details on ordnance, landing gear and engines. Sadly they were hard to find and rather expensive in Sweden then.

Those were the times!


Magnus
Bigrip74
_VISITCOMMUNITY
Texas, United States
Joined: February 22, 2008
KitMaker: 5,026 posts
AeroScale: 2,811 posts
Posted: Thursday, May 20, 2010 - 08:10 PM UTC
Matt, nice start on one of my favorite a/c. I cut my teeth on Aurora but as soon as I found Monogram it was love at first sight. Just the name (Monogram) conjurs up many happy memories, and I still love to build their boxed offerings. I cannot wait to see your finished build. Have you decided on the scheme?

Bob
AussieReg
Staff MemberAssociate Editor
AUTOMODELER
#007
_VISITCOMMUNITY
Victoria, Australia
Joined: June 09, 2009
KitMaker: 8,156 posts
AeroScale: 3,756 posts
Posted: Thursday, May 20, 2010 - 08:18 PM UTC
Great start Q, I've got the old 1/48 Monogram F-105G in the stash, so I'll be bookmarking this thread for ideas down the track.

Keep it cookin, D
litespeed
Staff MemberNews Reporter
AEROSCALE
_VISITCOMMUNITY
England - North West, United Kingdom
Joined: October 15, 2009
KitMaker: 1,976 posts
AeroScale: 1,789 posts
Posted: Thursday, May 20, 2010 - 11:30 PM UTC
Hi Matthew.
Looking fantastic, I particularly like your method of constructing the oxygen hoses, looks very effective. Keep us all posted.
tim
Red4
_VISITCOMMUNITY
California, United States
Joined: April 01, 2002
KitMaker: 4,287 posts
AeroScale: 1,164 posts
Posted: Friday, May 21, 2010 - 04:25 AM UTC
Thanks for the kind words all. Much appreciated.

Quoted Text

I cannot wait to see your finished build. Have you decided on the scheme?

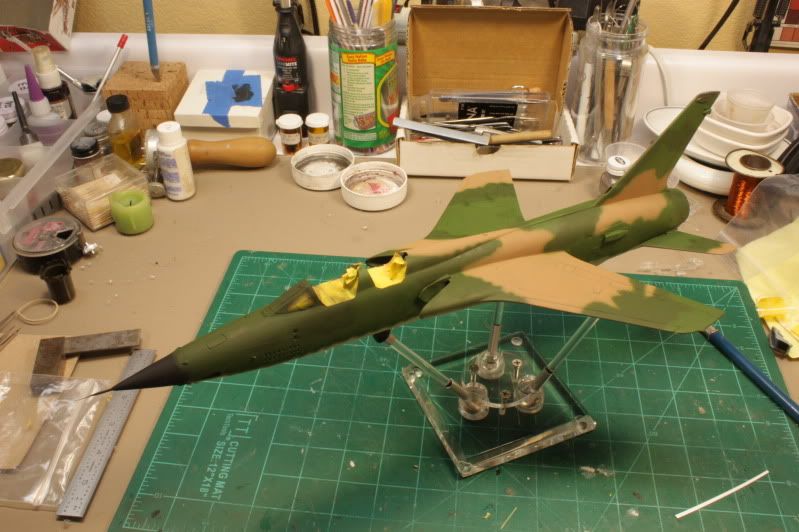
It will definitely be in SEA camo, but have as yet to pick a/c markings etc. I have several sheets to choose from.
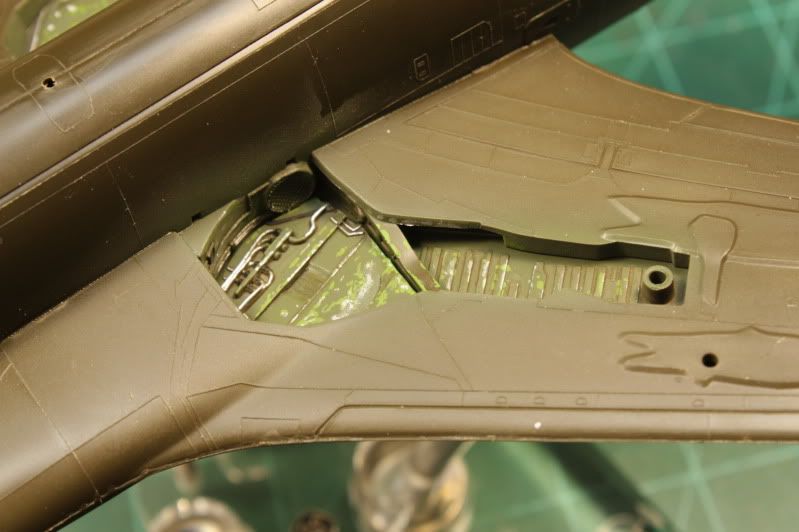
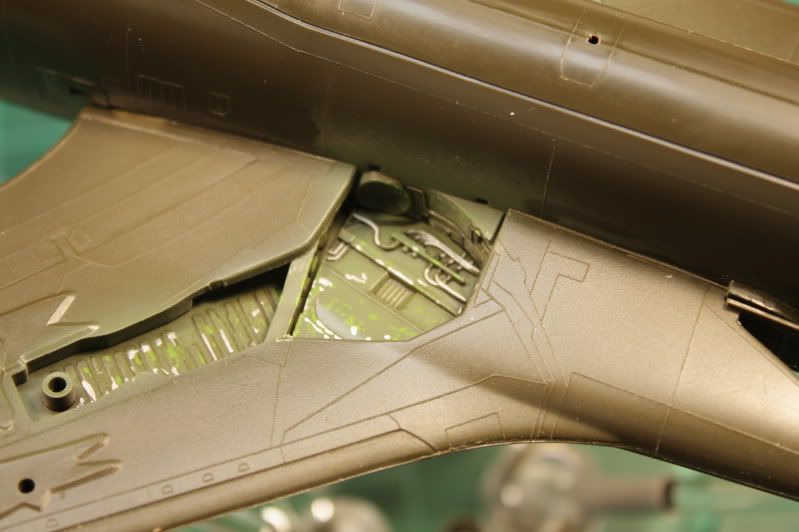
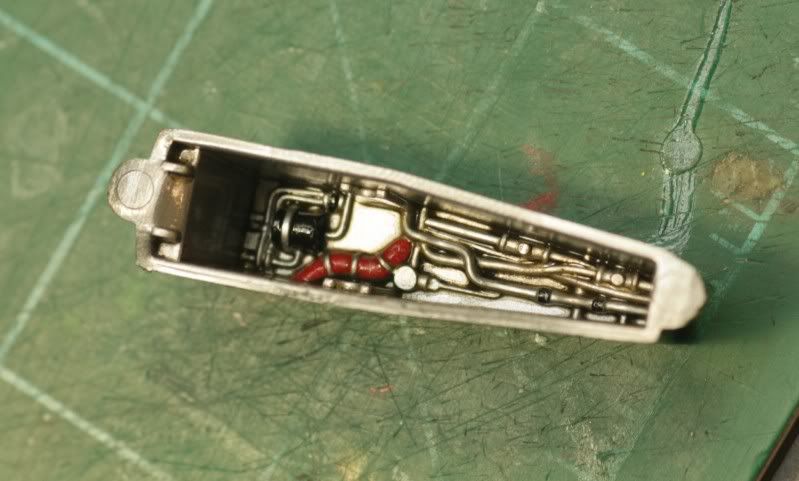
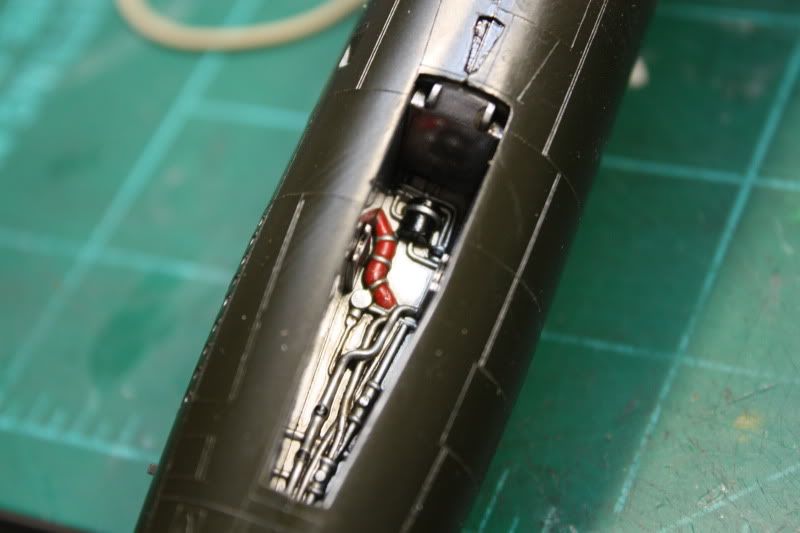
Glad you all are enjoying the build thus far. Here is an update for today. Late last night I painted, glossed, and weathered the nose wheel well. I painted it silver as most of the pics and 1:1 items I have come across show this to be the predominant color. I used the small square testors bottle of silver. This stuff sprays so well, just need to be sure and seal it before doing anything else to it as it will lift easily.
I picked out the largest line in there in red leaving the securing straps in silver for some contrast. I believe this was the fuel transfer line from the refueling port located on the nose. If not...oh well, it looks good in red and adds some visual appeal. Picked out some smaller items in black, and then finally sealed everything under some Future in preparation for an oil wash to better define the lines etc.

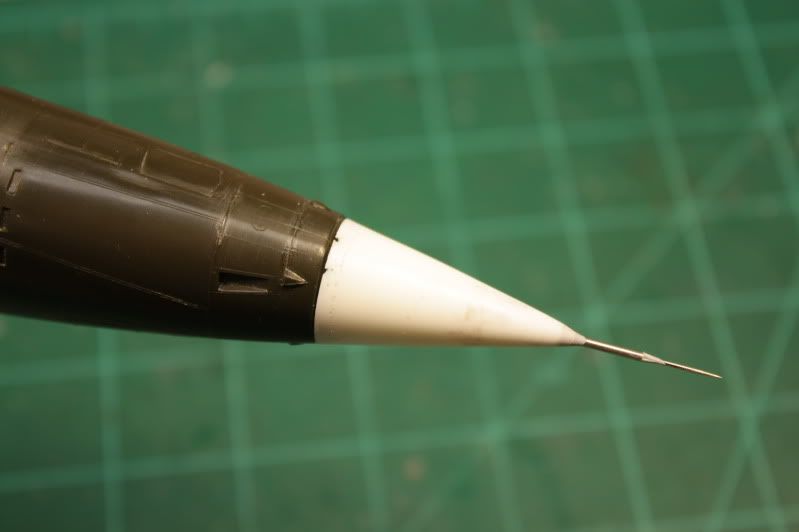
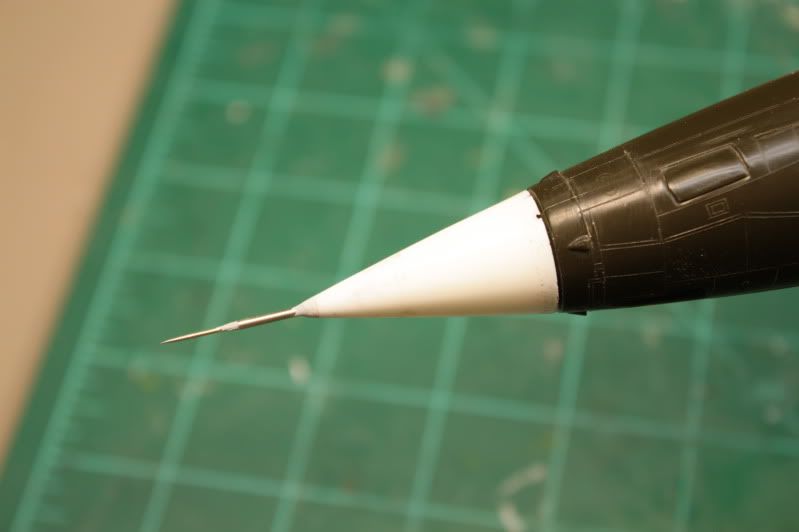
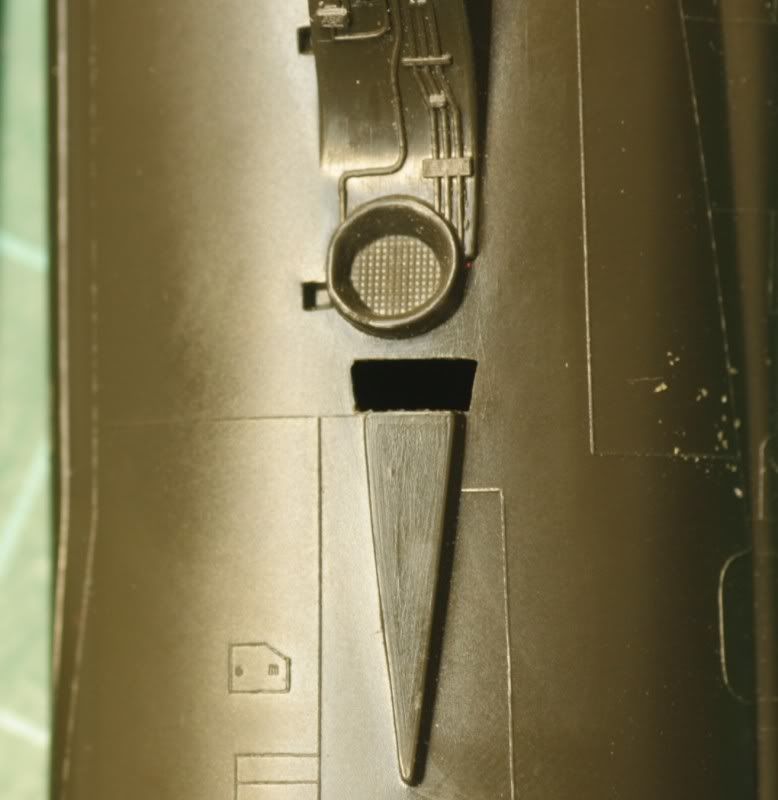
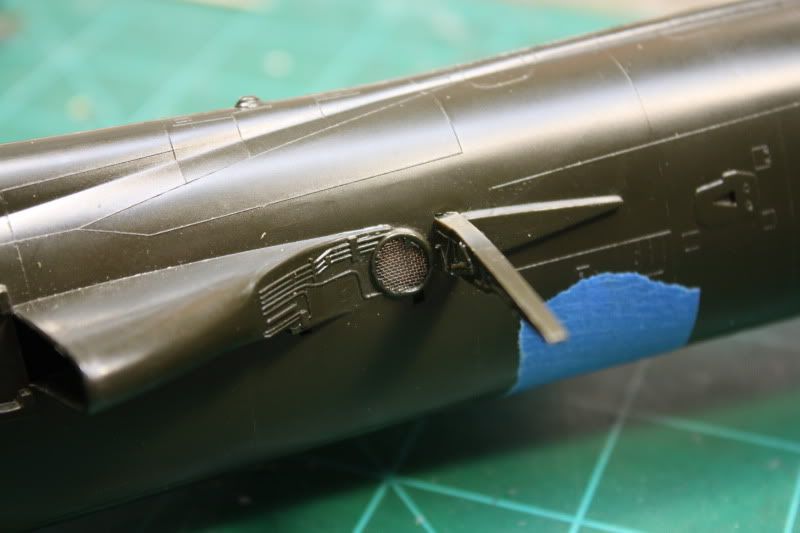
Using my Dremel I cut out the molded on screen in the main landing gear wells. I replaced this with some 70 mesh brass screen punched out using my punch set. I had trouble getting the screen to stay put as it had a lot of memory to it and kept rebounding when I pushed it in. A quick trip through the flame of a candle and the annealing process fixed this. I carefully tacked them in place around the outter edges using CA. The area under the screen is blanked off with a styrene disk and glued in place.
Before

After

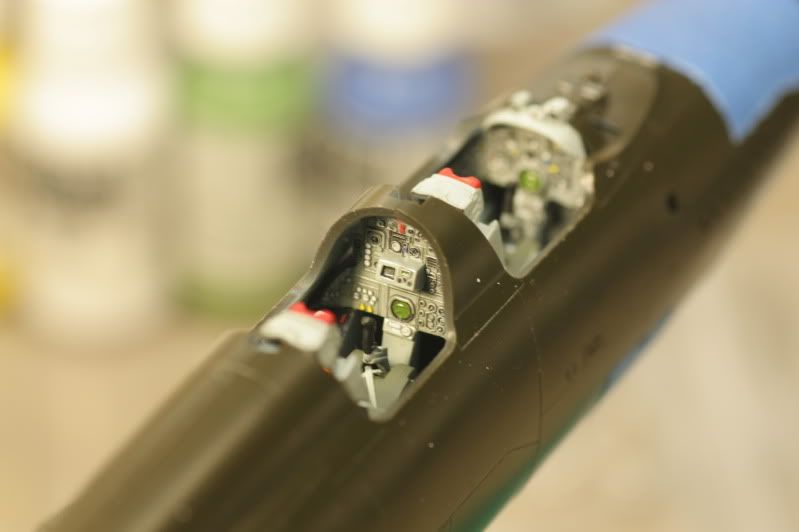
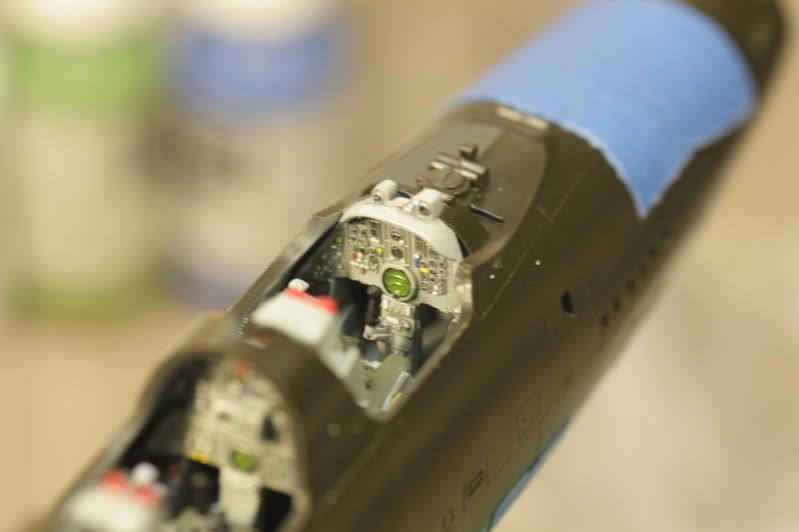
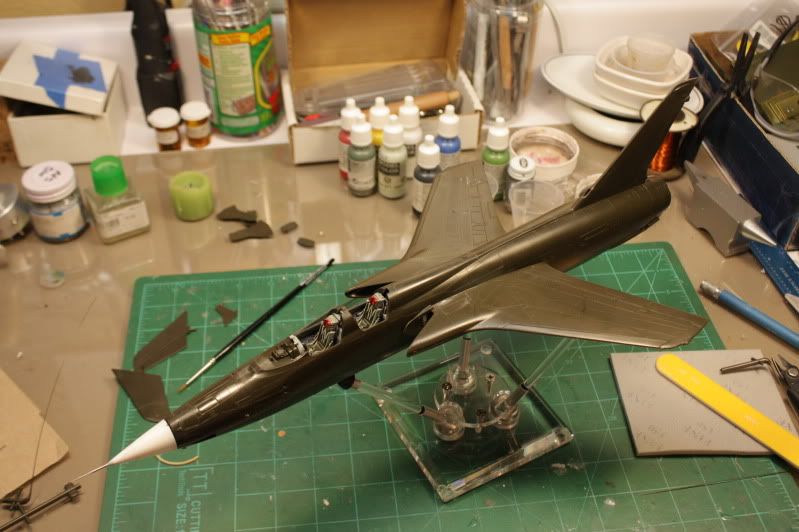
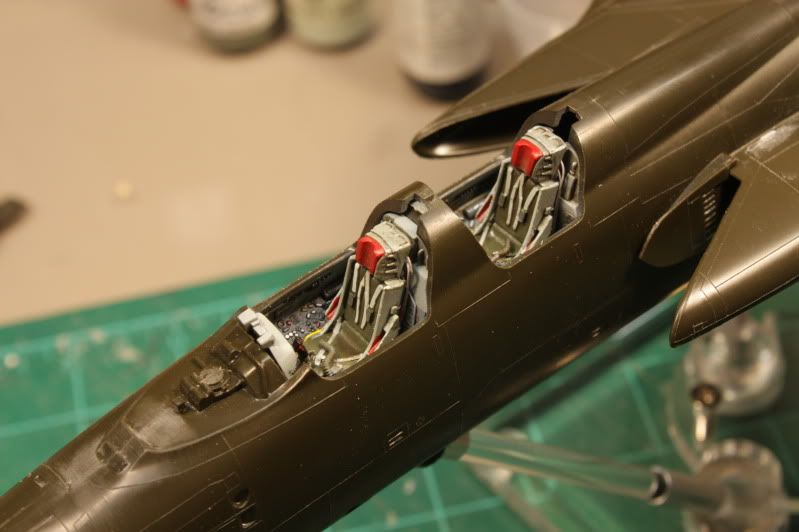
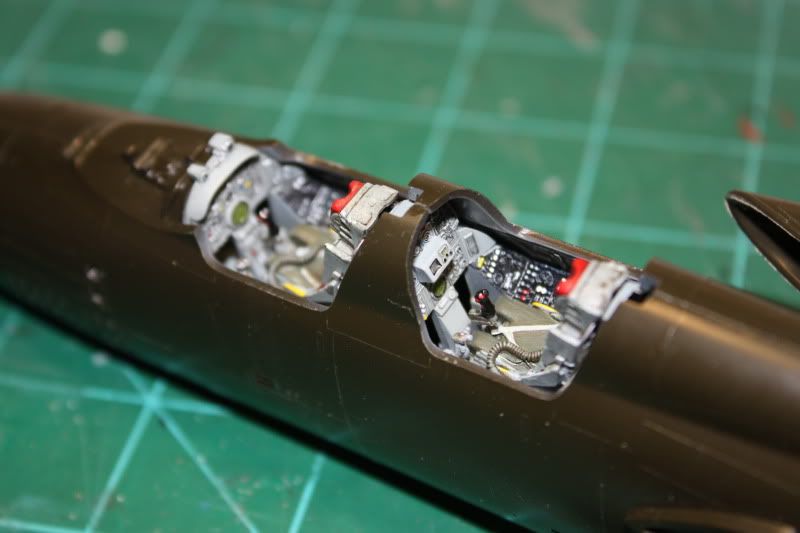
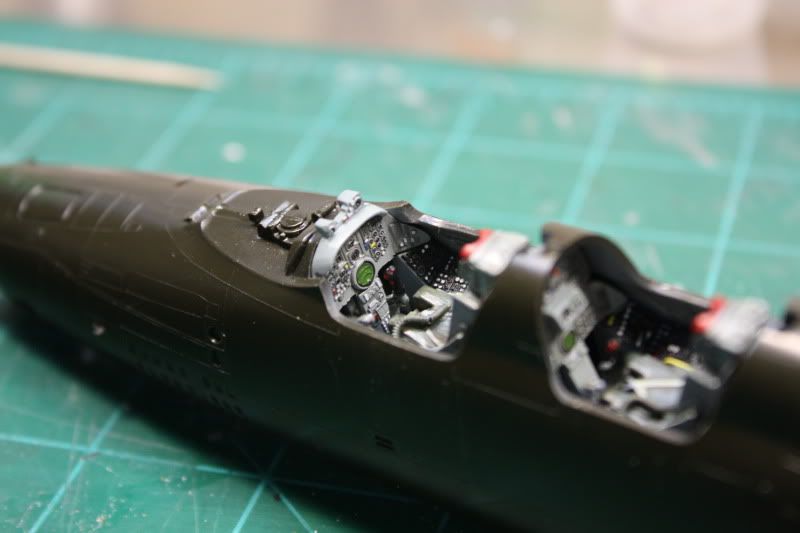
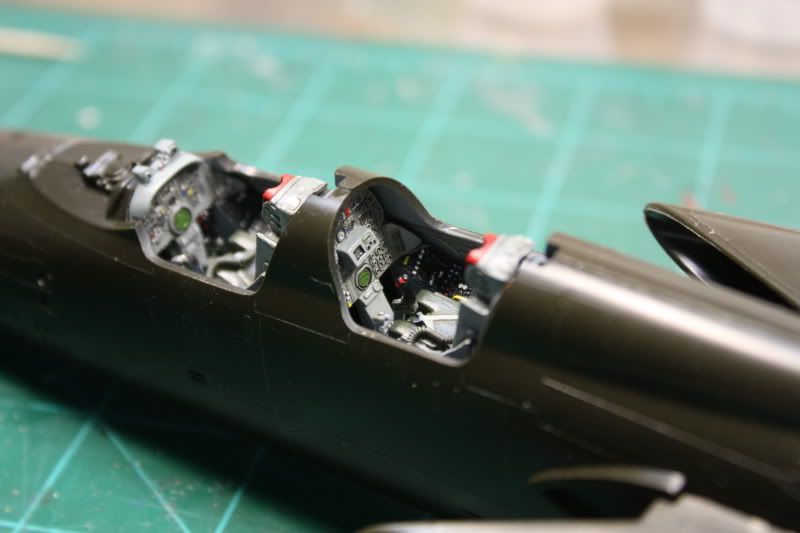
This morning I installed the wing spar, cockpit and nose gear well. Everything is drying at this point.


More to follow soon. Thanks for following along. "Q"
md72
#439
_VISITCOMMUNITY
Washington, United States
Joined: November 05, 2005
KitMaker: 4,950 posts
AeroScale: 3,192 posts
Posted: Friday, May 21, 2010 - 05:58 AM UTC
Matt,

Looking really good. How do you do the O2 hoses? And where did you find the mesh? I had some a while back but I can't find it now. Had to use som ribbon last time.
Red4
_VISITCOMMUNITY
California, United States
Joined: April 01, 2002
KitMaker: 4,287 posts
AeroScale: 1,164 posts
Posted: Friday, May 21, 2010 - 06:19 AM UTC

Quoted Text

Matt,

Looking really good. How do you do the O2 hoses? And where did you find the mesh? I had some a while back but I can't find it now. Had to use som ribbon last time.


Thanks Mark. O2 hoses were made using fine copper wire wrapped around a piece of flexible wire then bent to shape and glued in place with CA. The inner wire is pretty much the same as those find on bred bag ties. Just remove the outter paper and you're good to go. I scored the brass screen years ago at a contest. Every wedding reception I go to, they seem to like putting ribbon out on the tables. Extremely fine mesh it is, and I always end up leaving with yards of it. Works great for all kinds of things other than decorating candy dishes. Glad you like the progress thus far. Thanks again, "Q"
Red4
_VISITCOMMUNITY
California, United States
Joined: April 01, 2002
KitMaker: 4,287 posts
AeroScale: 1,164 posts
Posted: Friday, May 21, 2010 - 11:45 AM UTC
And yet more progress on the Thud. This will probably do it for today...
I painted the main landing gear wheel wells, glossed them and added washes and paint chipping to them. Also did the same with the inner portions of the wells that are molded as part of the fuselage.
In my inital post I commented on how well the ole Monogram kit fits. When I attached the wings there was no need for any putty as they fit that good at the roots. Even with the excellent fit, I wanted to ensure I didn't end up with any micro-gaps when it was all said and done so I stretched some sprue out really thin and laid this in a long the wing roots where it makes everything even that more snug. When I bought my kit I didn't realize it was missing the radome. I used one from another kit and scratch built a new one along with the pitot out of a hyperdermic needle and a straight pin. I need to fine tune it a little, but it came out really well. The last thing I did was to replace some of the panel lines I lost while dressing the seams on the spine and belly. I stretched some sprue to the same size as the panel lines and used Tamiya Super Thin to attach them. Once dry, I dressed them a bit with a Scotch Brite pad to blend them in with the other lines. Once painted, everything should blend in nicely. I'll let the pics speak for themselves. Thanks for watchiing, "Q"


Dirkpitt289
_VISITCOMMUNITY
New Jersey, United States
Joined: May 24, 2008
KitMaker: 346 posts
AeroScale: 307 posts
Posted: Friday, May 21, 2010 - 03:18 PM UTC
Very cool. I WANT ONE!!!!
Red4
_VISITCOMMUNITY
California, United States
Joined: April 01, 2002
KitMaker: 4,287 posts
AeroScale: 1,164 posts
Posted: Saturday, May 22, 2010 - 01:07 AM UTC
Thanks Dirk. I'm guessing you're refering to the pitot tube. It was very easy to make. Just inserted a straight pin into a length of hypo needle that had the same diameter opening, a little CA to hold it in plane, and viola', instant pitot tube. I fared everything in using some Mr. Surfacer 500 and sanded it to shape once dry. I'll see if I can dig up the size hypo I used and post that info as well. Gotta go hit the hobby shops today though. Maybe an update later this evening. Thanks, "Q"
md72
#439
_VISITCOMMUNITY
Washington, United States
Joined: November 05, 2005
KitMaker: 4,950 posts
AeroScale: 3,192 posts
Posted: Saturday, May 22, 2010 - 04:50 AM UTC
OK, another "How ja doit?" question. Where do you get hypodermic needles? Seems like around here you need a prescription and then you have to buy a large box.
Bigrip74
_VISITCOMMUNITY
Texas, United States
Joined: February 22, 2008
KitMaker: 5,026 posts
AeroScale: 2,811 posts
Posted: Saturday, May 22, 2010 - 06:08 AM UTC
Matt, the tripod stand holding the 105 has my attention. Did you build, modify, or just steal some item from the house to use in this manner?

Bob
Red4
_VISITCOMMUNITY
California, United States
Joined: April 01, 2002
KitMaker: 4,287 posts
AeroScale: 1,164 posts
Posted: Saturday, May 22, 2010 - 11:49 AM UTC

Quoted Text

Where do you get hypodermic needles?

My wife is a Doc. Her office had a water line break above one of their storage closets and the entire contents were soaked and thus ruined. The needles were going to be destroyed along with a lot of other useful items that I was able to bring home and save from the land fill or where ever they send that stuff for disposal. You are correct though, you usually do need a script to obtain them. You can find hollow aluminum tubing though and do the same thing instead of using the hypo's.

The tripod thingy is something I grabbed at a local hobby shop. They had them on the shelves for well over a year and were selling about zero of them. They made me a killer deal to the tune of about 80% off so I bought all they had left, which I believe was about 6. Check my reviews as I did one on the thing, and I think I listed a website for them too. Hope this helps
"Q"
Bigrip74
_VISITCOMMUNITY
Texas, United States
Joined: February 22, 2008
KitMaker: 5,026 posts
AeroScale: 2,811 posts
Posted: Saturday, May 22, 2010 - 12:53 PM UTC
Matt, I took a look at the review for the tripod. It looks pretty good, I may have to get a couple.

Thanks

Bob
md72
#439
_VISITCOMMUNITY
Washington, United States
Joined: November 05, 2005
KitMaker: 4,950 posts
AeroScale: 3,192 posts
Posted: Saturday, May 22, 2010 - 02:15 PM UTC
Thanks Matt. IIRC there's an online shop, Small Parts?, that has small hypo size. Had a strike out on the mesh, guy at LHS said K&S used to do some etched brass mesh, but it wasn't a good seller and they discontinued it. I did see some photo etched chain link fence, but at U$20 it was way too rich for me.
Red4
_VISITCOMMUNITY
California, United States
Joined: April 01, 2002
KitMaker: 4,287 posts
AeroScale: 1,164 posts
Posted: Sunday, May 23, 2010 - 02:09 AM UTC
Try and contact Caboose Hobbies in Denver, it's a train store. Not sure if they do mail order, but I was there yesterday and saw that they had several sheets of fine mesh brass screen on hand. Might be able to score some from them. Hope that helps.
"Q"
Red4
_VISITCOMMUNITY
California, United States
Joined: April 01, 2002
KitMaker: 4,287 posts
AeroScale: 1,164 posts
Posted: Monday, May 24, 2010 - 04:49 AM UTC
Just realized after going over my references that I painted my seats incorrectly Not a big deal; will just have to be careful with the re-touch. Getting ready to add some paint to the ole girl. Had to wait overnight for some putty work to dry around the radome. Just need to mask the cockpit off and I should be ready for paint this afternoon. Stay tuned and thanks for watching.
"Q"
md72
#439
_VISITCOMMUNITY
Washington, United States
Joined: November 05, 2005
KitMaker: 4,950 posts
AeroScale: 3,192 posts
Posted: Monday, May 24, 2010 - 05:20 AM UTC
Red headrests and OD fabric looks OK. What's up?
Red4
_VISITCOMMUNITY
California, United States
Joined: April 01, 2002
KitMaker: 4,287 posts
AeroScale: 1,164 posts
Posted: Monday, May 24, 2010 - 05:46 AM UTC
The back of the seats should be the same gray as the rest of the seat as the pilots carried the chute on them as opposed to being an actual part of the seat. Not a huge thing to change, just missed it when I initially started. "Q"
md72
#439
_VISITCOMMUNITY
Washington, United States
Joined: November 05, 2005
KitMaker: 4,950 posts
AeroScale: 3,192 posts
Posted: Monday, May 24, 2010 - 08:22 AM UTC
Oh, Need to take a new peek at my F-105 Walk Around, thought it showed OD 'cushions'.
Red4
_VISITCOMMUNITY
California, United States
Joined: April 01, 2002
KitMaker: 4,287 posts
AeroScale: 1,164 posts
Posted: Monday, May 24, 2010 - 11:06 AM UTC
The bottom cushions are OD, there just aren't any for the back of the seat.
I just got finished shooting the SEA camo on this beast. Took a fair bit of squinting as the two greens look a lot alike as they lay next to each other. Had to go back more than once to touch up an area that got missed. Came out great overall. Will let this dry a few hours and then get into it with some post shading and a gloss coat for decals. Final assembly should follow shortly there-after. Thanks, "Q"

litespeed
Staff MemberNews Reporter
AEROSCALE
_VISITCOMMUNITY
England - North West, United Kingdom
Joined: October 15, 2009
KitMaker: 1,976 posts
AeroScale: 1,789 posts
Posted: Monday, May 24, 2010 - 08:28 PM UTC
Hi Matthew
And now the fun bit, the painting. The camoflage is looking excellent. What brand of paints are you using?
tim
AussieReg
Staff MemberAssociate Editor
AUTOMODELER
#007
_VISITCOMMUNITY
Victoria, Australia
Joined: June 09, 2009
KitMaker: 8,156 posts
AeroScale: 3,756 posts
Posted: Monday, May 24, 2010 - 11:15 PM UTC
Looking good Q, now did you mask the camo or freehand ??

Cheers, D
 _GOTOTOP