Early Aviation
Discuss World War I and the early years of aviation thru 1934.
Hosted by Jim Starkweather
Fokker D.VII - downed
JackFlash
Colorado, United States
Joined: January 25, 2004
KitMaker: 11,669 posts
AeroScale: 11,011 posts
Joined: January 25, 2004
KitMaker: 11,669 posts
AeroScale: 11,011 posts
Posted: Friday, October 15, 2010 - 05:14 PM UTC
Greetings Edo,
This image shows the control column grip pointing directly back to the pilot. The whole top should be turned the pilot's right. The handle was to the right of the pilot and the auxilary throttles to the pilot's left.
Here is a modern replica (without auxilary throttles).
JackFlash
Colorado, United States
Joined: January 25, 2004
KitMaker: 11,669 posts
AeroScale: 11,011 posts
Joined: January 25, 2004
KitMaker: 11,669 posts
AeroScale: 11,011 posts
Posted: Friday, October 15, 2010 - 05:31 PM UTC
Here is an image of the Memorial Flight's replica Fokker D.VII cockpit.
edoardo
Milano, Italy
Joined: November 30, 2007
KitMaker: 642 posts
AeroScale: 382 posts
Joined: November 30, 2007
KitMaker: 642 posts
AeroScale: 382 posts
Posted: Sunday, October 17, 2010 - 06:31 AM UTC
Hi Stephen! OUCH! I see what you ... I Think I can try to fix it as it is broken and I had to glue it in place...
Thank you!
Ciao
Edo
Thank you!
Ciao
Edo
edoardo
Milano, Italy
Joined: November 30, 2007
KitMaker: 642 posts
AeroScale: 382 posts
Joined: November 30, 2007
KitMaker: 642 posts
AeroScale: 382 posts
Posted: Monday, November 01, 2010 - 11:49 PM UTC
Hi all!
I have some update for you, at last!
During the last days I worked hard on this project and now it is almost finished.
Something is still missing, particularely relating to the figures, but we'll talk of this later.
Now I just can't wait to show you some pics and see how do you like them...
so let's start, they are quite e fiew...
first some work in progress
Then a bit further, I set the upper wing...
now the missing section...
And now, lastly, the complete diorama...
Here are some close up...
In the following pic I have removed the broken wings to better show the engine compartment
The last picture is a detail of the barbed wire, a detail I like very much...
And that is all, flks... I hope you enjoy it...
And the figures? Well, the problem is that the diorama is, I think, too small for them. If one has to take a picture of a person in front of the aircraft (as my storyline should suggest), one has to be somewhat far from the plane in order to capture it all, or at least a big portion of it.
But in order to do so, the photograper should be lìplaced outside the diorama itself, I fear.... I'll make some tries and I'll let you see the results for you to comment.
Ciao
Edo
I have some update for you, at last!
During the last days I worked hard on this project and now it is almost finished.
Something is still missing, particularely relating to the figures, but we'll talk of this later.
Now I just can't wait to show you some pics and see how do you like them...
so let's start, they are quite e fiew...
first some work in progress
Then a bit further, I set the upper wing...
now the missing section...
And now, lastly, the complete diorama...
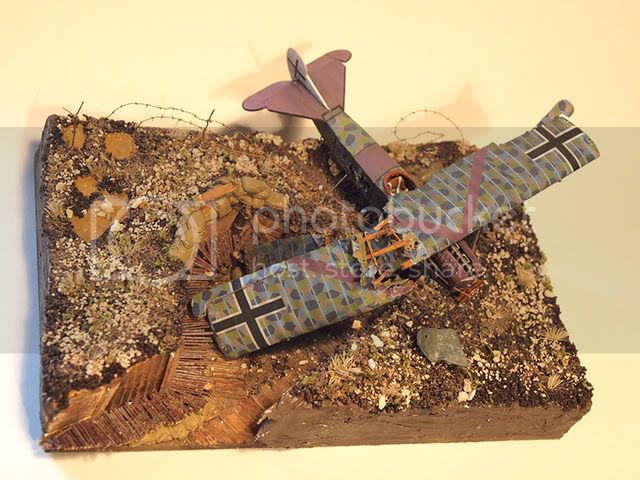
Here are some close up...
In the following pic I have removed the broken wings to better show the engine compartment
The last picture is a detail of the barbed wire, a detail I like very much...
And that is all, flks... I hope you enjoy it...
And the figures? Well, the problem is that the diorama is, I think, too small for them. If one has to take a picture of a person in front of the aircraft (as my storyline should suggest), one has to be somewhat far from the plane in order to capture it all, or at least a big portion of it.
But in order to do so, the photograper should be lìplaced outside the diorama itself, I fear.... I'll make some tries and I'll let you see the results for you to comment.
Ciao
Edo
OEFFAG_153
Västra Götaland, Sweden
Joined: February 19, 2010
KitMaker: 1,473 posts
AeroScale: 1,450 posts
Joined: February 19, 2010
KitMaker: 1,473 posts
AeroScale: 1,450 posts
Posted: Tuesday, November 02, 2010 - 12:27 AM UTC
Hi Edo
Wow – that diorama looks really good. I do like it alot!!!
I definately think putting some figures in would be a good idea, if only to give some human scale into the scene.
This really does fuel my idaes for a crash diorama of my own, question is which plane and scene to pick – hmmmmmmm
Btw – is that Leutnant Stark's D.VII?
Best Regards
Mikael
NickZour
Attica, Greece / Ελλάδα
Joined: May 01, 2008
KitMaker: 1,437 posts
AeroScale: 1,241 posts
Joined: May 01, 2008
KitMaker: 1,437 posts
AeroScale: 1,241 posts
Posted: Tuesday, November 02, 2010 - 01:16 AM UTC
That's a very inspiring dio Mr. Edorado
Really GREAT
Cheers Nick
Really GREAT
Cheers Nick
Mgunns
Arizona, United States
Joined: December 12, 2008
KitMaker: 1,423 posts
AeroScale: 1,319 posts
Joined: December 12, 2008
KitMaker: 1,423 posts
AeroScale: 1,319 posts
Posted: Tuesday, November 02, 2010 - 01:24 AM UTC
Hi Edo:
Good Job on the Diorama! It looks convincing, I like it.
Best
Mark
Good Job on the Diorama! It looks convincing, I like it.
Best
Mark
ludwig113
England - South East, United Kingdom
Joined: February 05, 2008
KitMaker: 1,381 posts
AeroScale: 1,110 posts
Joined: February 05, 2008
KitMaker: 1,381 posts
AeroScale: 1,110 posts
Posted: Tuesday, November 02, 2010 - 01:29 AM UTC
fantastic work
plastickjunkie
Florida, United States
Joined: December 31, 2009
KitMaker: 399 posts
AeroScale: 132 posts
Joined: December 31, 2009
KitMaker: 399 posts
AeroScale: 132 posts
Posted: Tuesday, November 02, 2010 - 02:16 AM UTC
Wow!! Fantastic detail!!
thegirl
Alberta, Canada
Joined: January 19, 2008
KitMaker: 6,743 posts
AeroScale: 6,151 posts
Joined: January 19, 2008
KitMaker: 6,743 posts
AeroScale: 6,151 posts
Posted: Tuesday, November 02, 2010 - 02:28 AM UTC
Hi Edo
Very nice indeed I do agree with Mikal on adding some figuars or at least the pilot walking away from the wreck it will aid in bring it all into scale more .
PS , very nice job on the weathering by the way . You have come a long way in your skills and your talents are shining !
Very nice indeed I do agree with Mikal on adding some figuars or at least the pilot walking away from the wreck it will aid in bring it all into scale more .
PS , very nice job on the weathering by the way . You have come a long way in your skills and your talents are shining !
Kornbeef
England - South East, United Kingdom
Joined: November 06, 2005
KitMaker: 1,667 posts
AeroScale: 1,551 posts
Joined: November 06, 2005
KitMaker: 1,667 posts
AeroScale: 1,551 posts
Posted: Tuesday, November 02, 2010 - 04:17 AM UTC
Ero....Lovely, I love the dynamics of this, very well thought out.
We could argue physics and details but it looks just right as it is...the sit of the plane, the popped nose cowls giving it that hit hard look. I love the torn fabric it worked so well...I spent an age poring over the photos. The only thing that looked odd was the grey green panel in the foreground just looks not right to my eye. but thats only me and I'm insane anyway.
I think a figure or two would give it scale and inject a little human interest too but it's not essential, just a done thing.
And like Mikael said YES it has inspired me to look at doing something similar and when I do it will be credited to you my friend.
Congratulations.
Keith
edoardo
Milano, Italy
Joined: November 30, 2007
KitMaker: 642 posts
AeroScale: 382 posts
Joined: November 30, 2007
KitMaker: 642 posts
AeroScale: 382 posts
Posted: Tuesday, November 02, 2010 - 06:05 PM UTC
hi guys! thank you very much for the kind worlds! i really appreciate it! yes mikael, it is stark's plane: i find it's colour scheme very atractive.
keith, you are completely right. i did not studied the phisics of a crash, i had in mind a scene that could be realistic and i used a lot of 'modeller's licence'.
i'd love to see you and mikael tackle a similar project you'll sure do wonders!
nick, terri, mark, paul, ernie: you are very kind, as usual, thank you so much my friends!
i can add some considerations on the tin foil use i have discovered along the way. even if applaying the tin foil is really a piece of cake (btw i used a plain cooking foil) it can be tricky afterwards. in fact decals tend to detach from it when bent, the underside MUST be painted before gluing or you will see a shiny backside when you bend the foil, and also the side of the foil is too shiny. Given the small thickness i thought it was irrelevant, but in fact it is not and this is a problem i did not manage to solve well.
aluminum foil can be sanded well after gluing to the plane both with fine sand paper and with steel wood so don't be afraid of the seam line bethween tin foil and plastic. Lastly it is better to firs place the lozenge decals on the foil and then glue it to the surface than the other way round. In this way you minimize the problem of adapting the decal to a particoular contour even if care must be taken when applying the foil as a too sharp a bend could make the decal to detach.
i hope this few considerations will be of use.
OEFFAG_153
Västra Götaland, Sweden
Joined: February 19, 2010
KitMaker: 1,473 posts
AeroScale: 1,450 posts
Joined: February 19, 2010
KitMaker: 1,473 posts
AeroScale: 1,450 posts
Posted: Tuesday, November 02, 2010 - 07:44 PM UTC
Hi again Edo – thank you for your pointers on the tinfoil – most useful info, that I think will save us a lot of time and problems if we should do something similar (and I'm seriously considering this).
Best Regards, and hope to see some more great dioramas from you
Mikael
Best Regards, and hope to see some more great dioramas from you
Mikael