Junkers Ju 87B-2 - 1/48 Italeri
Germany
Joined: September 07, 2005
KitMaker: 5,609 posts
AeroScale: 5,231 posts
Posted: Thursday, November 18, 2010 - 04:48 AM UTC
Hi all
Somehow I do not have a finished Stuka in my collection, thus this is a perfect excuse to start this model right away (Damian: Sorry I have the P-38 still on the bench, but somehow I am shying away from the "massive" PE --- at the moment).
So here is a bit of illustration (not much yet)


BTW the cockpit sits a few mm more to the front when compared to the Hasegawa kit but I have no idea if that is right or wrong.
I did not like the sit of the rudder controls this I glued them below the mounting points (see instrument panel from the back side). Else it is quite nice so far ...
all the best
Steffen
DULCE ET DECORUM EST PRO HOBBY MORI
Germany
Joined: September 07, 2005
KitMaker: 5,609 posts
AeroScale: 5,231 posts
Posted: Thursday, November 18, 2010 - 10:03 PM UTC
Hmm, many clicks but no comment .. seems you are disappointed...
Well, I will still post some pix for the moment. Here is the pit with some more pieces attached. It is really nice oob!

(I have to rely on artificial lighting for many pix now thus some colours may come out strange from time to time)
all the best
Steffen
DULCE ET DECORUM EST PRO HOBBY MORI
Roma, Italy
Joined: January 28, 2006
KitMaker: 1,368 posts
AeroScale: 377 posts
Posted: Thursday, November 18, 2010 - 10:06 PM UTC
TERRIFIC!
Is that the panel that comes out of the box?
Germany
Joined: September 07, 2005
KitMaker: 5,609 posts
AeroScale: 5,231 posts
Posted: Thursday, November 18, 2010 - 10:20 PM UTC
Hi Giacome
this is how it looks oob when painted. it consists of some plastic parts, some PE and two decals.
See
Jean-Lucs review for more pix of the model kit. (of coures I also have a German one on my site)
Thanks for your comment!
all the best
Steffen
DULCE ET DECORUM EST PRO HOBBY MORI
Moselle, France
Joined: May 15, 2005
KitMaker: 5,653 posts
AeroScale: 4,347 posts
Posted: Thursday, November 18, 2010 - 11:14 PM UTC
Hi Steffen,
You made a nice start on the Stuka. I see you also have some difficulties to stick to a project from time to time...

The instrument panel indeed looks very good out of the box.
You are not the only one who has no Stuka in his collection of built aircraft...
Jean-Luc

Better think one hour and build five minutes...
Than think five minutes and build an hour!
Italy
Joined: November 19, 2010
KitMaker: 5 posts
AeroScale: 4 posts
Posted: Thursday, November 18, 2010 - 11:22 PM UTC
Hi Steffen.
This is my first time on a forum.
First of all, I apologize for my poor English.
Your work looks very well.
At this moment I'm building the same kit, but I'm ahead in the work.
I like this kit, but I found some serius (for me) trouble on the canopy assembly on the fuselage and gears struts assembly on the wings.
I'm curious to see how you can fix this problems, I will follow your building with a lot of interest.

#041
Kobenhavn, Denmark
Joined: July 20, 2006
KitMaker: 10,069 posts
AeroScale: 3,788 posts
Posted: Thursday, November 18, 2010 - 11:31 PM UTC
Nice progress so far, Steffen. It is an interesting build to follow.
I have been tempted to buy this kit, but have so far resisted as my stash is getting out of hand.

Looking forward to see more

Campaign'oholic - 252+ campaigns completed
Germany
Joined: September 07, 2005
KitMaker: 5,609 posts
AeroScale: 5,231 posts
Posted: Friday, November 19, 2010 - 12:17 AM UTC
Many thanks Guys!! this is very encouraging and the reason why I post my progress on the net ... getting some motivation. I did not with my Me 262 and still did finish it, but it is only half the fun well maybe three quarter

@J-L: Actually I focus on projects at the moment, but there are still some (esp. campaign builds) that just grow over my head and I have to put them aside until I find some motivation again. I really want Bongs machine in my shelf but the PE is just too much for me at the moment...
@Antonio: Welcome to Aeroscale

So far the project was quite nice. The fit is not stellar but not too bad either. I filled a bit on the fire wall (though I plan to close the cowl as the detail on the inside of the panels is bad and I do not want to buy the Goffy stuff. In teh pic below you see that I had to grind a bit on the sun screen to make the canopy fit (more or less), but it sat a bit angled thus this was probably my own fault.
@Jesper: stash, I do not have a stash ..... I have several


all the best
Steffen
DULCE ET DECORUM EST PRO HOBBY MORI
England - East Anglia, United Kingdom
Joined: November 16, 2009
KitMaker: 79 posts
AeroScale: 75 posts
Posted: Friday, November 19, 2010 - 11:19 AM UTC
Very nice so far Steffen, i am sitting here what to build next the Italeri Ju87 or go bigger and have a go at the 21st Century kit in 1/32nd, might have to sleep on it.

AussieReg
 Associate Editor
#007
Victoria, Australia
Joined: June 09, 2009
KitMaker: 8,156 posts
AeroScale: 3,756 posts
Posted: Friday, November 19, 2010 - 05:50 PM UTC
Quoted Text
Somehow I do not have a finished Stuka in my collection, thus this is a perfect excuse to start this model right away (Damian: Sorry I have the P-38 still on the bench, but somehow I am shying away from the "massive" PE --- at the moment).
Hi Steffen. No need to apologise, that PE would bring the strongest man to his knees !!
Great work on your Stuka so far. Not only do I not have one on display, there's not one in the stash either !!
Cheers, D
ON the bench
Revell 1/24 '53 Corvette (building as '54)
Revell 1/24 BMW 507 Coupe and Cabrio
Italeri 1/48 Me262 B-1a/U1 Nightfighter
Monogram 1/24 '57 Chevy Nomad
Dragon 1/350 USS Frank Knox DD-742
Merlin
 Senior Editor
#017
United Kingdom
Joined: June 11, 2003
KitMaker: 17,582 posts
AeroScale: 12,795 posts
Posted: Friday, November 19, 2010 - 11:54 PM UTC
Hi Steffen
Nice work so far. It looks a really neat kit (I see what you mean about the rudder pedals though) - the only reason I haven't been tempted to get one is because I already have several Hasegawa (and Revell re-box) Ju 87Bs waiting to be built some day.
All the best
Rowan

BEWARE OF THE FEW...
As I grow older, I regret to say that a detestable habit of thinking seems to be getting a hold of me. - H. Rider Haggard
Germany
Joined: September 07, 2005
KitMaker: 5,609 posts
AeroScale: 5,231 posts
Posted: Saturday, November 20, 2010 - 12:02 AM UTC
Cheers Guys
Many thanks for the comments again!
Sorry no updated today, as I need to catch up a bit with "my" website, because every update needs time (a lot --- Rowan knows what I mean) ... further more I got a bit of distraction again .. but nothing "serious" ... maybe more tomorrow.
@Rowan: Me too Hasegawas, Revell, Promodeler plus tons of AM stuff ... but this one will be oob
all the best
Steffen
DULCE ET DECORUM EST PRO HOBBY MORI
Merlin
 Senior Editor
#017
United Kingdom
Joined: June 11, 2003
KitMaker: 17,582 posts
AeroScale: 12,795 posts
Posted: Saturday, November 20, 2010 - 09:16 AM UTC
Quoted Text
Sorry no updated today, as I need to catch up a bit with "my" website, because every update needs time (a lot --- Rowan knows what I mean) ...
all the best
Steffen
Hi again Steffen
I know exactly what you mean!

My current builds will have to wait until I've cleared a mounting backlog of admin work.! It's shocking how quickly just how quickly things build up if you can't deal with them every day.
All the best
Rowan

BEWARE OF THE FEW...
As I grow older, I regret to say that a detestable habit of thinking seems to be getting a hold of me. - H. Rider Haggard
Germany
Joined: September 07, 2005
KitMaker: 5,609 posts
AeroScale: 5,231 posts
Posted: Saturday, November 20, 2010 - 08:09 PM UTC
Hi all
Here is my little weekend side project. Got the kit on Friday ... pretty fast, eh


sorry for the crappy pic, but it's a dark November morning and I do not like to take flashlight pix
cheers
Steffen
DULCE ET DECORUM EST PRO HOBBY MORI
Germany
Joined: September 07, 2005
KitMaker: 5,609 posts
AeroScale: 5,231 posts
Posted: Saturday, November 20, 2010 - 11:26 PM UTC
Hi Rowan
I have a qustion: Did Jim play with the edit times again? I thought "we agreed" that own build logs can be accessed for longer than an hour .... I will have to change the picture links in the future) ...

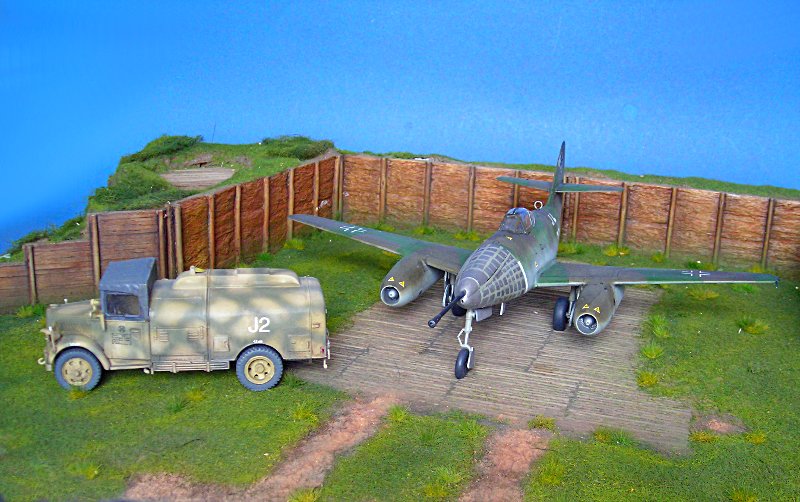
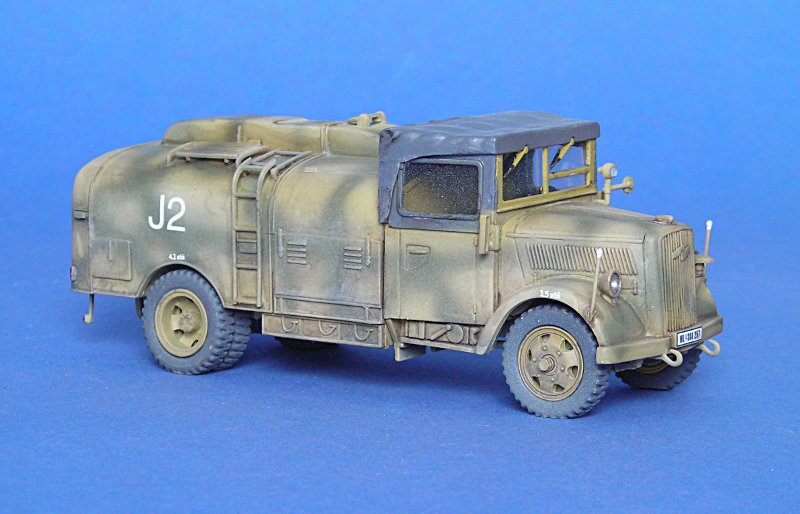
Here is another picture of the Italeri Kfz.385 with the HB Me 262A-1a/U4

But will get back on the Junkers Ju 87 today.
all the best
Steffen
DULCE ET DECORUM EST PRO HOBBY MORI
Moselle, France
Joined: May 15, 2005
KitMaker: 5,653 posts
AeroScale: 4,347 posts
Posted: Sunday, November 21, 2010 - 12:58 AM UTC
Hi Steffen,
Sweat...

definitely worth a feature...

I would like to see the Tankwagen from the other side as well. I suppose we will see and read more on the IPMS Germany website.
Jean-Luc

Better think one hour and build five minutes...
Than think five minutes and build an hour!
Germany
Joined: September 07, 2005
KitMaker: 5,609 posts
AeroScale: 5,231 posts
Posted: Sunday, November 21, 2010 - 01:07 AM UTC
Thanks Jean-Luc!
Just jump in your car ... you know where I live

I do want to send a photo feature on the 262, but the weather is bad today (yesterday it was nice, but I still needed to add a few things). A full feature will appear in our mag next year (I think) ... not much to show on the Kfz.385. I did no in progress shots as it was just a straight forward build. No Tamiya but good enough for my taste. I will probably publish a short picture feature on my site next week...
cheers
Steffen
P.S.

DULCE ET DECORUM EST PRO HOBBY MORI
Moselle, France
Joined: May 15, 2005
KitMaker: 5,653 posts
AeroScale: 4,347 posts
Posted: Sunday, November 21, 2010 - 01:38 AM UTC
Hi Steffen,
Many thanks! Maybe you could post your Tankwagen pictures in the review thread. I'm sure they will en up in the Track48 website...

Jean-Luc

Better think one hour and build five minutes...
Than think five minutes and build an hour!
England - East Anglia, United Kingdom
Joined: November 16, 2009
KitMaker: 79 posts
AeroScale: 75 posts
Posted: Sunday, November 21, 2010 - 02:01 AM UTC
I know we are going off topic here, but is this Tankwagon a new kit! it would look sweet next to, well any 1/48th German aircraft.
England - East Anglia, United Kingdom
Joined: November 16, 2009
KitMaker: 79 posts
AeroScale: 75 posts
Posted: Sunday, November 21, 2010 - 02:20 AM UTC
Before you all jump down my throat, i have just seen the review on this kit,
so sorry for messing up.
Germany
Joined: September 07, 2005
KitMaker: 5,609 posts
AeroScale: 5,231 posts
Posted: Sunday, November 21, 2010 - 02:56 AM UTC
Don't worry Keith ...
yes it is a new kit though it shares a few parts with the earlier released Opel Blitz (Kfz.305) which also appeared under Tamiya and Supermodel label.
all the best
Steffen
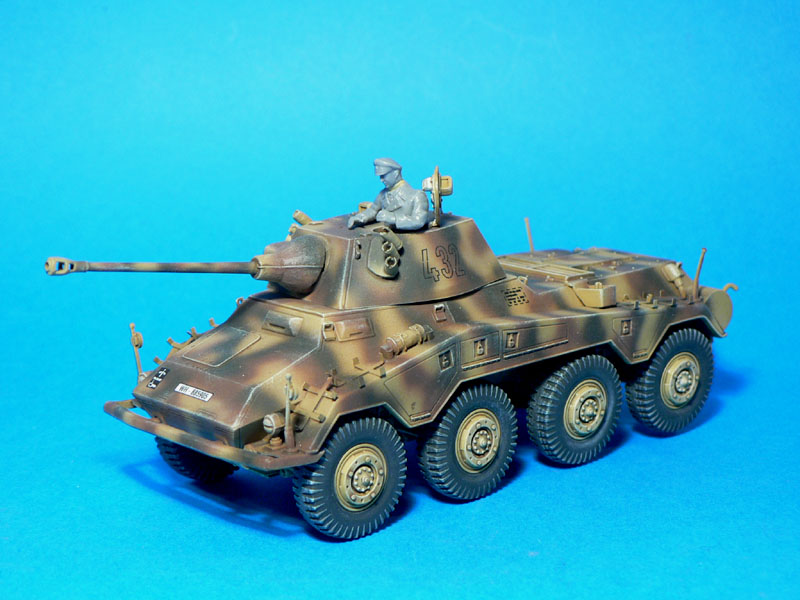
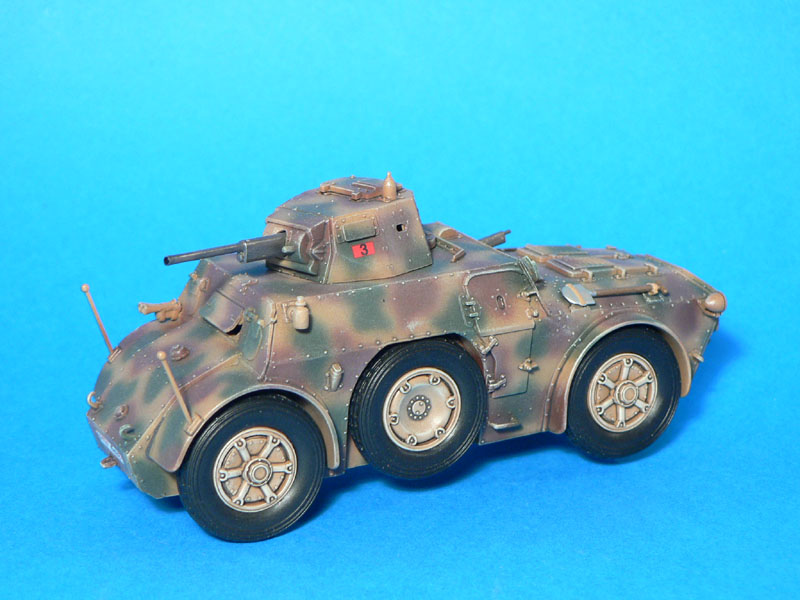
Btw. the Puma looks also very nice and I like the AB41 too .. these are no Tamiya shake'n'bake kits but good nonetheless. Hope Italeri will proceed with this line.
DULCE ET DECORUM EST PRO HOBBY MORI
Moselle, France
Joined: May 15, 2005
KitMaker: 5,653 posts
AeroScale: 4,347 posts
Posted: Sunday, November 21, 2010 - 06:52 AM UTC
Hi all,
Quoted Text
Btw. the Puma looks also very nice and I like the AB41 too ..
Here are pics of the Puma and the AB41. Both have been built out of the box (except for the jerrycans holders on the Puma) and are still "clean"...


Jean-Luc

P.S. It seems we are indeed way off topic now...

Better think one hour and build five minutes...
Than think five minutes and build an hour!
Germany
Joined: September 07, 2005
KitMaker: 5,609 posts
AeroScale: 5,231 posts
Posted: Monday, November 22, 2010 - 10:20 PM UTC
Hi again
so lets get a bit more on topic again

Not much of a progress though. I played a bit with the engine (though I plan to close it up). Some rubber piping is included but you have to cut it to length. Not sure the covers will fit to the fuselage, but I'd break everything off to make it fit. In the last picture you see taht I had to fill a bit on the windshield the white stuff on teh window and uselage is just a bit of residue no scratches.
The "trousers" are not sided so you havee to fiddle a bit to make them look right --- no big deal though, I just mad them straight down. I cut slots in teh wheels mounts so I can paint them separately. I though about leaving them off until after painting, but I rather mask them than to repair glue marks in the paint job.


all teh best
Steffen
DULCE ET DECORUM EST PRO HOBBY MORI
Germany
Joined: September 07, 2005
KitMaker: 5,609 posts
AeroScale: 5,231 posts
Posted: Wednesday, November 24, 2010 - 08:04 PM UTC
Hi all
Rowan: could you please answer my question from above?! (if you prefer also offboard)
So here is a little progress. Fitting the engine first was of course not very clever, but as this is kind of a review build I wanted to show the engine
in situ before closing it up. Thus some fiddling, trimming, brute force etc. was necessary (swearing is also very popular in my model room).
Next thing I do not understand is how the PE at the elevators should work (I am sticking to the instructions there but still could not make it out yet .. I'll probably just install it as I think it should be.
so here is a pic of the actual state (the struts on the elevators are just clipped in for the correct position of the elevator)

all the best
Steffen
DULCE ET DECORUM EST PRO HOBBY MORI
Germany
Joined: September 07, 2005
KitMaker: 5,609 posts
AeroScale: 5,231 posts
Posted: Friday, November 26, 2010 - 08:20 PM UTC
Some more progress
Last things fitted in the cockpit and middle (fixed) canopy added. I am not sure how I will do the painting - with the other canopies in place or not. I also added the tail wheel and this is pretty nice and gives the whole thing a better look. The main wheels can still move and thus are not flat on the ground - BTW I sanded the bulges away as I do not like this "True detail style" flat tires...


all the best
Steffen
DULCE ET DECORUM EST PRO HOBBY MORI


