_GOTOBOTTOM
Early Aviation
Discuss World War I and the early years of aviation thru 1934.
Eduard 1:48 Dr.I
Kornbeef
_VISITCOMMUNITY
England - South East, United Kingdom
Joined: November 06, 2005
KitMaker: 1,667 posts
AeroScale: 1,551 posts
Posted: Tuesday, November 23, 2010 - 04:27 AM UTC
Hi all, work at the Albatros Werken is being disrupted.

For the contest over on Swanny's (as enticed/bullied/persuaded by Terri) I've dropped down to 1/48th for a change, building the Dr.I Dual Combi from Eduard.

Stephen gave me plenty information on the kits shortcomings *thank you*

So saying, I intended to build pretty OOB, what I didnt specify was that it was OOB out of two boxes not one.

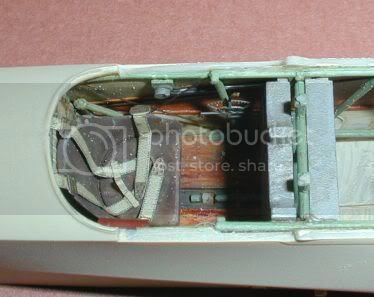
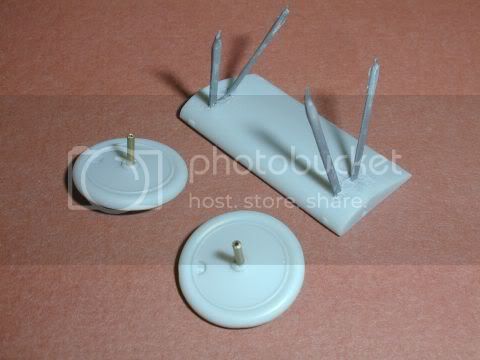
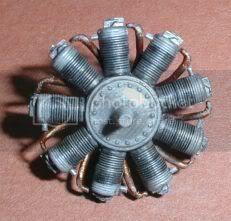
So heres a few shots of work as its progressed so far, keen eyes might notice some of the plastic isnt Eduard tan and some isnt even plastic. See if you can spot the difference?


So much for OOB


okay, kind of rushed but details to follow.

http://www.swannysmodels.com/yabb2/YaBB.pl?num=1289119668

Keith
Maynard
_VISITCOMMUNITY
Florida, United States
Joined: September 29, 2007
KitMaker: 32 posts
AeroScale: 9 posts
Posted: Tuesday, November 23, 2010 - 10:43 AM UTC
This looks really good! i will follow this build, i have been thinking of trying this kit.
thanks for posting it.
Sean
thegirl
_VISITCOMMUNITY
Alberta, Canada
Joined: January 19, 2008
KitMaker: 6,743 posts
AeroScale: 6,151 posts
Posted: Tuesday, November 23, 2010 - 01:56 PM UTC
Yup , parts came out of this box and this one and that one ..oh yeah and the one over there ....

Nice start Keith , the streaking looks good and a little confused on your way of cutting the lower wing spar .......hey , I'm blonde ....a hot one at that !

Dragons under carriage legs sure look better then Eduards . Will you be using the cab struts from the Dragon kit as well ?
Kornbeef
_VISITCOMMUNITY
England - South East, United Kingdom
Joined: November 06, 2005
KitMaker: 1,667 posts
AeroScale: 1,551 posts
Posted: Tuesday, November 23, 2010 - 09:09 PM UTC
Thanks for the encouraging comments guys.

Terri, you know me by now...I never follow instructions. It seemed logical to me to cut the lower spar, that way I could finish the fuselage without worrying about the ugly seam underneath, dryfitting the parts rang alarm bells that this area if done as per isntructions may cause bother. Now I can complete the fuselage up to popping the midlle wing on without having the lower wing interfering.
Also I'm undecided as yet on choice of struts but may well stick with Eduards, I've altered them to make up for opening up the holes in the front section already as a matter of course.

And Hey Blonde or not, you're an inspiration... besides Blonde is better than bald isnt it?
OEFFAG_153
_VISITCOMMUNITY
Västra Götaland, Sweden
Joined: February 19, 2010
KitMaker: 1,473 posts
AeroScale: 1,450 posts
Posted: Tuesday, November 23, 2010 - 09:54 PM UTC
Hi Keith,

I see you're up to your usual tricks – This is looking really good I do like your streaking technique – what paint and brush do you use?

As ever – looking forward to this one developing!

Best Regards

Mikael
Mgunns
_VISITCOMMUNITY
Arizona, United States
Joined: December 12, 2008
KitMaker: 1,423 posts
AeroScale: 1,319 posts
Posted: Wednesday, November 24, 2010 - 02:54 AM UTC
Hi Keith:

I have yet to do an Eduard Build. I have this kit, but with the luke warm reviews, and my gravitation to the 1/32nd side of the house, not sure I will ever do it. However, I will watch you do yours and might take the plunge.
Streaking looks good.

Best
Mark
Kornbeef
_VISITCOMMUNITY
England - South East, United Kingdom
Joined: November 06, 2005
KitMaker: 1,667 posts
AeroScale: 1,551 posts
Posted: Wednesday, November 24, 2010 - 06:05 AM UTC
Mikael, thanks,

Paint is oils Rowneys Olive green and W&N Burnt Umber(this is a little grainy, a smoother pigment may be better) mixed with a medium called Liquin, it dries virtually overnight, eough to recoat at least.
The paint is rather thin, thinking in after thought I might have Airbrushed some of the darker area's first to add a little solidity to it but its looking okay. Its actually a little greener than the pics show.
Brush wise I use a small flat art brush with a squared off tip about 3mm across so its a fairly in scale brush, I buy them in sets from *Hobbycraft* cheap at £2-4 a set and not so worried when they dont last too long or I forget to clean them. I havent had any hairloss problems with them either.

Mark. Thanks too

Honestly, its not a bad kit, in fact apart from a few small issues she builds well, I just had the DML kits laying by and the engines marginally better, the other issues are easy fixes really and to anyone just building an OOB it is a lovely well detailed kit. I know theres issues with some of the profiles but, the day we get a perfect kit is the day to hang up our tool and give up.

Finances made me step down from 1/32nd this kit I bought ages ago along with the profi camel to build for the Fokker Vs Camel campaign that Terri ran. I have to say I'm enjoying this build incredibly, even if I have put my thumb through the cockpit and broke all the internals loose.

K

Kornbeef
_VISITCOMMUNITY
England - South East, United Kingdom
Joined: November 06, 2005
KitMaker: 1,667 posts
AeroScale: 1,551 posts
Posted: Monday, November 29, 2010 - 08:58 PM UTC
Had a major setback...stupidity.

I had the wings, tail rudder and fuselage all painted ready for decals but thought a coat of clear over the top first might be prudent..

Stupid I know but I thought seeing as I had a can of aerosol clear Citadel laquer it would do......readjust the letters of aerosol to know how I felt after I did and watched the paint wrinkle and buckle in dispair.

So back to stage 3 I guess...wondering whats best to strip the paint without damaging the kit too much (UK brand names would be a great help) She's painted in acrylics enamels and oils.
JackFlash
_VISITCOMMUNITY
Colorado, United States
Joined: January 25, 2004
KitMaker: 11,669 posts
AeroScale: 11,011 posts
Posted: Tuesday, November 30, 2010 - 08:24 AM UTC
A sad bit of affairs that. I had a Pfalz D.III that had a similar experiences and had to strip it down. Try oven cleaner but wear rubber gloves and a paper mask at least. Follow the directions.
 _GOTOTOP