_GOTOBOTTOM
Cold War (1950-1974)
Discuss the aircraft modeling subjects during the Cold War period.
Hosted by Tim Hatton
Roden Pilatus Porter build log
Red4
_VISITCOMMUNITY
California, United States
Joined: April 01, 2002
KitMaker: 4,287 posts
AeroScale: 1,164 posts
Posted: Wednesday, December 22, 2010 - 06:57 AM UTC
Having recently received this in the mail, I wasted no time in getting this build started. This is one my favorite looking planes and I was happy to do a build log to follow Stephen Lawson's in Box review of the kit. So without further ado, here is what I have been able to accomplish thus far....
Ye' olde box top...

Some of the fuselage interior parts cleaned and assembled...namely the upper portion of the cabin, rear bulkhead and forward supports. The horizontal stab was also taken care of.

I am currently working on the seats. These are some very small and fragile parts that I needed to figure out how to assemble them without crushing them in my hamfisted hands. I decided to build them piece by piece after first installing the front portion of the seat brackets to the floor. Once these had set up enough, I could continue installing the sides and seat backs. The diagonal support rod that runs from the rear corner to the front corner was too short and was swapped out with a length of .020 rod. Once everything is completely dried/set/cured I will clean up the seat frames a bit more as there is still some small portions of the sprue attachment points visible on them. Tedious work to be sure, but it is working well thus far. I will also add some belts to the seats once all painting has been done.


More to follow soon. Thanks for looking.
"Q"
NickZour
_VISITCOMMUNITY
Attica, Greece / Ελλάδα
Joined: May 01, 2008
KitMaker: 1,437 posts
AeroScale: 1,241 posts
Posted: Wednesday, December 22, 2010 - 07:28 AM UTC
That's a very nice looking aircraft

Only a question: How are you going to paint this camo' with the airbrush!

Good luck for the rest of the build Mr. Matthew


Cheers Nick
Red4
_VISITCOMMUNITY
California, United States
Joined: April 01, 2002
KitMaker: 4,287 posts
AeroScale: 1,164 posts
Posted: Wednesday, December 22, 2010 - 07:37 AM UTC
Thanks Nick. I won't be painting it in the scheme as depicted on the box art. I will scan the instructions of the paint scheme I'll be doing and post them soon. Thanks, "Q"
warreni
_VISITCOMMUNITY
South Australia, Australia
Joined: August 14, 2007
KitMaker: 5,926 posts
AeroScale: 2,201 posts
Posted: Wednesday, December 22, 2010 - 09:34 AM UTC

Quoted Text

Thanks Nick. I won't be painting it in the scheme as depicted on the box art. I will scan the instructions of the paint scheme I'll be doing and post them soon. Thanks, "Q"


Come on Q! Do the one in the box cover art! You know you want an Australian Army aircraft in your collection. I am going to be doing that camo scheme whenever mine finally arrives. If you use my paper mask method it won't be too hard at all.

Red4
_VISITCOMMUNITY
California, United States
Joined: April 01, 2002
KitMaker: 4,287 posts
AeroScale: 1,164 posts
Posted: Wednesday, December 22, 2010 - 03:55 PM UTC
For this go round it will be in the Hi-viz Army scheme of gloss white over gloss dark green. I plan on getting another one of these to do and Australian bird though as I do like the camo... "Q"
litespeed
Staff MemberNews Reporter
AEROSCALE
_VISITCOMMUNITY
England - North West, United Kingdom
Joined: October 15, 2009
KitMaker: 1,976 posts
AeroScale: 1,789 posts
Posted: Thursday, December 23, 2010 - 04:56 AM UTC


Hi all.
Matt has kindly allowed me to share his build log as I am building Rodens Pilatus ''Air America'' release. The kit was very kindly sent to me by Stephen Lawson, our man dealing with Roden.
The kit was a bit damaged in transit to me, it looked like an elephant or two had sat on the USP box.


Stephen has kindly requested replacement parts for the few parts missing, but in the meantime on with the build.


VonCuda
_VISITCOMMUNITY
North Carolina, United States
Joined: November 28, 2005
KitMaker: 2,216 posts
AeroScale: 1,080 posts
Posted: Thursday, December 23, 2010 - 07:24 AM UTC
Q, don't waste your God given talents on that Army scheme. DO IT IN THE BOX ART!!!

Eh.......I'm not really into this particular plane, but since you're building it I'll watch with everyone else.

Hermon
Red4
_VISITCOMMUNITY
California, United States
Joined: April 01, 2002
KitMaker: 4,287 posts
AeroScale: 1,164 posts
Posted: Thursday, December 23, 2010 - 10:19 AM UTC
Easy on the Army now... I will be doing another one in the Aussie camo scheme, just not this one. Looking at Tim's parts layout, it looks like the kits are going to be identical, just different markings. Once this is posted, I'll be stepping over to the bench and continuing with my seats....fiddly little things that they are. Thanks for following along..."Q"
Red4
_VISITCOMMUNITY
California, United States
Joined: April 01, 2002
KitMaker: 4,287 posts
AeroScale: 1,164 posts
Posted: Thursday, December 23, 2010 - 11:39 AM UTC
Well a little over an hour later and the cockpit is complete for the most part. Particular attention needs to be paid to the pilot and co-pilot seat locations. The bottoms are simply boxes that can be assembled backwards....trust me on this. I ended up having to sand off the locating pins on the bottom of said boxes to get them in place. There is a lot going on in the instructions in dealing with the seats. I missed it. Luckily it isn't a show stopper. Just pay attention to the instructions. I modified my assembly technique for the seats. I used some CA to tack the front frame work in place, and also to tack the side pieces on. I used Tamiya extra thin when attaching the back of the seat and the diagonal cross member. Once everything had set up a few minutes, I could move everything in a little closer to where it needed to go, and nail things down with some more CA. I brushed on some Mr. Surfacer 1200 over all the joints and things look well. Once paint is applied, it should tie everything together nicely. I test fit the cockpit/cabin into place in the fuselage and I like what I am seeing. No significant gaps or misalignment's that I can see so far. Once the seat cushions are installed, all that frame work will be hidden Oh well....Taking the wife to dinner, so I need to stop for the night. More to follow soon. Thanks for following along. "Q"
Pay attention in this step!


litespeed
Staff MemberNews Reporter
AEROSCALE
_VISITCOMMUNITY
England - North West, United Kingdom
Joined: October 15, 2009
KitMaker: 1,976 posts
AeroScale: 1,789 posts
Posted: Thursday, December 23, 2010 - 11:44 AM UTC
Hi Matt.
Fantastic job on those seats. Man they are fiddly.
All the best.
tim
Red4
_VISITCOMMUNITY
California, United States
Joined: April 01, 2002
KitMaker: 4,287 posts
AeroScale: 1,164 posts
Posted: Thursday, December 23, 2010 - 03:44 PM UTC

Quoted Text

Man they are fiddly.

You got that right!
Thanks, "Q"
Red4
_VISITCOMMUNITY
California, United States
Joined: April 01, 2002
KitMaker: 4,287 posts
AeroScale: 1,164 posts
Posted: Friday, December 24, 2010 - 04:21 AM UTC
Well, I was up bright and early this morning and got some time in at the bench. I have painted the interior and got the seats painted as well. I base coated everything with acrylics then used oils for shadows and hi-lights. I want to add seat belts to this thing, but had no clue as to how they would route for the pilot/co-pilot seats. Then I stumbled across this web-site http://www.pilatus-aircraft.com Under the PC-6 tab was "Cockpit" I clicked on this and it provided a 360 degree virtual tour of the cockpit which showed the seat and seat belts, albeit of a newer Pilatus, but I can't imagine the seats would be much different. Other images I found of the cabin seats showed the spindly frame seat framework was just about dead on accurate. Now the kit seats for the cockpit aren't anywhere near close to looking like the real things, but I'll make do with what I have. Once the oils are dry I will flat coat everything so that the sheen from the oil is removed. So, without further ado, here is where we stand currently. More to follow soon. "Q"


litespeed
Staff MemberNews Reporter
AEROSCALE
_VISITCOMMUNITY
England - North West, United Kingdom
Joined: October 15, 2009
KitMaker: 1,976 posts
AeroScale: 1,789 posts
Posted: Friday, December 24, 2010 - 04:38 AM UTC
Hi Matt, great looking interior. Some progress from me after some last minute shopping for groceries this morning.


Really enjoying this build so far. I saw some interesting photos of a Pilatus with a load of netted down cargo. I like the idea of something slightly different, perhaps with the rear doors open.
All the best.
tim
VonCuda
_VISITCOMMUNITY
North Carolina, United States
Joined: November 28, 2005
KitMaker: 2,216 posts
AeroScale: 1,080 posts
Posted: Friday, December 24, 2010 - 02:11 PM UTC
Looking good guys. This twin build blog is a great idea.

Q, any reason for the oil wash instead of mixing up some acrylic and Future wash or something like Promodeler washes? Just wondering.


Hermon
Red4
_VISITCOMMUNITY
California, United States
Joined: April 01, 2002
KitMaker: 4,287 posts
AeroScale: 1,164 posts
Posted: Friday, December 24, 2010 - 03:43 PM UTC
No washes used as yet. I used oils and blended them over the acrylic base colors. Makes for an easier way to achieve a nice, subtle change in colors from light to dark as they blend really easy and have a long working time. Only drawback is the drying time, but I can compensate for that with the use of Japan Drier which helps speed up the drying time. I've played with the pro-modeler washes and don't much care for them. I'll stick to my oils when the time comes for washes. I agree with the dual build thing. Nice way to see two different plans of attack on the same kit. I'll be leaving town tomorrow for a few days thereby giving Tim time to get some updates posted on his build. See you all on the 29th or there abouts. Hope everybody has a great Christmas and a Wonderful New Year.
See you soon..."Q"
Red4
_VISITCOMMUNITY
California, United States
Joined: April 01, 2002
KitMaker: 4,287 posts
AeroScale: 1,164 posts
Posted: Friday, December 31, 2010 - 06:31 AM UTC
Hola' everybody. I hope Santa rewarded all of you with nice shiny new plastic! A small update on my Pilatus build. I've run into a small snag with the fuselage assembly. I tried using shims like Tim did with his to re-enforce the fuselage seam, but there was a small lip inside my fuselage that didn't allow that to work. Still, I pressed on and got the sides together trapping the interior in place. I ended up with a step along the top seam that I have filled with Tamiya regular putty and troweled out in an attempt to even things up. I don't like doing things this way, but couldn't figure out a different route. It has taken two applications of the putty to level the top of the fuselage up, and once I block sand it, it should look alright. The putty dries quickly, so I should be back in business here shortly. Thanks again for following along. More to follow soon. "Q"
The lake O'putty along the top seam...

The bottom...not so bad as I can work this out.

Red4
_VISITCOMMUNITY
California, United States
Joined: April 01, 2002
KitMaker: 4,287 posts
AeroScale: 1,164 posts
Posted: Friday, December 31, 2010 - 07:57 AM UTC
While waiting for the putty on the upper fuselage seam to dry I worked on the nose of the plane. There are two sets of prominent sink marks that need to be filled on the nose. One close to the windscreen and the other near the prop. I'll use the same Tamiya regular putty for these. I added some locating shims to the fuselage so the nose would be a bit easier to locate to the fuselage. I made my own jig for assembling the prop. I used a piece of rigid foam and simply pushed the spinner backing into it, then added the props and glued them in place. I'll leave them here until everything sets up completely. The nose has a seam that runs right through the middle of where the backing would be. Even with the spinner in place, it was visible, so I punched a piece of .010 sheet the same diameter and used this to cover it. Even though it pushes the prop out from the face a bit, It looks considerably better to my eye. More to follow soon. Thanks, "Q"


VonCuda
_VISITCOMMUNITY
North Carolina, United States
Joined: November 28, 2005
KitMaker: 2,216 posts
AeroScale: 1,080 posts
Posted: Friday, December 31, 2010 - 01:03 PM UTC
It's starting to look like this kit may not be suitable for "beginners". On the bright side, the cockpit/cabin looks mighty good sitting in the fuselage.

Hermon


ps: Matt, as for ProModeler wash...............
I've started adding some super fine ground powder from my artist chalk sticks to various places on my models using PM wash as a medium. So far I've had really good results (to my untrained eye).
Red4
_VISITCOMMUNITY
California, United States
Joined: April 01, 2002
KitMaker: 4,287 posts
AeroScale: 1,164 posts
Posted: Saturday, January 01, 2011 - 05:23 AM UTC

Quoted Text

It's starting to look like this kit may not be suitable for "beginners".


It could be a bit daunting to deal with the seam issues for somebody who is new to the hobby. With the second one I have, I will take a different approach and see how that goes. It might have been something I did or failed to do with this one, but I can't be sure. So far it is coming together well even with the seam issues I had. I taped the entire thing up last night and it is a big plane. The wings are considerably longer than I had initially thought they would be. I'll grab some pics here shortly...once the hangover subsides a bit...
"Q"
Red4
_VISITCOMMUNITY
California, United States
Joined: April 01, 2002
KitMaker: 4,287 posts
AeroScale: 1,164 posts
Posted: Saturday, January 01, 2011 - 08:32 AM UTC
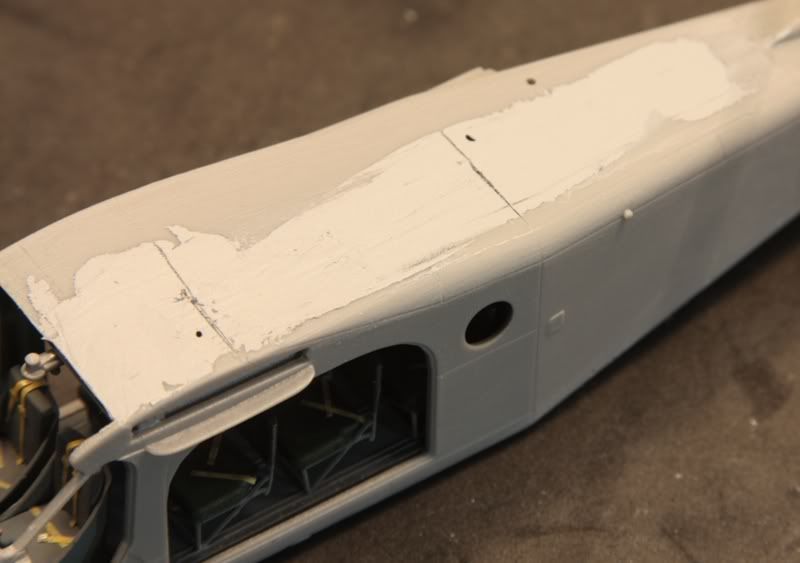
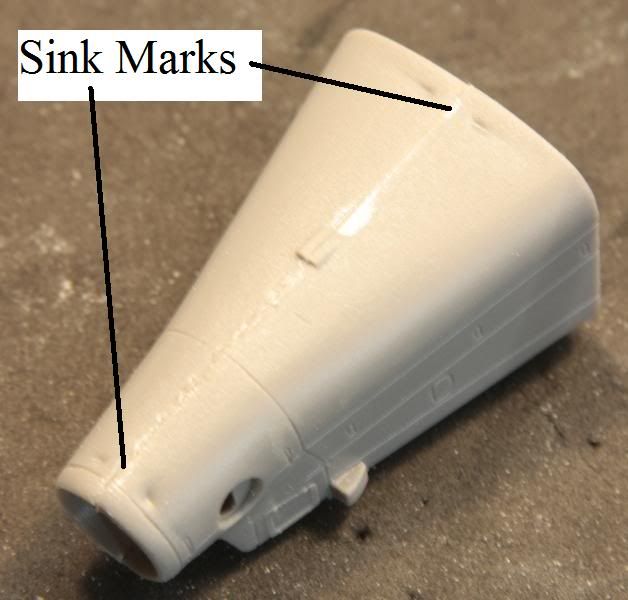
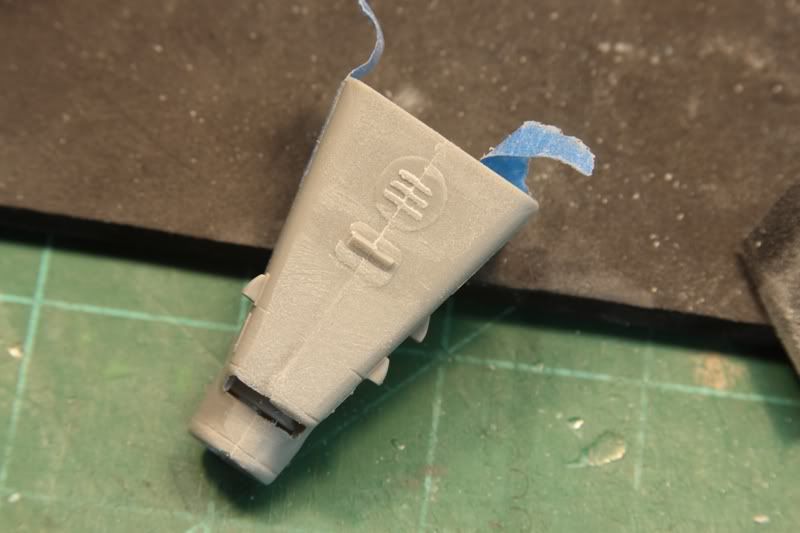
Lots of progress and some minor setbacks. Once my hangover subsided, I made some decent progress on this thing. I began by dressing the puttied areas on the nose. In doing so, I figured it would be easier to remove the molded on scoop on the top of the cowling and replace it later. It was molded with one half on one side of the cowl, and the other half on the opposite side. Not an easy seam to dress by any means.


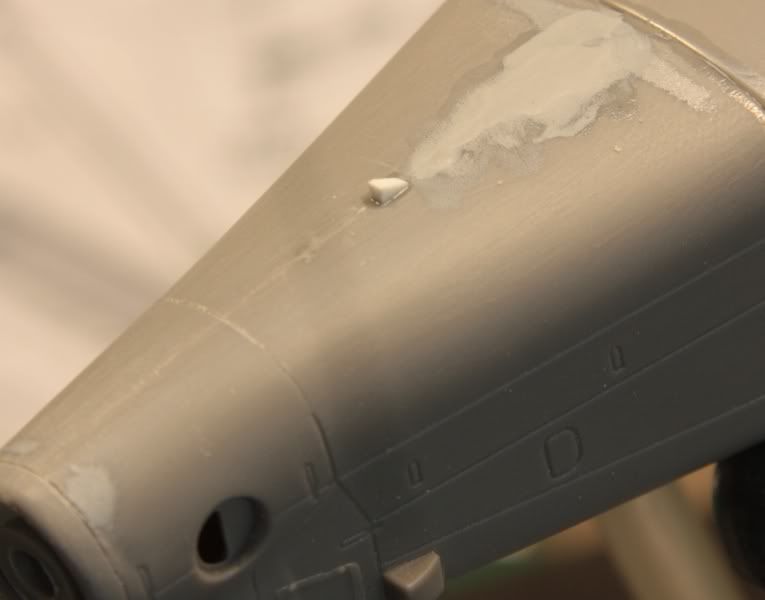
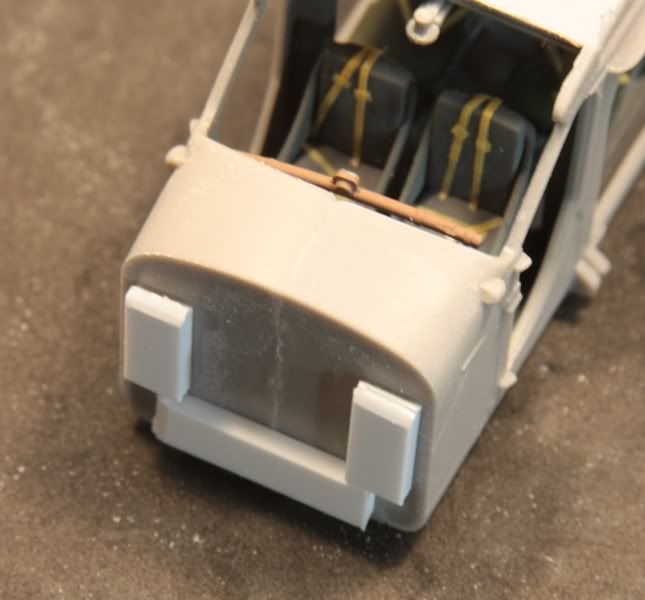
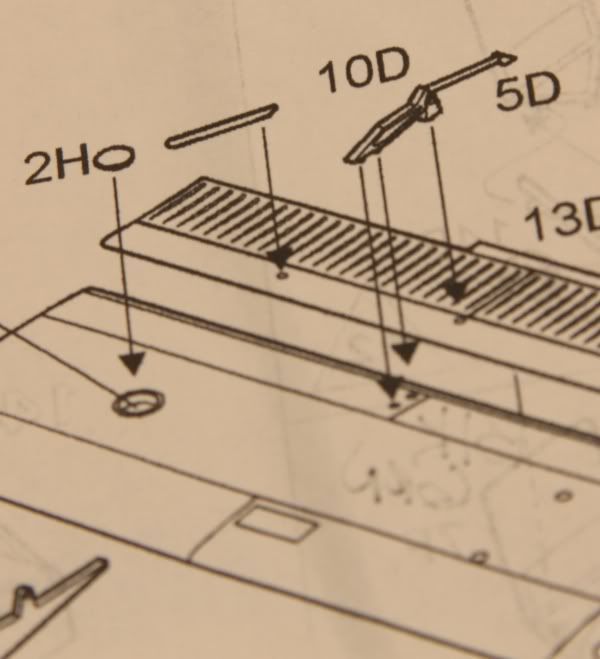
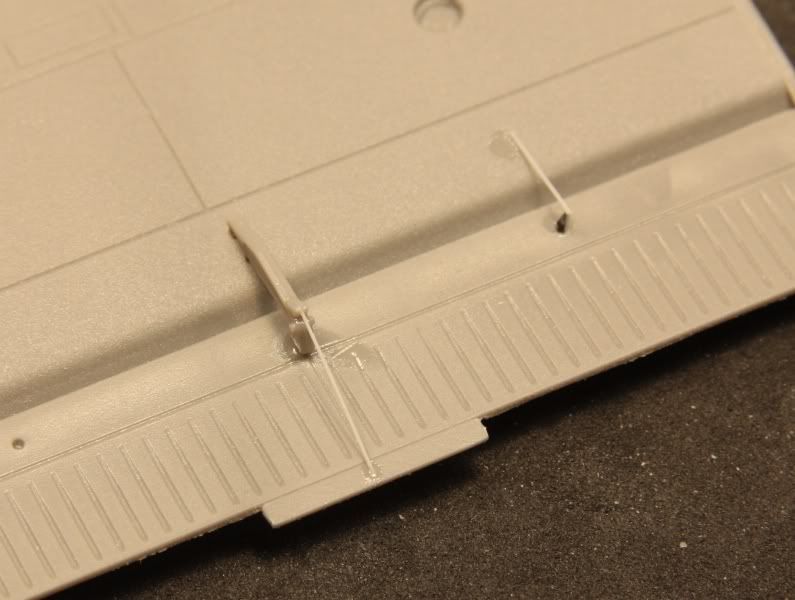
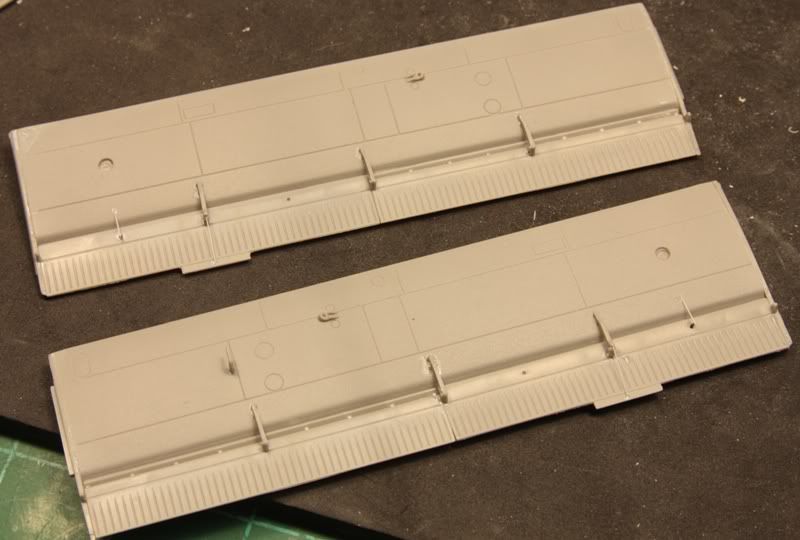
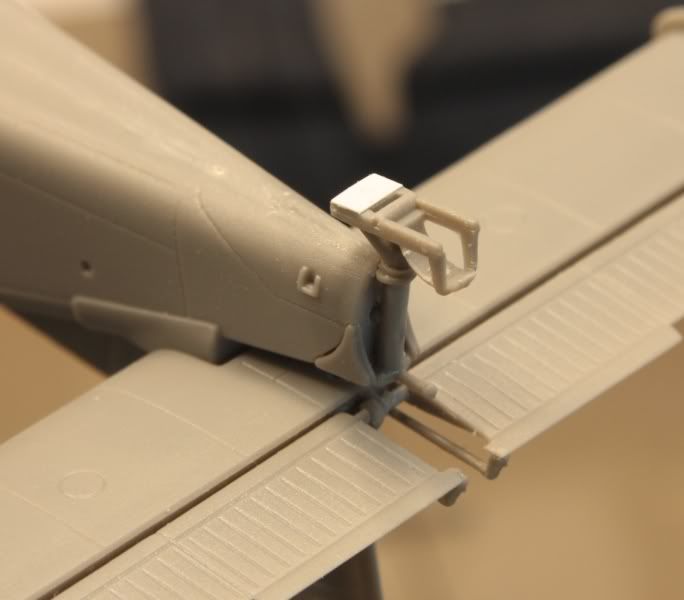
Moving on to the bottom, I discovered the same problem with the details down there...

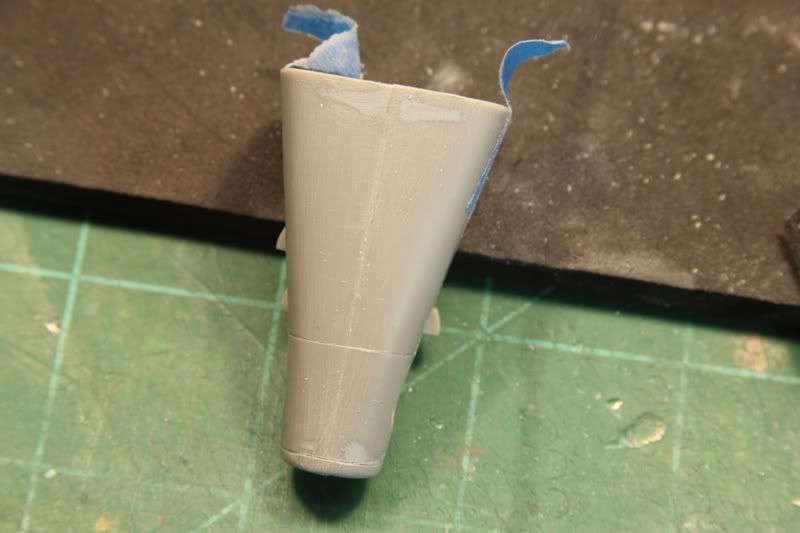
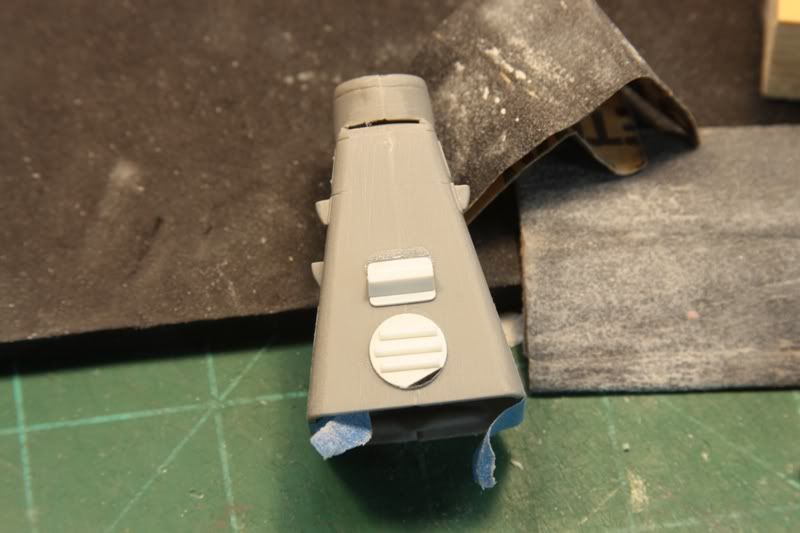
I treated this area the same and sanded off everything, then smoothed out the plastic. I used my punch set and made the disc from some scrap .010 sheet, and added the strips with .020 half round pieces. The detail in front of this was cut from the same scrap .010 sheet then had the corners rounded off a bit. The scoop is a piece of triangular stock cut to length. All of this is a little larger than what was molded on the kit, but should look the part once painted.

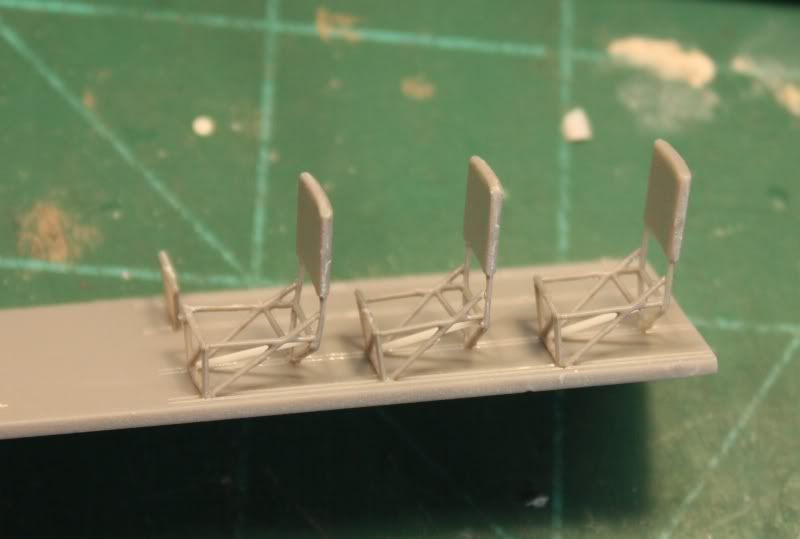
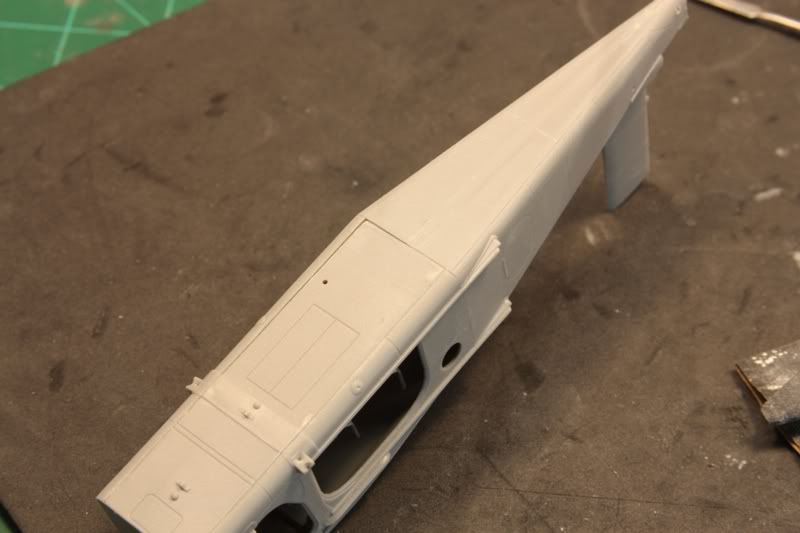
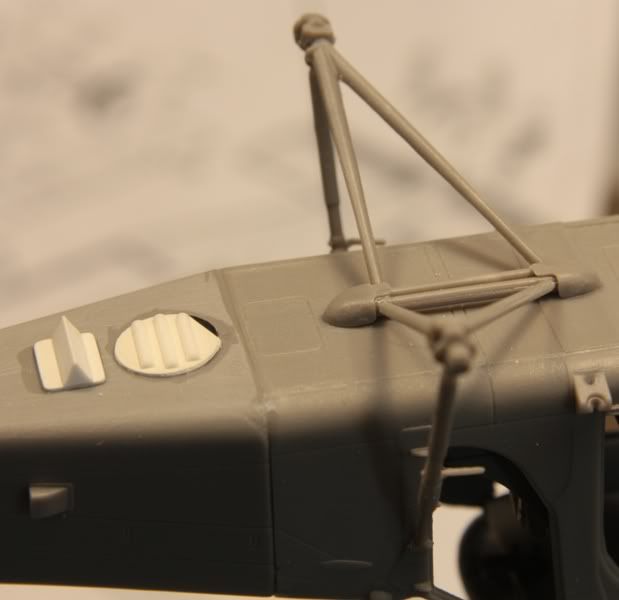
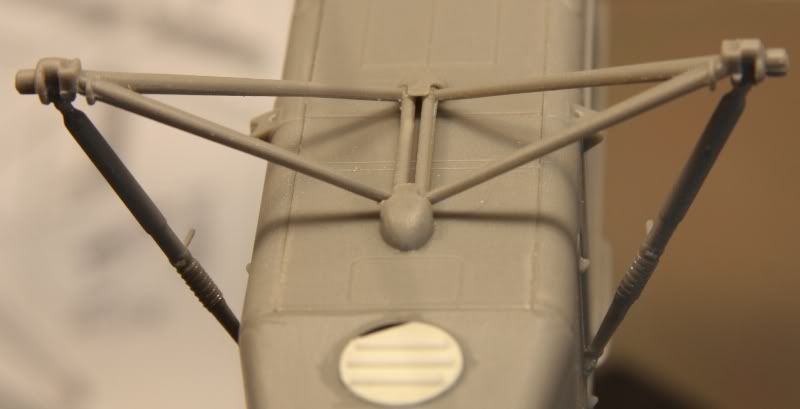
I added the spindly landing gear. This reminds me of the Fiesler Storch. I was pleasantly surprised at how well everything fit. I didn't have to cut, sand or otherwise tweak anything to get the pieces to line up and fit.


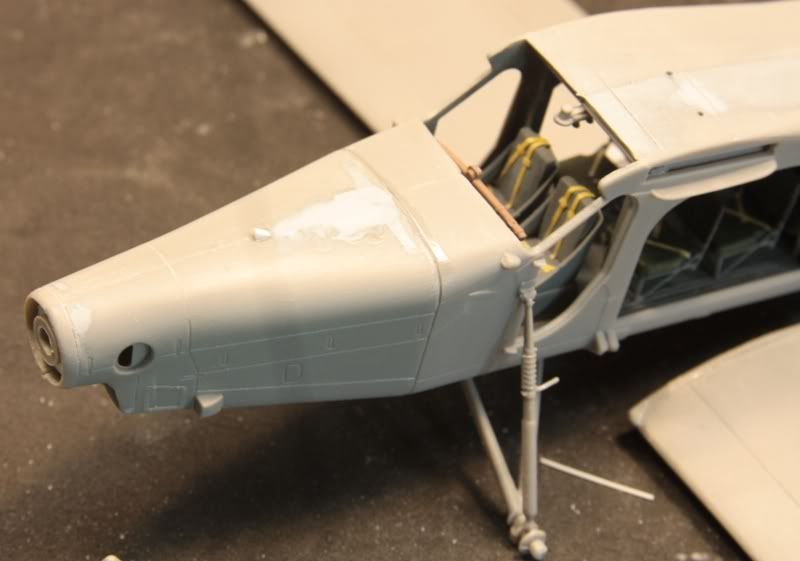
I also added the tail wheel. No problem adding this piece either...but there was a small sink mark on the bottom that I cut some .005 sheet to cover rather than putty it.

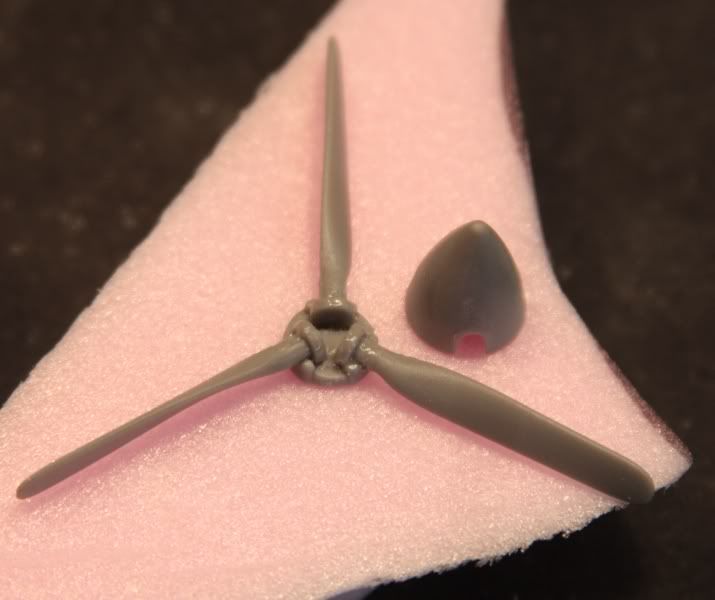
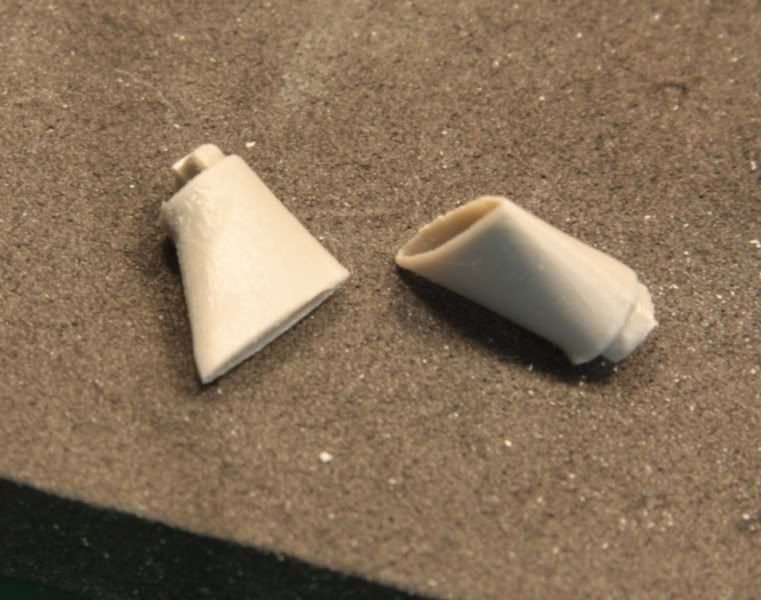
I assembled the exhausts and about lost my cool. They are really small, have no locating pins/tabs and were hard to hold onto. I had to scrape the exhaust openings a bit to make them look like the gases had some place to escape as they were molded almost completely closed. Once assembled and dry, I was able to dress the small seams with the back of a #11 blade, and some fine sandpaper.

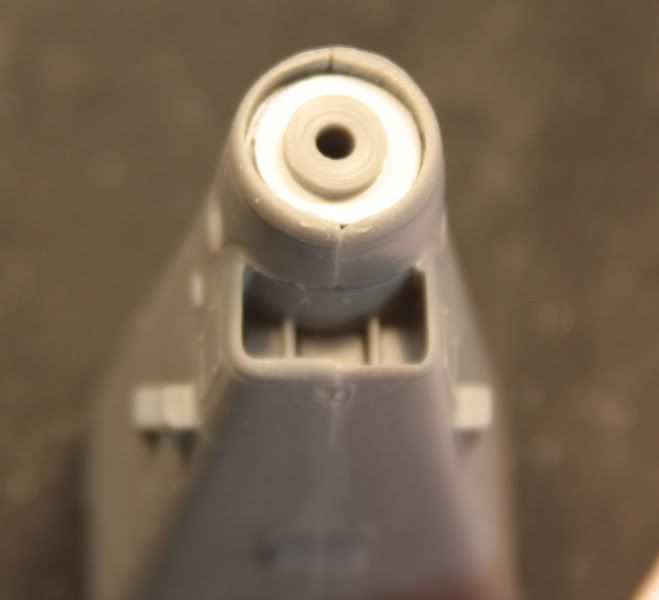
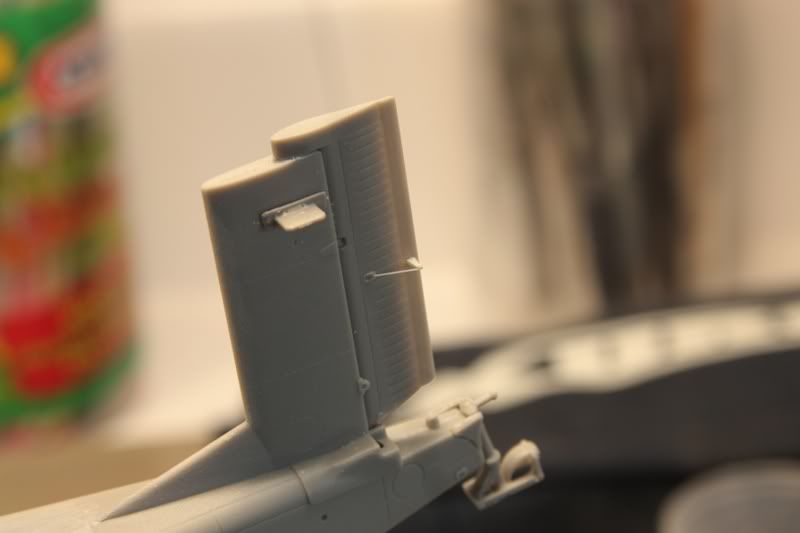
While cleaning up the actuator arm for the trim tab, the carpet monster got hungry and attacked.. I searched in vain for a few minutes then sat down and scratched a replacement piece from the .010 sheet stretched sprue and an end slice of .010 rod. Again, it should look alright under paint.

The rudder was the last thing added this morning. Everything is sitting on the bench drying. Hoping to get back to it this afternoon. Thanks for following along. "Q"
ps. This thing is quite large when everything is in its proper place...


VonCuda
_VISITCOMMUNITY
North Carolina, United States
Joined: November 28, 2005
KitMaker: 2,216 posts
AeroScale: 1,080 posts
Posted: Saturday, January 01, 2011 - 11:39 AM UTC
I'm still shaking my head at that replacement actuator arm. Man, that looks better than kit.
The exhaust stacks turned out well also. Could you have made replacement ones out of some flattened out brass rod? And finally, that's a great shot of the landing gear struts. It'll be interesting to see if they actually hold that beast up over time.


Hermon
Red4
_VISITCOMMUNITY
California, United States
Joined: April 01, 2002
KitMaker: 4,287 posts
AeroScale: 1,164 posts
Posted: Saturday, January 01, 2011 - 05:07 PM UTC
Thanks for the kudos Hermon. The actuator arm in the kit was actually a little clunky in regards to the rod, so the stretched sprue was a good and logical choice as I could get it nice and small. In fact, I am thinking I might replace all of the remaining ones with it from here out. The legs are sturdy. I don't see them splaying out over time, but you can never know with these things. Will get back at it tomorrow. Thanks again for the comments. "Q"
Red4
_VISITCOMMUNITY
California, United States
Joined: April 01, 2002
KitMaker: 4,287 posts
AeroScale: 1,164 posts
Posted: Sunday, January 02, 2011 - 05:12 AM UTC
Day 2 of the new year and progress continues. I started early this morning by tackling the windshield. Unfortunately, I got into a groove and didn't stop to take any pictures. Right out of the box, the kit part doesn't fit well. It sat proud of the opening in the fuselage, but I used the backside of a #11 blade and carefully scraped away material from the lower inside edge of the windshield and also along the corresponding mating surface on the fuselage. It took a few tests, but I finally got the thing to fit considerably better than it did. There is still a small gap between the two, but I didn't want to risk making the piece too thin and then breaking it. I can fill the gap with some Micro Krystal Kleer and it'll look fine. I cleaned off the windshield from all the handling and then gave it a couple of quick dunks in Future. It is now drying/curing.
I moved onto the wings from here. I decided to improve the look of the ailerons by swapping out the kit supplied rod on part 5D that runs to the trim tab with stretched sprue. I also swapped out part 10D for stretched sprue and some more scrap to make the control horn as the kit part merely laid across the bottom of the wing with one end floating in the air...

The locating holes on the wing bottom were shallow so those were drilled out to allow parts D5, 6, &7 to sit flush with the wing.

The flaps and ailerons were a little snug when I tried to fit them in the wing glove. It was quickly and easily fixed with a few light passes of a sanding stick to the ends of the flaps.

There is no locating hole for the pitot tube, so one was drilled in the approximate location of where it mounted. I am going to try and test fit all of the wing components to the fuselage this afternoon to see how the alignment looks. Will try to grab some pics and get them posted showing the results when I do. Thanks for following along. More to follow soon. "Q"
Red4
_VISITCOMMUNITY
California, United States
Joined: April 01, 2002
KitMaker: 4,287 posts
AeroScale: 1,164 posts
Posted: Sunday, January 02, 2011 - 09:03 AM UTC
While other parts and pieces were drying, I decided to try something a bit different with one of the extra windows/doors in the kit. I decided to try and pour my own glass. The first step was to blank off the exterior portion of the window openings with some clear packing tape.....I made sure to burnish this down along the edges with a tooth pick really well to avoid any leaks.

Next, I mixed up some clear casting resin/plastic from Alumilite and poured a small amount into the interior portions of the window openings using a toothpick to help fill the entire opening. Need to be careful doing this as it is easy to get too much and have it slop out and thereby ruin the effect.


You can see air bubbles in the resin from the mixing process. I could have left these alone and hoped they would float themselves out, but I decided to do it myself. Lighting a match, I ran it back and forth just above the resin making sure not to get too close and not to touch the resin as it would scorch it. Like magic the bubbles rose to the surface and popped. You have to look closely, but the windows are crystal clear..no bubbles


Then it was a matter of setting the door off to the side and letting it fully cure. I kept the mixing cup so I could judge how things were going with the mixture in the windows. The contents of the cup have cured about 95% since I poured everything so I will let this set another couple of hours to make sure everything is good and solid. Once cured, I'll remove the tape and hopefully be left with some nice clear windows.
In regards to the plane, she is about ready to head to the paint shop. I've added a few various antenna's to the spine and the belly...


She's all masked off and ready. I need to do some minor touch up work on the lower wings, so I will wait to get that knocked out before moving on to paint. Shouldn't be long now. Thanks for following along. "Q"
grimmo
_VISITCOMMUNITY
Queensland, Australia
Joined: January 17, 2006
KitMaker: 752 posts
AeroScale: 10 posts
Posted: Sunday, January 02, 2011 - 11:38 AM UTC
Matthew,

this is a great build! I saw this on the shelf at my LHS, and will get it next week! I got the chance to see one of these up close and flying back when i was 8 or 9. And i'll be doing it in the aussie cam of course!
 _GOTOTOP