World War II: Germany
Aircraft of Germany in WWII.
Hosted by Rowan Baylis
Focke Wulf 189 A-2 Great Wall Hobby 1/48
NickZour
_VISITCOMMUNITY
Attica, Greece / Ελλάδα
Joined: May 01, 2008
KitMaker: 1,437 posts
AeroScale: 1,241 posts
Posted: Sunday, March 27, 2011 - 11:41 PM UTC
Hello Mr. Gaston.
Can you show me a photo of the problem
About the kubelwagen: Yes I know the bandai's kit excistance, but it is impossible to buy a new kubelwagen kit now


Cheers Nick
TedMamere
_VISITCOMMUNITY
Moselle, France
Joined: May 15, 2005
KitMaker: 5,653 posts
AeroScale: 4,347 posts
Posted: Monday, March 28, 2011 - 12:24 AM UTC
Hi Nick,

Nice progress...

Beware of the masks included in the kit, they don't fit very well. I wonder why Eduard has not made a replacement sheet yet. Good luck for this!

Jean-Luc
NickZour
_VISITCOMMUNITY
Attica, Greece / Ελλάδα
Joined: May 01, 2008
KitMaker: 1,437 posts
AeroScale: 1,241 posts
Posted: Monday, March 28, 2011 - 07:28 AM UTC

Quoted Text

Hi Nick,

Nice progress...

Beware of the masks included in the kit, they don't fit very well. I wonder why Eduard has not made a replacement sheet yet. Good luck for this!

Jean-Luc


Hello Mr. Jean-Luc

Thank you very much
Yes, I know that some of the kit masks are problematic, but thanks anyway !


Cheers Nick
GastonMarty
_VISITCOMMUNITY
Quebec, Canada
Joined: April 19, 2008
KitMaker: 595 posts
AeroScale: 507 posts
Posted: Monday, March 28, 2011 - 08:04 AM UTC

Quoted Text

Hello Mr. Gaston.
Can you show me a photo of the problem
About the kubelwagen: Yes I know the bandai's kit excistance, but it is impossible to buy a new kubelwagen kit now


Cheers Nick


Hello Nick:

The Bandai has quite a few problems of its own, but they are fixable: The nose is too narrow by 0.7 mm, which on such a small car is quite noticeable, but by using plasticard the front can be spread very easily.

The slope of the Bandai rear is too slanted but easily fixed.

I will also use Tamiya front fenders on the Bandai kit, moved forward by 1 mm. The Bandai kit is still often available (?) from http://www.oldmodelkits.com/ , and the price is not too bad, but it is rare...

The Tamiya kit is nearly 1 mm too wide at the nose and 0.7 mm too wide at the firewall.

I have checked, and this cannot be fixed because of the way the parts interlock.

The Bandai hood is at a correct steeper angle, but oversteps higher above the doors, which is very wrong: A 0.5 mm sliver of Plasticard can be used to reduce the overstep over the doors, up to and incuding the tail., without making the Bandai body too deep, as it is a touch shallow anyway...

The Bandai windshield is the correct size, and it is a huge difference...:

The actual windshield width is 1113 mm per 368 mm depth.

In 1/48th scale this translate to 23.18 mm wide per 7.66 mm deep.


Bandai's windshield is 23 mm wide by 7.5 mm deep.

Tamiya's windshield is 25 mm wide by 8.5 mm deep.

This a 13% error in depth by Tamiya, and 7.8% on the width.

1.82 mm is 3.43(!) scale inches for the width, and 1mm is 1.9 inches for the depth.

Tamiya's windshield "scale" is 1/44.5 for the width and 1/43.2 for the height...

Body:

Nose width: Tamiya: 18.6 mm. Bandai: 17.0. Actual: 17.7 mm. (850 mm). (Again, Bandai is correctable, but the fenders are a bit in the way and would require a bit of carving; they are too wide anyway...)

Body width at windshield level:

Tamiya: 23.8 mm, Bandai: 23.0 mm. Actual: 23.1 mm (1113 mm)

I will post step by step pictures of my corrected Bandai Kubelwagen in the future, but it will take quite some time because of other projects nearing completion now...

Note that as you lowered your windshield and showed it covered and opaque, many of these issues are not so noticeable on your model anymore...

Spread a map on the nose and it will all be practically invisible, as the rear body width is correct!

Gaston
Merlin
Staff MemberSenior Editor
AEROSCALE
#017
_VISITCOMMUNITY
United Kingdom
Joined: June 11, 2003
KitMaker: 17,582 posts
AeroScale: 12,795 posts
Posted: Wednesday, March 30, 2011 - 09:42 AM UTC
Hi Nick

Good job so far! Your Uhu is set to turn out really nicely!

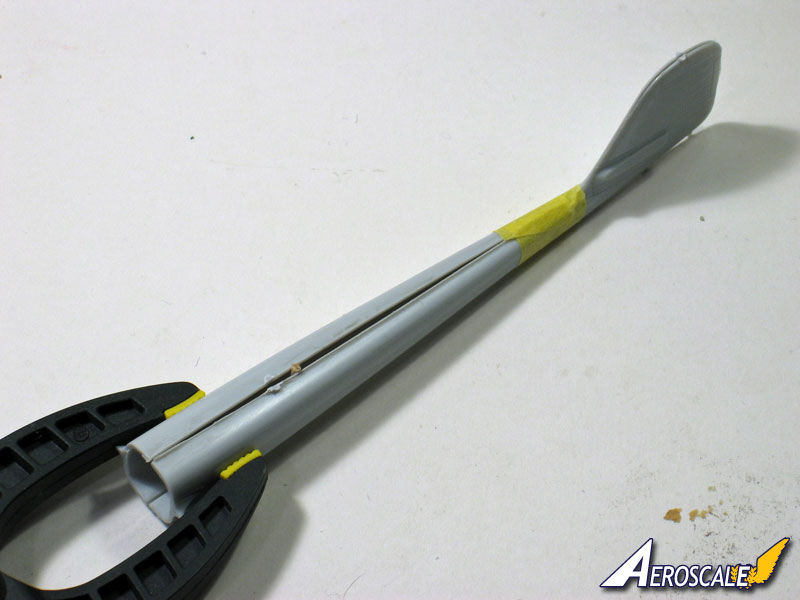
I couldn't tell from your post whether you were asking about the problem with the kit's tail-booms or the Kübelwagen. Anyway, assuming it was the tail-booms as Gaston mentioned, this is my suggestion for a simple fix (demonstrated with the MPM Fw 189):


It probably won't satisfy die-hard rivet counters, but inserting a spacer adds a bit of a curve and does depict the shape of the booms better than the unmodified kit parts. You'll need to add a flange on the bottom of the booms anyway (Great Wall Hobby missed it), so it's no great deal to to fill the gap that results from the mod and add a replacement on the top too.

All the best

Rowan
NickZour
_VISITCOMMUNITY
Attica, Greece / Ελλάδα
Joined: May 01, 2008
KitMaker: 1,437 posts
AeroScale: 1,241 posts
Posted: Thursday, March 31, 2011 - 04:26 AM UTC
Thank you everyone!
I'm Sorry Mr. Martin but I don't have the intention to change the kubelwagen kit. Yes Mr. Rowan, I was reffering to the tail boom problem,Sorry for being too ambiguous

Thank you for your reply about the tail booms. What flange do you mean? Can you please explain it to me further


Cheers Nick
Merlin
Staff MemberSenior Editor
AEROSCALE
#017
_VISITCOMMUNITY
United Kingdom
Joined: June 11, 2003
KitMaker: 17,582 posts
AeroScale: 12,795 posts
Posted: Tuesday, April 05, 2011 - 09:12 AM UTC
Hi Nick

Sorry for the late reply - I didn't spot your post.

If you put the kit's tail-boom parts together, you'll see there's a raised "lip" running along each side of the joint on the top - the flange. It's a distinctive feature of the Fw 189 and part of how the boom was constructed on the real aircraft. There should be an identical flange on the underneath, but Great Wall Hobby missed it. It's easy enough to add with a strip of thin styrene stock.

All the best

Rowan
Tailor
_VISITCOMMUNITY
Nordrhein-Westfalen, Germany
Joined: May 26, 2008
KitMaker: 1,168 posts
AeroScale: 199 posts
Posted: Tuesday, April 05, 2011 - 07:44 PM UTC

Quoted Text

... there's a raised "lip" running along each side of the joint on the top - the flange. It's a distinctive feature of the Fw 189 and part of how the boom was constructed on the real aircraft ... Great Wall Hobby missed it...


According to plans this lip scales out 0.25mm in height and 0.021mm width. In the kit this flange would have made cleaning up the glueing seam more complicated and was left away for better handling in construction. It's one of those cases when GWH looks into making a kit workable for the intermediate and inexperienced modeller. In the end all scale models need to compromise in one or another way. While they are in the midst of desiging new kits, they constantly read your comments and hope to still satisfy, even though they will have to compromise in the future, too.
We hope you can understand this.
Cheers,
Guido

NickZour
_VISITCOMMUNITY
Attica, Greece / Ελλάδα
Joined: May 01, 2008
KitMaker: 1,437 posts
AeroScale: 1,241 posts
Posted: Saturday, April 30, 2011 - 06:18 AM UTC
I have just finished the kubelwagen, started masking (I'll stick the bad pieces of the masking paper with a bit of Blue tack ) And I also get together some other pieces of the aircraft


Cheers Nick
NickZour
_VISITCOMMUNITY
Attica, Greece / Ελλάδα
Joined: May 01, 2008
KitMaker: 1,437 posts
AeroScale: 1,241 posts
Posted: Saturday, April 30, 2011 - 06:21 AM UTC
Why the heck the chipping looks so bad in the photos


Cheers Nick
NickZour
_VISITCOMMUNITY
Attica, Greece / Ελλάδα
Joined: May 01, 2008
KitMaker: 1,437 posts
AeroScale: 1,241 posts
Posted: Wednesday, May 11, 2011 - 12:48 AM UTC
Update

I have painted four different colors (RLM 02, RLM 66, Red, Black) and not only....


Cheers Nick
NickZour
_VISITCOMMUNITY
Attica, Greece / Ελλάδα
Joined: May 01, 2008
KitMaker: 1,437 posts
AeroScale: 1,241 posts
Posted: Sunday, June 05, 2011 - 09:17 AM UTC
NEWS
At this point I want to announce that I used two products that Mr. Alexey Sulla from www.northstarmodels.com send me
The main wheels.
And the Tail gear bay.
Crisp detail everywhere, with only some minor flash. P.E. parts are also very nice


Cheers Nick
AlexeySulla
_VISITCOMMUNITY
Omsk, Russia
Joined: September 21, 2010
KitMaker: 31 posts
AeroScale: 23 posts
Posted: Sunday, June 05, 2011 - 09:43 AM UTC
Hi, Nick. I'm glad that the parcel reached you so quickly. I hope you can install photoetched part from tail wheel bayl.
Note that the wheels on the main landing gear installed the same way: brake drums right on the direction of flight. This was due to the fact that tomrmoznye hoses on the right and left side were identical.

Some pictures:


NickZour
_VISITCOMMUNITY
Attica, Greece / Ελλάδα
Joined: May 01, 2008
KitMaker: 1,437 posts
AeroScale: 1,241 posts
Posted: Wednesday, June 08, 2011 - 11:02 AM UTC
Hi again
I finally understand what you mean Mr. Allexey, but now it's too late, I have already glued the wheels...VERY hard. I have glued them judging by the kit wheels and I thought that the brake drums would not look each other (I mean that, on the right wheel will look right and on the left wheel, left !) Now I can not do nothing, but fortunately it is not so easy to spot and I think that you' re gone love the painting I done on this part. I also managed to complete the whole back wheel bay, by removing the outside panel and also removed the interior detail with an electrical multitool I have for several jobs of our hobby

Comment on the base too, please


NickZour
_VISITCOMMUNITY
Attica, Greece / Ελλάδα
Joined: May 01, 2008
KitMaker: 1,437 posts
AeroScale: 1,241 posts
Posted: Tuesday, June 14, 2011 - 11:03 AM UTC
I am very busy in modelling terms these days, because school has CLOSED DOWN for the summer vacations which last THREE MONTHS, YEEEAAAAH !


Cheers Nick
Emeritus
_VISITCOMMUNITY
Uusimaa, Finland
Joined: March 30, 2004
KitMaker: 2,845 posts
AeroScale: 1,564 posts
Posted: Wednesday, June 15, 2011 - 12:06 AM UTC
As one Mr. Cooper put it:
School's out for summer
School's out forever


Looking good! Nice work on the base too.
It seems those canopy masks really like to pop off. Hope you got them in place when laying down the paint.

NickZour
_VISITCOMMUNITY
Attica, Greece / Ελλάδα
Joined: May 01, 2008
KitMaker: 1,437 posts
AeroScale: 1,241 posts
Posted: Wednesday, June 15, 2011 - 11:18 AM UTC

Quoted Text

As one Mr. Cooper put it:
School's out for summer
School's out forever


Looking good! Nice work on the base too.
It seems those canopy masks really like to pop off. Hope you got them in place when laying down the paint.


Thank you very much Mr. Eetu
No I didn't manage to hold most masks down while painting and in places like the tail cone, there is too much color in places that it shouldn't be . But fortunately for me, I have a thinner which is called "Aceton" and women use it to clean their nails from paint. The "aceton" can remove ANY paint, even the primer and it doesn't harm the plastic. There is also an other "aceton" which is sold for use by workers, but it harms the plastic and it not contains the special oil that it is on the "aceton" that women use.


Cheers Nick
NickZour
_VISITCOMMUNITY
Attica, Greece / Ελλάδα
Joined: May 01, 2008
KitMaker: 1,437 posts
AeroScale: 1,241 posts
Posted: Tuesday, June 21, 2011 - 10:29 AM UTC
And.....Beleive it or not.....I can call it FINISHED !
The only thing I want to mention is that as you can see in the photos below, the movable parts of the canopy have glued in a not usual way, because the mechanics have disconnect them from each other, for maintence reasons and now the movable parts are only hang by the main frame
Now I just have to wait for your comments good and bad


Cheers Nick
rochaped
_VISITCOMMUNITY
Lisboa, Portugal
Joined: August 27, 2010
KitMaker: 679 posts
AeroScale: 669 posts
Posted: Tuesday, June 21, 2011 - 11:23 PM UTC
Hello Nick,

Congratulations on a job well done.
Like your diorama, very interesting mis en scene, plus a very realistic heavy weathering on the top surfaces of the plane.
Only point ( in my view excessive) is the weathering on the RLM 65 painted surfaces. Looks like white over the blue (??) why not a preshading before the blue, or some dark grey/brown wash as an after coating?

Best
Pedro
NickZour
_VISITCOMMUNITY
Attica, Greece / Ελλάδα
Joined: May 01, 2008
KitMaker: 1,437 posts
AeroScale: 1,241 posts
Posted: Wednesday, June 22, 2011 - 01:02 AM UTC
Thank you very much Mr. Pedro
I don't know excactly what do you want to say about the weathering on the RLM-65 but I already have done a wash with paynes grey oil on them, and I weathered them like the top surfaces. I also postshade the whole aircraft.
Can you please explain to me furtherer what you didn't like about the RLM 65 Surfaces. I really want to know


Cheers Nick
TedMamere
_VISITCOMMUNITY
Moselle, France
Joined: May 15, 2005
KitMaker: 5,653 posts
AeroScale: 4,347 posts
Posted: Wednesday, June 22, 2011 - 01:12 AM UTC
Hi Nick,

Splendid work!


Quoted Text

Can you please explain to me furtherer what you didn't like about the RLM 65 Surfaces. I really want to know


I think the RLM 65 undersurfaces weren't oversprayed with white on the real aircraft. I know it is pictured otherwise in the instructions but it seems GWH have made a mistake here. You can always blame them...

Jean-Luc
rochaped
_VISITCOMMUNITY
Lisboa, Portugal
Joined: August 27, 2010
KitMaker: 679 posts
AeroScale: 669 posts
Posted: Wednesday, June 22, 2011 - 01:21 AM UTC
Hello Nick,

It is not a matter of disliking your job on the under surfaces of the FW, it more about the effect seen on the photo.
Seems the GWH instructions pointed white distemper also apllied underneath the AC, to me incorrectly, and this explains the odd looking effect in the photo.
Trust me it's a splendid job you got there!

Best
Pedro
NickZour
_VISITCOMMUNITY
Attica, Greece / Ελλάδα
Joined: May 01, 2008
KitMaker: 1,437 posts
AeroScale: 1,241 posts
Posted: Wednesday, June 22, 2011 - 01:21 AM UTC
Hi again

Thank you very much for your kind comments Mr. Jean-Luc
Can you please show me some photos that prove that the "UHU" wasn't white-washed on the RLM-65 Surfaces


Cheers Nick
TedMamere
_VISITCOMMUNITY
Moselle, France
Joined: May 15, 2005
KitMaker: 5,653 posts
AeroScale: 4,347 posts
Posted: Wednesday, June 22, 2011 - 10:09 AM UTC
Hi Nick,


Quoted Text

Can you please show me some photos that prove that the "UHU" wasn't white-washed on the RLM-65 Surfaces


Can you show us some photos that proves that it was...

Jokes aside, I can't prove it. It may have been the case on some aircraft. Who knows?

Jean-Luc
NickZour
_VISITCOMMUNITY
Attica, Greece / Ελλάδα
Joined: May 01, 2008
KitMaker: 1,437 posts
AeroScale: 1,241 posts
Posted: Wednesday, June 22, 2011 - 10:26 AM UTC

Quoted Text

Hi Nick,


Quoted Text

Can you please show me some photos that prove that the "UHU" wasn't white-washed on the RLM-65 Surfaces


Can you show us some photos that proves that it was...

Jokes aside, I can't prove it. It may have been the case on some aircraft. Who knows?

Jean-Luc


You have just made me happy Mr. Jean-Luc


Cheers Nick