

Nice and very informative Stephen, I'll bookmark this for use in future. Might get to this kit later on this year?
Thanks for posting
Mikael
Early Aviation
Discuss World War I and the early years of aviation thru 1934.
Discuss World War I and the early years of aviation thru 1934.
Hosted by Jim Starkweather
REVIEW
British Armoured Car 1914
OEFFAG_153

Joined: February 19, 2010
KitMaker: 1,473 posts
AeroScale: 1,450 posts

Posted: Wednesday, June 20, 2012 - 08:35 PM UTC

JackFlash

Joined: January 25, 2004
KitMaker: 11,669 posts
AeroScale: 11,011 posts
Posted: Thursday, June 21, 2012 - 02:00 AM UTC
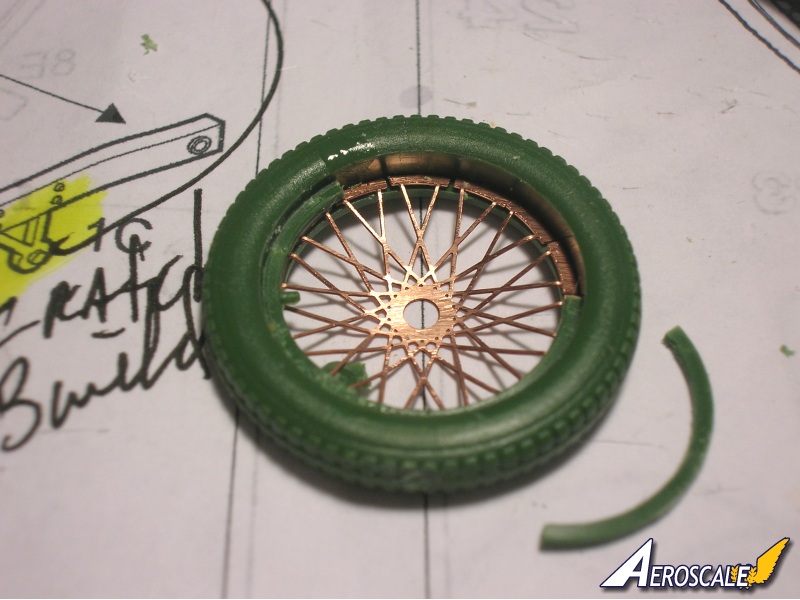
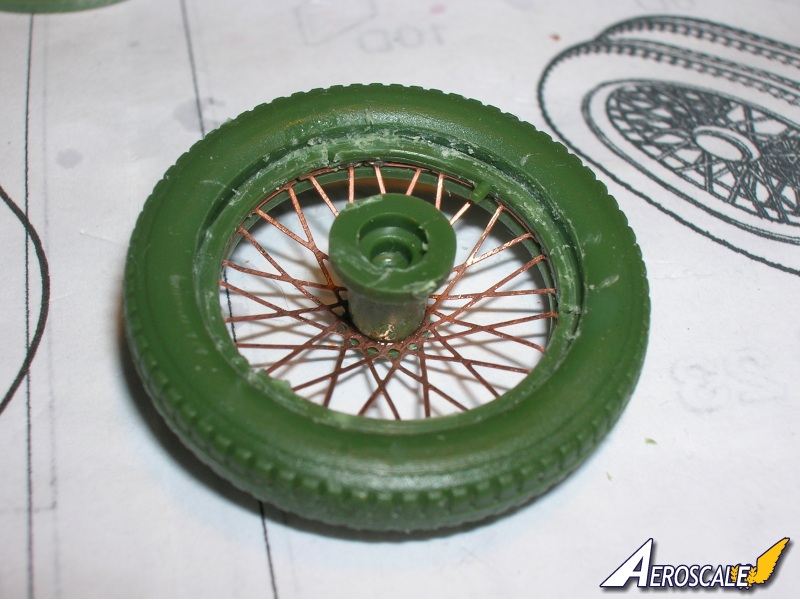
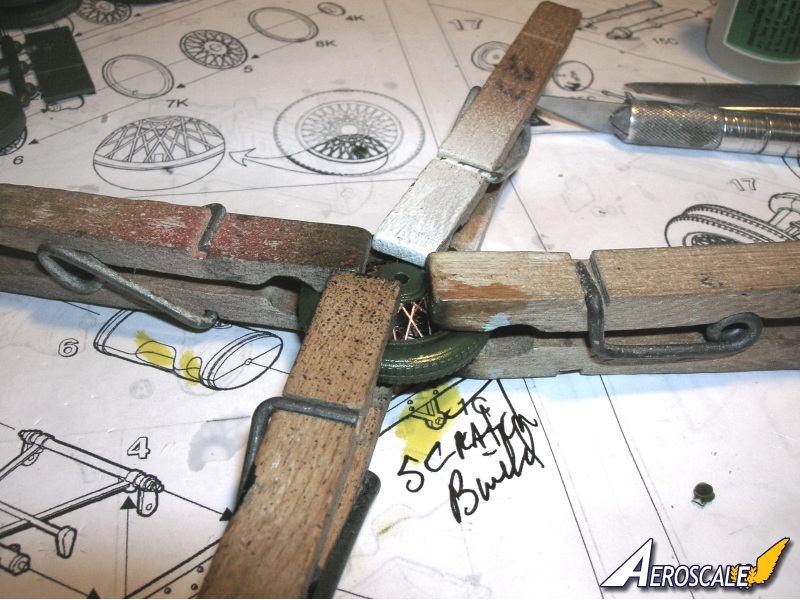
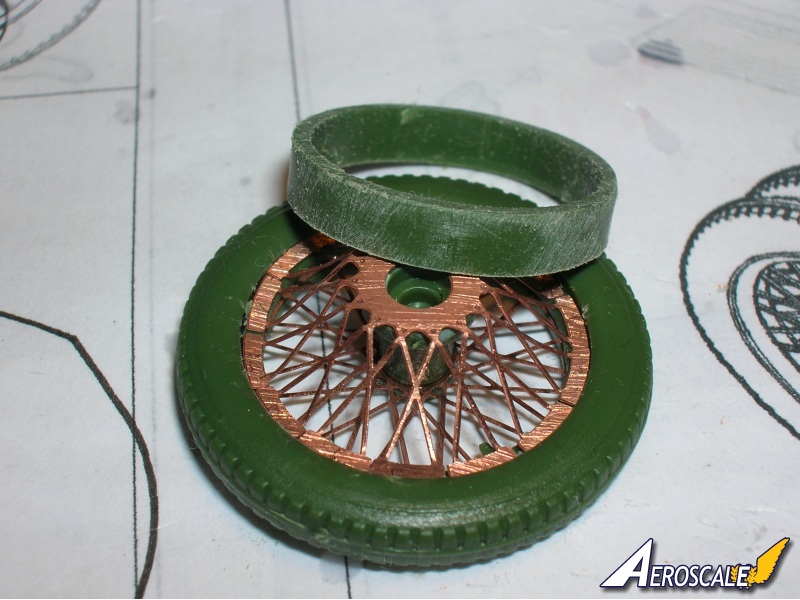
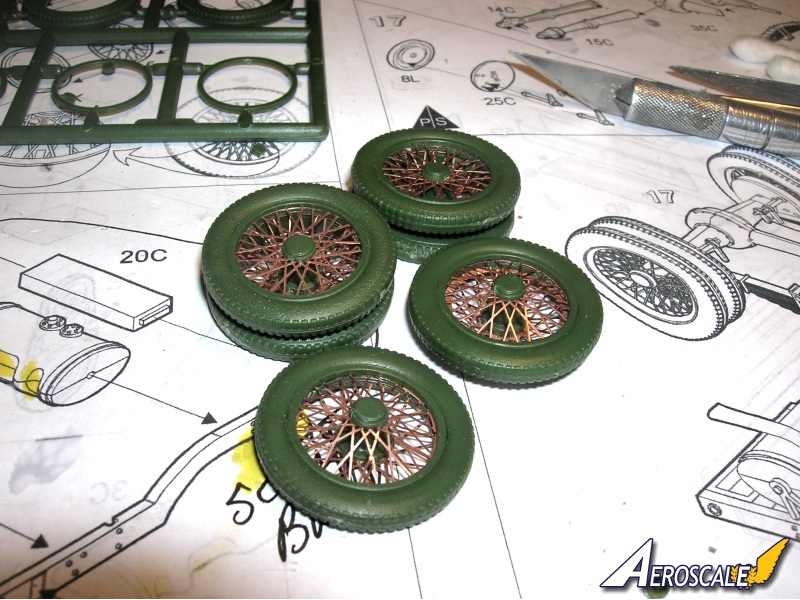
Thanks Mikael! More on the wheels. Note the set up on the copper PE. Only one wheel rim broke but still went in without further issue.
JackFlash
Joined: January 25, 2004
KitMaker: 11,669 posts
AeroScale: 11,011 posts
Posted: Thursday, June 21, 2012 - 02:42 AM UTC
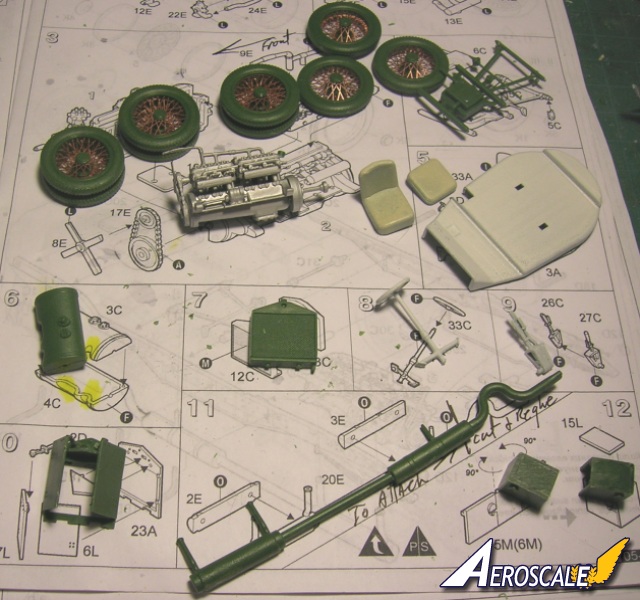
2/3 of the finished Wheels for the Roden 1/35 Rolls Royce armoured car. Kit #803
JackFlash
Joined: January 25, 2004
KitMaker: 11,669 posts
AeroScale: 11,011 posts
Posted: Tuesday, June 26, 2012 - 06:28 PM UTC
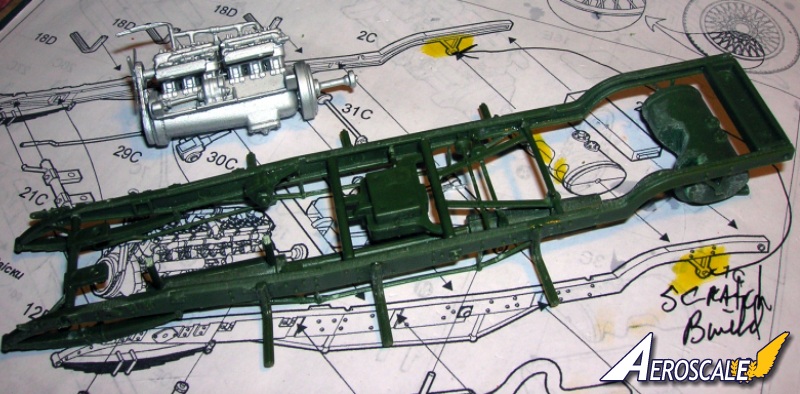
Basics and framework.
JackFlash
Joined: January 25, 2004
KitMaker: 11,669 posts
AeroScale: 11,011 posts
Posted: Tuesday, July 03, 2012 - 06:46 PM UTC
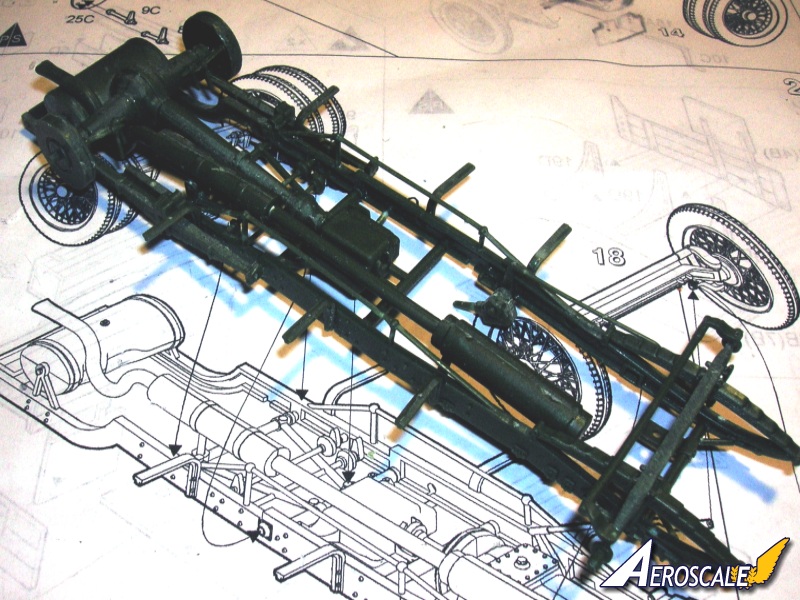
More of the chassis underside and the turret top with 4 contacts that need to be cleaned up.

JackFlash
Joined: January 25, 2004
KitMaker: 11,669 posts
AeroScale: 11,011 posts
Posted: Tuesday, July 03, 2012 - 06:47 PM UTC
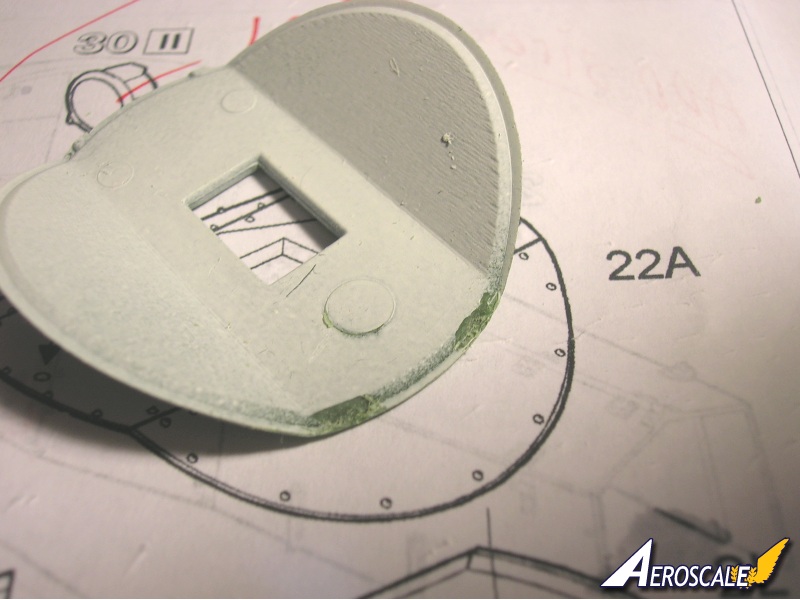
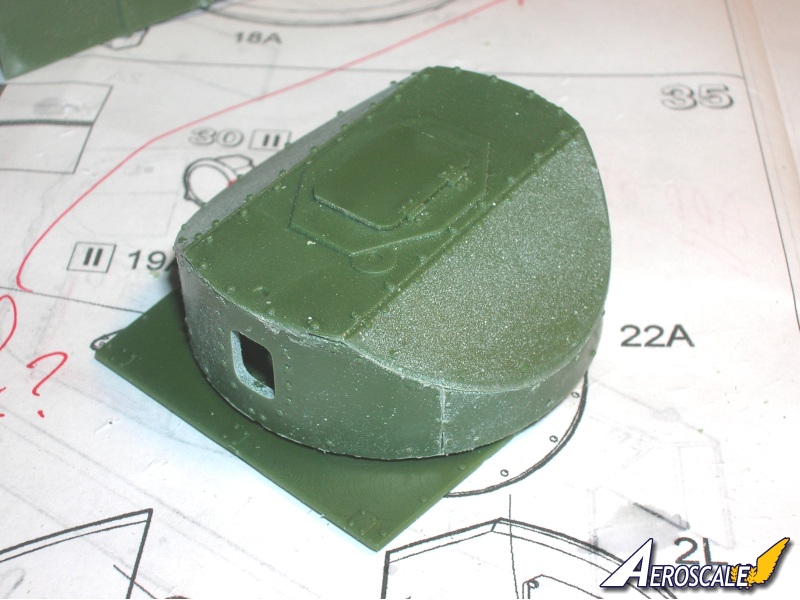
Once cleaned up the top fits well enough but still needs to have some light sanding to blend the seams.
JackFlash
Joined: January 25, 2004
KitMaker: 11,669 posts
AeroScale: 11,011 posts
Posted: Tuesday, July 03, 2012 - 06:50 PM UTC
Note my earlier 1920 pattern armoured car kit.
Major components being finished and almost ready to unite. Since this will be an RNAS machine the instructions call out for a blue grey for a top coat. But! The new Osprey book by D. Fletcher says it was brown khaki. The first cars like this with turrets started showing up around Nov. 1914.

Major components being finished and almost ready to unite. Since this will be an RNAS machine the instructions call out for a blue grey for a top coat. But! The new Osprey book by D. Fletcher says it was brown khaki. The first cars like this with turrets started showing up around Nov. 1914.
OEFFAG_153
Joined: February 19, 2010
KitMaker: 1,473 posts
AeroScale: 1,450 posts
Posted: Saturday, July 07, 2012 - 03:54 AM UTC
Looking very good Stephen, I'm tempted to do some land based modeling after the Fee, maybe this one!
Mikael
Mikael
JackFlash
Joined: January 25, 2004
KitMaker: 11,669 posts
AeroScale: 11,011 posts
Posted: Monday, July 09, 2012 - 02:00 AM UTC
Gadzooks and Hot Marimba! It appears there was one of these from the early RNAS series (before Nov. 1914) that had a 40mm Vickers Pompom gun without a covered turret. It just had the gun shield surrounding the machine gun barrel jacket. 
OEFFAG_153
Joined: February 19, 2010
KitMaker: 1,473 posts
AeroScale: 1,450 posts
Posted: Monday, July 09, 2012 - 02:07 AM UTC
Im sensing a major conversion looming? 
JackFlash
Joined: January 25, 2004
KitMaker: 11,669 posts
AeroScale: 11,011 posts
Posted: Monday, July 09, 2012 - 02:38 PM UTC
Quoted Text
I'm sensing a major conversion looming?
Ok, I will need to scratch build a Vicker to resemble a 40mm Pompom. . .To equal the size I need a regular Vickers pattern in 1:16 to look like a 40mm in 1:35 . . .Arrgghhhh!

JackFlash
Joined: January 25, 2004
KitMaker: 11,669 posts
AeroScale: 11,011 posts
Posted: Tuesday, July 10, 2012 - 10:18 PM UTC
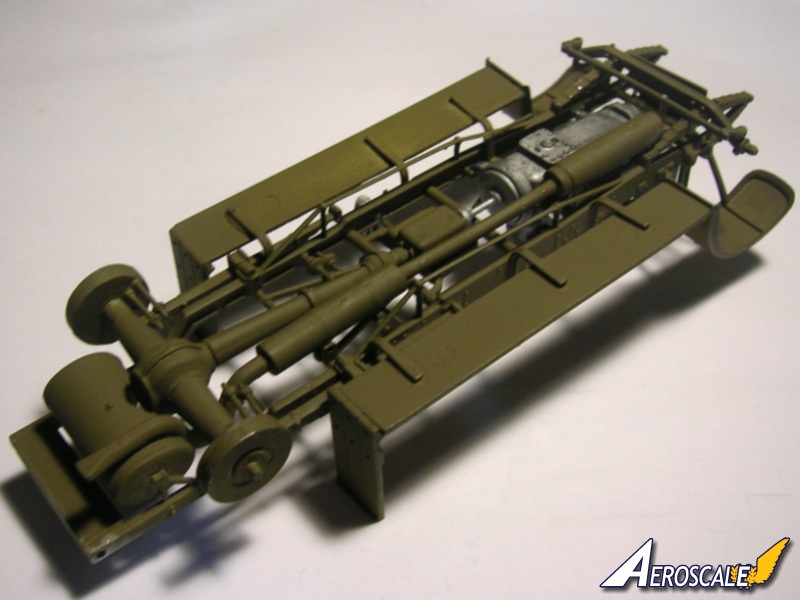
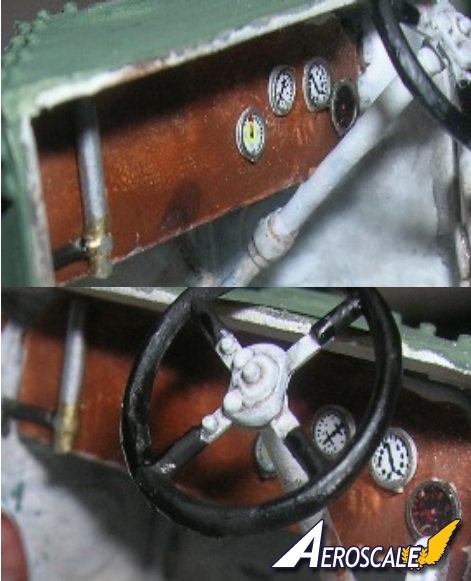
Shots of the nearly finished chassis

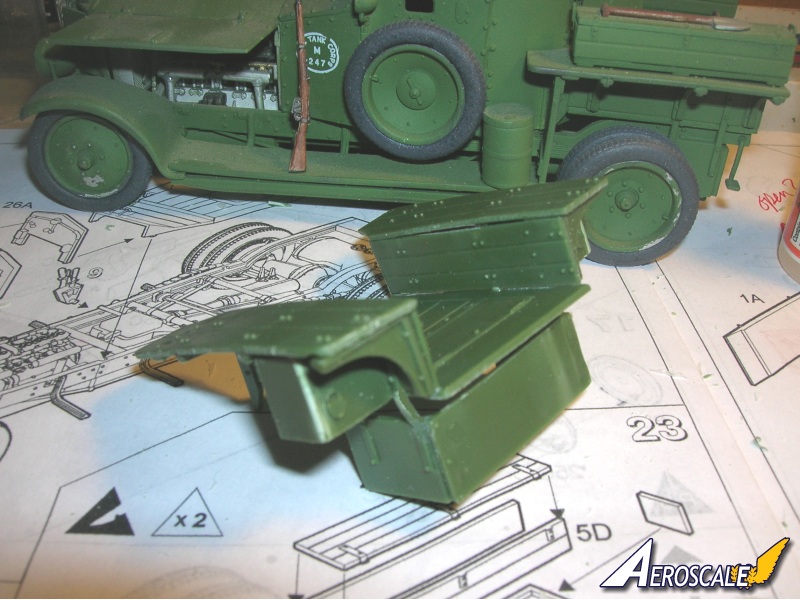
The bonnet and crew compartment

The bonnet and crew compartment
JackFlash
Joined: January 25, 2004
KitMaker: 11,669 posts
AeroScale: 11,011 posts
Posted: Tuesday, July 10, 2012 - 10:28 PM UTC
These proof shots are for the 1920 pattern armoured car but I used it in this build too.

This was my first atttempt on the 1920 version.
Rear compartment
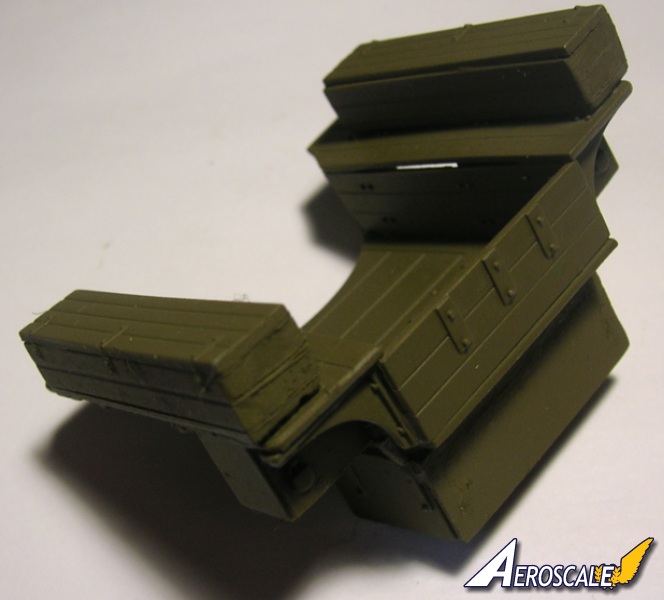
Turret and top plate.

This was my first atttempt on the 1920 version.
Rear compartment
Turret and top plate.
JackFlash
Joined: January 25, 2004
KitMaker: 11,669 posts
AeroScale: 11,011 posts
Posted: Tuesday, July 10, 2012 - 10:42 PM UTC
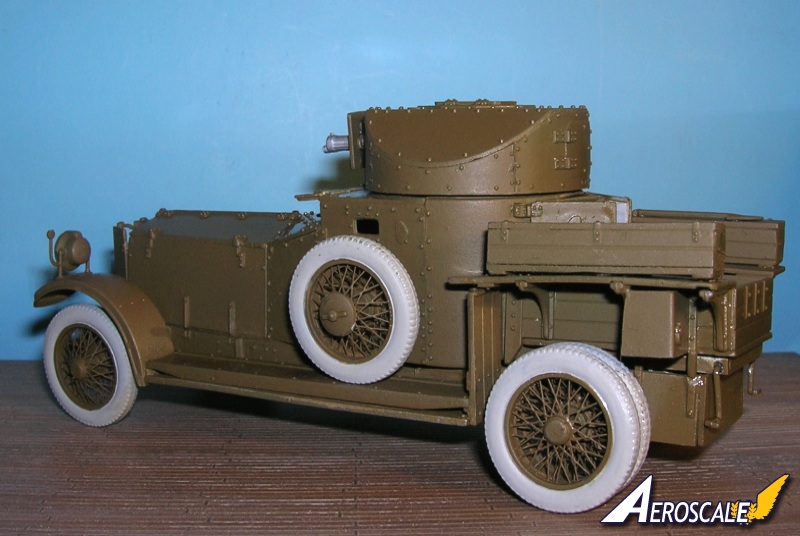
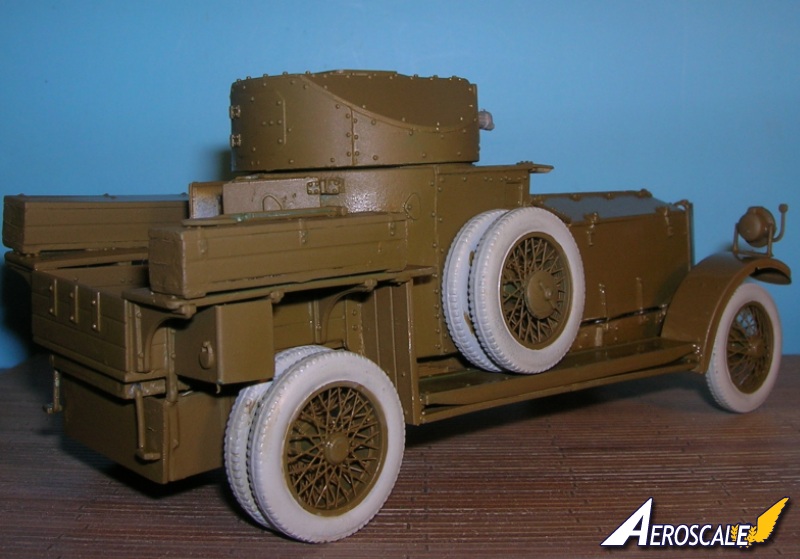
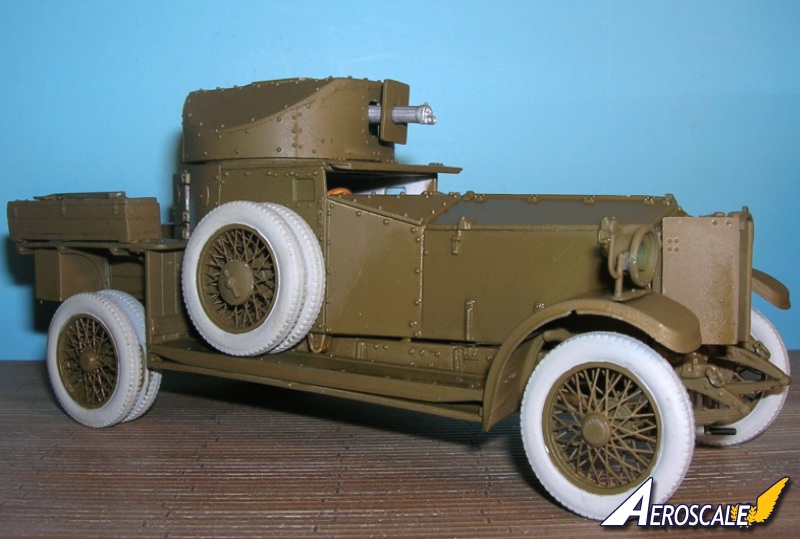
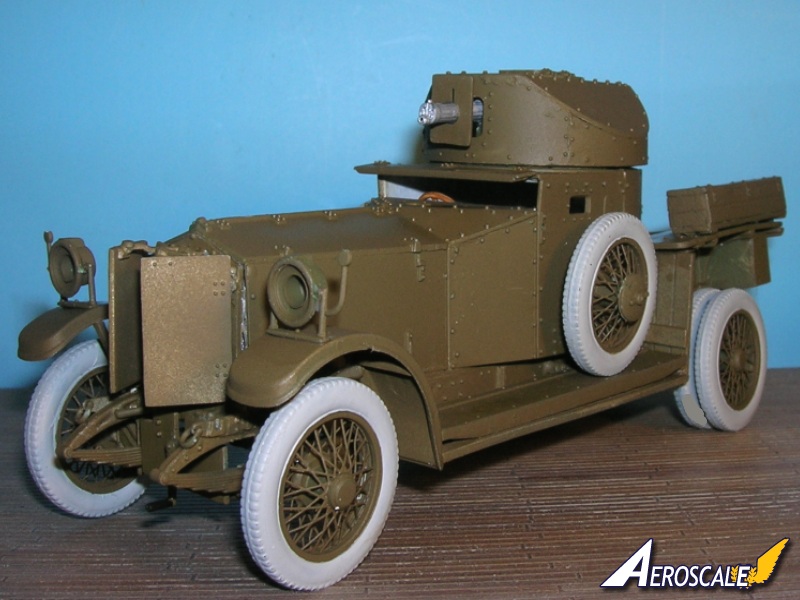
Almost done. Next, lenses for the headlights / lamps and markings.
JackFlash
Joined: January 25, 2004
KitMaker: 11,669 posts
AeroScale: 11,011 posts
Posted: Wednesday, July 11, 2012 - 11:07 PM UTC
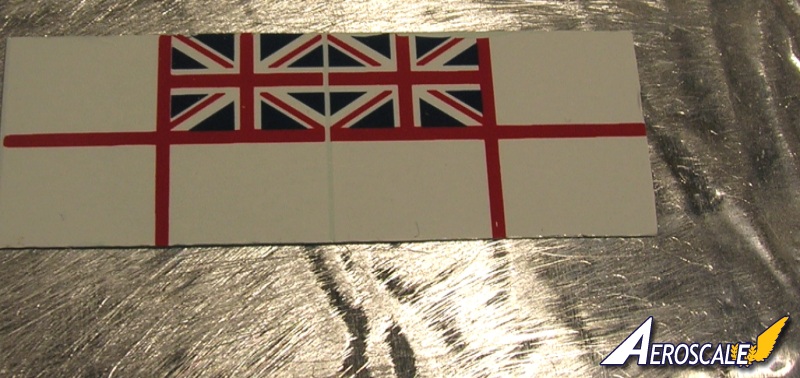
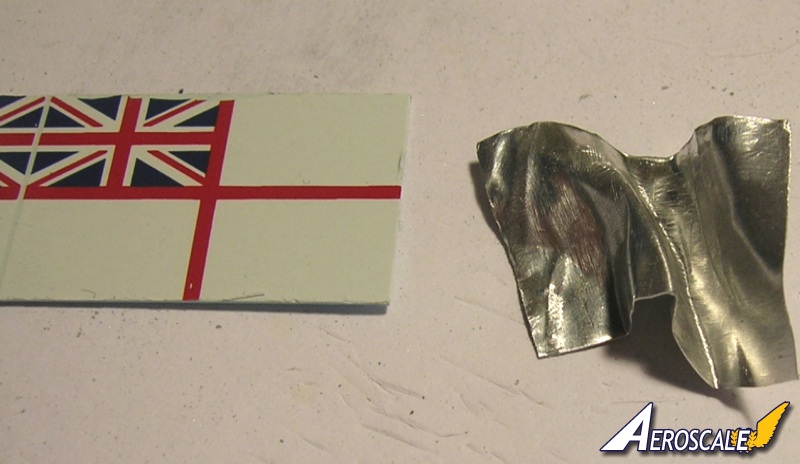
Ok, the RNAS Insigne start with toolers aluminum (Railroad hobby store)is thicker than aluminum foil.

JackFlash
Joined: January 25, 2004
KitMaker: 11,669 posts
AeroScale: 11,011 posts
Posted: Wednesday, July 11, 2012 - 11:17 PM UTC
I will call this build done. I still may put this into a diorama in the near future.

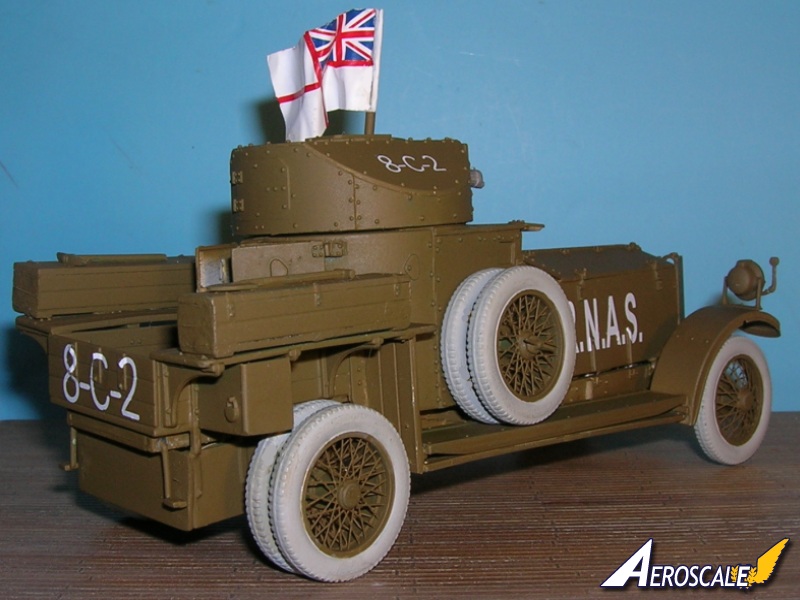
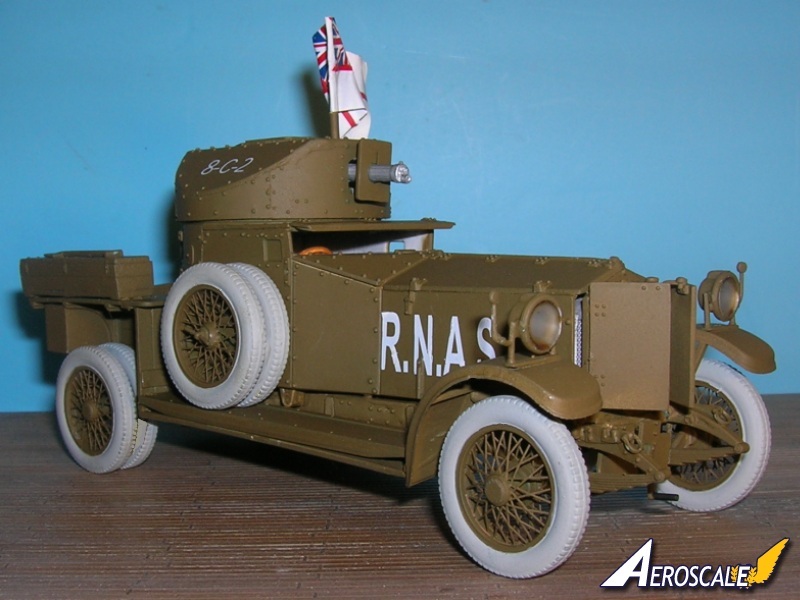
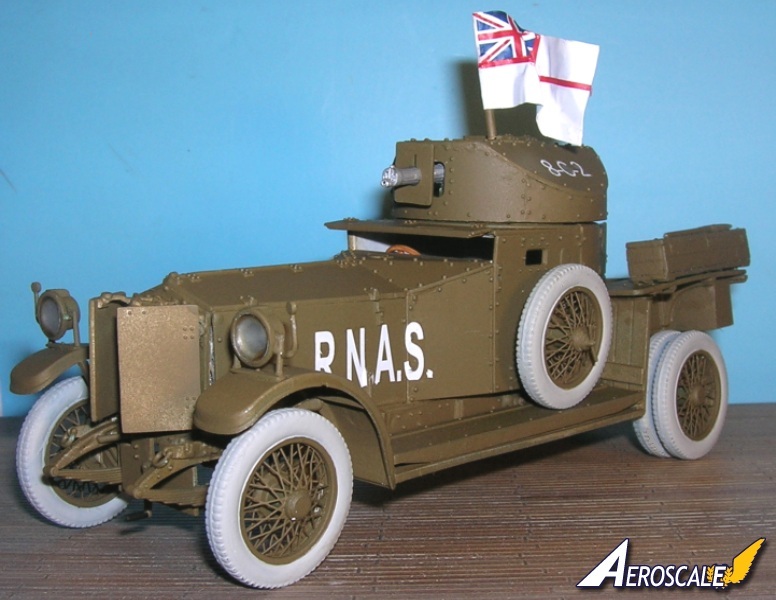
Here is my 1920 pattern Rolls Royce armoured car next to the 1914 pattern Rolls Royce armoured car I just did.

Just a quick note here. The tires (tyres) tended to be lighter back during WWI. it was a matter of how much carbon black was added. There is a fine book by Osprey on the subject of Rolls Royce armoured cars by D. Fletcher that came out this year and tells a detailed story on these buckets. Great photo images there. I highly recommend it. Mine looks like it just left the factory at this time. It seems the white designation letters & numbers were used at home during training operations and overpainted soon after arrival on the European continent. The Naval insigne was of course in reference to the Royal Naval Air Service to which this car belonged.

Here is my 1920 pattern Rolls Royce armoured car next to the 1914 pattern Rolls Royce armoured car I just did.
Just a quick note here. The tires (tyres) tended to be lighter back during WWI. it was a matter of how much carbon black was added. There is a fine book by Osprey on the subject of Rolls Royce armoured cars by D. Fletcher that came out this year and tells a detailed story on these buckets. Great photo images there. I highly recommend it. Mine looks like it just left the factory at this time. It seems the white designation letters & numbers were used at home during training operations and overpainted soon after arrival on the European continent. The Naval insigne was of course in reference to the Royal Naval Air Service to which this car belonged.
OEFFAG_153
Joined: February 19, 2010
KitMaker: 1,473 posts
AeroScale: 1,450 posts
Posted: Thursday, July 12, 2012 - 08:52 AM UTC
Great finish Stephen it certainly came together very fast in the end! Like what you did out of her, and it's weated my apetite to try my own kit some time soon. That flag trick was pretty nifty!
Congratulations on finishing
Mikael
Congratulations on finishing
Mikael
 |

WEB HOSTING BY


Copyright ©2021 AeroScale and Kitmaker Network, a subsidiary of Silver Star Enterprises
All Rights Reserved. Please read our Conditions of Use and Privacy Policy.
All Rights Reserved. Please read our Conditions of Use and Privacy Policy.