_GOTOBOTTOM
Early Aviation
Discuss World War I and the early years of aviation thru 1934.
KoTS GB 2011 Albatros D.III lcarroll
lcarroll
_VISITCOMMUNITY
Alberta, Canada
Joined: July 26, 2010
KitMaker: 1,032 posts
AeroScale: 1,025 posts
Posted: Saturday, April 16, 2011 - 03:22 PM UTC

INTRODUCTION:

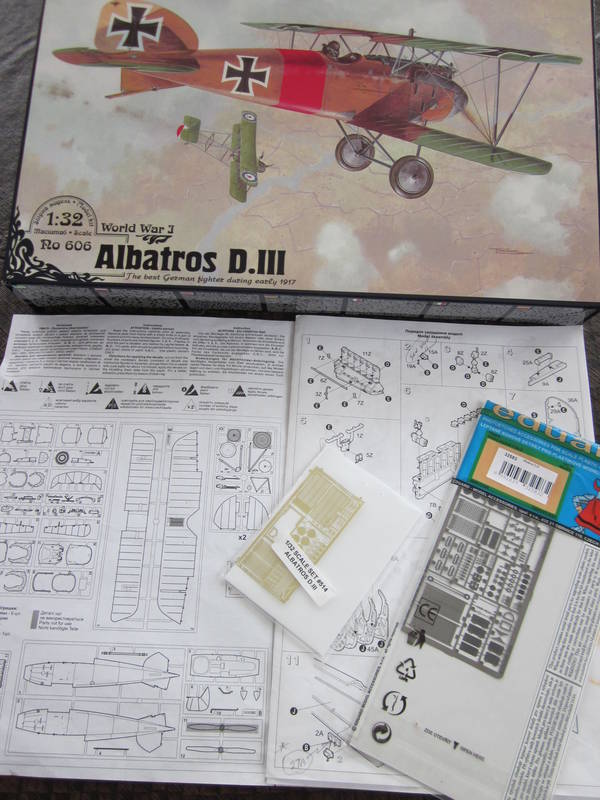
Well, it has started. Mr. Magoo comes to Aeroscale Early Aviation with his first attempt at a build thread for KoTS 2011. I've probably got photos posted everywhere on the site but where they should be, if the photos are MIA the attempt was a photo of the box, plan booklet, and the Eduard PE Set as an introduction. Suspect I am in serious need of specific direction and help however I have to start somewhere so will press submit and see where we go from there.
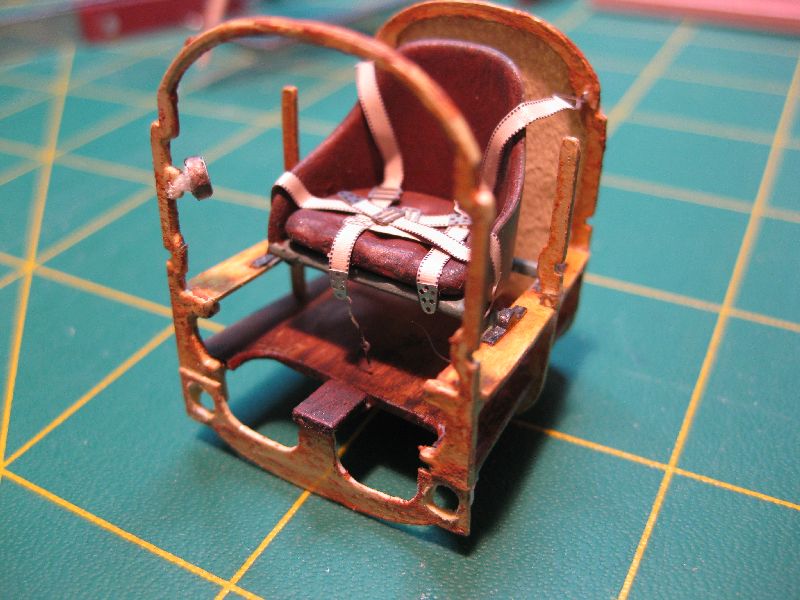
My submission is the Roden Albatross DIII (early version) done (at this stage) in Berthold's colors when with Jasta 14 in April 1917. The choice of this scheme is the last (read only!) concession to OOB on this project. I have been working casually on the kit for the past 6 or more months as I slowly wind down to full retirement and some quality modelling time. During that time I have taken copious written notes and photographed the stages of construction; I intend to build this blog from those sources to today's point of progress before putting hands on the project further. At this point I am nearly ready to install the various "modules" of engine, fuel and Ammo components, and cockpit and "button her up" for completion of the main structure.
I am attempting to utilise numerous techniques picked up earlier in my surfing of this wonderful site; most notably wood graining, pre-shading, and numerous "scratch"techniques gleaned from a number of incredibly impressive builds by many of you folks out there. Further, a long absence from active participation has proved a genuine eye opener, as the after market influence, quality of products overall, and particularly the knowlege level of other hobbyists has evolved to a tremendously high standard, all to great effect So, as our Brit members would say (at least in my day) " in for a penny, in for a pound!"
I'll press submit and wait for a host of kind folks to reply and get me smart on how to put out something of interest complete with illustrations. Don't hesitate Steven, I sincerely hope my shot gun approach doesn't mar a very well organised and enjoyable project. I may need some rather direct and specific guidance to get this thread going properly!

Cheers,
Lance
lcarroll
_VISITCOMMUNITY
Alberta, Canada
Joined: July 26, 2010
KitMaker: 1,032 posts
AeroScale: 1,025 posts
Posted: Saturday, April 16, 2011 - 03:33 PM UTC
As you All can see in the preceeding, , no #@#@*&^%$%^&%% Photo! I'll sleep on it and hopefully have a lot of good and informed advice/direction waiting for me tomorrow.

Lance
Kornbeef
_VISITCOMMUNITY
England - South East, United Kingdom
Joined: November 06, 2005
KitMaker: 1,667 posts
AeroScale: 1,551 posts
Posted: Saturday, April 16, 2011 - 11:16 PM UTC
I see the pic Lance, sometimes the forum is slow to update, I've had a time or two when only half a long post has appeared at first. Checking back the whole post is there, just one of those gremlins...

This was my first Roden Albi, I messed it up, used it for spares for several builds, but will reaquire again soon. Unless WNW are secretly producing a DIII of course.

If you need any advice or help, you know just to shout. Depending on just how *correct you want your finished build, there are a few issues, only one of them serious but even ignoring that it builds quite nicely.

Keith
mtnflyer
_VISITCOMMUNITY
Alberta, Canada
Joined: March 08, 2009
KitMaker: 394 posts
AeroScale: 360 posts
Posted: Sunday, April 17, 2011 - 03:56 AM UTC
Hi Lance. Nice to see there's someone more adept than myself who is building basically the same kit. That way, I'll have someone close at hand to follow and learn from, as I'm using the same AM as well. My Roden DIII(OAW) is moving along at a snails pace. Looking forward to when your photos are all gathered up. Guy
Bigrip74
_VISITCOMMUNITY
Texas, United States
Joined: February 22, 2008
KitMaker: 5,026 posts
AeroScale: 2,811 posts
Posted: Sunday, April 17, 2011 - 04:20 AM UTC
Lance, I have several Roden kits so I will be following your progress to give me some guidence.

Bob
lcarroll
_VISITCOMMUNITY
Alberta, Canada
Joined: July 26, 2010
KitMaker: 1,032 posts
AeroScale: 1,025 posts
Posted: Sunday, April 17, 2011 - 05:10 AM UTC

Quoted Text

I see the pic Lance, sometimes the forum is slow to update, I've had a time or two when only half a long post has appeared at first. Checking back the whole post is there, just one of those gremlins...

This was my first Roden Albi, I messed it up, used it for spares for several builds, but will reaquire again soon. Unless WNW are secretly producing a DIII of course.

If you need any advice or help, you know just to shout. Depending on just how *correct you want your finished build, there are a few issues, only one of them serious but even ignoring that it builds quite nicely.

Keith


Keith,
"Shock and awe" when I too saw the photo this morning!! I did something right; now to remember how I did it to get going on this project. Thanks for the offer and I'm sure I'll take you up on it further. Your referral to Koloman's thread has already proven invaluable.

Bob & Guy,
Thanks for the encouragement. I should get more posted today catching up to where the build is actually at, don't hesitate to pitch in as any and all comments, suggestions, or hints are welcome.

I'm hoping to get going pretty steady shortly, had surgury 4 days ago and am still very sore & moving slowly. On the bright side, the forced slowdown for recovery should provide for a lot of "Bench Time"!

Cheers All,
Lance
lcarroll
_VISITCOMMUNITY
Alberta, Canada
Joined: July 26, 2010
KitMaker: 1,032 posts
AeroScale: 1,025 posts
Posted: Sunday, April 17, 2011 - 06:45 AM UTC
At this point I'll record general comments/impressions of the Kit..............

Roden 1/32 Scale Albatros DIII (Early) Kit # RO606 - General

This kit has been reviewed earlier in the Forum thus I'll keep it brief and limit this to my overall personal impressions.
Generally I am pleased with the quality of the kit. Crisp mouldings, lack of excessive flash, well hidden ejector pin marks, and finely presented details made this a pleasant introduction to the Roden 1/32nd line. The engine mouldings are particularly impressive and the finely indented panel lines and rib representation in the same category.
The Kit Instructions are rather rudimentary, however I am guilty of comparing them to the supurb WNW examples I've pored over. Basic instruction sequence has worked well to this point with a few exceptions which will be detailed as the build description progresses. The decal sheet appears very well done and the choice of 5 finishes a very nice touch. I did find several contradictory (possibly incorrect) directions in the painting instructions when consulting the various references at hand. The major relevant discrepancy was in the scheme chosen for this build; Bertholds "winged sword" natually varnished DIII is described as having the main and tail planes in 2 color (Brown and dark green) where as all other references specified the 3 tone finish of reddish brown, dark and Brunswick Green which I deemed the correct choice.
To this point the build is progressing relatively smoothly however AMS being what it is, the sequence of assembly has had to be modified to allow for cockpit enhancement, particularly addition of the flight control cables and associated components. More of which later in the sequence.
In summary, a very nice kit, not up to the stellar quality of the New Zealand products (albeit I havn't built one yet but initial impressions lean me towards the WNW products) however subject matter adds a lot to the overall grading......if you want a very decent DIII in your line up this one will fit the bill nicely and with a little extra effort and improvisation should "shine". The fact that I've added 3 other Rodens to the stash speaks volumes for my overall rating of this kit and Roden's products.

Next posting, References, short and sweet and then the engine build (hopefully with photos!) to follow.

Cheers,
Lance
RAGIII
_VISITCOMMUNITY
North Carolina, United States
Joined: June 19, 2007
KitMaker: 604 posts
AeroScale: 600 posts
Posted: Sunday, April 17, 2011 - 07:08 AM UTC
I think you will find this kit goes together relatively well with the exception of the cockpit /engine cover piece. I think that cutting that piece at the panel line helps a little. Having built this kit virtually out of the box I have to say I like it very much! Good luck with your build!
RAGIII
lcarroll
_VISITCOMMUNITY
Alberta, Canada
Joined: July 26, 2010
KitMaker: 1,032 posts
AeroScale: 1,025 posts
Posted: Sunday, April 17, 2011 - 07:38 AM UTC
Rick,
Not surprised regarding the engine panel; was already anticipating some minor complications. Considering leaving it uncovered per yours on your gallery.
Thanks for the encouragement and keep those comments coming.
Cheers,
Lance
lcarroll
_VISITCOMMUNITY
Alberta, Canada
Joined: July 26, 2010
KitMaker: 1,032 posts
AeroScale: 1,025 posts
Posted: Sunday, April 17, 2011 - 08:42 AM UTC
Roden Albatros DIII Build, REFERENCES

The following References were consulted in the researching and building of this Kit for KoTS 2011...........

1. Albatros Fighters in Action. Squadron/Signal Publications No. 46;
2. Windsock Datafile #1 Albatros DIII by R. Rimell;
3. Windsock Datafile Special Albatros Fighters by R. Rimell;
4. Windsock Datafile Special Albatros DIII by Peter M,. Grosz;
5 Osprey Aircraft of the Aces #32 Albatros Aces of WWI by Norman Franks;
6. " " " #77 " " " " Part 2 by Greg Van Wyngarden;
and to a much lesser degree.
7. Above the Lines by Franks, Bailey, and Guest, Grub Street London 1993; and
8. Knights of the Black Cross by Terry C. Treadwell, Cerberus Publishing Ltd. 2004.

Note that Reference #5 provided the one and only photograph of the subject that I could locate; a distant "line-up" shot taken of Jasta 14 on their flight line in April 1917, location not specified and photo from Greg VanWyngarden's collection.(Page 38) Does anyone have more details on this photo?
Also consulted were numerous threads on this site and importantly (Thanks to a suggestion from our fellow member Keith Graveson) Koloman Mayrhofer's Replica Build Info thread on the Aerodrome Site.

Following soon, I beat the photo challenge and detail the build starting with the Mercedes 160 HP Engine..................................

Cheers,
Lance
lcarroll
_VISITCOMMUNITY
Alberta, Canada
Joined: July 26, 2010
KitMaker: 1,032 posts
AeroScale: 1,025 posts
Posted: Sunday, April 17, 2011 - 12:40 PM UTC
OOOOPs!
Having trouble with the photo thing and somehow deleted the intro photo in my thread opener. Thought all was going entirely too well.
Anyone help with some simple way to get it back?
thegirl
_VISITCOMMUNITY
Alberta, Canada
Joined: January 19, 2008
KitMaker: 6,743 posts
AeroScale: 6,151 posts
Posted: Sunday, April 17, 2011 - 02:10 PM UTC
Hi Lance !

Well I must say I'm looking forward to your build , I think Stephen can help you put the photo back in your first post .
lcarroll
_VISITCOMMUNITY
Alberta, Canada
Joined: July 26, 2010
KitMaker: 1,032 posts
AeroScale: 1,025 posts
Posted: Monday, April 18, 2011 - 04:50 AM UTC

Quoted Text

Hi Lance !

Well I must say I'm looking forward to your build , I think Stephen can help you put the photo back in your first post .


Steven,
Per Terri's suggestion, can you help with re-inserting my Intro Photo? Its in My Gallery/ My Pictures if that's necessary.
Big problem appears to be that all my build photos are too big content-wise. I'll be working on them today to try and shrink the pixel count to match the maximums that can be imported to the site and hopefully get rolling. Should be a real riot as I'm a real amateur on the computer skills thing.

Thanks,
Lance
Kornbeef
_VISITCOMMUNITY
England - South East, United Kingdom
Joined: November 06, 2005
KitMaker: 1,667 posts
AeroScale: 1,551 posts
Posted: Monday, April 18, 2011 - 06:18 AM UTC
Lance I use a free program called Irfanview, it has simple easy to use resizing tools.

On your build, Kolomar just posted this today, a lovely shot of the control layout for the DIII, you can see the difference to what Roden and Windsock both say is there. Only look if you are an AMS sufferer. http://www.theaerodrome.com/forum/replica-aircraft/35610-albatros-d-ii-d-iii-news-99.html#post571736

cheers Keith
lcarroll
_VISITCOMMUNITY
Alberta, Canada
Joined: July 26, 2010
KitMaker: 1,032 posts
AeroScale: 1,025 posts
Posted: Monday, April 18, 2011 - 07:44 AM UTC

Quoted Text

Lance I use a free program called Irfanview, it has simple easy to use resizing tools.

On your build, Kolomar just posted this today, a lovely shot of the control layout for the DIII, you can see the difference to what Roden and Windsock both say is there. Only look if you are an AMS sufferer. http://www.theaerodrome.com/forum/replica-aircraft/35610-albatros-d-ii-d-iii-news-99.html#post571736

cheers Keith


Keith,
Once again thanks for the help. Immediately checked out Koloman's latest; invaluable and I had it right to boot! AMS however will force me to add a widget or two and re-locate the position of the lower elevator cables.
Now I'll see if I can locate your suggested photo management site.

Lance
lcarroll
_VISITCOMMUNITY
Alberta, Canada
Joined: July 26, 2010
KitMaker: 1,032 posts
AeroScale: 1,025 posts
Posted: Monday, April 18, 2011 - 11:46 AM UTC
The first module constructed was the Mercedes 160 HP DIII Engine. The cylinders were base coated with Model Master Interior Black enamel #2040, the lower block with Humbrol Metallic Aluminum #1056. The rocker springs were removed and replaced with scratch built ones using the "fine copper wire and drill bit " technique to produce the 12 required. These were painted with Model Master "gunmetal". Rocker arms were constructed from metal in the PE spares box, painted burnt iron and added. PE bolt heads from Tom's 1/48th nuts and bolts sheet were added to the rocker arm box covers, and the kit supplied conduit containing the spark plug wires replaced with a scratch built one painted copper. These were installed with fore and aft clamps of PE strapping salvaged from spares box old frets. (I throw away NOTHING!)

The kit spark plugs were shaved off, drilled out, and scratch plugs made from insulated wire installed. The insulation was removed from the tips, that remaining trimmed to size and painted S/G white became the main body of the plugs.Plug wires were fashioned from copper wire and once attached to each plug and the conduit painted ivory. Once the remaining ancilleries were attached the same copper wire was used to represent wire from the conduit to each distributer and attached with CA. Next time I'll use Edo's method of pre-drilling the distributers as I am not particularly pleased with this portion. Too messy in my view. Last, I added the Eduard PE Manufacturers plates and engine mounting bolts from Vector Cut. (Not sure if each lug had one or two bolts. I opted for one.
The engine was then completed with various tones of silver, gun metal etc. to provide contrasts and to pick out detail, then a thinned down wash of Tamiya smoke applied to provide the usual oil, dirt, and stained effect.

Photos follow and next a short but not entirely sweet version of the installation of the engine into the Formers/Bulkheads module.
lcarroll
_VISITCOMMUNITY
Alberta, Canada
Joined: July 26, 2010
KitMaker: 1,032 posts
AeroScale: 1,025 posts
Posted: Monday, April 18, 2011 - 02:48 PM UTC
Tried to insert photos; hopefully they'll show up!
Kornbeef
_VISITCOMMUNITY
England - South East, United Kingdom
Joined: November 06, 2005
KitMaker: 1,667 posts
AeroScale: 1,551 posts
Posted: Monday, April 18, 2011 - 07:51 PM UTC
No
JackFlash
_VISITCOMMUNITY
Colorado, United States
Joined: January 25, 2004
KitMaker: 11,669 posts
AeroScale: 11,011 posts
Posted: Tuesday, April 19, 2011 - 04:26 AM UTC
Greetigs Lance.

1. Go to your images gallery.
2. Left click on image to open.
3. Now when its open right click on the open image.
4. Left Click on the"properties & " Select and highlight "address (URL)" info.
5. Copy to your clipboard.
6. Go to the thread post you want it in.
7. When you first create a post their is the text box you type the contents in.
left click on the "image brackets" button on the black bar of the text box. It has seven buttons. The one on the furthest right is what you want.
8. Left click between the image brackets img XXX /img and paste the address(URL) info between the brackets . See the XXX I typed here is where your address(URL) info should be place. It usually says "http://put.url.here image.file"
9. Finish your post and hit enter.
10.Viola.

Kornbeef
_VISITCOMMUNITY
England - South East, United Kingdom
Joined: November 06, 2005
KitMaker: 1,667 posts
AeroScale: 1,551 posts
Posted: Tuesday, April 19, 2011 - 04:35 AM UTC
Lance, I went to your gallery, nice work I want to say.

Click here.

One little thing though, the float chambers on the carb (brass coloured) are upside down. This of course won't matter at all if you are putting on the cowls.

I like your seat, its come out very nice. and a nice fix on the structure beneath too.


Keith
lcarroll
_VISITCOMMUNITY
Alberta, Canada
Joined: July 26, 2010
KitMaker: 1,032 posts
AeroScale: 1,025 posts
Posted: Tuesday, April 19, 2011 - 09:41 AM UTC
Steven,
Thanks very much for your quick reply and the step by step procedure.I'll give it a shot! Also appreciate your work in getting back my info photo at the top. AMS extends to the thread work as well, the absence of the standard "Box etc." photo would have driven me over the edge in no time!
Appreciate your help immensely.

Cheers,
Lance
lcarroll
_VISITCOMMUNITY
Alberta, Canada
Joined: July 26, 2010
KitMaker: 1,032 posts
AeroScale: 1,025 posts
Posted: Tuesday, April 19, 2011 - 09:52 AM UTC

Quoted Text

Lance, I went to your gallery, nice work I want to say.

Click here.

One little thing though, the float chambers on the carb (brass coloured) are upside down. This of course won't matter at all if you are putting on the cowls.

I like your seat, its come out very nice. and a nice fix on the structure beneath too.


Keith


Keith,
Thanks for the encouragement. Regarding the carbs being in the wrong hemisphere...AAAARRRRGGGG!!!! Leaps right out of the picture once you've caught it for me. Easy fix; much better at this stage then down the line. Timely and nice catch on your part, mucho appreciated.

Cheers,
Lance
JackFlash
_VISITCOMMUNITY
Colorado, United States
Joined: January 25, 2004
KitMaker: 11,669 posts
AeroScale: 11,011 posts
Posted: Tuesday, April 19, 2011 - 09:55 AM UTC
No worries its what I do.
Removed by original poster on 04/19/11 - 22:50:48 (GMT).
Removed by original poster on 04/19/11 - 23:10:08 (GMT).
 _GOTOTOP