KotS GB 2011 Albatros D.V warreni
South Australia, Australia
Joined: August 14, 2007
KitMaker: 5,926 posts
AeroScale: 2,201 posts
Posted: Thursday, May 19, 2011 - 08:49 PM UTC
Greetings yet again!
Well, what does one do when he cannot progress his other 4 builds at the moment due to drying time or lack of parts? Why one starts yet another one!

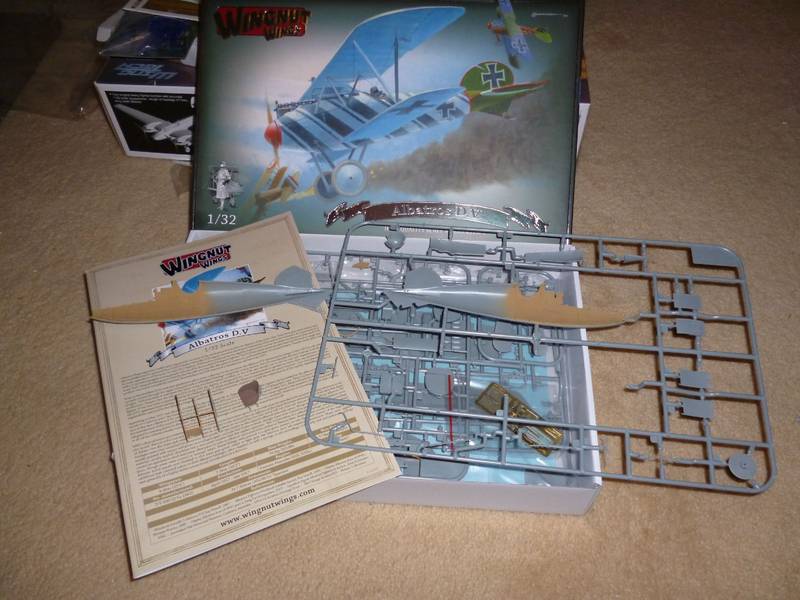
I am sure you have all seen this one before, but unlike my Roden Fokker this one has no battle damage before I even start it..
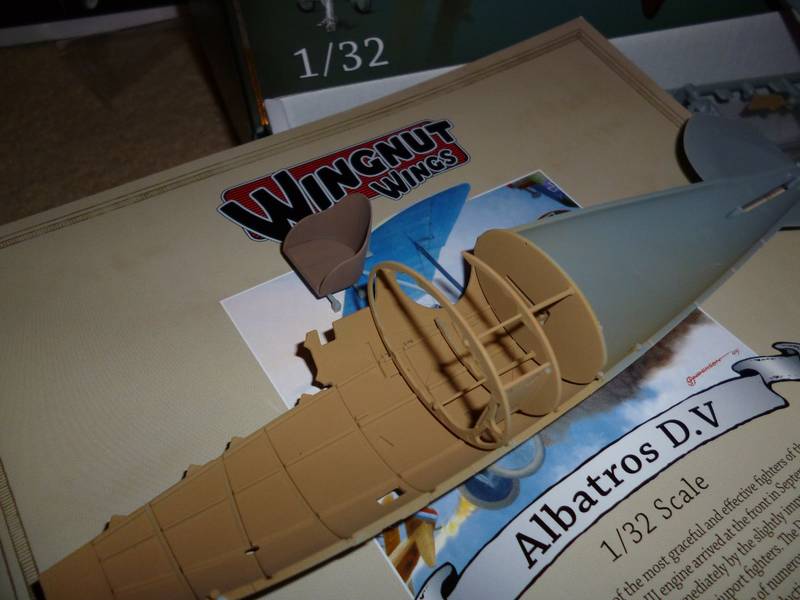
Lets see, I got the base coat of XF-59 applied to the wooden parts of the fuselage. I got the seat base coated for the leather. And then I ran into a slight snag as I don't have any Tamiya XF-76 handy for parts of the interior. And the color comparison chart I use doesn't go up to XF-76

So it looks like it is a trip to the LHS tomorrow for yet another paint for my collection.
I am thinking of doing the plane with the spiral striping, but I might just forget it too as being a bit hard for soft Warren..
You may be right, I may be crazy.
Colorado, United States
Joined: January 25, 2004
KitMaker: 11,669 posts
AeroScale: 11,011 posts
Posted: Thursday, May 19, 2011 - 10:18 PM UTC
This good fellow reminds me of . . .me.! Model On!
". . .The most important thing is to know why you build and then get the most that you can out of building." via D.D.
South Australia, Australia
Joined: August 14, 2007
KitMaker: 5,926 posts
AeroScale: 2,201 posts
Posted: Monday, May 23, 2011 - 08:40 AM UTC
Oops.. I just realised I did not format the title of this Blog correctly.. sorry about that Stephen..
Yes indeed, if you can't go any further, start another one!
Anyway, here are a couple of progress shots of my Albatross.
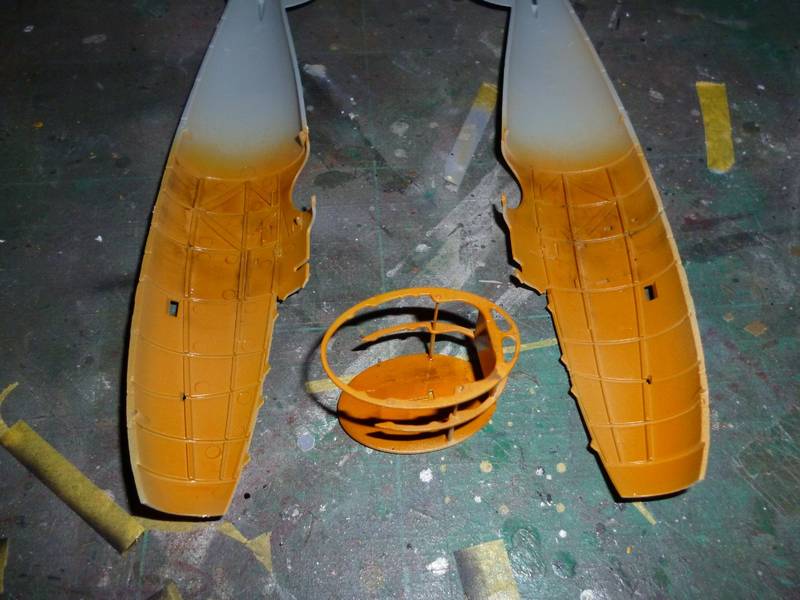
Warren's version of wood cortesy of Tamiya paint and Mig Pigments.
I am one of those modellers who think that if you will never see the area again why bother detailing it up? That is why I didn't bother with the wood-grain effect in the nose area.
One thing that did annoy me a little was the profusion of ejector in marks in the side-walls of the cockpit.

On a differenet note, I recently purchased a Panasonic Lumix camera for these shots for well under $180 and it leaves my $1200 Canon EOS for dead with these close up shots! Can recommend it to anyone wanting a cheap camera that takes great photos.
You may be right, I may be crazy.
New Jersey, United States
Joined: June 02, 2006
KitMaker: 1,212 posts
AeroScale: 468 posts
Posted: Monday, May 23, 2011 - 08:45 AM UTC
The plastic is really flying around here! No pun intended... well maybe a little

South Australia, Australia
Joined: August 14, 2007
KitMaker: 5,926 posts
AeroScale: 2,201 posts
Posted: Tuesday, May 24, 2011 - 09:37 PM UTC
Some more progress today in between rigging the Brisfit...
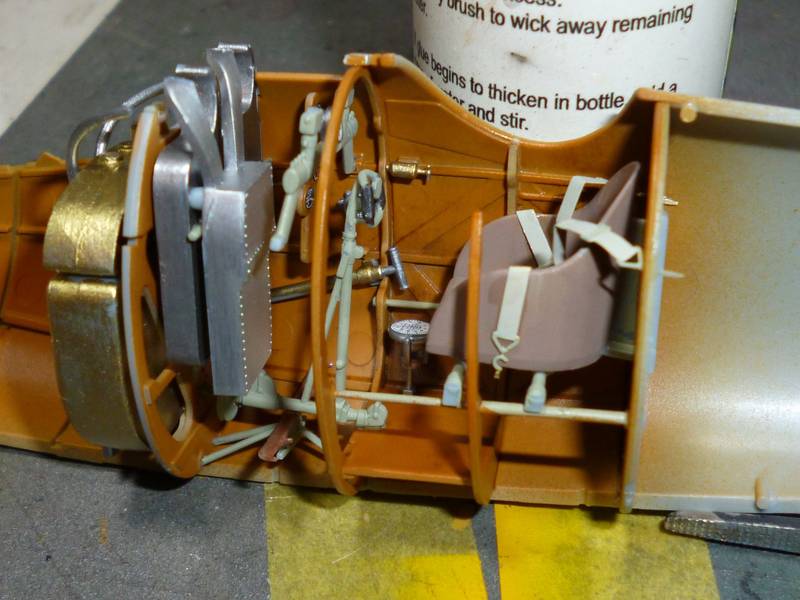
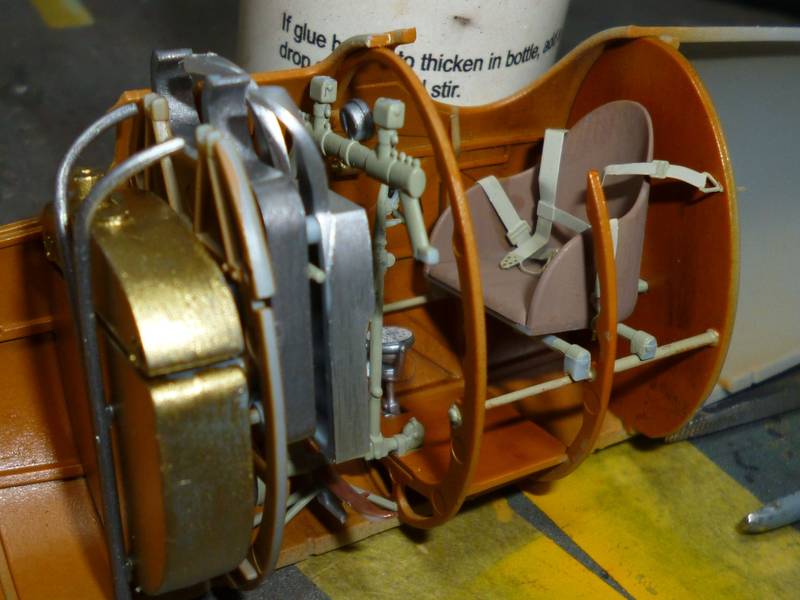
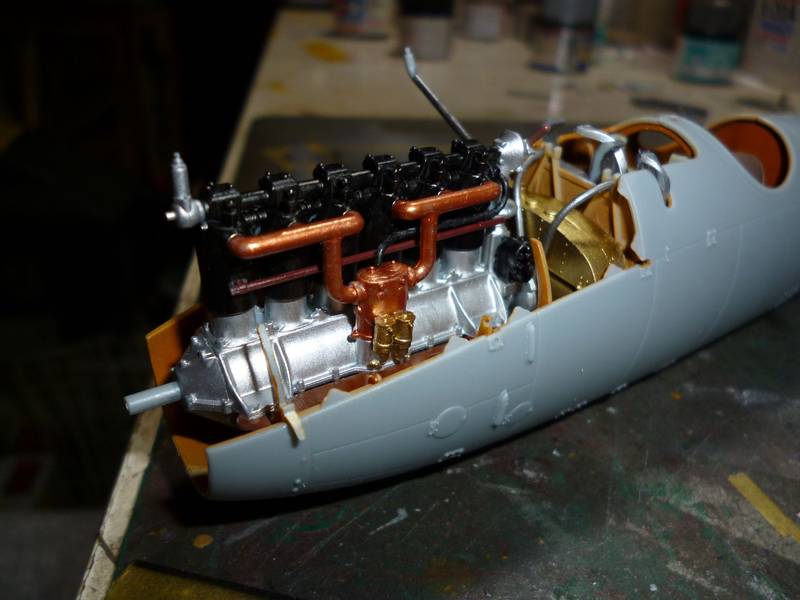
This is the last piccies of the cockpit before I closed it up. I also fixed the levitating PE belts and touched up the paint in a few places.I also got started on the engine today.
More photos later.
You may be right, I may be crazy.
Arizona, United States
Joined: December 12, 2008
KitMaker: 1,423 posts
AeroScale: 1,319 posts
Posted: Wednesday, May 25, 2011 - 01:07 AM UTC

Hi Warren:
This is moving right along and looking good; it would be neat to see it done in Rumey's markings: you can do it. You certainly have a lot on the bench. Looking forward to more. I am on this too and need to get going on it again.
Best
Mark
We few, we happy few........
South Australia, Australia
Joined: August 14, 2007
KitMaker: 5,926 posts
AeroScale: 2,201 posts
Posted: Wednesday, May 25, 2011 - 08:54 AM UTC
Hi Mark.
Which scheme are you thinking of doing? I like that scheme but would be no good for both of us to do it.
Cheers
Warren
You may be right, I may be crazy.
South Australia, Australia
Joined: August 14, 2007
KitMaker: 5,926 posts
AeroScale: 2,201 posts
Posted: Thursday, May 26, 2011 - 06:40 PM UTC
Oh oh... I made a booboo.. Not being used to having two different engines to build for a model I just followed WNW instructions to the letter diagram wise, but missed the thing at the top saying that you build that engine if you are going to use colour schemes A, B, C or E. Guess which one I was going to do.. yep.. D

Stoopid Warren..
@ Mark, it looks like I won't be doing Rumsey's scheme this time after all. Pity as I had worked out how to do the stripes and all.. Oh well...
Have finished the motor and am almost ready to button up the fuselage. Some pictures later.
You may be right, I may be crazy.
Arizona, United States
Joined: December 12, 2008
KitMaker: 1,423 posts
AeroScale: 1,319 posts
Posted: Friday, May 27, 2011 - 12:34 AM UTC
Quoted Text
Hi Mark. Which scheme are you thinking of doing? I like that scheme but would be no good for both of us to do it.
Cheers
Warren
Hi Warren: I am going with a PHEON model sheet of Lehman from Jasta 5.. His is a grey and red scheme with an Edelweiss, sort of like Paul Baumer's but painted instead of some wood.
We few, we happy few........
South Australia, Australia
Joined: August 14, 2007
KitMaker: 5,926 posts
AeroScale: 2,201 posts
Posted: Friday, May 27, 2011 - 08:57 AM UTC
There is an all over black scheme with an Edelweiss in the WNW kit and I was thinking of doin that one now. Or maybe I should just ignore the motor...
You may be right, I may be crazy.
South Australia, Australia
Joined: August 14, 2007
KitMaker: 5,926 posts
AeroScale: 2,201 posts
Posted: Friday, May 27, 2011 - 08:58 AM UTC
There is an all over black scheme with an Edelweiss in the WNW kit and I was thinking of doing that one now. Or maybe I should just ignore the motor...
You may be right, I may be crazy.
South Australia, Australia
Joined: August 14, 2007
KitMaker: 5,926 posts
AeroScale: 2,201 posts
Posted: Friday, May 27, 2011 - 11:39 AM UTC
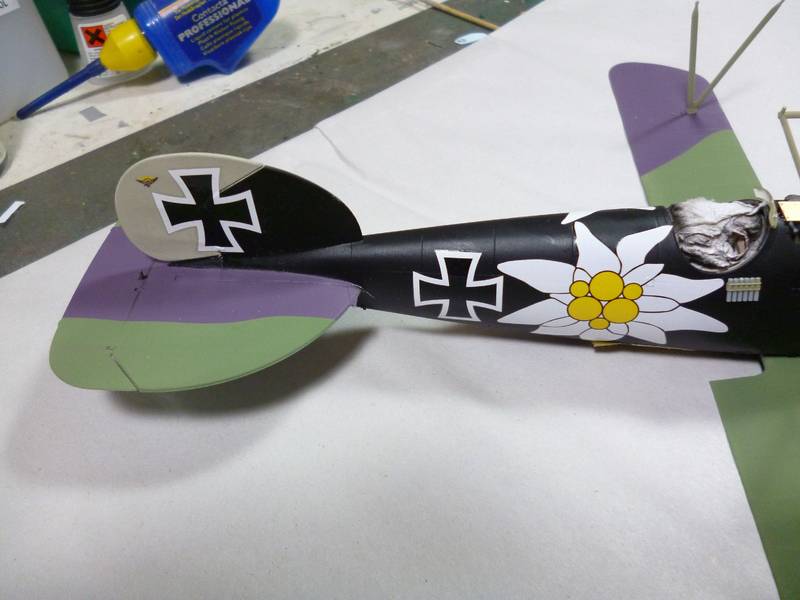
Some progress Ladies and Gentlemen!
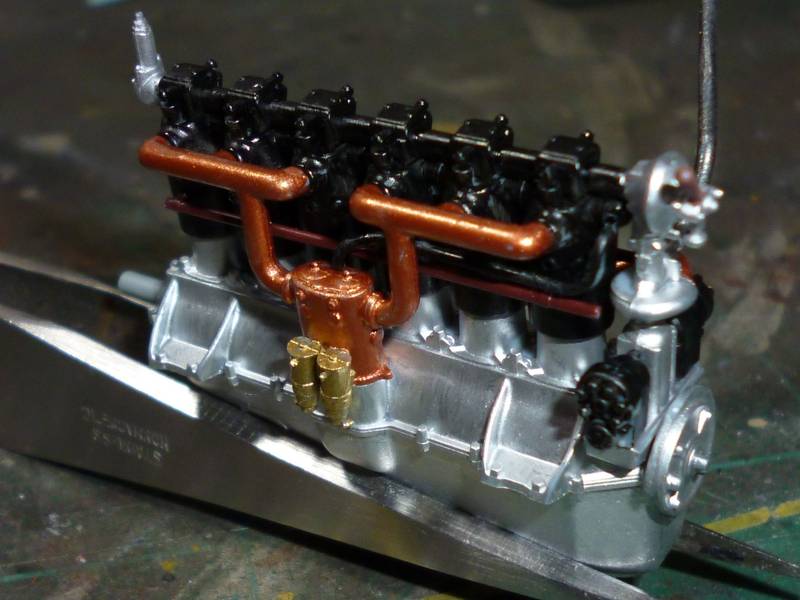
The motor pre-installation..
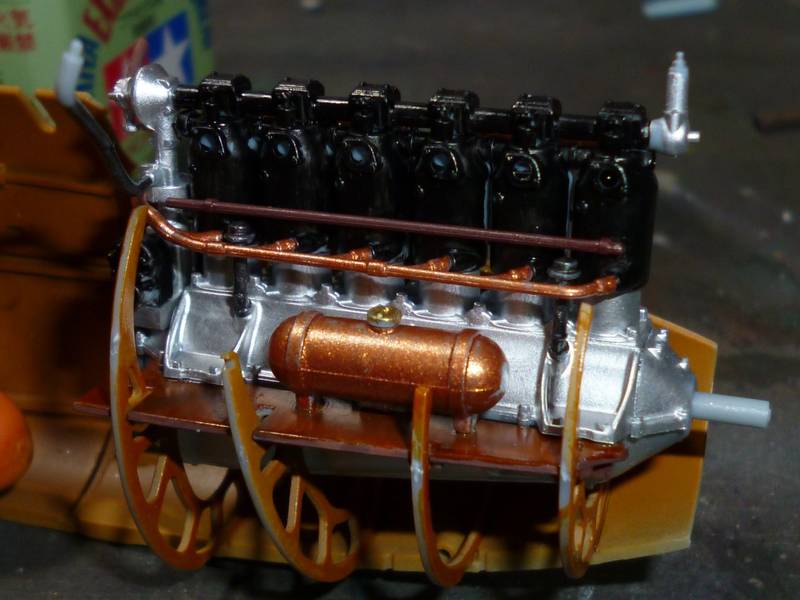
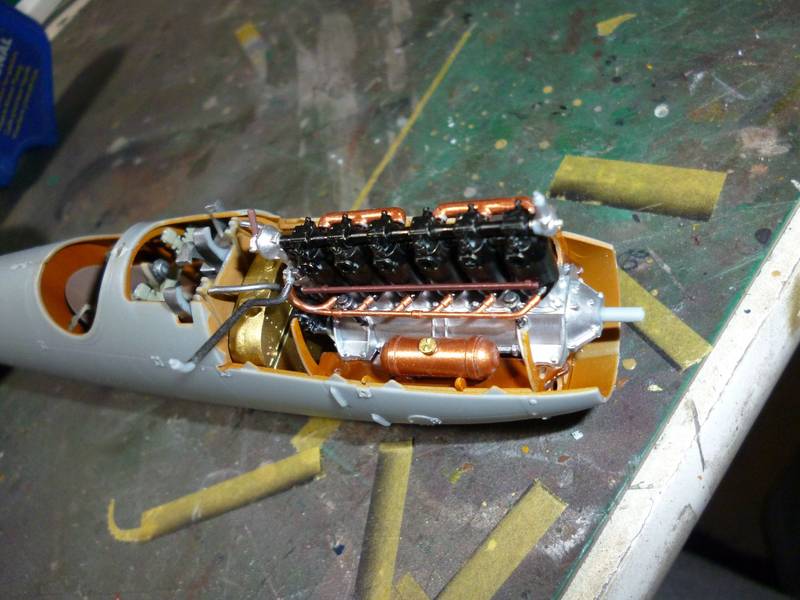
And after installation. I have to touch up the oil tank and a few other small things. I also installed the engine and frame in the opposite side of the airframe to the cockpit just to make it a little easier. I also tapped the fuselage together while the engine framed dried to make sure it all lined up later.
I have also installed all the eyelets in the wings.
You may be right, I may be crazy.
South Australia, Australia
Joined: August 14, 2007
KitMaker: 5,926 posts
AeroScale: 2,201 posts
Posted: Sunday, May 29, 2011 - 08:19 PM UTC
Greetings fellow Aeroscalists.
Some more progress shots..
SInce I took these tI have installed the engine covers, which like every other WNW kit has required some surgery to get them to fit correctly, and applied the first coats of paint, the white for the fuselage and the pale blue for the undersides of the wings.
Thanks for looking.
You may be right, I may be crazy.
New Jersey, United States
Joined: June 02, 2006
KitMaker: 1,212 posts
AeroScale: 468 posts
Posted: Monday, May 30, 2011 - 03:42 AM UTC
All coming together nicely Warren.
South Australia, Australia
Joined: August 14, 2007
KitMaker: 5,926 posts
AeroScale: 2,201 posts
Posted: Monday, May 30, 2011 - 10:25 AM UTC
You may be right, I may be crazy.
South Australia, Australia
Joined: August 14, 2007
KitMaker: 5,926 posts
AeroScale: 2,201 posts
Posted: Wednesday, June 01, 2011 - 06:48 PM UTC
Greetings fellow KotSers...
Some progress shots!
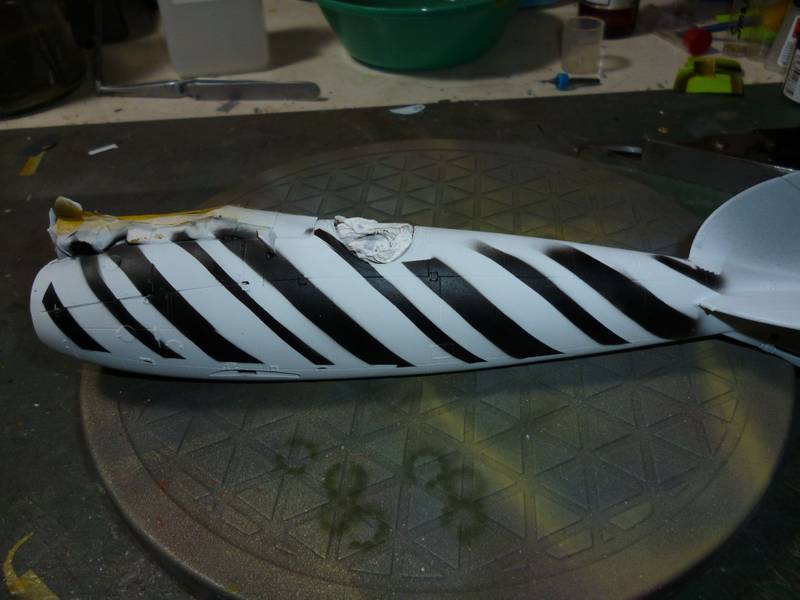
Here was my attempt at the humbug (the lolly) colour scheme. Only problem was I couldn't seem to get it to work. But I have worked out what I was doing wrong and will use this scheme on my next D.V.. don't forget I had built the wrong engine for this plane anyway. Next time I will build the right one!
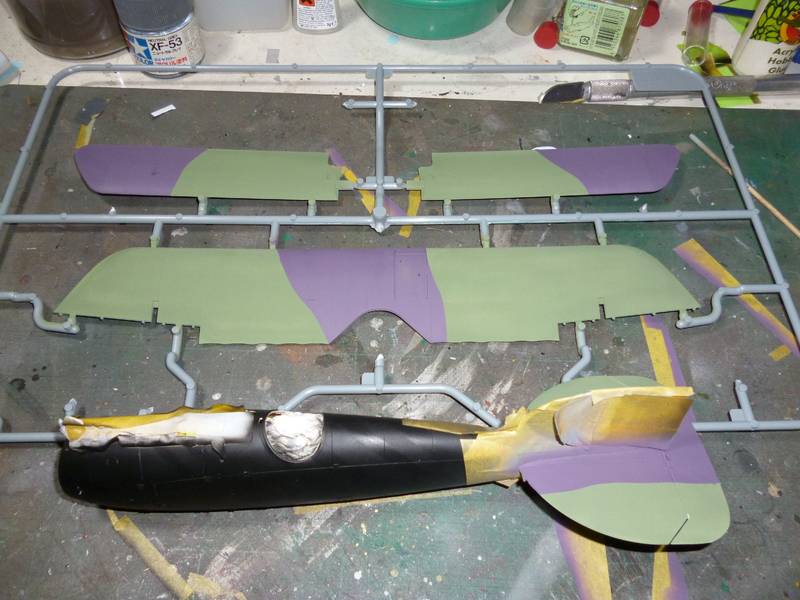
And here it is after applying the new colour scheme. I really live the mauve colour. I thought it was going to come out like sludge when I first mixed it, but I was wrong and it is a lovely colour.
You can still see the different texture of the stripes after I tried brushpainting them, but that is OK as they will disappear once I apply the matt coat later... I hope..

Thanks for looking.
You may be right, I may be crazy.
New Jersey, United States
Joined: June 02, 2006
KitMaker: 1,212 posts
AeroScale: 468 posts
Posted: Thursday, June 02, 2011 - 12:37 AM UTC
I have no clue whether the colors are correct (you'll never see or hear me in that discussion

) but I like 'em. The flat coat will take away the appearance of some of that. There were a few things on my DVa wings that i hoped for the same thing and got my wish. Not a large as on your fuselage. You may need a light sanding with some wet 600 paper and another flat coat but you it may work well enough without. Fingers crossed for ya.
South Australia, Australia
Joined: August 14, 2007
KitMaker: 5,926 posts
AeroScale: 2,201 posts
Posted: Thursday, June 02, 2011 - 06:26 AM UTC
Hi Marc.
I am solving all my colour problems by just using WNWs references and building OOB.
The stripes will be interesting to say the least. I tried a windex wash but the paint had been let cure too long and it wasn't lifting. I didn't want to use anything stronger as it may have ruined the interior and there was no way to fix that..
I believe the flat coat will fix it like it fixes shiny decals.
You may be right, I may be crazy.
Arizona, United States
Joined: December 12, 2008
KitMaker: 1,423 posts
AeroScale: 1,319 posts
Posted: Thursday, June 02, 2011 - 06:59 AM UTC
HI Warren:
I like the Mauve as well. That is where I am stuck right now. Painting! I am following your build with interest. I would try the light sanding with 600 just to play it safe on the fuselage, give it a mist coat and then dull coat it. So far so good.
Best
Mark
We few, we happy few........
South Australia, Australia
Joined: August 14, 2007
KitMaker: 5,926 posts
AeroScale: 2,201 posts
Posted: Thursday, June 02, 2011 - 04:49 PM UTC
And some more progress, but these will be the last for a few days as I am going to go and sit by the river and fish for the next few days. Hard life..
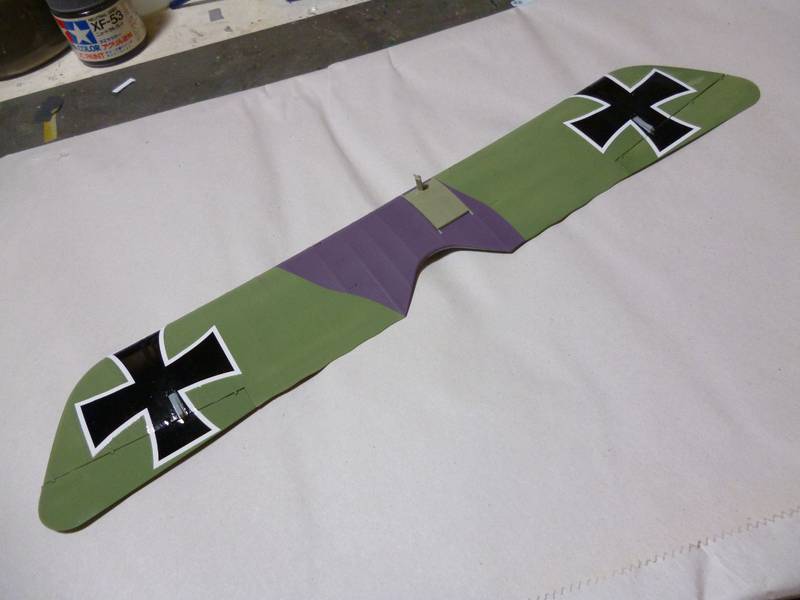
Zee upper ving...
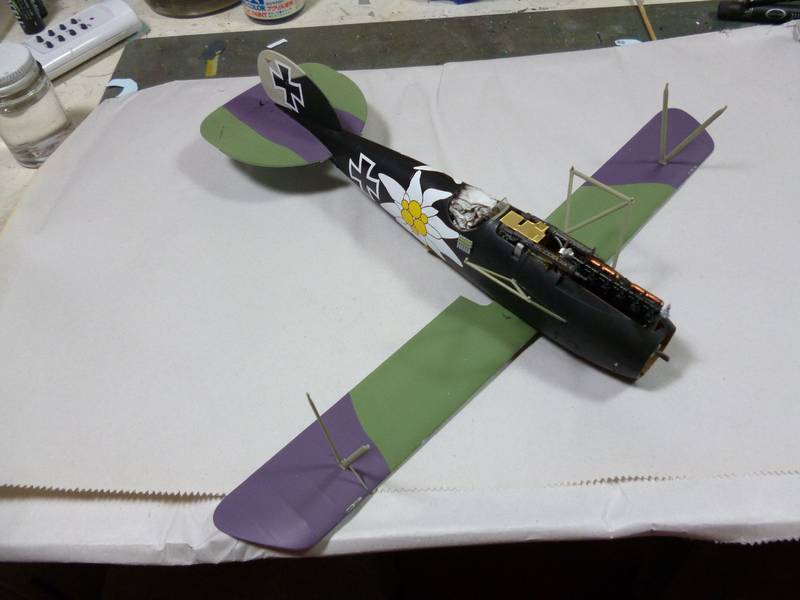
Zee decals are on.. Colourful no?
And zee Edelviess decoration in all its glory...
After I get back the struts etc should all be nice and solid for the attachment of the upper-wing.
Cheers and have a good weekend everyone,
Warren
You may be right, I may be crazy.
Colorado, United States
Joined: January 25, 2004
KitMaker: 11,669 posts
AeroScale: 11,011 posts
Posted: Thursday, June 02, 2011 - 05:14 PM UTC
". . .The most important thing is to know why you build and then get the most that you can out of building." via D.D.
South Australia, Australia
Joined: August 14, 2007
KitMaker: 5,926 posts
AeroScale: 2,201 posts
Posted: Thursday, June 02, 2011 - 05:38 PM UTC
Thanks Stephen. I am getting straight back on the horse and will be ordering another D.V as soon as they bring out another kit, or I run out of the WNW ones I have..
You may be right, I may be crazy.
New Jersey, United States
Joined: June 02, 2006
KitMaker: 1,212 posts
AeroScale: 468 posts
Posted: Sunday, June 05, 2011 - 12:54 PM UTC
My daughter would that the fuselage is BANGIN". And I would agree.
South Australia, Australia
Joined: August 14, 2007
KitMaker: 5,926 posts
AeroScale: 2,201 posts
Posted: Sunday, June 05, 2011 - 01:55 PM UTC
Thanks Marc. Might get some more done this afternoon. Chilled out real good after a weekend of fishing, eating and drinking.
You may be right, I may be crazy.
South Australia, Australia
Joined: August 14, 2007
KitMaker: 5,926 posts
AeroScale: 2,201 posts
Posted: Sunday, June 05, 2011 - 07:13 PM UTC
Here is a hint, if you use enamels on an model don't try and use a de-bonder to remove anything covered in CA glue... it makes the enamel go all crackle finsh..
I used some CA glue to glue a pair of struts to the upper wing but found that I had accidently applied a little too much and two of the tiny eyelets had got covered in the stuff. I thought I could de-bod them from the CA glue with the de-bonder but it did not work and all it did was ruin some of the paint around the strut.
No real problem, I washed the rest of the de-bonder off with some alcohol and have touched up the paint. I will glue in new eyelets tomorrow when everything is dry.
So the upper wing is on, the undercarriage in place and I drilled out the end of the exhaust pipe using a couple of different size drills. Has come out fine.
Pictures tomorrow when it may be finished..
You may be right, I may be crazy.


