_GOTOBOTTOM
World War II
Discuss WWII and the era directly before and after the war from 1935-1949.
Hosted by Rowan Baylis
Diorama 1/48 Spitfire Recovery
orcada
_VISITCOMMUNITY
Virginia, United States
Joined: December 30, 2007
KitMaker: 16 posts
AeroScale: 11 posts
Posted: Saturday, June 11, 2011 - 06:48 AM UTC
Hi everyone,

I an excited to say I will be starting a diorama of the following scene in 1/48 which I plan on doing an in progress build on Aeroscale.


I was hoping with the great knowledge base on Aeroscale I could get some input:
1. What is the most accurate Spitfire Mk.IXc in 1/48?

I am doing a detailed build of this plane and have the Aires resin detail set for the Hasegawa kit, but I know in the past there was issues with the length of the fuselage. I was not sure if Airfix has release a newer version of this plane and if it would take the detail aftermarket. I also have the ICM and occidental kiting of this plane, just not sure which is the best.

2. Does anyone have scale drawings of how the wing would connect to the fuselage?

3. I have acquired almost all of the vehicles and most of the figures. If anyone is able to help with figures that I can augment to pose in these positions please let me now.


4. Need scale drawings of a rig /trailer assembly since I will need to scratch build the trailer and modify the truck into a rig.


What I have found out about this specific scene is as followed:
Photos are from the John Bradley Collection and more shots of the scene can be seen here:


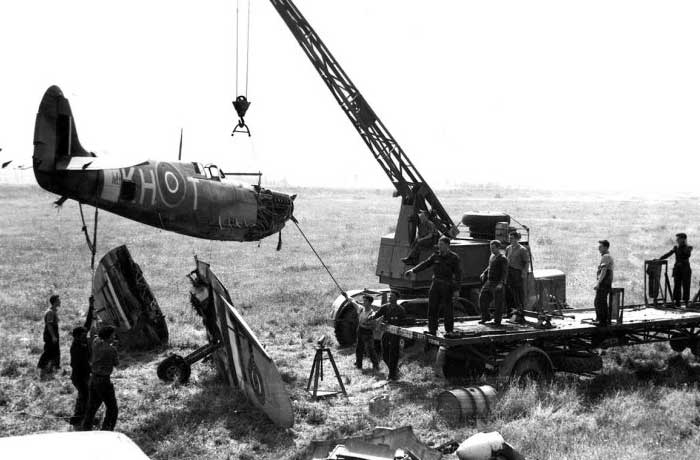
I am interested in more information regarding the Spitfire mk. IXc serial no. mh779 kh-t of the 403 Squadron. There are photographs of it being recovered on 11 August 1944. The aircraft damaged on ops on 14 July 1944.

I am also looking for any additional information on the aircraft and/or pilot of this specific plane at the time of the accident. If anyone knows of any additional photos or can point me in the right directions I would be appreciative.

An interesting note is there appears to be invasion stripes only on one side of the aircraft. This is noticed in the two photos of the recovery found in the above link.

The following kits will be used in this build:


Accurate-Armor AEC 6x6 Coles EMA Mk-VII Crane


Accurate-Armor AEC MATADOR RAF Flat Bed


Wespe Bedford to be converted into a rig and the cover back end to be donated to the Matadore


Aires Full detail resin set

Thank you in advance,

Scott Bricker
orcada
_VISITCOMMUNITY
Virginia, United States
Joined: December 30, 2007
KitMaker: 16 posts
AeroScale: 11 posts
Posted: Saturday, June 11, 2011 - 09:46 AM UTC
Pat Murphy just pointed me to some additional references.

Stu Tosh was flying KH-T on July 19, 944 when he was hit by flack and crash landed his Spitfire. this is according to the book "Spitfire the Canadian" by Robert Brackens.

Thanks Pat!
Merlin
Staff MemberSenior Editor
AEROSCALE
#017
_VISITCOMMUNITY
United Kingdom
Joined: June 11, 2003
KitMaker: 17,582 posts
AeroScale: 12,795 posts
Posted: Saturday, June 11, 2011 - 11:12 AM UTC
Hi Scott

It looks set to be a really interesting diorama. I always turn to Edgar Brooks https://aeroscale.kitmaker.net/user.php?op=userinfo&uname=EdgarBrooks for expert knowledge on technical questions concerning the Spit, so PM him if he doesn't spot your thread.

All the best

Rowan
orcada
_VISITCOMMUNITY
Virginia, United States
Joined: December 30, 2007
KitMaker: 16 posts
AeroScale: 11 posts
Posted: Saturday, June 11, 2011 - 11:24 AM UTC
Thank you will do.

Scott
Merlin
Staff MemberSenior Editor
AEROSCALE
#017
_VISITCOMMUNITY
United Kingdom
Joined: June 11, 2003
KitMaker: 17,582 posts
AeroScale: 12,795 posts
Posted: Saturday, June 11, 2011 - 11:40 AM UTC
Hi again

You'll find Antoni Lachetta https://aeroscale.kitmaker.net/user.php?op=userinfo&uname=Antoni a mine of useful information too.

All the best

Rowan
Jessie_C
_VISITCOMMUNITY
British Columbia, Canada
Joined: September 03, 2009
KitMaker: 6,965 posts
AeroScale: 6,247 posts
Posted: Saturday, June 11, 2011 - 04:07 PM UTC
The most accurate would be the ICM kit, but the easiest to build would be the Hasegawa. You'd have to scratchbuild the wing root area for either of those. Here are a couple of websites with pictures of Spits undergoing restoration. It appears that the only structural attachments for the wing are the spars, with the main spar taking most of the load; everything else is aerodynamic fairings. Here's a cutaway showing the spars and fairing supports and here is a phenomenal 1/24 cutaway model wth lots of inside bits

Jessica
orcada
_VISITCOMMUNITY
Virginia, United States
Joined: December 30, 2007
KitMaker: 16 posts
AeroScale: 11 posts
Posted: Saturday, June 11, 2011 - 05:02 PM UTC
Thank you Jessica, I think these links will help out a lot.

Cheers,

Scott
orcada
_VISITCOMMUNITY
Virginia, United States
Joined: December 30, 2007
KitMaker: 16 posts
AeroScale: 11 posts
Posted: Monday, June 13, 2011 - 04:05 AM UTC
It looks like I will be using the ICM or Hasegawa Spitfire IX for this build

I have two of each kit and based on the fact that the wings are off and the aires engine will be used and was made for the Hasegawa kit I think this is what I will start out with. If I find out this is not working for me I will switch or kitbash the kits to make something I am happy with. I am excited about all the information I have gathered and will be starting on this project this week. Thank you to all who have sent me information and posted. If you have any other information please do send.

Things I am still not sure on:

1.I am still trying to get a good idea on what the interior of the two hatches that are open in the fuselage contain.

2. I have ordered the recovery set in 1/72 as a guide for scratch building the trailer, but do not have any detail photos or know where to get any of the rig to trailer assembly.

3. I have found out there was also a Accurate-Armor AEC MATADOR RAF Flat Bed at the scene which I will need to build a tarp for, any ideas on best construction of a tarp?

Thanks,

Scott
Jessie_C
_VISITCOMMUNITY
British Columbia, Canada
Joined: September 03, 2009
KitMaker: 6,965 posts
AeroScale: 6,247 posts
Posted: Monday, June 13, 2011 - 08:36 AM UTC

Quoted Text


Things I am still not sure on:

1.I am still trying to get a good idea on what the interior of the two hatches that are open in the fuselage contain.


Those areas can be seen in the 1/24 cutaway model I linked to.

The hatch on the left hand side behind the cockpit contained the radio. Take a look at posts # 38 and 39 on this page. The hatch on the right side nearer the empennage was for access to the control cables. Look at post #40 and also # 43 on this page .
EdgarBrooks
_VISITCOMMUNITY
England - South East, United Kingdom
Joined: June 03, 2006
KitMaker: 397 posts
AeroScale: 384 posts
Posted: Tuesday, June 14, 2011 - 12:29 AM UTC

This a frame 5 (i.e. firewall) without ancillaries, complete with the stub frames, to which the ends of the wingspars attached; three bolt-holes on the top edge, four on the bottom, and I'd suspect that the fuselage would have been suspended from the crane by some of those holes.
There were similar, but smaller, stub-spars on one of the cockpit frames, which attached to the rear spars. The open hatches probably signify that the radio had been removed, leaving just the empty tray, after all they wouldn't want to risk the fairly fragile valves, while bouncing across the ground. The main items, from the starboard hatch, would have been the battery box, since the battery (filled with acid) would have been removed, as would the upward-firing pyrotechnic in the top of the spine.
It's only a guess, but the D-day stripes were done in non-permanent paint, and, if that airframe had been sitting out in the open for over a month, with the prevailing winds being westerly, rain could have washed the stripes off one side, and not the other (same would probably apply to the wing upper surfaces, as well.
Edgar
Removed by original poster on 06/14/11 - 16:13:54 (GMT).
orcada
_VISITCOMMUNITY
Virginia, United States
Joined: December 30, 2007
KitMaker: 16 posts
AeroScale: 11 posts
Posted: Tuesday, June 14, 2011 - 05:17 AM UTC

Quoted Text


This a frame 5 (i.e. firewall) without ancillaries, complete with the stub frames, to which the ends of the wingspars attached; three bolt-holes on the top edge, four on the bottom, and I'd suspect that the fuselage would have been suspended from the crane by some of those holes.
There were similar, but smaller, stub-spars on one of the cockpit frames, which attached to the rear spars. The open hatches probably signify that the radio had been removed, leaving just the empty tray, after all they wouldn't want to risk the fairly fragile valves, while bouncing across the ground. The main items, from the starboard hatch, would have been the battery box, since the battery (filled with acid) would have been removed, as would the upward-firing pyrotechnic in the top of the spine.
It's only a guess, but the D-day stripes were done in non-permanent paint, and, if that airframe had been sitting out in the open for over a month, with the prevailing winds being westerly, rain could have washed the stripes off one side, and not the other (same would probably apply to the wing upper surfaces, as well.


You are correct on the Invasion stripes I have checked and I have a total of 5 photos of the scene, but could only find two online. The paint was removed from the tops of the wings. Thank you also for the information regarding the two hatches and I have been wondering how I was going to connect the crane to the fuselage. This photo is a big help!

Thanks,

Scott
orcada
_VISITCOMMUNITY
Virginia, United States
Joined: December 30, 2007
KitMaker: 16 posts
AeroScale: 11 posts
Posted: Wednesday, June 15, 2011 - 07:12 PM UTC
Posting before I head off to bed.
I have decided to go with the Hasegawa kit at this time since the Aires kit was made with the Hasegawa kit in mind. I figure since the wings will be detached and the engine exposed the issues everyone talks about will not matter. I have started the initial removal of the plastic from the fuselage and wings. I am posting before I head off to bed. I still need to clean up a lot of the initial surgery and still have more to do. I will also have to build up missing wing area which was covered up where the wing connected to the fuselage. I will also have to rebuild the fuselage since the fuselage should be smooth all the way around. If anyone has suggestions on how to build the fuselage back in please let me know. I will need to scratch build the wing route bracing in each wing as well as the internal frame work.


Photo 1 - This is the initial possible aftermarket that I will be using with the Hasegawa 1/48 Spitfire Mk. IXc


Photo 2 - I have marked what will need to be removed for this build


Photo 3 - This is the initial surgery for the wings. I still need to sand and refine the initial cuts. I still need to remove hatches. I am comparing the wings to the original wings from another kit. The wings will also need to have addition plastic sheet added to extend the wings upper length to be parallel to the longer wings width.


Photo 4 - I have to remove the hatches still and rebuild the missing fuselage to form a uniformed surface.
orcada
_VISITCOMMUNITY
Virginia, United States
Joined: December 30, 2007
KitMaker: 16 posts
AeroScale: 11 posts
Posted: Friday, August 26, 2011 - 04:56 AM UTC
I have not given up on this project. I have run into several snags with the Spitfire fuselage and I am having a heck of a time getting the contours correct once I hacked off all of the plastic to accommodate the new exterior. This has resulted in some scratch building and I am currently looking into vaccuforming a new fuselage as a possible solution to solve this issue.
 _GOTOTOP