

Hi Kenneth,
Great job there. What do you mean when you say that the Surroundings of the mask affects the previous wash?? Is it an excessive glue on the mask that peel off the paint and/or weathering?
Very much appreciate your experience fedback cause I'm about to use this products on a very, very time consuming project and if I can antecipat issues on this matter it would be super.
Thanks and keep up the good work
Cheers
Pedro
World War II
Discuss WWII and the era directly before and after the war from 1935-1949.
Discuss WWII and the era directly before and after the war from 1935-1949.
Hosted by Rowan Baylis
Dragon Messerschmitt Bf110C-7 1/32

rochaped

Joined: August 27, 2010
KitMaker: 679 posts
AeroScale: 669 posts

Posted: Saturday, September 24, 2011 - 03:43 AM UTC
wespe66

Joined: June 27, 2011
KitMaker: 122 posts
AeroScale: 121 posts

Posted: Saturday, September 24, 2011 - 04:46 AM UTC
Ed: Thank you!
Mal: Thank you! I would have loved to use a paintmask instead of the decal for the bug, but Montex does not do that one AFAIK.
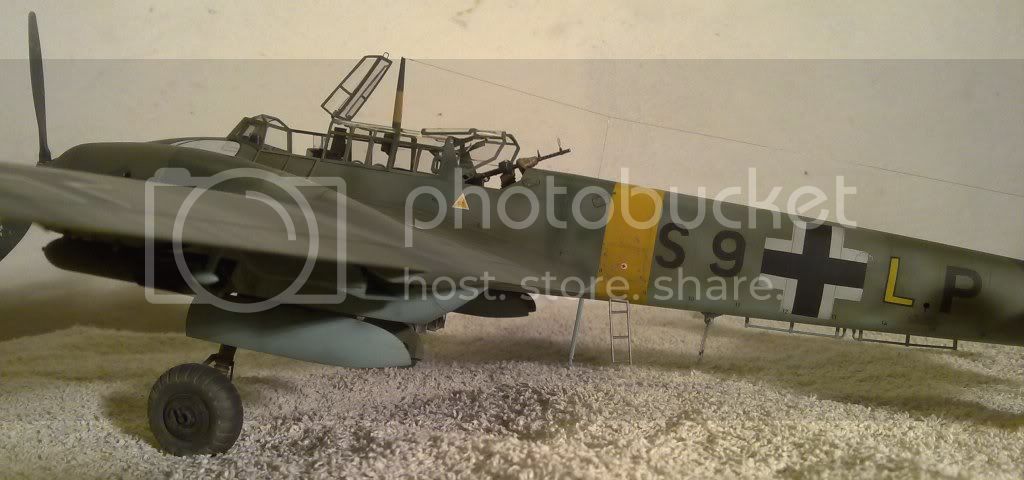
Pedro: I knew it was a bad explanation when I wrote it As you can see on the pictures I painted the camo first, sealed it with a gloss varnish, left it to dry for a couple of days, then placed the outside masks and painted the black/white/yellow inside. When I removed the outside masks I could very clearly see were they had been, because they left a kind of shadow, like the surface is somewhat more matt where the mask has been. This matt trace can NOT be removed with normal washing detergent, window cleaner or even with alcohol. It therefore looks to me as a permanent "damage" of the varnish, and not just a hint of glue left behind by the mask. It normally disappears when I give the whole surface a coat of matt varnish though. But, in this case, instead I gave the model a wash of Promodeller light and dark wash, whiped off with a damp cloth. This emphasised the problem a lot, because the promodeller stuff was more or less impossible to remove from the "matt" areas where the masks had been. End result, I had a square around the each cross that was a very different color than the rest of the camo
  What I have done before - and will do again next time - is to paint the markings first, directly on the primer, and place the inside masks on them before painting the camo. This way the mask is only in contact with the markings, not the surrounding camo, and since the markings are a very different color than the camo, this usually leaves a perfect result.
I hope the above explanation makes sense!
Cheers
Kenneth
Mal: Thank you! I would have loved to use a paintmask instead of the decal for the bug, but Montex does not do that one AFAIK.
Pedro: I knew it was a bad explanation when I wrote it
As you can see on the pictures I painted the camo first, sealed it with a gloss varnish, left it to dry for a couple of days, then placed the outside masks and painted the black/white/yellow inside. When I removed the outside masks I could very clearly see were they had been, because they left a kind of shadow, like the surface is somewhat more matt where the mask has been. This matt trace can NOT be removed with normal washing detergent, window cleaner or even with alcohol. It therefore looks to me as a permanent "damage" of the varnish, and not just a hint of glue left behind by the mask. It normally disappears when I give the whole surface a coat of matt varnish though. But, in this case, instead I gave the model a wash of Promodeller light and dark wash, whiped off with a damp cloth. This emphasised the problem a lot, because the promodeller stuff was more or less impossible to remove from the "matt" areas where the masks had been. End result, I had a square around the each cross that was a very different color than the rest of the camo What I have done before - and will do again next time - is to paint the markings first, directly on the primer, and place the inside masks on them before painting the camo. This way the mask is only in contact with the markings, not the surrounding camo, and since the markings are a very different color than the camo, this usually leaves a perfect result. I hope the above explanation makes sense!
Cheers
Kenneth
wespe66
Joined: June 27, 2011
KitMaker: 122 posts
AeroScale: 121 posts
Posted: Sunday, October 09, 2011 - 07:09 AM UTC
So today I glued the antenna cable, glued the wing lights, broke off the antenna cable again and glued it again.
And I can finally call it finished. It has been a long but fun and teaching experience! It is a very nice kit, and I plan on also building the night fighter version sometime.
I will post some better pictrures as soon as when weather and time permits it.
Thanks for watching and for your support!

And I can finally call it finished. It has been a long but fun and teaching experience! It is a very nice kit, and I plan on also building the night fighter version sometime.
I will post some better pictrures as soon as when weather and time permits it.
Thanks for watching and for your support!
Holdfast

#056

Joined: September 30, 2002
KitMaker: 8,581 posts
AeroScale: 4,913 posts

Posted: Monday, October 10, 2011 - 06:52 AM UTC
Quoted Text
Mal: Thank you! I would have loved to use a paintmask instead of the decal for the bug, but Montex does not do that one AFAIK.
I have drawn the Wespa nose art and intend to produce the masks when I can find the time to build this kit. Whether it will work over the complex nose is to be seen but I'll be able to tweak it, hopefully, until it does
 Never the less, still a great build and I will be refering to this when I start mine.
 Thanks for sharing

rochaped
Joined: August 27, 2010
KitMaker: 679 posts
AeroScale: 669 posts
Posted: Monday, October 10, 2011 - 01:00 PM UTC
Hi Kenneth,
Thanks for your cristal clear explanation on the issues you found using those masks. Although i also use pigments (different brand though, believe promodeller isn't even marketed over here), i am a recently converted to AK washes, which I found to be very easy to use and allows me to achieve different levels of weathering without effort or mishaps.
Clearly your new approach to that "how-to-do-it next time" makes perfect sense and i shall do it also.
Great looking 110 you made there! Looks very authentic and worn out from sorties!
Cheers
Pedro
Holdfast
#056
Joined: September 30, 2002
KitMaker: 8,581 posts
AeroScale: 4,913 posts
Posted: Tuesday, October 11, 2011 - 05:27 AM UTC
Hi Kenneth,
I'm interested to know which gloss coat it was that you used before applying the masks, as I changed the type of material that I used because of residue problems that couldn't be removed? I've had no reports of this problem since changing
I'm interested to know which gloss coat it was that you used before applying the masks, as I changed the type of material that I used because of residue problems that couldn't be removed? I've had no reports of this problem since changing
wespe66
Joined: June 27, 2011
KitMaker: 122 posts
AeroScale: 121 posts
Posted: Tuesday, October 11, 2011 - 07:01 AM UTC
Mal, the varnish I used is called Marabu aqua Klarlack Gloss varnish. I think it is a german product. I have been using it for everything for the last year mostly because I have lots of it, but I could of course try another brand.
Interesting to hear that you have heard of the same problems.
Do you have a selection of masks for sale, or do you only cut them on a per-project basis? I could need your help with masks for a future 1/32 Hellcat project sometime next year - I will of course be a good customer and pay you properly

Thanks for your comments, guys!
Best regard
Kenneth
Holdfast
#056
Joined: September 30, 2002
KitMaker: 8,581 posts
AeroScale: 4,913 posts
Posted: Wednesday, October 12, 2011 - 06:52 AM UTC
Hi Kenneth,
It may not be the varnish but I think most aircraft modellers use Klear/Future and this doesn't seem to be affected. It's odd because the adhesive on the masking film is water based and low tack and shouldn't leave any residue? I do believe that the masking film that Montex use is of German origin? Residue is something to be aware of when using paint masks but it can be tested before use quite easily (obviously) but it's something that really would be thought of as needing to be done. I took the caution out of my instructions when I changed material so I was just curious as to what gloss varnish you used, hoping that it wasn't Future
I produce masks to order so a set for a 1/32 Hellcat won't be a problem and as you are a member of the Kitmaker network you get a 15% discout When you are ready simply contact me via my email address:
[email protected]
and I will send you details and the price, or if you haven't decided on a scheme, there will be a guide as to what price to expect. My prices are based around a RAF WWII subject as they tend to require more masks (unles we are talking nose art etc) and a 1/32 scale subject, with full markings, including codes and serial number is £13.75 (£11.70 with Kitmaker discount). A 1/32 Hellcat should work out less, unless it is of the "Cats Mouth" scheme, for instance. I should say that for your money you get at least 4 of each mask plus application tape and comprehensive instructions, including a set drawn by Chuk (of the Ju 388- Planet Models fame)
It may not be the varnish but I think most aircraft modellers use Klear/Future and this doesn't seem to be affected. It's odd because the adhesive on the masking film is water based and low tack and shouldn't leave any residue? I do believe that the masking film that Montex use is of German origin? Residue is something to be aware of when using paint masks but it can be tested before use quite easily (obviously) but it's something that really would be thought of as needing to be done. I took the caution out of my instructions when I changed material so I was just curious as to what gloss varnish you used, hoping that it wasn't Future
I produce masks to order so a set for a 1/32 Hellcat won't be a problem and as you are a member of the Kitmaker network you get a 15% discout
When you are ready simply contact me via my email address:[email protected]
and I will send you details and the price, or if you haven't decided on a scheme, there will be a guide as to what price to expect. My prices are based around a RAF WWII subject as they tend to require more masks (unles we are talking nose art etc) and a 1/32 scale subject, with full markings, including codes and serial number is £13.75 (£11.70 with Kitmaker discount). A 1/32 Hellcat should work out less, unless it is of the "Cats Mouth" scheme, for instance. I should say that for your money you get at least 4 of each mask plus application tape and comprehensive instructions, including a set drawn by Chuk (of the Ju 388- Planet Models fame)
wespe66
Joined: June 27, 2011
KitMaker: 122 posts
AeroScale: 121 posts
Posted: Friday, October 14, 2011 - 06:45 AM UTC
Mal, I have been thinking about the Future, because everybody else seem to use it, but I haven't found it in Denmark yet.
Your prices seems absolutely fair. I will probably only need the numbers, since I already have the stars and stripes.
I will contact you as soon as I'm ready.
Kenneth
Your prices seems absolutely fair. I will probably only need the numbers, since I already have the stars and stripes.
I will contact you as soon as I'm ready.
Kenneth

JPTRR
#051


Joined: December 21, 2002
KitMaker: 7,772 posts
AeroScale: 3,175 posts
Posted: Friday, October 14, 2011 - 10:21 AM UTC
Hi Kenneth,
Outstanding -110! I really look forward to your Hellcat.
Outstanding -110! I really look forward to your Hellcat.

wespe66
Joined: June 27, 2011
KitMaker: 122 posts
AeroScale: 121 posts
Posted: Monday, October 17, 2011 - 05:58 AM UTC

warreni

Joined: August 14, 2007
KitMaker: 5,926 posts
AeroScale: 2,201 posts
Posted: Monday, October 17, 2011 - 08:46 AM UTC
Well done Kenneth.
I have had one of these with the cockpit mostly finished for months wating for some brass barrels that have never come. Think it is time to bit the bullet and just use the plastic barrels.
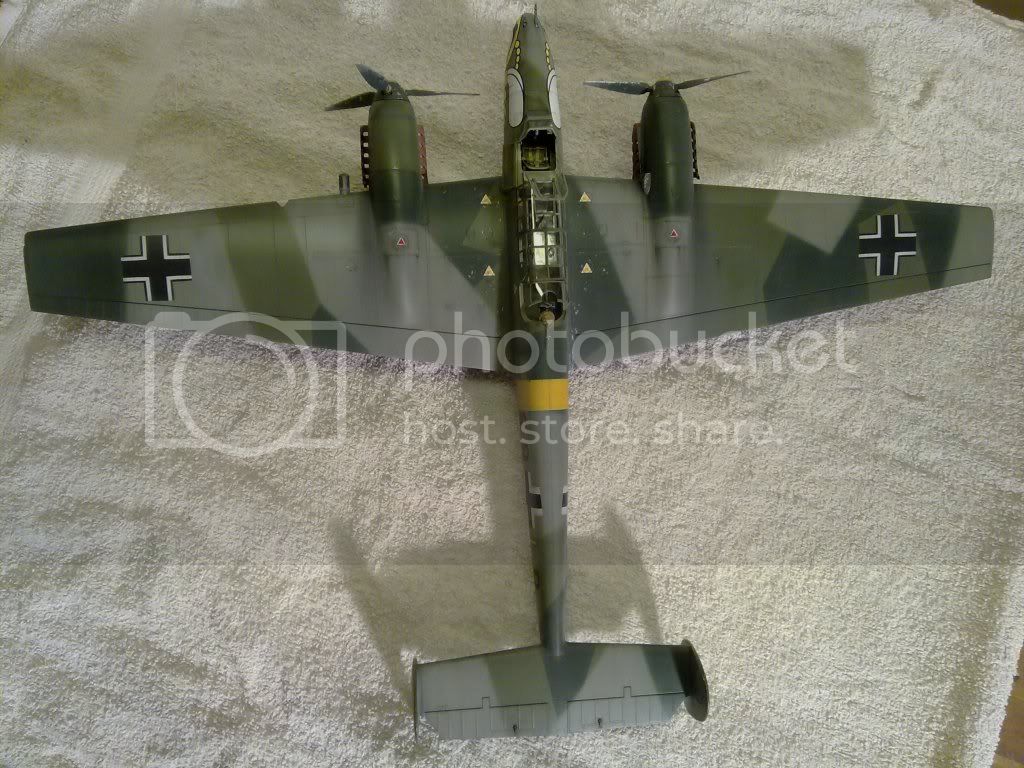
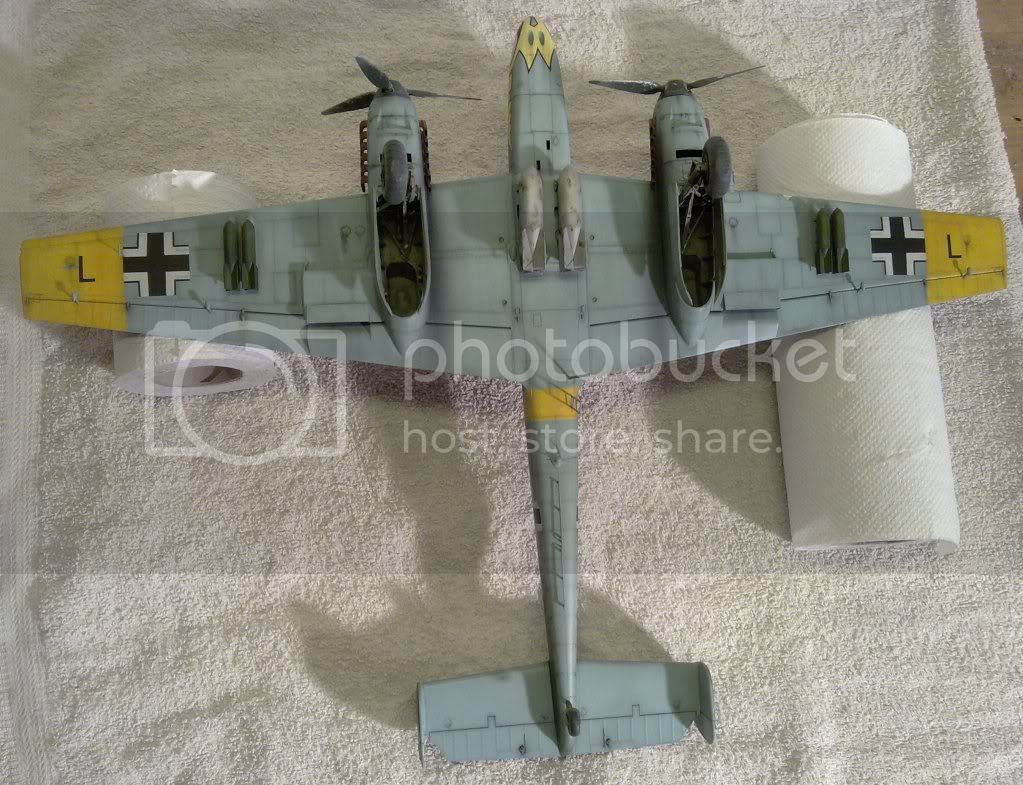
I have one comment though, beware when applying weathering and chipping. Sometimes you can go overboard and chip and weather in places it would never have happened. The only place you normally get chipping on aircraft undersides is around access panels where heavy handed aircraft technicians aren't careful and have their screwdrivers etc slip and mar the finish. Being out of the sun and elements underneath a wing would normally mean that their is little chipping away from these access panels.
But oil and grease stains are another thing entirely!!
Again, well done Kenneth. Hopefully I will get mine back on track after my WW1 obsession passes (if it ever does)...

I have had one of these with the cockpit mostly finished for months wating for some brass barrels that have never come. Think it is time to bit the bullet and just use the plastic barrels.
I have one comment though, beware when applying weathering and chipping. Sometimes you can go overboard and chip and weather in places it would never have happened. The only place you normally get chipping on aircraft undersides is around access panels where heavy handed aircraft technicians aren't careful and have their screwdrivers etc slip and mar the finish. Being out of the sun and elements underneath a wing would normally mean that their is little chipping away from these access panels.
But oil and grease stains are another thing entirely!!
Again, well done Kenneth. Hopefully I will get mine back on track after my WW1 obsession passes (if it ever does)...
wespe66
Joined: June 27, 2011
KitMaker: 122 posts
AeroScale: 121 posts
Posted: Monday, October 17, 2011 - 09:31 AM UTC
Hi Warren,
Thanks for your reply! I agree that the chipped yellow is a bit overdone, but besides that I think I only chipped the belly and under-wings a bit around the access panels. I also agree that it could have had some more oil-stains around the engines.
Actually I thought about blowing a head gasket and smear it in oil on one engine, but I guess I didn't have the courage Maybe next time.
Thanks again for your comments.
Best regards
Kenneth
Thanks for your reply! I agree that the chipped yellow is a bit overdone, but besides that I think I only chipped the belly and under-wings a bit around the access panels. I also agree that it could have had some more oil-stains around the engines.
Actually I thought about blowing a head gasket and smear it in oil on one engine, but I guess I didn't have the courage
Maybe next time.Thanks again for your comments.
Best regards
Kenneth

rholmstr
Joined: September 30, 2010
KitMaker: 28 posts
AeroScale: 8 posts
Posted: Monday, October 17, 2011 - 09:58 AM UTC
Absolutly stunning so far. Beautifully executed.
Bob
Bob


Merlin
#017

Joined: June 11, 2003
KitMaker: 17,582 posts
AeroScale: 12,795 posts
Posted: Wednesday, October 19, 2011 - 01:51 AM UTC
Hi Kenneth
This beauty really should be on the Frontpage as a Feature! Fantastic work!
All the best
Rowan
This beauty really should be on the Frontpage as a Feature! Fantastic work!
All the best
Rowan

 |

WEB HOSTING BY


Copyright ©2021 AeroScale and Kitmaker Network, a subsidiary of Silver Star Enterprises
All Rights Reserved. Please read our Conditions of Use and Privacy Policy.
All Rights Reserved. Please read our Conditions of Use and Privacy Policy.