Lance, I use both a number 10 and a number 7. They are a trade off between magnification and focal length.
The number 10 is best for tiny stuff, but the focal length is very short, and the focal range (how much you can vary the distance from the focal point) is very limited.
The number 7 is less magnification but a longer focal length and range.
The number 10 takes more getting used to because of the short focal length/range, but provides the greatest magnification. However, I find myself with more headaches and backaches when I use the number 10 for extended periods, like last night!
I also use one other visual aide, which is a pair of prescription glasses, with fold down magnifiers. They are about the same magnification as a number 7 Optivisor, but the focal length and range are exceptional. I can sit almost normally and use them. I now use them for almost all my modelling, except for the really tiny stuff, then out comes the #10 again. I got these from CraftOptics: http://craftoptics.com/
They are expensive but well worth it, IMHO.
-Good luck, Jim
Early Aviation
Discuss World War I and the early years of aviation thru 1934.
Discuss World War I and the early years of aviation thru 1934.
Hosted by Jim Starkweather
WnW Fe.2B Early version
Jcoatney

Joined: March 05, 2010
KitMaker: 28 posts
AeroScale: 28 posts

Posted: Wednesday, January 18, 2012 - 10:10 AM UTC
Jcoatney

Joined: March 05, 2010
KitMaker: 28 posts
AeroScale: 28 posts

Posted: Wednesday, January 18, 2012 - 10:14 AM UTC
Quoted Text
Instead of an Optivisor, I just picked up a couple cheap pairs of reading glasses - works great!
Doug
Doug, I've tried reading glasses in the past, but my eyes don't seem to work well with them, and I don't think I can work as well w/o some serious magnification. That said, if they work for you, that's just more you can spend on kits instead of tools!
lcarroll

Joined: July 26, 2010
KitMaker: 1,032 posts
AeroScale: 1,025 posts

Posted: Wednesday, January 18, 2012 - 10:36 AM UTC
Jim,
Great info on both products. Thanks for taking the time, it will make my choice(s) much easier.
Cheers,
Lance
Great info on both products. Thanks for taking the time, it will make my choice(s) much easier.
Cheers,
Lance

wing_nut

Joined: June 02, 2006
KitMaker: 1,212 posts
AeroScale: 468 posts

Posted: Wednesday, January 18, 2012 - 12:35 PM UTC
Jim, your work and patience are extraordinary to say the least. The painting and rigging of the booms look fantastic.
I have a couple of questions, not criticisms, since I know not of what I speak For the flat rigging, I thought I read somewhere that that was only on the wings. Is it in fact all over the darn thing? Regardless of where they are used... would they be installed and adjusted to be set aerodynamically with the thin edge into the wind? Seems that would be the point of the whole exercise.
I have a couple of questions, not criticisms, since I know not of what I speak
 For the flat rigging, I thought I read somewhere that that was only on the wings. Is it in fact all over the darn thing? Regardless of where they are used... would they be installed and adjusted to be set aerodynamically with the thin edge into the wind? Seems that would be the point of the whole exercise.
 Jcoatney

Joined: March 05, 2010
KitMaker: 28 posts
AeroScale: 28 posts

Posted: Wednesday, January 18, 2012 - 01:47 PM UTC
Quoted Text
Jim, your work and patience are extraordinary to say the least. The painting and rigging of the booms look fantastic.
I have a couple of questions, not criticisms, since I know not of what I speakFor the flat rigging, I thought I read somewhere that that was only on the wings. Is it in fact all over the darn thing? Regardless of where they are used... would they be installed and adjusted to be set aerodynamically with the thin edge into the wind? Seems that would be the point of the whole exercise.
Marc, thenks for the kind words. I don't feel very patient!
Re the flying wires: I'm no expert either, but I belive that the RAF used "flying wires" (flat rigging) in most places where it was not subject to movement and could help with drag. The WNW instructions call for flat rigging, and below is a shot of the Vintage Aviation's Fee, with rigging on the booms.
I suspect that they are angled to be the most drag free. For my model, I'm trying to orient the thin side towards the front of the plane.

Also, if you go to the WNW website, you can browse through the instructions; they show where the different rigging goes.
I hope that helps clarify.
Take care, Jim
Jcoatney

Joined: March 05, 2010
KitMaker: 28 posts
AeroScale: 28 posts

Posted: Friday, January 20, 2012 - 02:45 AM UTC
Quoted Text
Life has gotten in the way, so I've not accomplished much in the last few days on this model. However, I do want to share some thoughts on one of the more challenging aspects of this model. This is not a criticism of the kit.. it's more of an issue with how the real Fee is made.
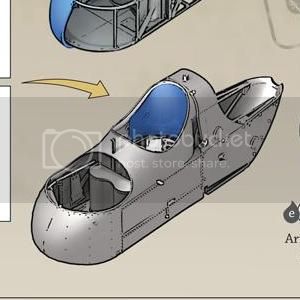
Once the nacelle halves are glued together, there is an insert that practically snaps into place behind and above the seat that forms the rear of the pilot's compartment. Here is how the instructions show the piece, in blue:
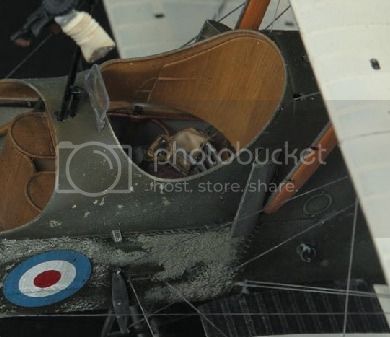
The challenge is that on the real thing, it's not a separate unit, but part of the side walls. Here's how the real thing looks:
I've not figured a way to blend this in so that it looks like one continuous section of wood, because of the risk of damaging other cockpit details, like the instrument panel, throttle, seat belts and framing. Not to mention getting it painted to match the wood grain on the side walls.
In hindsight, I think the solution is to firmly glue this part to both sides of the nacelle, fix any seams, and paint as desired. Then slide the the floor and sidewalls in from the bottom before gluing the rest of the nacelle together. This means that the radiator will need to be put in after the nacelle is glued together. Instructions call for that part in step one, but it would block the sliding of the framed cockpit in from the bottom. This would also allow painting the outer surface of the nacelle without having to figure out a way the keep radiator from overspray.
The alternative would be to leave any seam showing, but I think that would stick out like a sore thumb. I'm going to remove the radiator from what I've done so far (hopefully without any damage) and try this angle.
Wish me luck!
To better clarify this issue, here's a shot of the build on the WNW website. It's a stunning model, but the insert is clearly not bleneded in.
Jcoatney

Joined: March 05, 2010
KitMaker: 28 posts
AeroScale: 28 posts

Posted: Friday, January 20, 2012 - 02:55 AM UTC
Ok... had a bit of a setback last night. I had the bracing on both booms installed and glued the booms together so I could start on all of the cross bracing. Out of the ten wires installed so far, six popped lose from the terminals. I think the booms are too flexible and CA doesn't have the sheer strength to hold the teminals and wires together. I tried soldering the wires to the terminals but solder doesn't seem to want to stick to the metal. White glue isn't strong enough.
I think it's time to take a couple days off from this one....
I think it's time to take a couple days off from this one....
Jamo_kiwi

Joined: November 04, 2008
KitMaker: 123 posts
AeroScale: 122 posts

Posted: Friday, January 20, 2012 - 07:42 AM UTC
After using stainless steel wire and photo etched RAF wires on my WNW LVG and Pup models I am convinced that stretchy EZ Line or similar is the way to go. Much more forgiving with flexing of wings. This is also what WNW recommend and what they use themselves on their display models.
Cheers
James
Cheers
James

Mgunns

Joined: December 12, 2008
KitMaker: 1,423 posts
AeroScale: 1,319 posts

Posted: Friday, January 20, 2012 - 08:58 AM UTC
I concur with Jamo's advice on the EZ line. It is a bit fidly at first, but once you get the hang of it, it is really nice to work with and you don't have to worry about sag.
Good luck
Mark
Good luck
Mark
Jcoatney

Joined: March 05, 2010
KitMaker: 28 posts
AeroScale: 28 posts

Posted: Friday, January 20, 2012 - 09:36 AM UTC
Quoted Text
I concur with Jamo's advice on the EZ line. It is a bit fidly at first, but once you get the hang of it, it is really nice to work with and you don't have to worry about sag.
Good luck
Mark
I love the way the metal wires look, but I may just have to give up and go either the EZ line or the other flat line they offer.
I'm going to try one more angle on the wires. If I fold the very end over and use that to anchor an eyebolt, it should be pretty strong. I could then use bits from the terminals to cover it up. That way there's no stress point that's held by glue, other than where the eyebolts goes into the platic.
Given my recent track record, I'll be ordering EZ wire tomorrow... lol.
Jamo_kiwi

Joined: November 04, 2008
KitMaker: 123 posts
AeroScale: 122 posts

Posted: Friday, January 20, 2012 - 12:46 PM UTC
If you use wire then I would suggest using CA glue not white PVA. Yes it is less forgiving of mistakes in application but will hold the wire much more tightly in place. That, I think, is one of the problems with wire/PVA - the wire pulls out of the dried white glue when stressed, then is permanently bowed. You should rig the plane with it resting on its wheels otherwise the stresses will be different when you display the model and there is a risk of bowed wires. I never had these problems in 1/72 . . .

wing_nut

Joined: June 02, 2006
KitMaker: 1,212 posts
AeroScale: 468 posts

Posted: Sunday, January 22, 2012 - 10:59 AM UTC
Quoted Text
You should rig the plane with it resting on its wheels otherwise the stresses will be different when you display the model and there is a risk of bowed wires.
A good point... one I had not thought of. Using the EZ Line would negate that need.
I have been going back and forth and whether to use the metal wires or the EZ line. The ezl is actually flat, not round, so you can get away with using it from the respect. Having said that, it really is hard to tell being black. It is actually called charcoal but its so dark it is basically black. though. But is is black, not silver. Too bad it does not come in gray. Come in black and white so stands to reason there could be a gray too.

JackFlash

Joined: January 25, 2004
KitMaker: 11,669 posts
AeroScale: 11,011 posts

Posted: Sunday, January 22, 2012 - 12:19 PM UTC
In doing rigging sometimes you have to consider the length of the run for the individual strand. Metal really needs that end cap joint for a turnbuckle to anchor itself. I remember the old Eduard 1:48 Hannover CL.IIIa I did years ago. Using stainless steel I found a few years later several of the longer strands popped loose. I had used Cyano only. Short metal strands do give support in smaller scales.
Tail booms always tend to flex more in any scale if done in all-plastic. "Plastruct" has structure steel rods coated in plastic for industrial models. I used these on an Eduard 1:48 DH 2 some years ago and am using them on a more recent build of the same kit. Also Aeroscale member Des (wombat58) Delatorre did a 1:32 DH 2 on his site and described in detail his methods.
Tail booms always tend to flex more in any scale if done in all-plastic. "Plastruct" has structure steel rods coated in plastic for industrial models. I used these on an Eduard 1:48 DH 2 some years ago and am using them on a more recent build of the same kit. Also Aeroscale member Des (wombat58) Delatorre did a 1:32 DH 2 on his site and described in detail his methods.
Jcoatney

Joined: March 05, 2010
KitMaker: 28 posts
AeroScale: 28 posts

Posted: Thursday, February 02, 2012 - 03:41 AM UTC
Again, life has gotten in the way, so it's been a while since I've been able to post any progress.
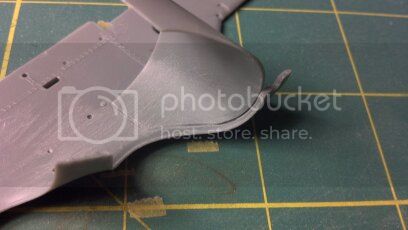
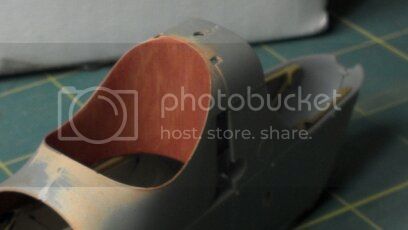
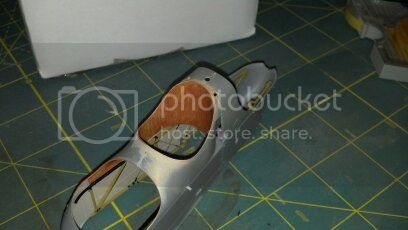
I think I've got the issue with the insert behind the pilot seat solved. By glueing the insert FIRMLY in place on both nacelle halves, but leaving the rest of the nacelle un-glued, you can slide the nacelle frame in from the bottom. The frame and nacelle sides are flexible enough to get everything in place, though it's a bit "fiddly". The worst part is the fuel tank, which has to go in last. This way, you can address the seam on the insert without worrying about damaging other details.
Here are some shots of the work on the insert:
For reference, here is a shot of the build on the WNW site. As usual, it's outstanding, but the seam on the insert is an issue.

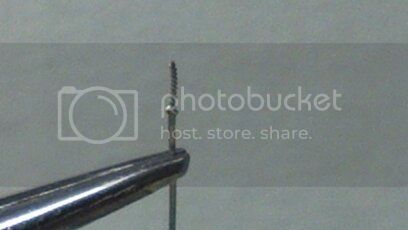
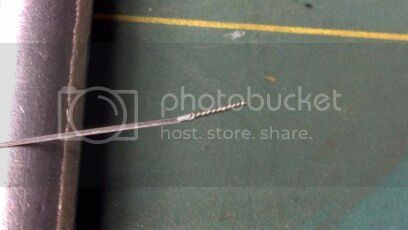
I think I also have a solve for attaching the flat flying wires. CA and white glue were not holding the wires under any type of stress, so I needed a way to securely attach the wire. By folding the very end of the wire over and trapping some 32-gauge bead wire in the fold, I can make an "eyebolt" using the free wire ends. I can still use some of the RB terminals to dress up the ends of the wire, but they will be just for show; all of the stress is on the eyebolt. It will likely take a bit of practice to get the lengths "just right".
Here are some shots of how it looks with the eyebolt created. When installed, the eyebolt will be trimmed down to match the depth of the locating hole and glued in with CA. I tested this on some scrap and it's very strong. It actually tore the plastic instead of popping loose.
I'm actually going to hold off on re-rigging the booms until they are installed. Based on suggestions I've received here, the model needs to sit naturally in order to avoid sagging.
As always, comments, critiques, and suggestions are welcome.
I think I've got the issue with the insert behind the pilot seat solved. By glueing the insert FIRMLY in place on both nacelle halves, but leaving the rest of the nacelle un-glued, you can slide the nacelle frame in from the bottom. The frame and nacelle sides are flexible enough to get everything in place, though it's a bit "fiddly". The worst part is the fuel tank, which has to go in last. This way, you can address the seam on the insert without worrying about damaging other details.
Here are some shots of the work on the insert:


For reference, here is a shot of the build on the WNW site. As usual, it's outstanding, but the seam on the insert is an issue.

I think I also have a solve for attaching the flat flying wires. CA and white glue were not holding the wires under any type of stress, so I needed a way to securely attach the wire. By folding the very end of the wire over and trapping some 32-gauge bead wire in the fold, I can make an "eyebolt" using the free wire ends. I can still use some of the RB terminals to dress up the ends of the wire, but they will be just for show; all of the stress is on the eyebolt. It will likely take a bit of practice to get the lengths "just right".
Here are some shots of how it looks with the eyebolt created. When installed, the eyebolt will be trimmed down to match the depth of the locating hole and glued in with CA. I tested this on some scrap and it's very strong. It actually tore the plastic instead of popping loose.


I'm actually going to hold off on re-rigging the booms until they are installed. Based on suggestions I've received here, the model needs to sit naturally in order to avoid sagging.
As always, comments, critiques, and suggestions are welcome.
lcarroll

Joined: July 26, 2010
KitMaker: 1,032 posts
AeroScale: 1,025 posts

Posted: Thursday, February 02, 2012 - 04:01 AM UTC
Jim,
Nice "fix", you are doing a great job on this build and the end product should be spectacular at this rate!
Cheers, I'll be following your progress with great interest.
Lance
PS Got my Optivisor in the mail a few days ago, great product and thanks for the info/advice.
Nice "fix", you are doing a great job on this build and the end product should be spectacular at this rate!
Cheers, I'll be following your progress with great interest.
Lance
PS Got my Optivisor in the mail a few days ago, great product and thanks for the info/advice.
Jcoatney

Joined: March 05, 2010
KitMaker: 28 posts
AeroScale: 28 posts

Posted: Thursday, February 02, 2012 - 04:55 AM UTC
Quoted Text
Jim,
Nice "fix", you are doing a great job on this build and the end product should be spectacular at this rate!
Cheers, I'll be following your progress with great interest.
Lance
PS Got my Optivisor in the mail a few days ago, great product and thanks for the info/advice.
Lance, which Optivisor did you go for? If you're like me, it will make a real difference in seeing the tiny details.
lcarroll

Joined: July 26, 2010
KitMaker: 1,032 posts
AeroScale: 1,025 posts

Posted: Thursday, February 02, 2012 - 05:13 AM UTC
Quoted Text
Quoted TextJim,
Nice "fix", you are doing a great job on this build and the end product should be spectacular at this rate!
Cheers, I'll be following your progress with great interest.
Lance
PS Got my Optivisor in the mail a few days ago, great product and thanks for the info/advice.
Lance, which Optivisor did you go for? If you're like me, it will make a real difference in seeing the tiny details.
Jim,
I bought the DA 05 (2 1/2 power at 8 inches) and a LP10 spare lens (3 1/2 at 4), both with the glass vs. plastic lenses. I find the #5 is actually clear at about 6 vs. 8 inches so it's a bit of a back strain as you said.
Now that I've tried them out I probably didn't need the second one however time will tell. I've also got an Optiloupe coming in the mail which should further eliminate the requirement for higher magnification. Nice products for sure.
Cheers,
Lance
Jcoatney

Joined: March 05, 2010
KitMaker: 28 posts
AeroScale: 28 posts

Posted: Monday, March 05, 2012 - 03:16 AM UTC
Greetings all! I finally have some progress to show on my early Fee. Lots of delays: We were out of town for over a week to Texas for vacation. I entered my WnW Dh.9 at Model Fiesta 31 in San Antonio and took 1st in category and Best WW1 aircraft. Needless to say, I was happy with that result. It was fun getting that through airport security and finding a case that would both fit and protect the DH.9 as well as fit under the airplane seat.
My wife also decided that now is the perfect time to repaint our basement.....
Anyway.....
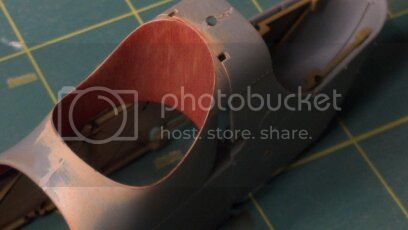
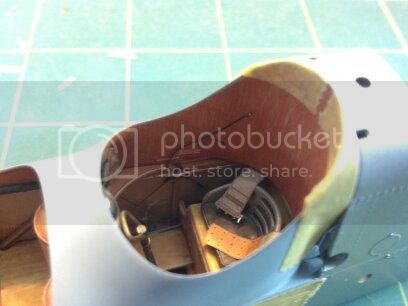
I posted a shot similar to this ealier, but here is my solution for the insert behind the pilot's seat:
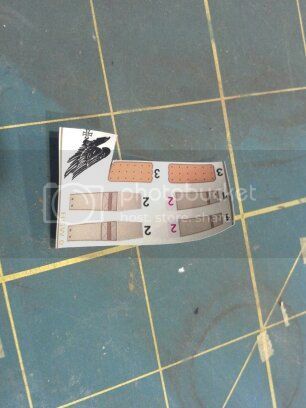
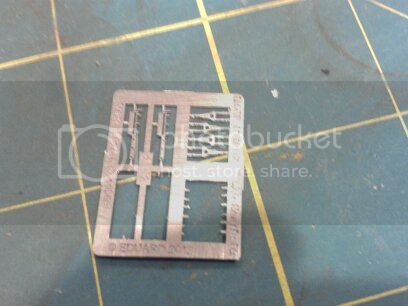
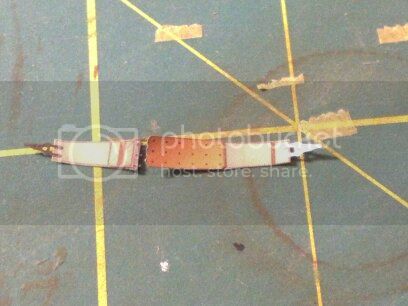
I also decided to go with HGW's fabric/paper seat belts instead of the brass set included in the kit. Here are some shots of how they go together:
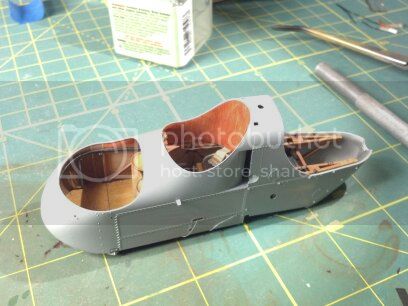
Here are some shots of the nacelle buttoned up. Inserting the cockpit frame from below worked fine, then I sealed up the front and back and cleaned up the seams. I'm going with marking option "D", which is a very early bird. The Forward part of the nacelle is light grey, with a CDL fabric panel. The rear of the nacelle is aluminum.
Since filling the seam for the rear insert wiped out all of the molded on wiring detail, I replaced it with some 32-gauge wire, "painted" black with a Sharpie, and some scrap PE.
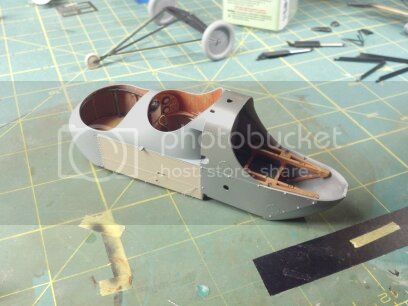
My wife also decided that now is the perfect time to repaint our basement.....
Anyway.....
I posted a shot similar to this ealier, but here is my solution for the insert behind the pilot's seat:

I also decided to go with HGW's fabric/paper seat belts instead of the brass set included in the kit. Here are some shots of how they go together:


Here are some shots of the nacelle buttoned up. Inserting the cockpit frame from below worked fine, then I sealed up the front and back and cleaned up the seams. I'm going with marking option "D", which is a very early bird. The Forward part of the nacelle is light grey, with a CDL fabric panel. The rear of the nacelle is aluminum.

Since filling the seam for the rear insert wiped out all of the molded on wiring detail, I replaced it with some 32-gauge wire, "painted" black with a Sharpie, and some scrap PE.


kynance

Joined: August 09, 2008
KitMaker: 5 posts
AeroScale: 4 posts

Posted: Monday, March 05, 2012 - 04:25 AM UTC
Jim,
Great build. May be worth checking the orientation of the control column before you get too far into the build, I believe it may be 180 degs out.
Regards
Mick
Great build. May be worth checking the orientation of the control column before you get too far into the build, I believe it may be 180 degs out.
Regards
Mick
Jcoatney

Joined: March 05, 2010
KitMaker: 28 posts
AeroScale: 28 posts

Posted: Monday, March 05, 2012 - 06:06 AM UTC
Quoted Text
Jim,
Great build. May be worth checking the orientation of the control column before you get too far into the build, I believe it may be 180 degs out.
Regards
Mick
As Homer Simpson would say, "Doh!" Thanks for catching that! Luckily, I haven't put on the bottom panel, so I should be able to fix it.
lcarroll

Joined: July 26, 2010
KitMaker: 1,032 posts
AeroScale: 1,025 posts

Posted: Monday, March 05, 2012 - 06:20 AM UTC
Jim,
Great progress and beautiful work. As for the "Doh!" catch in time thing, been there and done that more then once myself; it's the forest and trees thing.
Looking forward to more updates as I follow you along; this should be a real standout and lots of learning happening on my part.
Cheers,
Lance
Great progress and beautiful work. As for the "Doh!" catch in time thing, been there and done that more then once myself; it's the forest and trees thing.
Looking forward to more updates as I follow you along; this should be a real standout and lots of learning happening on my part.
Cheers,
Lance
Jcoatney

Joined: March 05, 2010
KitMaker: 28 posts
AeroScale: 28 posts

Posted: Monday, March 26, 2012 - 04:49 AM UTC
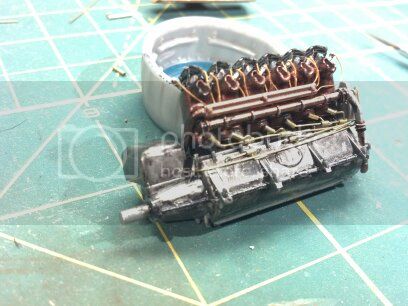
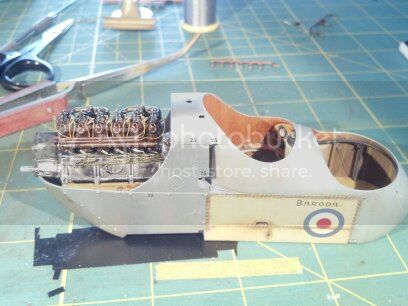
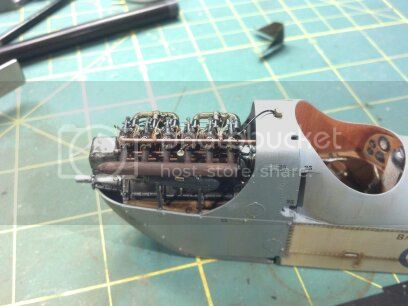
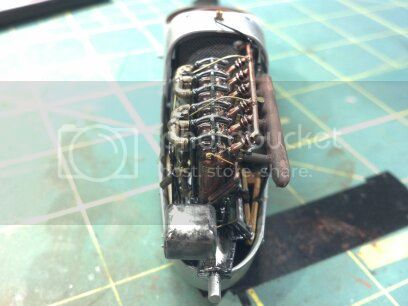
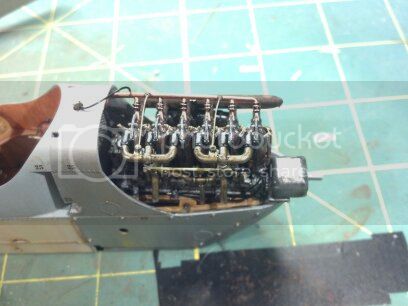
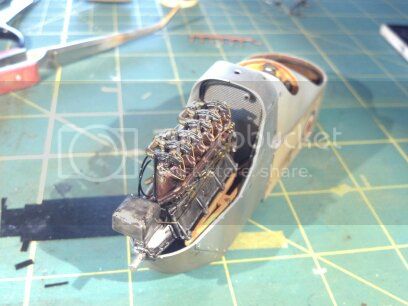
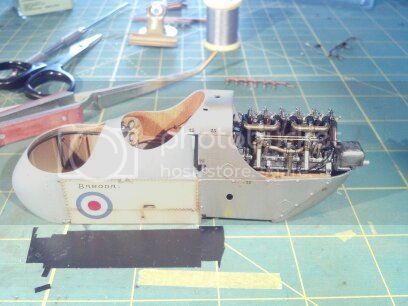
I have a little more progress to show. I spent the last week on the engine. I added a bit of plumbing and wiring, and I'm happy with it. There's a lot more that could be done, especially with the wonderfull reference material that James Fahey has posted, but I had to stop somewhere. I also fixed my "doh!" moment and reversed the control collumn. As also comments and critiques are welcome.


Mgunns

Joined: December 12, 2008
KitMaker: 1,423 posts
AeroScale: 1,319 posts

Posted: Tuesday, March 27, 2012 - 07:42 AM UTC
 Hello Jim:
You certainly did a great job on the engine. I have one of these and will reference your build when I get to it. It looks busy.
Best
Mark
 |


