_GOTOBOTTOM
Early Aviation
Discuss World War I and the early years of aviation thru 1934.
WnW Fe.2B Early version
Jcoatney
_VISITCOMMUNITY
United States
Joined: March 05, 2010
KitMaker: 28 posts
AeroScale: 28 posts
Posted: Wednesday, December 28, 2011 - 07:51 AM UTC
It's not much to look at yet, but here is step 1 complete. I'm using Gunze lacquers and the RB productions wood grain stencil for the wood patterns. The rigging for the rudder bar will eventually go around the pullies beside the seat box then out to the wings. For now, I've got the lines rolled around some spare sprue and taped under the floor.

I may try to make some foot loops for the rudder bar out of tin foil or spare PE. For some reason WnW did not include these, and I suspect they may be visible.


Removed by original poster on 01/02/12 - 22:14:48 (GMT).
Removed by original poster on 01/02/12 - 22:17:49 (GMT).
Jcoatney
_VISITCOMMUNITY
United States
Joined: March 05, 2010
KitMaker: 28 posts
AeroScale: 28 posts
Posted: Monday, January 02, 2012 - 10:33 AM UTC
Here are some more shots of the my WnW FE.2b through step 2. See my earlier post for Step 1.

Since I'm going to be using RB Productions wood grain template, I painted most of the wood in a light tan color for the undercoat. (Gunze C045 sail color).


Here is the template in place, ready to spray the darker color, in this case C039, dark yellow.


The results of the first section of the observer' floor with the wood grain applied.


The completed observer's floor. Just needs some detail painting and a wash.


The same techniques applied to the observer's ammo storage, this time with C039 (dark yellow) under C043 (wood brown) for the darker parts.


The observer's floor mated to the ammo bin.


For the bracing I'm using eyebolts made of 32-gauge beading wire twisted around a #80 bit to make the eyebolts.


Here is an installed eyebolt. I drilled a hole for it using the same #80 bit.


14/0 fly tieing line is passed through micro-midge tubing, the eyebolt and back out the tubing. Magnification is a must for this.


On brace completed.


After a couple hours, here is the bracing for one side finished.


Matched up with the cockpit floor.


Both sides installed.


Here's the instrument panel, painted and decaled.. I used the same process for the wood grain, but it's much harder to see.


And Installed:


I still have to put in the control column and seat belts, but that's about it for step two of this kit.

Mgunns
_VISITCOMMUNITY
Arizona, United States
Joined: December 12, 2008
KitMaker: 1,423 posts
AeroScale: 1,319 posts
Posted: Monday, January 02, 2012 - 11:28 AM UTC
I really like the work so far. The attention to detail is outstanding. I also like the RB production wood templates. I have never seen those before and am very impressed by the results. Looking good so far. Keep us posted.

Best

Mark
JackFlash
_VISITCOMMUNITY
Colorado, United States
Joined: January 25, 2004
KitMaker: 11,669 posts
AeroScale: 11,011 posts
Posted: Monday, January 02, 2012 - 03:02 PM UTC
Very nice indeed.
OEFFAG_153
_VISITCOMMUNITY
Västra Götaland, Sweden
Joined: February 19, 2010
KitMaker: 1,473 posts
AeroScale: 1,450 posts
Posted: Monday, January 02, 2012 - 07:36 PM UTC
This is looking really nice indeed – keep posting!

Mikael
Kornbeef
_VISITCOMMUNITY
England - South East, United Kingdom
Joined: November 06, 2005
KitMaker: 1,667 posts
AeroScale: 1,551 posts
Posted: Wednesday, January 04, 2012 - 09:04 AM UTC
Jim,

Nice attention to detail, I'll folllow this with interest.

I've not seen that woodgrin stencil before, an intriguing solution to an age old issue.
For me the Jury is still out on it but you made nice work of its use.

Keith
Jcoatney
_VISITCOMMUNITY
United States
Joined: March 05, 2010
KitMaker: 28 posts
AeroScale: 28 posts
Posted: Friday, January 13, 2012 - 03:53 AM UTC
Life has gotten in the way, so I've not accomplished much in the last few days on this model. However, I do want to share some thoughts on one of the more challenging aspects of this model. This is not a criticism of the kit.. it's more of an issue with how the real Fee is made.

Once the nacelle halves are glued together, there is an insert that practically snaps into place behind and above the seat that forms the rear of the pilot's compartment. Here is how the instructions show the piece, in blue:


The challenge is that on the real thing, it's not a separate unit, but part of the side walls. Here's how the real thing looks:


I've not figured a way to blend this in so that it looks like one continuous section of wood, because of the risk of damaging other cockpit details, like the instrument panel, throttle, seat belts and framing. Not to mention getting it painted to match the wood grain on the side walls.

In hindsight, I think the solution is to firmly glue this part to both sides of the nacelle, fix any seams, and paint as desired. Then slide the the floor and sidewalls in from the bottom before gluing the rest of the nacelle together. This means that the radiator will need to be put in after the nacelle is glued together. Instructions call for that part in step one, but it would block the sliding of the framed cockpit in from the bottom. This would also allow painting the outer surface of the nacelle without having to figure out a way the keep radiator from overspray.

The alternative would be to leave any seam showing, but I think that would stick out like a sore thumb. I'm going to remove the radiator from what I've done so far (hopefully without any damage) and try this angle.

Wish me luck!


lcarroll
_VISITCOMMUNITY
Alberta, Canada
Joined: July 26, 2010
KitMaker: 1,032 posts
AeroScale: 1,025 posts
Posted: Friday, January 13, 2012 - 05:01 AM UTC
Jim,
I am following your Build with great interest; my compliments on beautiful work so far and yes, good luck with the tricky problem you've encountered.
Really intrigued with the RB Template, I may look into one.
Keep it coming, it's stimulating and I'm learning from your efforts already.
Cheers,
Lance
Mgunns
_VISITCOMMUNITY
Arizona, United States
Joined: December 12, 2008
KitMaker: 1,423 posts
AeroScale: 1,319 posts
Posted: Friday, January 13, 2012 - 08:45 AM UTC
You could try to fill the seam with white glue or a bead of super glue. It may not fill it completely but it may just hide it enough to not be noticeable.
Good Luck

Mark
Jcoatney
_VISITCOMMUNITY
United States
Joined: March 05, 2010
KitMaker: 28 posts
AeroScale: 28 posts
Posted: Friday, January 13, 2012 - 10:00 AM UTC
Thanks Mark, I'll look into that option. This part of the kit will be very exposed, and I need the wood grain pattern to match up. If I can made it work, it will save lots of effort.
JackFlash
_VISITCOMMUNITY
Colorado, United States
Joined: January 25, 2004
KitMaker: 11,669 posts
AeroScale: 11,011 posts
Posted: Friday, January 13, 2012 - 01:34 PM UTC
How about you use the WNW piece as a backing to a large item you cut from scratch? You may have to thin down the WNW item but it would certainly support any larger area piece you glued on the WNW part front face.
Jcoatney
_VISITCOMMUNITY
United States
Joined: March 05, 2010
KitMaker: 28 posts
AeroScale: 28 posts
Posted: Monday, January 16, 2012 - 05:54 AM UTC
Good suggestion. I've got some thin sheet that I'll try. The challenge, I think, will be that no matter how it's done, it will need to be painted (with wood grain) with the two nacelle halves mostly glue together. That will be some tight quarters for the airbrush.

I've run out of the paint I need for this. I'm a planner by profession, so you'd think I'd be better at not letting that happen. Of course spilling a good portion of a bottle doesn't help. In the mean time, I'll start working on the tail booms. Lots and lots of mold lines to clean on these.
Jessie_C
_VISITCOMMUNITY
British Columbia, Canada
Joined: September 03, 2009
KitMaker: 6,965 posts
AeroScale: 6,247 posts
Posted: Monday, January 16, 2012 - 05:59 AM UTC
What about cutting it to shape, getting the fit correct, then painting it before fitting it into place?
Jcoatney
_VISITCOMMUNITY
United States
Joined: March 05, 2010
KitMaker: 28 posts
AeroScale: 28 posts
Posted: Monday, January 16, 2012 - 08:05 AM UTC
That may work, especiaasly if I can get it thin enough. I'll post some shots of how this goes (once my paint arrives).

Thanks to all for the suggestions.

For any others building a WnW Fee, I'd love to hear how you tackle this issue.

-Jim
Jcoatney
_VISITCOMMUNITY
United States
Joined: March 05, 2010
KitMaker: 28 posts
AeroScale: 28 posts
Posted: Tuesday, January 17, 2012 - 05:02 AM UTC
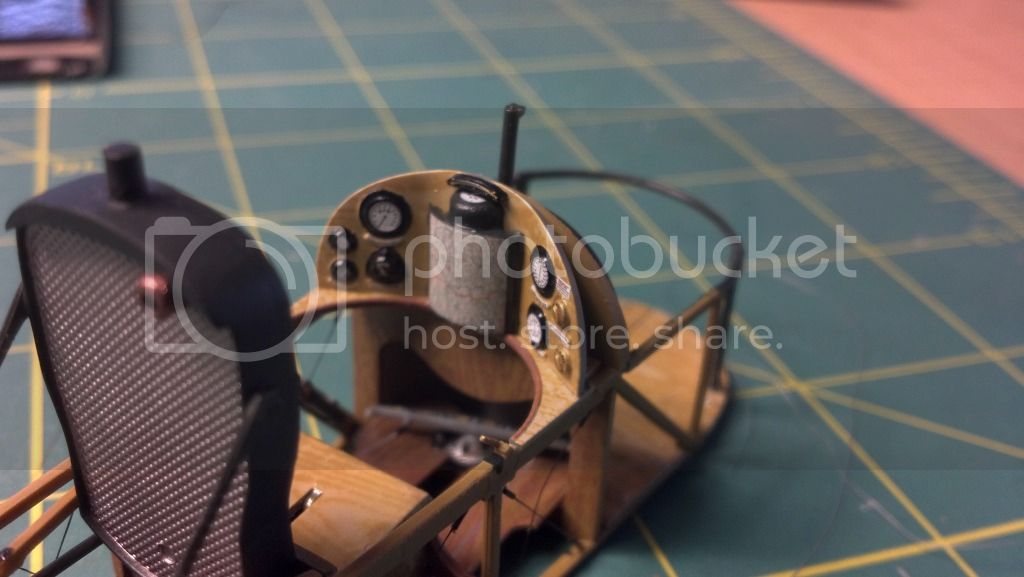
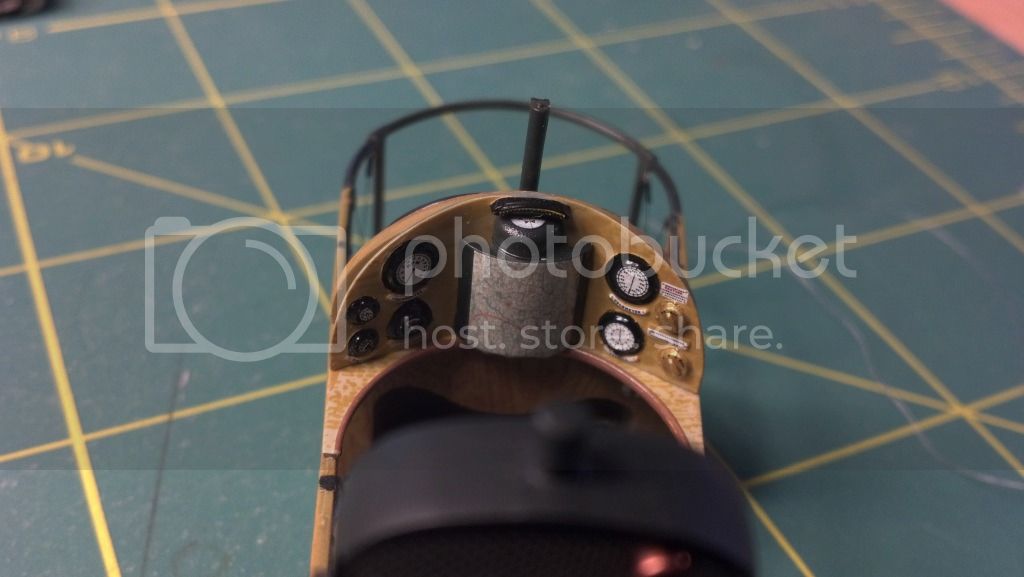
OK, while I'm processing the suggestions and deciding how to handle the above-referenced issue and waiting for some paint to arrive, I've started work on the tail booms.

WnW has thoughtfully molded each side as one unit, which will fit snugly in slots in both wings. They are molded cleanly, but there are mold lines that need to be removed. And due to the nature of these parts, there are lots and lots of them. After several hours of delicate scraping and sanding, I was able to lay down a base coat of Gunze dark yellow (C039).

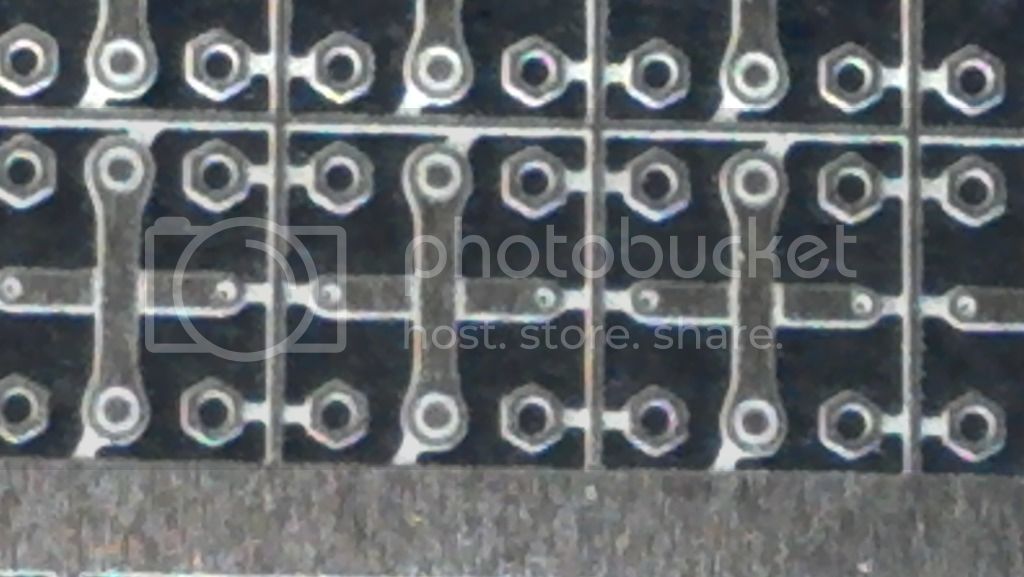
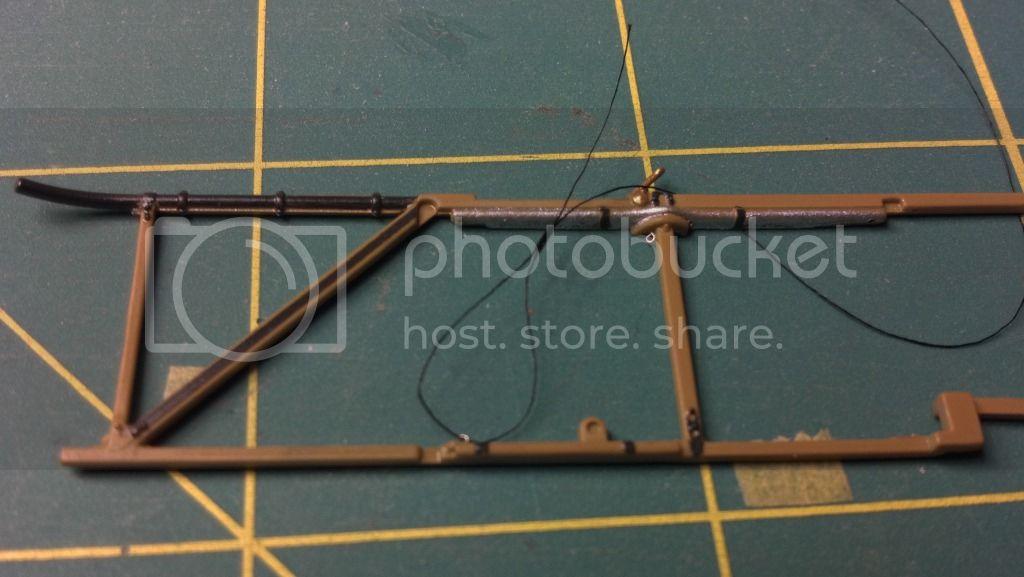
The instructions call for multiple dark brown bands around each boom. Decal strips are provided which are to be cut to 7mm lengths. There are 78 of these to be cut and applied! To save myself from insanity, I opted not to go this route and masked and painted the loops in Wood Brown (C043). There are also some silver and red bands to paint, plus the metal brackets in black. Here are the results:


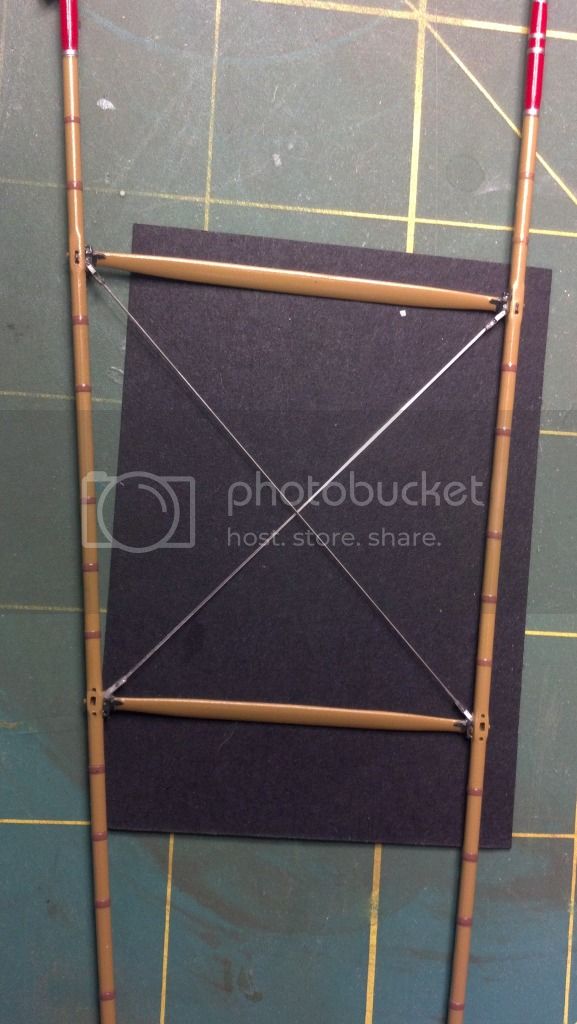
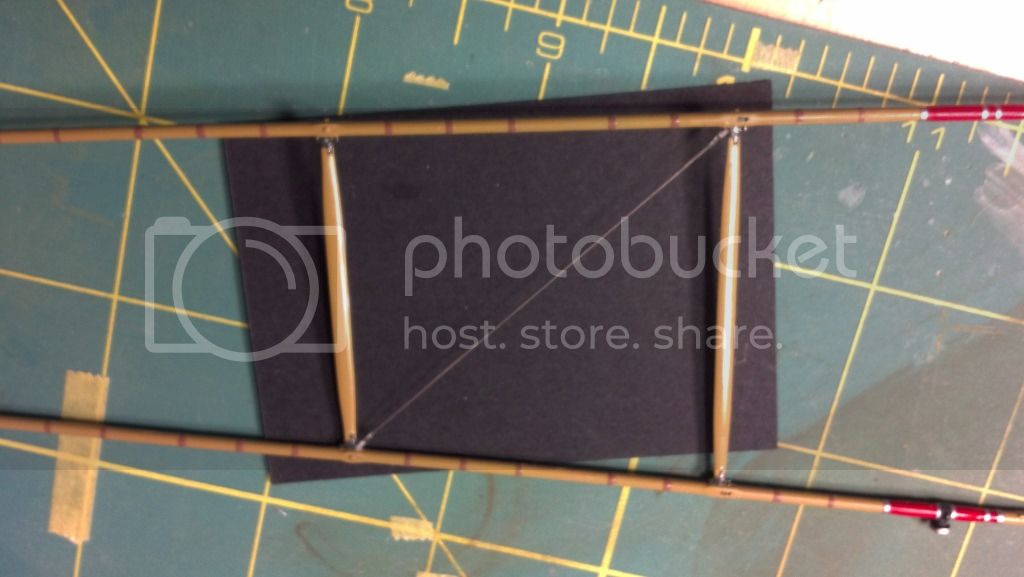
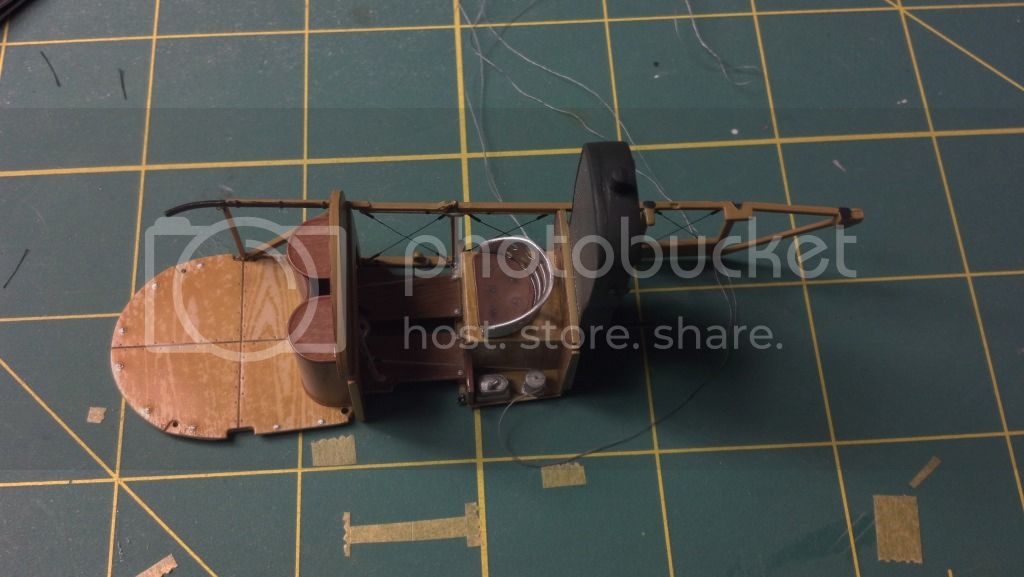
These booms also have to be rigged. Instructions call for RAF aerodynamic flying wire, so to be accurate, my normal route of 14/0 fly tying line won't work. I decided to try RB Productions RAF wire and terminals.

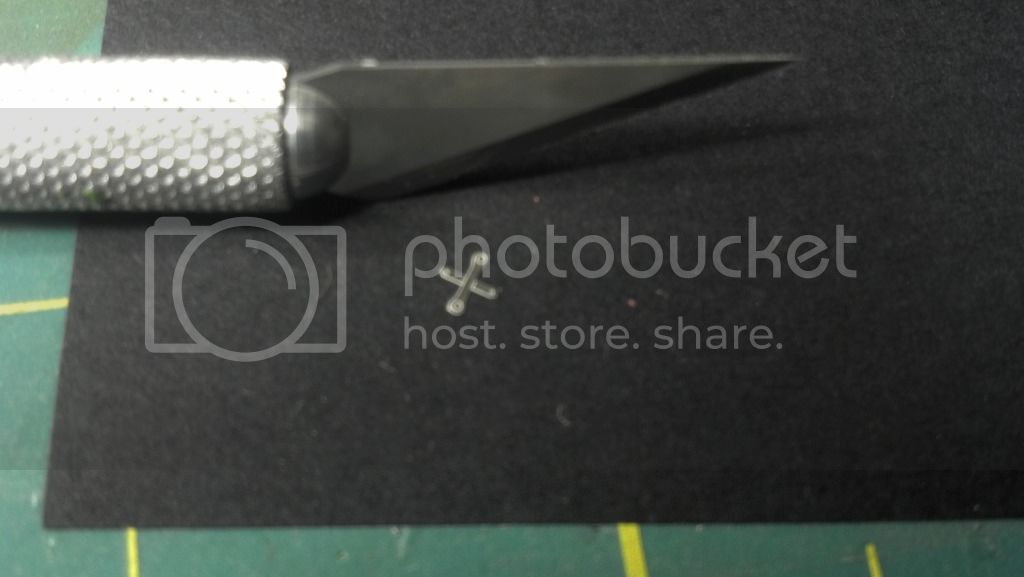
The terminals come in PE fret:


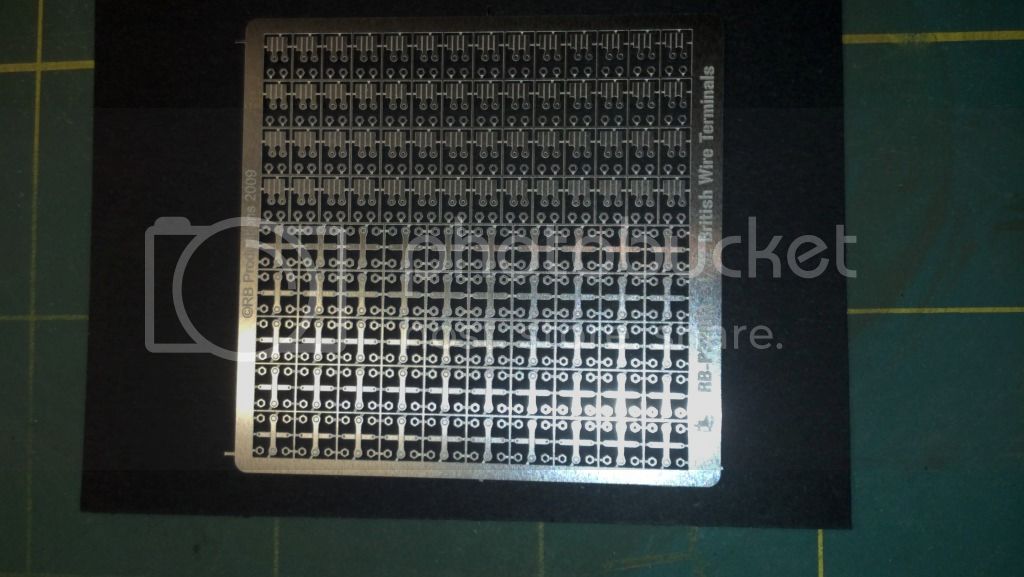
Here is a close up of the terminals:


For scale:


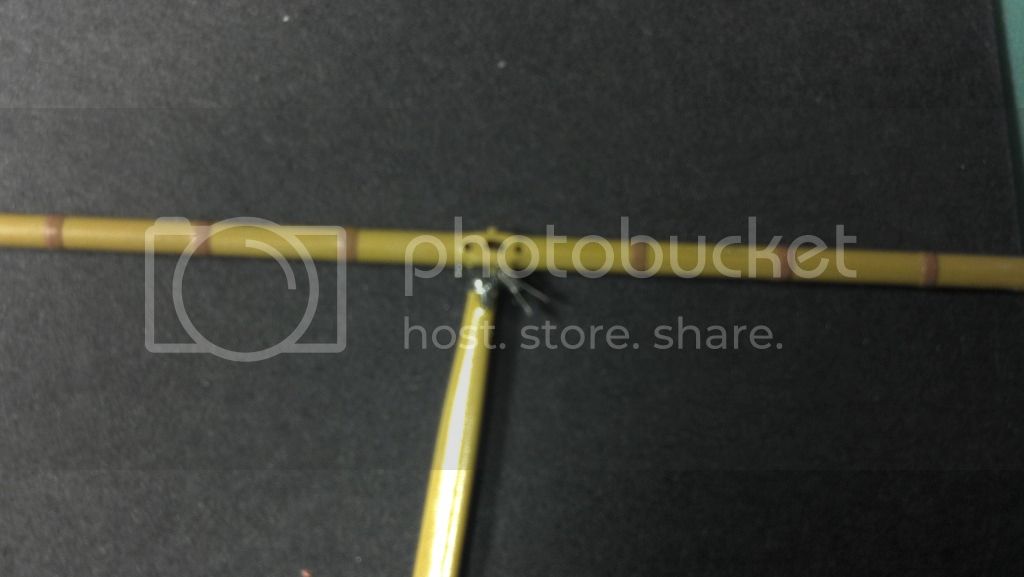
And after breaking a few and losing a few, here is one folded:


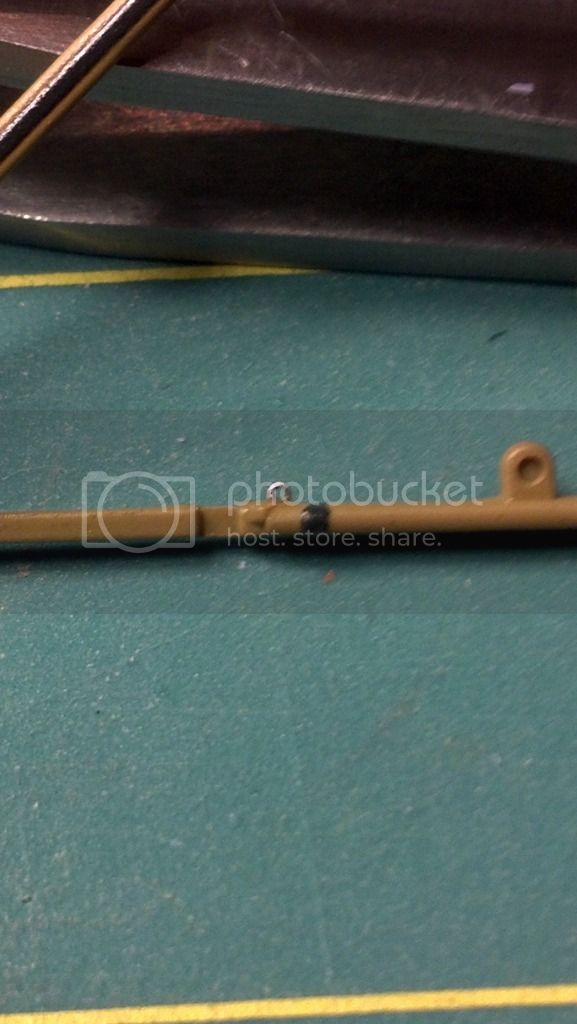
I used Gator's Grip Glue to hold the terminal in place, then I hit it with CA and accelerator to "lock it down". Here is how one looks installed:


I then used calipers to measure the distance, so I could cut the flat flying wire to length:


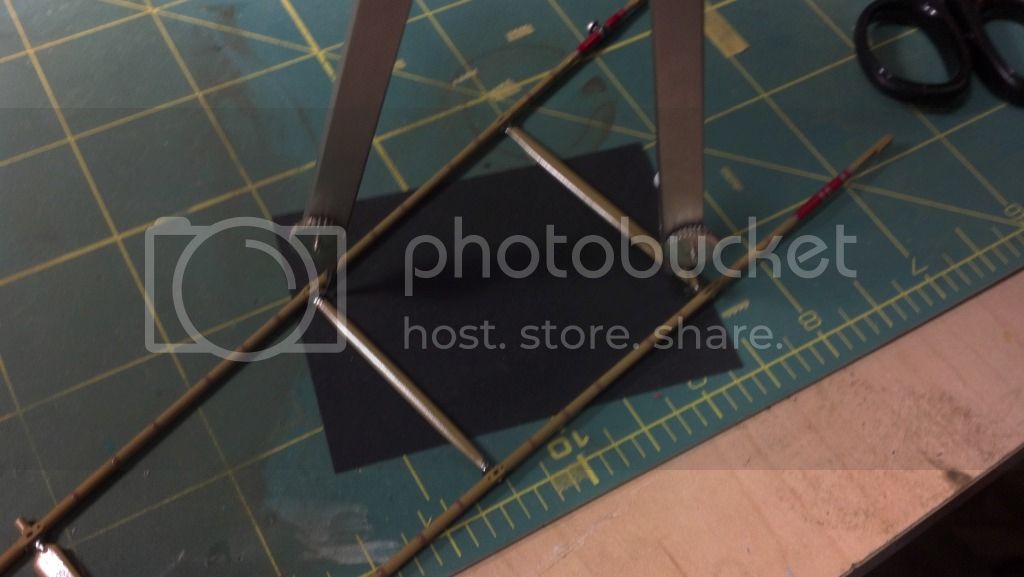
There are also very small nuts that go on each end of the wire, against the terminals:


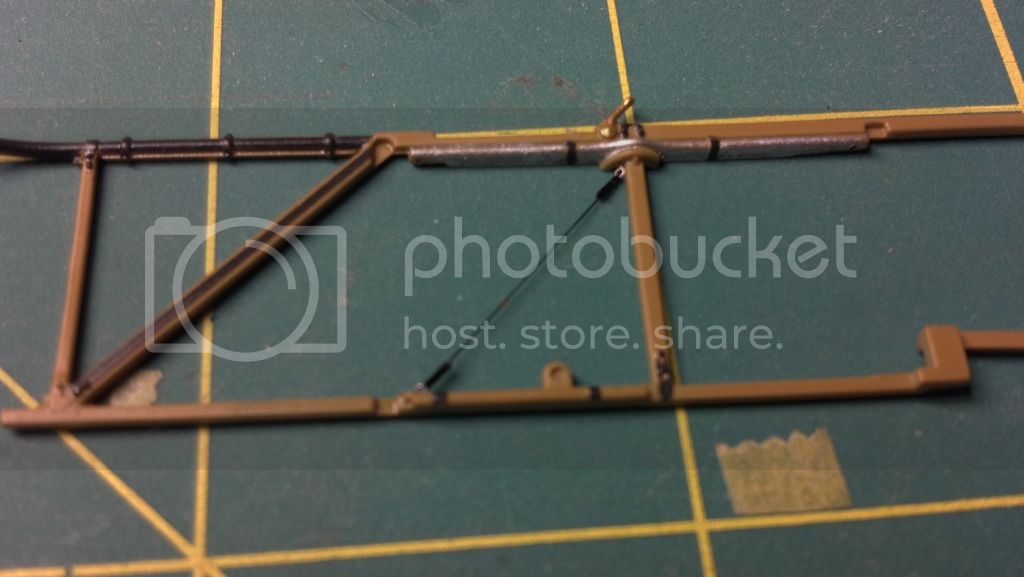
After losing/breaking a few terminals, losing half a dozen nuts, accidentally bending a wire (they can't be straightened), re-cutting a wire, knocking the terminals loose a few times, scaring the dogs and wife with bouts of blasphemous language, and over an hour, I finally have ONE wire installed:


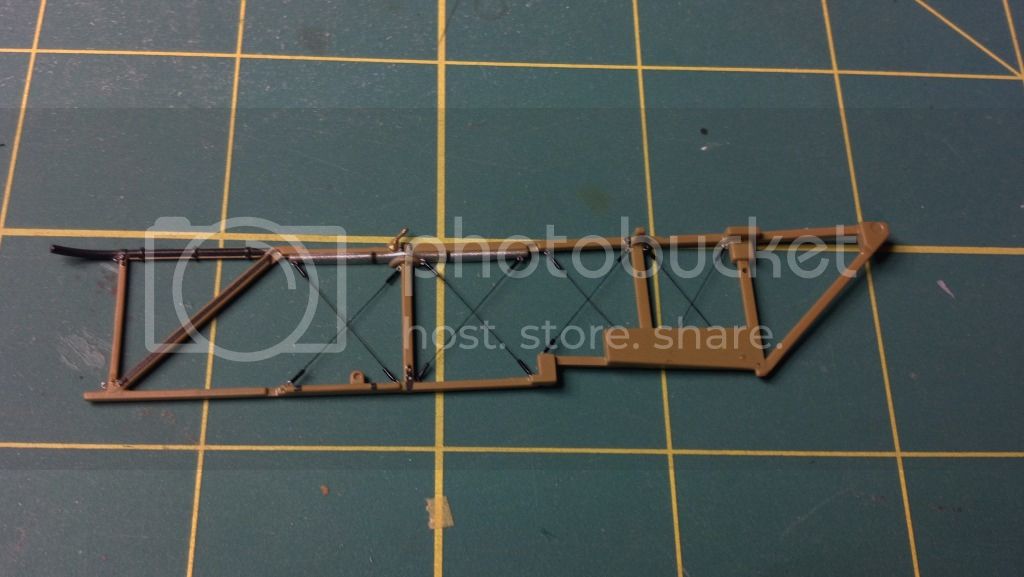
I think I'm going to order some more wires and terminals now, since the attrition rate seems pretty high. There are 70+ flying wires to put on this beast, so at this rate, I'll finish some time in 2014. I can only hope I get faster with experience, and lower the parts attrition rate too.

As always, comments and critiques are welcome.


edoardo
_VISITCOMMUNITY
Milano, Italy
Joined: November 30, 2007
KitMaker: 642 posts
AeroScale: 382 posts
Posted: Tuesday, January 17, 2012 - 09:38 PM UTC

Quoted Text

...scaring the dogs and wife with bouts of blasphemous language...


...modelling wasn't supposed to be a relaxing hobby???
That happens to me also: fortunately my work bench is in the basement where I work at nights, so it is difficult to hear me!!

Apart from joking: gorgeus modeling sofar!
Keep it coming!
ciao
Edo
OEFFAG_153
_VISITCOMMUNITY
Västra Götaland, Sweden
Joined: February 19, 2010
KitMaker: 1,473 posts
AeroScale: 1,450 posts
Posted: Tuesday, January 17, 2012 - 09:49 PM UTC
Nice work on the booms – those buckles will look great, well worth the fiddly work.

Best Regards

Mikael
Jcoatney
_VISITCOMMUNITY
United States
Joined: March 05, 2010
KitMaker: 28 posts
AeroScale: 28 posts
Posted: Wednesday, January 18, 2012 - 04:43 AM UTC
I worked for a couple hours last night. I only ruined one terminal and bent one wire, but it can still be used on a shorter run. I was able to get three in place, so attrition is going down, speeed is going up, cursing is lessening. The wife and dog again feel comfortable in the same room.

Thanks for the comments thus far.

Some more shots:


lcarroll
_VISITCOMMUNITY
Alberta, Canada
Joined: July 26, 2010
KitMaker: 1,032 posts
AeroScale: 1,025 posts
Posted: Wednesday, January 18, 2012 - 07:57 AM UTC

Quoted Text

I worked for a couple hours last night. I only ruined one terminal and bent one wire, but it can still be used on a shorter run. I was able to get three in place, so attrition is going down, speeed is going up, cursing is lessening. The wife and dog again feel comfortable in the same room.

Thanks for the comments thus far.

Some more shots:


Jim,
Looking VERY nice to say the least! You are a braver man then I; I have an order of the RB Productions products on hand but after examining them I elected to put them away until someone reported success with them. Looks like you have them beat; think I'll wait until I get an Optivisor as it looks like a bit of an "eye test" as well.
In the interim I'll follow your project with great interest; your updates are great for the learning process and your work is stunning; can't wait to see the completed FEE.
Cheers,
Lance
Jcoatney
_VISITCOMMUNITY
United States
Joined: March 05, 2010
KitMaker: 28 posts
AeroScale: 28 posts
Posted: Wednesday, January 18, 2012 - 08:09 AM UTC
Lance, good plan on the Optivisor. I'm using one with a #10 lens and it's still hard to work with the tniy "nuts" that go on top of the terminal. For me, it would be totally hopeless w/o a vision aid.
lcarroll
_VISITCOMMUNITY
Alberta, Canada
Joined: July 26, 2010
KitMaker: 1,032 posts
AeroScale: 1,025 posts
Posted: Wednesday, January 18, 2012 - 08:19 AM UTC

Quoted Text

Lance, good plan on the Optivisor. I'm using one with a #10 lens and it's still hard to work with the tniy "nuts" that go on top of the terminal. For me, it would be totally hopeless w/o a vision aid.


Jim,
I've been making some inquireys on the Optivisor; what magnification and at what distance does your Number 10 provide? Also, would you recommend that lense or, from this experience, a different one? Would really appreciate your recommendations before I take the "plunge".

Cheers,
Lance
JackFlash
_VISITCOMMUNITY
Colorado, United States
Joined: January 25, 2004
KitMaker: 11,669 posts
AeroScale: 11,011 posts
Posted: Wednesday, January 18, 2012 - 08:59 AM UTC
Once you use and optivisor you will never want to be without one.
DougN1
_VISITCOMMUNITY
Georgia, United States
Joined: August 08, 2011
KitMaker: 410 posts
AeroScale: 409 posts
Posted: Wednesday, January 18, 2012 - 09:56 AM UTC
Instead of an Optivisor, I just picked up a couple cheap pairs of reading glasses - works great!

Doug
 _GOTOTOP