_GOTOBOTTOM
Early Aviation
Discuss World War I and the early years of aviation thru 1934.
WNW Rumpler Early. Kornbeef
Kornbeef
_VISITCOMMUNITY
England - South East, United Kingdom
Joined: November 06, 2005
KitMaker: 1,667 posts
AeroScale: 1,551 posts
Posted: Tuesday, January 17, 2012 - 04:09 AM UTC
Well after a long torturous wait I finally got my hands on her. As soon as I did of course my leisure time was seriously reduced... such is life!

Anyway after some drooling I couldnt resist. The kit really is incredibly well thought out and executed to build sweetly pretty much straight out of the box. The wings and rudder assembly's are cleaned up and partially built, I've drilled the wings and aerlerons ready for pinning with brass, I would do the tail surfaces but theyre so sublimy thin I'm a bit scare to try. Rad's assembled awaiting paint. Honestly this just flows together, the sprues empty alarmingly fast.

I'm building her as an early model with the pointed spinner, I'm seriously thinking of buying a later to complement her.


Theres a few AMS area's of course, and one or two ummmms *what kit doesnt have these?*

Anyway prog pics.


The motor, pretty much as she comes, yet to be detailed with oil lines plugs etc. I might actually make this my first cowl off build well partially at least. I'm still undecided.
Mods so far, I'm attempting to work around the rocker arms, WNW cast this as one assy and the arms have webs connecting them to the rocker boxes. Totally understandably of course but I'm attempting to add a little depth here... I wonder how long before one pings into the void?


Not sure how well my lagging worked, its not quite how it seemed before paint... hmmm


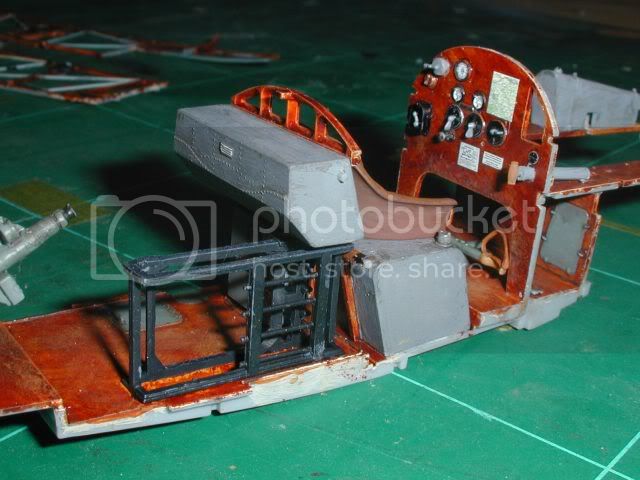
basic painting of wood work, tank in grey needs chipping an wearing in. lots of scope for detailing here


The Dash, gorgeous decals by WNW I would as an after thought though reccomend sperating them mine didnt quite seem to stretch too well, a touch of paint here and there as I paint the details will mask that though easily enough. I shaved off the knob beneath the fuel controls and will be adding that as its actually a pull knob. I might replace the dynamo handle too, I've a few Roden spares.

On the reverse I've removed all the moulded on pipework and will be adding it in copper etc if I go for a panel off which is very tempting.

Finally an ummmm

The undercarriage I pored over pics of period Rumplers and the museum one too, I think (and may well be wrong) the axle assembly sits to low, its too extended (as in the museum Rumpler which stands off its wheels on stands) In all the pics I checked the axle appears to sit in the slot in the undercarriage legs not beneath it?
Anyway I was convinced enough to mod mine.

Opinions?

Loving this build though, another WNW gem.

Keith
Jcoatney
_VISITCOMMUNITY
United States
Joined: March 05, 2010
KitMaker: 28 posts
AeroScale: 28 posts
Posted: Tuesday, January 17, 2012 - 05:11 AM UTC
Looking good thus far. I'll be following this build with interest. I'm amazed at how well WnW kits fit together.
OEFFAG_153
_VISITCOMMUNITY
Västra Götaland, Sweden
Joined: February 19, 2010
KitMaker: 1,473 posts
AeroScale: 1,450 posts
Posted: Tuesday, January 17, 2012 - 08:52 PM UTC
Keith – beautiful work as ever – I look forward to your take on this one!

Best Regards

Mikael
JackFlash
_VISITCOMMUNITY
Colorado, United States
Joined: January 25, 2004
KitMaker: 11,669 posts
AeroScale: 11,011 posts
Posted: Wednesday, January 18, 2012 - 09:06 AM UTC
The early version is a favorite of mine. (I did one in 1:48 here sometime back). Motor looks the part and your asbestos wrappings are looking good so far. The landing gear looks so frail but by design it should hold up nicely. Model on!
wing_nut
_VISITCOMMUNITY
New Jersey, United States
Joined: June 02, 2006
KitMaker: 1,212 posts
AeroScale: 468 posts
Posted: Wednesday, January 18, 2012 - 12:46 PM UTC
Good looking start. Look forward to more.
Kornbeef
_VISITCOMMUNITY
England - South East, United Kingdom
Joined: November 06, 2005
KitMaker: 1,667 posts
AeroScale: 1,551 posts
Posted: Wednesday, January 18, 2012 - 07:34 PM UTC
Thanks guys, time like the light seems in short supply here so I'll post more as I get chance to both work and capture my progress.

TY

Keith
gajouette
_VISITCOMMUNITY
Texas, United States
Joined: February 01, 2007
KitMaker: 365 posts
AeroScale: 356 posts
Posted: Thursday, January 19, 2012 - 07:34 PM UTC
Keith,
As alway my friend excellent work.Looking forward to seeing more. Glad she finally landed at your doorstep safe and sound.
Highest Regards,
Gregory Jouette
Kornbeef
_VISITCOMMUNITY
England - South East, United Kingdom
Joined: November 06, 2005
KitMaker: 1,667 posts
AeroScale: 1,551 posts
Posted: Saturday, January 21, 2012 - 04:21 AM UTC
Moving along.

Thank you Gregory.

Made some great progress, post is short, getting earache to go out.

Dust etc needs clearing off but all the parts are coming together nicely. Wings tail etc are ready for the first coat of paint. UC needs work but some of the nigglies are done,

Engine. plugs leads etc to be done, ancillary pipework to be added and the same for the back of the dash panel, just going to have to improvise on some of the routing for pipes and wiring.

I added levers to the fuel valves, I dunno why WNW dont include them, it would be a nice touch (used afv catches made by Bronco.)

Anyway no time to waffle on


TTFN
Keith
Mgunns
_VISITCOMMUNITY
Arizona, United States
Joined: December 12, 2008
KitMaker: 1,423 posts
AeroScale: 1,319 posts
Posted: Saturday, January 21, 2012 - 05:21 AM UTC
Hello Keith:

You are certainly making good progress on this kit and it is coming along nicely. The interior certainly looks "lived in" and the engine is shaping to appear as if in service. Outstanding work as Always Keith. I will book mark this for future reference when I tackle mine.

Best

Mark
 _GOTOTOP