

Hosted by Rowan Baylis
Focke-Wulf Ta 152 C and H from Dragon in 1/72

Siderius

Joined: September 20, 2005
KitMaker: 1,747 posts
AeroScale: 1,673 posts
Posted: Friday, May 04, 2012 - 12:12 PM UTC
Magnus, they both look great! I really am partial to the H model! Good job, can't wait to see them done. Russell


magnusf

Joined: May 02, 2006
KitMaker: 1,953 posts
AeroScale: 1,902 posts
Posted: Friday, May 11, 2012 - 06:39 PM UTC
Russell! I am nearing completion now so with a bit of luck I will be able to fulfil your wishes before the end of May 
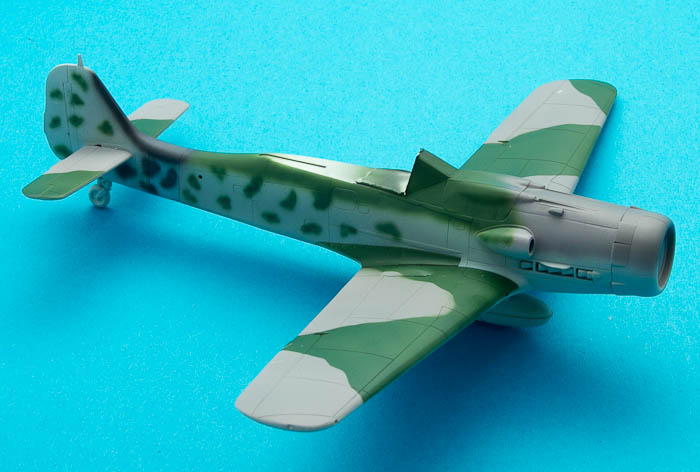
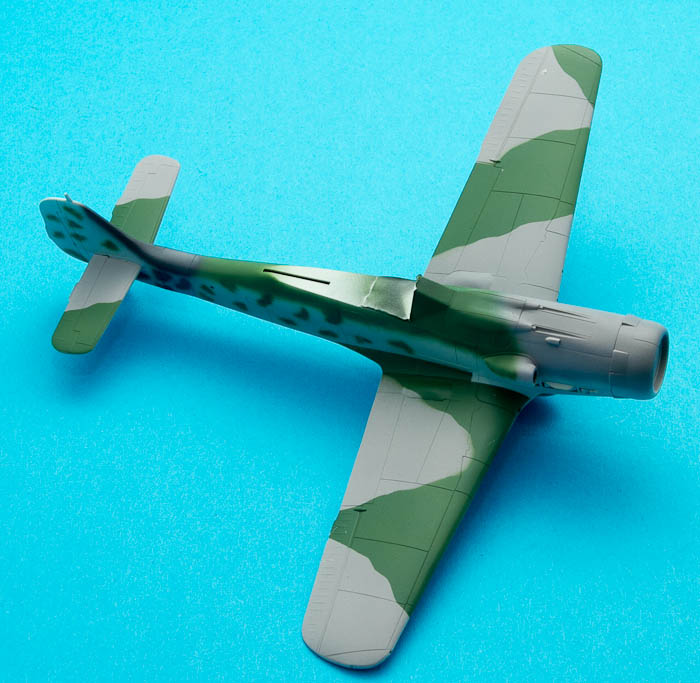
I have been Focke-Wulfing (is that a real word by the way, I doubt it...) heavily the last few days. Too bad there weren't more mottling to do on these, it is great fun! I think I'll have to do more Luftwaffe subjects in the future...
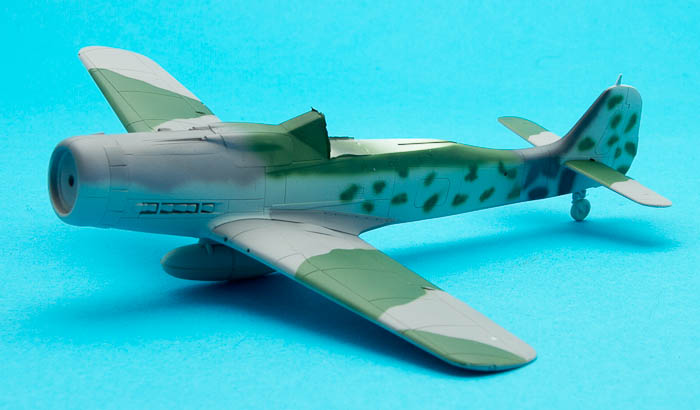
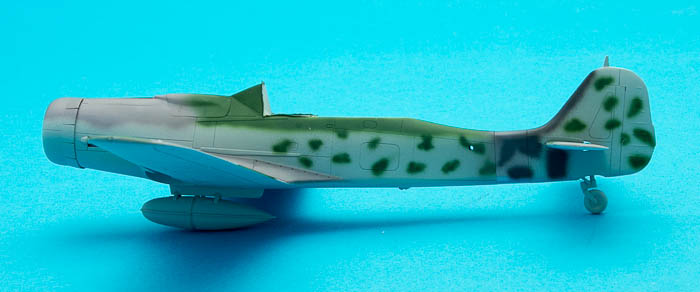
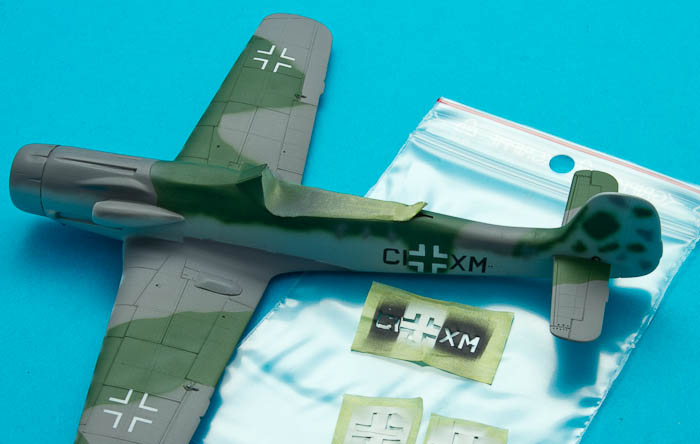
Ta 152-C:
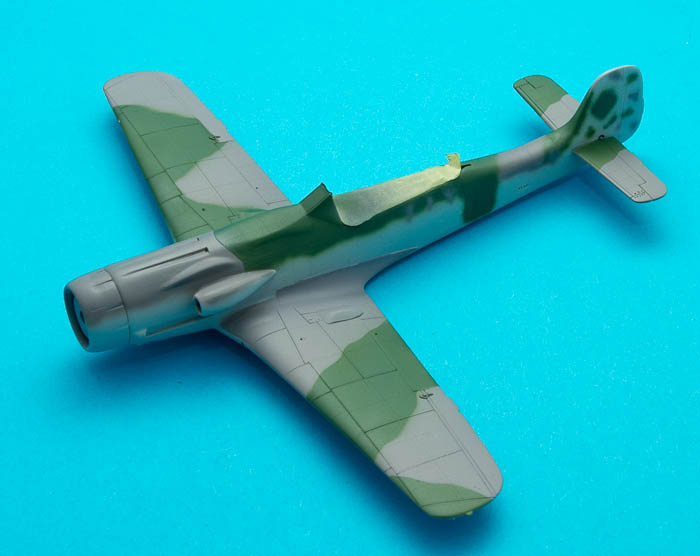
The german crosses will be painted over the dark patches on the sides.
This one also had a natural metal wing centre section...
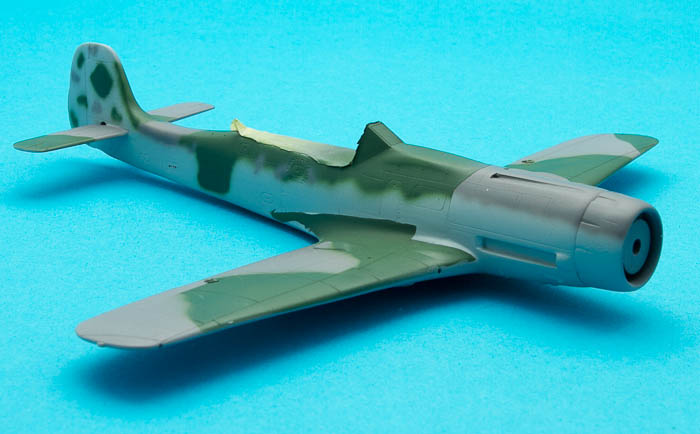
Wing root needs a bit of a touch-up...
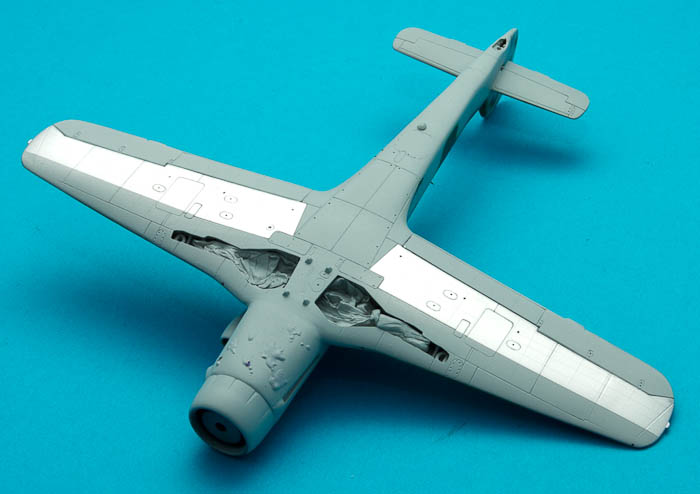
FW 190D-9:
I don't have a photo of this machine so I have been following the profile from the Aeromaster sheet.
That same sheet also shows a natural metal fuselage insert sloppily overpainted with dark paint. I added a drop of black to my RLM75 mix...

Magnus
I have been Focke-Wulfing (is that a real word by the way, I doubt it...) heavily the last few days. Too bad there weren't more mottling to do on these, it is great fun! I think I'll have to do more Luftwaffe subjects in the future...
Ta 152-C:
The german crosses will be painted over the dark patches on the sides.
This one also had a natural metal wing centre section...
Wing root needs a bit of a touch-up...
FW 190D-9:
I don't have a photo of this machine so I have been following the profile from the Aeromaster sheet.
That same sheet also shows a natural metal fuselage insert sloppily overpainted with dark paint. I added a drop of black to my RLM75 mix...
Magnus
magnusf
Joined: May 02, 2006
KitMaker: 1,953 posts
AeroScale: 1,902 posts
Posted: Monday, May 14, 2012 - 09:00 AM UTC
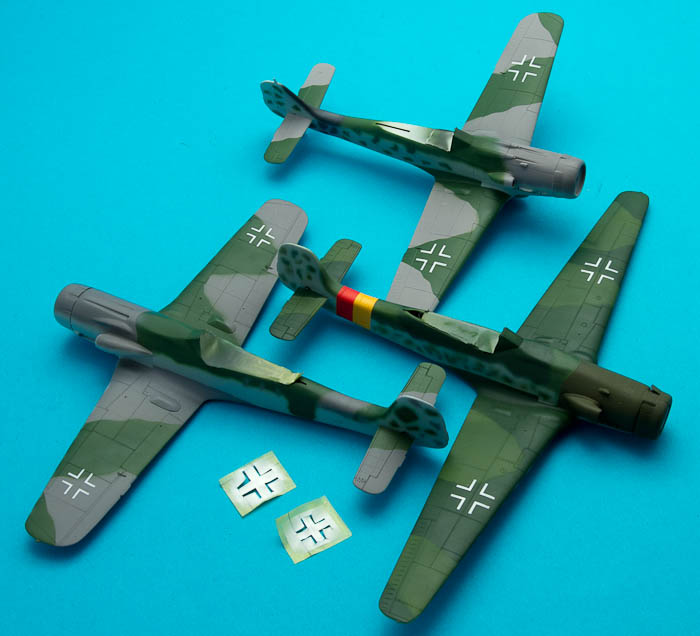
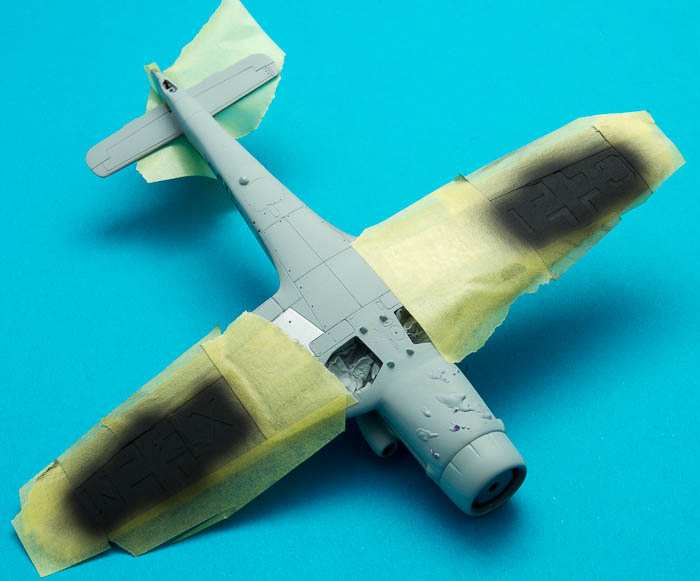
The paintshop has been busy tonight cutting masks and painting crosses! Tomorrow they are going for the black ones!
Magnus
Magnus
Siderius
Joined: September 20, 2005
KitMaker: 1,747 posts
AeroScale: 1,673 posts
Posted: Monday, May 14, 2012 - 12:17 PM UTC
Wow! Your FW's look superb Magnus!! Good job there. Russell
magnusf
Joined: May 02, 2006
KitMaker: 1,953 posts
AeroScale: 1,902 posts
Posted: Tuesday, May 15, 2012 - 08:50 AM UTC
Russell! Thanks for keeping me company !
A bit more cutting, masking and painting!
The letter "C" is one that I really could do without. It will need a bit of a touch-up later...
Magnus
!A bit more cutting, masking and painting!
The letter "C" is one that I really could do without. It will need a bit of a touch-up later...
Magnus

Emeritus

Joined: March 30, 2004
KitMaker: 2,845 posts
AeroScale: 1,564 posts

Posted: Tuesday, May 15, 2012 - 09:58 AM UTC
Looking good! 
Can't wait to see them finished.
Can't wait to see them finished.

SunburntPenguin

Joined: March 15, 2011
KitMaker: 121 posts
AeroScale: 112 posts

Posted: Tuesday, May 15, 2012 - 11:18 PM UTC
Great work Magnus.
I'm really inspired to build my own Ta152C in 1/48th now.
Can't wait to see the finished models.
I'm really inspired to build my own Ta152C in 1/48th now.
Can't wait to see the finished models.
chukw1
Joined: November 28, 2007
KitMaker: 817 posts
AeroScale: 729 posts
Posted: Wednesday, May 16, 2012 - 02:32 AM UTC
Up to your usual standards of excellence, Magnus- cheers! You get an extra cookie for those hand-cut masks. 

magnusf
Joined: May 02, 2006
KitMaker: 1,953 posts
AeroScale: 1,902 posts
Posted: Friday, May 18, 2012 - 08:43 AM UTC
Eetu and Matt! Working hard to finish them !
Chuck! More work than I thought to do masks for all three of them. Finally finished with that now though! And thanks for the cookie, I'll save it for my kids !

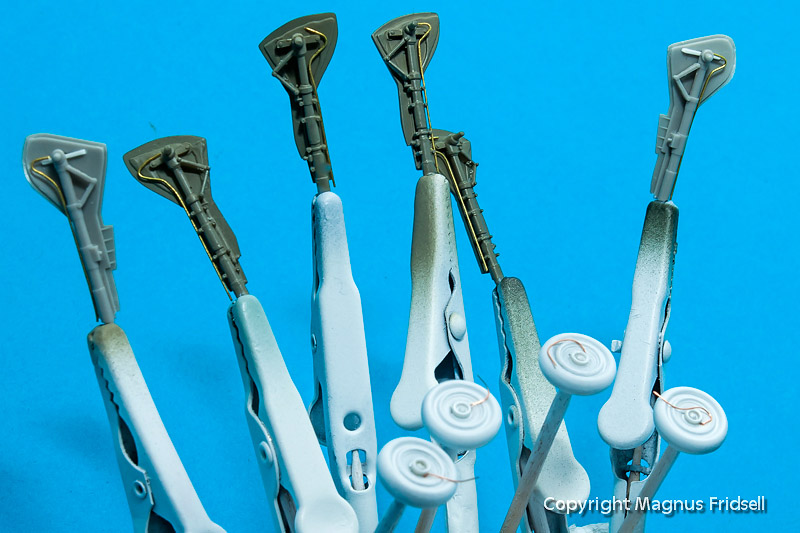
Using a copy of the Dragon instructions for cutting the masks.

Applying the masks to the wing.
Painting...
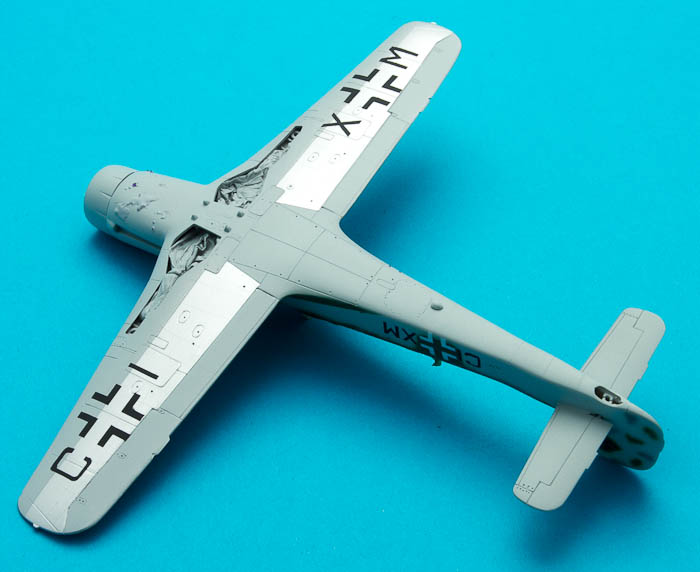
The finished result!
Magnus
!Chuck! More work than I thought to do masks for all three of them. Finally finished with that now though! And thanks for the cookie, I'll save it for my kids
!Using a copy of the Dragon instructions for cutting the masks.
Applying the masks to the wing.
Painting...
The finished result!
Magnus
magnusf
Joined: May 02, 2006
KitMaker: 1,953 posts
AeroScale: 1,902 posts
Posted: Saturday, May 19, 2012 - 08:06 AM UTC
One last masking that I forgot yesterday, the spinner...
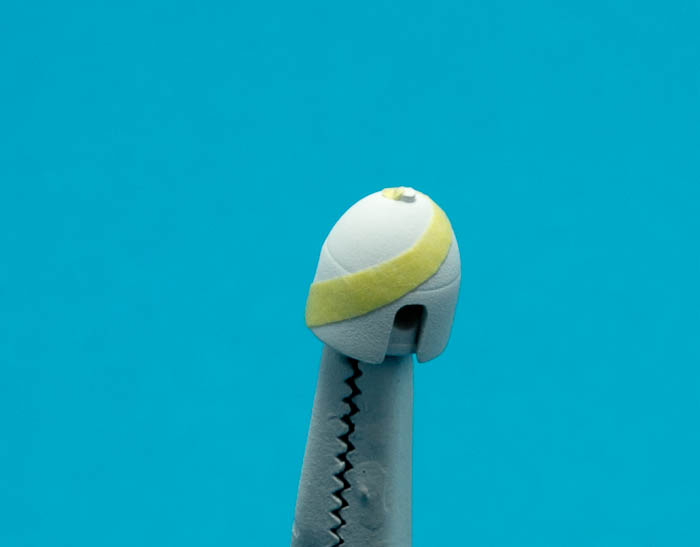
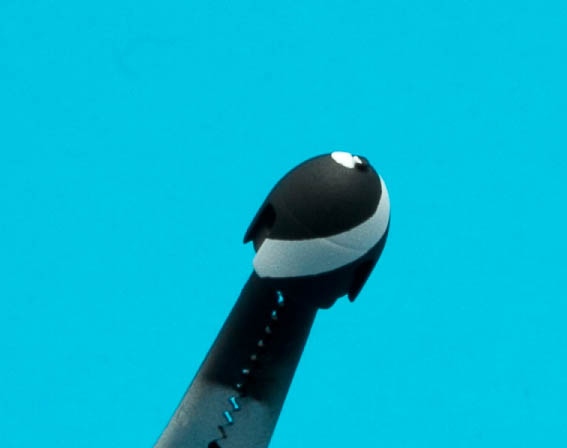
Once again I used a decal as a master to cut the tape over.
Magnus
Once again I used a decal as a master to cut the tape over.
Magnus
magnusf
Joined: May 02, 2006
KitMaker: 1,953 posts
AeroScale: 1,902 posts
Posted: Saturday, February 02, 2013 - 06:43 AM UTC
Time to breathe a bit of life into this build again! This should be a fairly quick process. Didn't I say that back in May last year by the way?
Detailing... I added the cylindrical "core" to the wheels. The Dragon wheels don't really look like the real thing but that bit of tubing was at least a step in the right direction. There is some prominent brake tubing on the inner faces of the wheels that I am in the process of adding. One end glued...
I also added some brake tubing along the gear leg. Wire was slightly on the thick side, I had forgotten that I have three spools of delicately thin transformer wire... I need to do more of this kind of detailing!
Magnus

spaarndammer

Joined: January 28, 2007
KitMaker: 1,945 posts
AeroScale: 388 posts
Posted: Saturday, February 02, 2013 - 09:58 AM UTC
Great working with the masks, that is a great skill of careful cutting!
Jelger
Jelger
magnusf
Joined: May 02, 2006
KitMaker: 1,953 posts
AeroScale: 1,902 posts
Posted: Saturday, February 02, 2013 - 08:45 PM UTC
Quoted Text
Great working with the masks, that is a great skill of careful cutting!
Jelger! Thanks!
This is one of those activities that are a bit tricky but can still be considered as "low risk": it all happens away from the model using stuff that are cheap and in almost unlimited supply. It also can be done very slowly! It is more tedious than difficult and something that I think more modellers ought to try!
Magnus
spaarndammer
Joined: January 28, 2007
KitMaker: 1,945 posts
AeroScale: 388 posts
Posted: Sunday, February 03, 2013 - 03:23 AM UTC
Quoted Text
Quoted TextGreat working with the masks, that is a great skill of careful cutting!
Jelger! Thanks!
This is one of those activities that are a bit tricky but can still be considered as "low risk": it all happens away from the model using stuff that are cheap and in almost unlimited supply. It also can be done very slowly! It is more tedious than difficult and something that I think more modellers ought to try!
Magnus
And looks better than decals

magnusf
Joined: May 02, 2006
KitMaker: 1,953 posts
AeroScale: 1,902 posts
Posted: Saturday, February 09, 2013 - 06:55 PM UTC
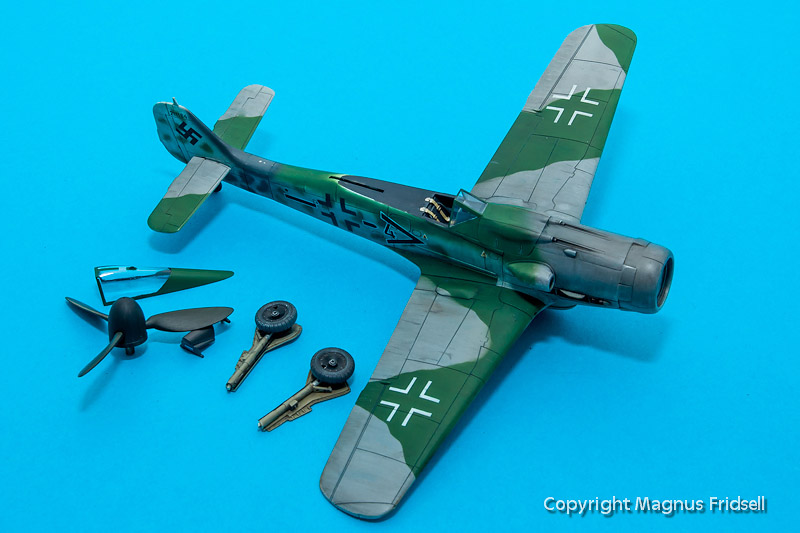
I've been Focke-Wulfing a lot lately but progress is slow when you have to do triplets of everything ! Landing gear are nearly finished, wheels painted and so on. Lost in detail, I felt that it was time to use the broad brush for a while!
I have started weathering on the Dora. I don't think Luftwaffe was a very happy ship in early 1945 so I'm going for a doom-and-gloom look with toned down colours and a quite heavy weathering.
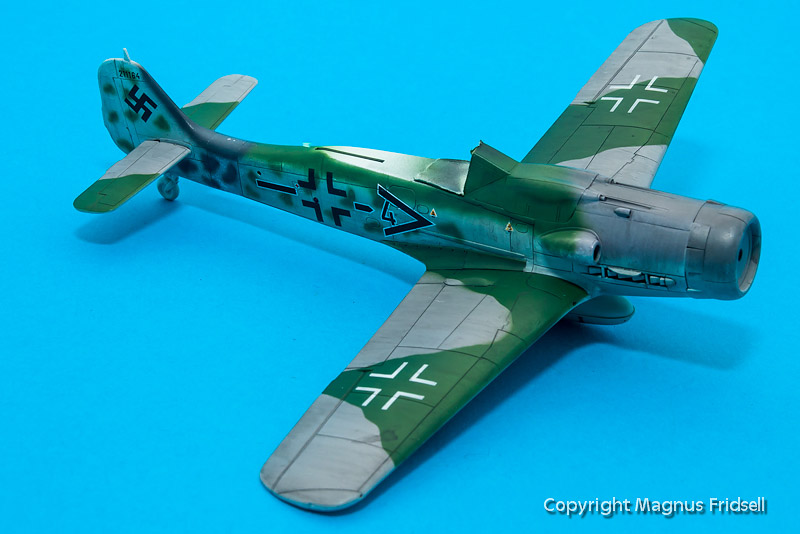
This is a start and as usual I get a bit chocked by the way it looks in the photos in this magnification ! The splotches shouldn't be there but I find them quite hard to avoid. They will be toned down with the airbrush later though!
Doomy-and-gloomy enough?
Magnus
! Landing gear are nearly finished, wheels painted and so on. Lost in detail, I felt that it was time to use the broad brush for a while!I have started weathering on the Dora. I don't think Luftwaffe was a very happy ship in early 1945 so I'm going for a doom-and-gloom look with toned down colours and a quite heavy weathering.
This is a start and as usual I get a bit chocked by the way it looks in the photos in this magnification
! The splotches shouldn't be there but I find them quite hard to avoid. They will be toned down with the airbrush later though!Doomy-and-gloomy enough?
Magnus
magnusf
Joined: May 02, 2006
KitMaker: 1,953 posts
AeroScale: 1,902 posts
Posted: Friday, February 15, 2013 - 07:17 PM UTC
A further few small steps towards completion...
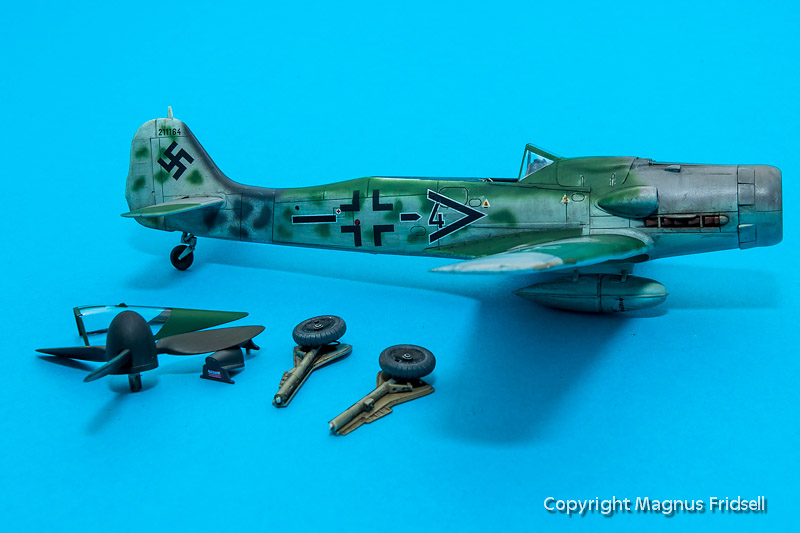
Magnus
Magnus
spaarndammer
Joined: January 28, 2007
KitMaker: 1,945 posts
AeroScale: 388 posts
Posted: Friday, February 15, 2013 - 09:46 PM UTC
Great progress!
That big matt propellor will look great on the plane. The work on the engine exhausts also looks nice.
Jelger
That big matt propellor will look great on the plane. The work on the engine exhausts also looks nice.
Jelger

GhostHawk

Joined: January 27, 2011
KitMaker: 268 posts
AeroScale: 264 posts
Posted: Saturday, February 16, 2013 - 01:49 AM UTC
Hi,
They are Really impressive...!!!
Very enjoyable...
Thanks
Diego
They are Really impressive...!!!
Very enjoyable...
Thanks
Diego

guitarlute101
Joined: December 18, 2006
KitMaker: 1,121 posts
AeroScale: 1,063 posts
Posted: Saturday, February 16, 2013 - 03:02 AM UTC
Fantastic work, I have to keep reminding myself that the kit is 1/72 not 1/48! Bravo!!
Mark
magnusf
Joined: May 02, 2006
KitMaker: 1,953 posts
AeroScale: 1,902 posts
Posted: Saturday, February 16, 2013 - 09:14 PM UTC
Jelger! Thanks! The exhausts are really simple: I painted them with Vallejo reddish brown mixed with black, when still sticky I added red pigments. Easy!
Diego and Mark! !!!
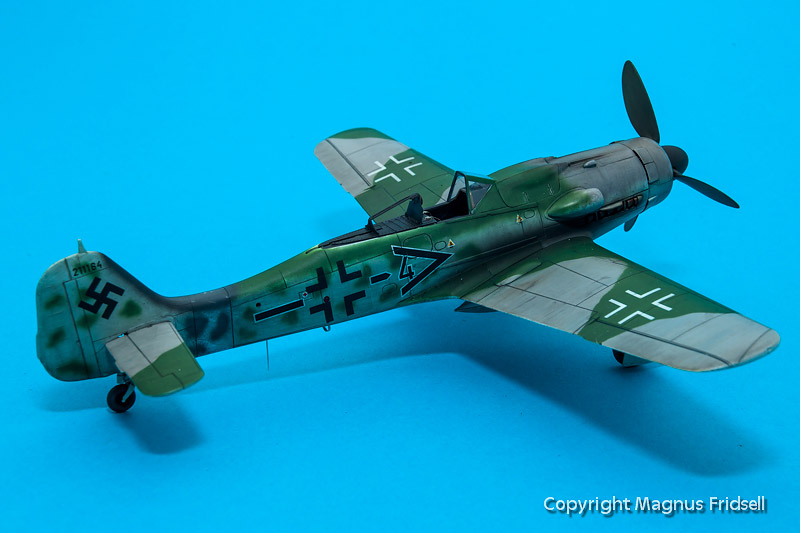
Finally on it's own wheels! And since I have never built an FW-190 (OK, a prototype way back then but anyway...) I had a terrible case of slanted wheels since I had mounted the wheels to the struts before attaching the struts to the model. The axle stub on the Hasegawa kit isn't of any help (it will locate the wheel parallel to the strut) but luckily I had used CA glue for the wheels so I was able to snap them off and re-glue them without any damage to the rest of the structure.
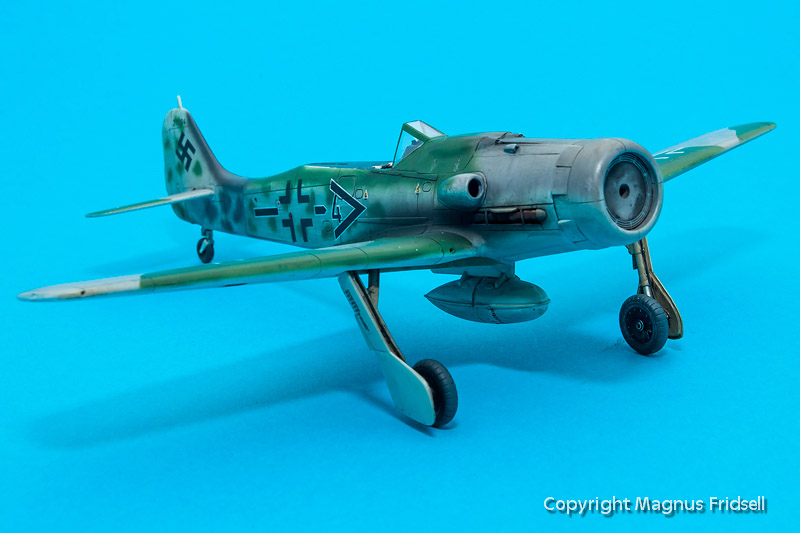
Note cleverly chosen photo angle: I am sure that there are some angles that are wrong and assymetric (gear location wasn't all that positive...) but unless photographed from dead head-on it is impossible for any of you to prove it. Ain't I a stinker !
I bought a huge set of PE (of which I will use close to nothing) but I did find a few parts that will come in handy. Most important it contains a nicely done head armour.
And now it is time for the traditional PE-rant: I hate the stuff! I dislike so much that it is hard to describe the amount of disliking I feel when working with it! And often this work would have been unnecessary if the parts had been designed only a little bit more clever! In this case, the head armour and it's supporting frame could have been made as one part that then simply could have been folded to shape. That is NOT the case: the supporting frame has to be glued to the head armour. It has a tiny attachment point. It will consume just about all of your early morning modelling time and more than it's share of your good mood...
Apart from that, the structure isn't strictly authentic either since the head armour structure is attached to the canopy and not to the rear fuselage decking. I think that I will get away with this though and this method is less likely to ruin the canopy! Head cushion shamelessly stolen from from original Hasegawa part.
Magnus
Diego and Mark!
!!!Finally on it's own wheels! And since I have never built an FW-190 (OK, a prototype way back then but anyway...) I had a terrible case of slanted wheels since I had mounted the wheels to the struts before attaching the struts to the model. The axle stub on the Hasegawa kit isn't of any help (it will locate the wheel parallel to the strut) but luckily I had used CA glue for the wheels so I was able to snap them off and re-glue them without any damage to the rest of the structure.
Note cleverly chosen photo angle: I am sure that there are some angles that are wrong and assymetric (gear location wasn't all that positive...) but unless photographed from dead head-on it is impossible for any of you to prove it. Ain't I a stinker
!I bought a huge set of PE (of which I will use close to nothing) but I did find a few parts that will come in handy. Most important it contains a nicely done head armour.
And now it is time for the traditional PE-rant: I hate the stuff! I dislike so much that it is hard to describe the amount of disliking I feel when working with it! And often this work would have been unnecessary if the parts had been designed only a little bit more clever! In this case, the head armour and it's supporting frame could have been made as one part that then simply could have been folded to shape. That is NOT the case: the supporting frame has to be glued to the head armour. It has a tiny attachment point. It will consume just about all of your early morning modelling time and more than it's share of your good mood...
Apart from that, the structure isn't strictly authentic either since the head armour structure is attached to the canopy and not to the rear fuselage decking. I think that I will get away with this though and this method is less likely to ruin the canopy! Head cushion shamelessly stolen from from original Hasegawa part.
Magnus
magnusf
Joined: May 02, 2006
KitMaker: 1,953 posts
AeroScale: 1,902 posts
Posted: Tuesday, February 19, 2013 - 09:59 AM UTC
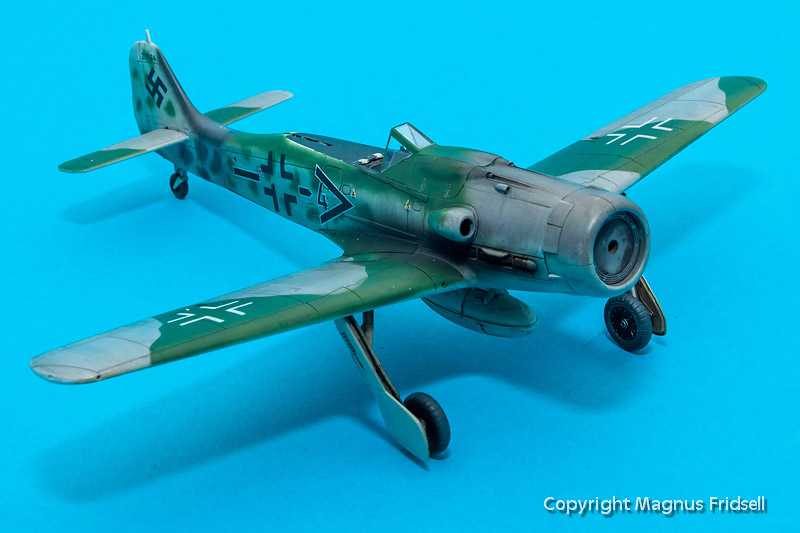
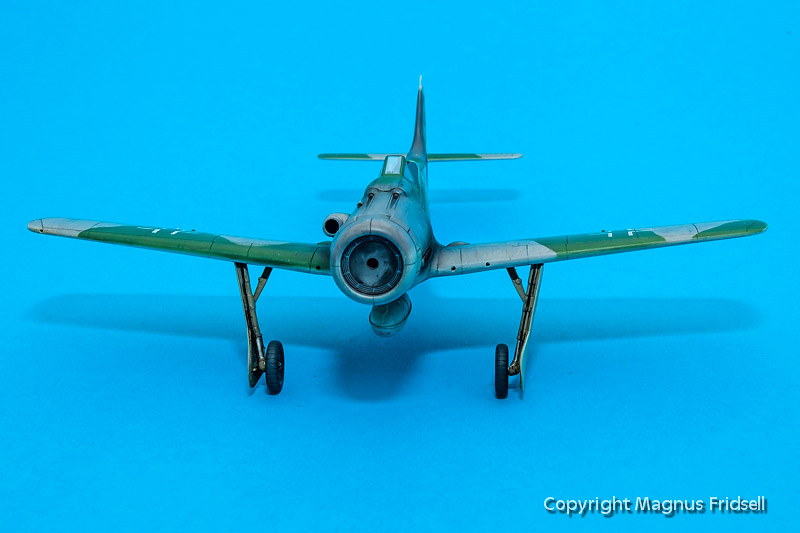
Cannon barrels, canopy and antenna left to do... And I'll have to do something about that big black prop also, it is hard to weather dark objects. I have tried but it still looks freshly off the shelf!
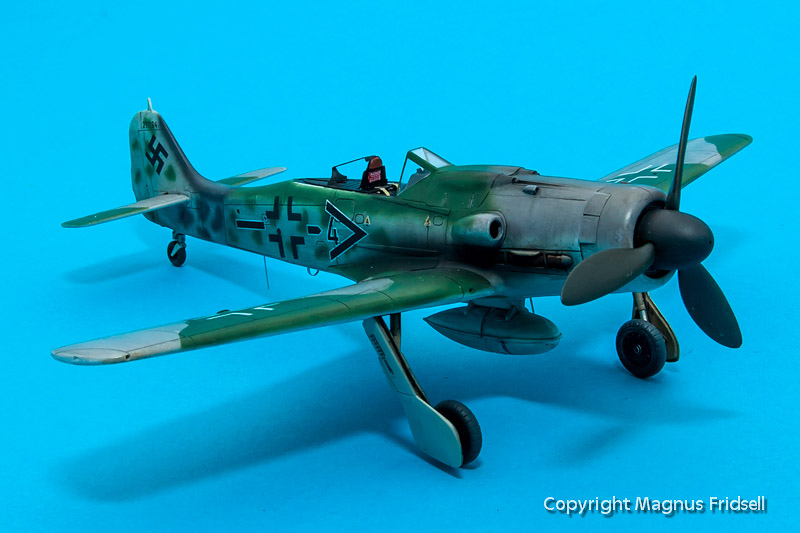
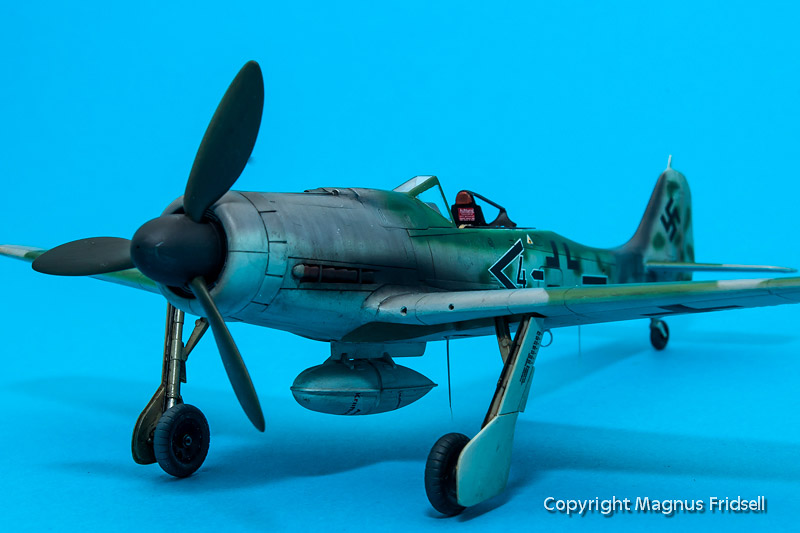
Magnus
Magnus

Jessie_C


Joined: September 03, 2009
KitMaker: 6,965 posts
AeroScale: 6,247 posts

Posted: Tuesday, February 19, 2013 - 10:15 AM UTC
Quoted Text
...I'll have to do something about that big black prop also, it is hard to weather dark objects. I have tried but it still looks freshly off the shelf!
Have you tried various greys and light greens? Making dark things look oldish often involves lightening them up.
Siderius
Joined: September 20, 2005
KitMaker: 1,747 posts
AeroScale: 1,673 posts
Posted: Tuesday, February 19, 2013 - 10:38 AM UTC
Magnificent Magnus, really good looking FW there. You should be proud to add it to your display shelf. Russell
magnusf
Joined: May 02, 2006
KitMaker: 1,953 posts
AeroScale: 1,902 posts
Posted: Tuesday, February 19, 2013 - 08:18 PM UTC
Jessica! I'll try that tonight!
Russell! Thanks!
Magnus
Russell! Thanks!
Magnus
Mecenas
Joined: December 23, 2007
KitMaker: 1,596 posts
AeroScale: 1,275 posts
KitMaker: 1,596 posts
AeroScale: 1,275 posts

Posted: Tuesday, February 19, 2013 - 09:04 PM UTC
Quoted Text
Quoted Text...I'll have to do something about that big black prop also, it is hard to weather dark objects. I have tried but it still looks freshly off the shelf!
Have you tried various greys and light greens? Making dark things look oldish often involves lightening them up.
Definitely a very light coat of highly diluted grey should do the job. Or you can either try to drybrush it with some other shade of black or very dark grey.
 |

WEB HOSTING BY


Copyright ©2021 AeroScale and Kitmaker Network, a subsidiary of Silver Star Enterprises
All Rights Reserved. Please read our Conditions of Use and Privacy Policy.
All Rights Reserved. Please read our Conditions of Use and Privacy Policy.