litespeed
 News Reporter
England - North West, United Kingdom
Joined: October 15, 2009
KitMaker: 1,976 posts
AeroScale: 1,789 posts
Posted: Monday, February 20, 2012 - 10:33 AM UTC
Hi all
I just started to put together the Tarangus 1/48 Saab Lansen. The large beast is impressively moulded and a dry fit of the major components results in a good fit. But I know as soon as there is whiff of glue in the air things can change.
I started by gluing the lower wing halves together and left them overnight to cure. Next day I glued the one piece insert that forms the main under carriage bay. The fit is very good and does not require any filler around the joint. The bay adds a lot of strength to the joint. The recessed ejector pin mark was filled and when dry, the ribbed detail was re-instated using a file, very easy. Not sure whether this repair will even be seen as there is a plastic part that fits over it. Upper wings were added later.

The cockpit tubs are separate so to make things easier I have added a piece of plasticard to join the two parts together. There is a little flex in the joint, just in case I need to adjust anything when fitting the tubs inside the fuselage. The forward undercariage bay has been built and added underneath front cockpit tub.

Added some platicard tabs to one half of the fuselage for lining up the two halves when joining.

To be continued

Florida, United States
Joined: January 14, 2009
KitMaker: 2,798 posts
AeroScale: 2,443 posts
Posted: Monday, February 20, 2012 - 03:56 PM UTC
I watch with intrigue sir

"From time to time, the tree of liberty must be watered with the blood of
tyrants and patriots."
- Thomas Jefferson
IPMS#47611
litespeed
News Reporter England - North West, United Kingdom
Joined: October 15, 2009
KitMaker: 1,976 posts
AeroScale: 1,789 posts
Posted: Thursday, February 23, 2012 - 09:01 AM UTC
Hi all
A have made bit of progress with the Tarangus 1/48 Saab Lansen over the last couple of evenings. I have put together the parts for the air ducts for the engine. There are some large raised ejector marks to remove from the inside. The whole lot was left overnight to cure before rubbing down the inside. The inside of the duct was primed with Halfords [a UK auto accessories outlet] grey primer and when dry [15 mins] sprayed with Humbrols Aluminuim 56 acrylic spray paint. The ducts were left overnight to dry before I then attached the ducts to the inside of the fuselage. A little trimming is necessary to achieve a snug fit. You will notice I have added a plasticard insert to the rear of the duct to prevent seeing into the cavernous fuselage.

I have started to paint the cockpit and also the reheat ring of the engine. I have left the raised ejector pin mark on the cockpit floor in place as they are very difficult to access. Its much easier to drill a hole underneath the resin seats so they fit over the ejector marks.

To be continued
litespeed
News Reporter England - North West, United Kingdom
Joined: October 15, 2009
KitMaker: 1,976 posts
AeroScale: 1,789 posts
Posted: Tuesday, February 28, 2012 - 08:52 AM UTC
Hi all
Bit more work on the Lansen. I glued the fuselage halves, wings and stabilisers together. No major fit issues, the only un closable gap is just above the jet pipe. After a session of filling/sanding/filling/sanding the beast was ready for priming.


As ever I use Halfords grey primer from a spray can. A few minor flaws in my filling were put right. I have decided to use Alclad II for the natural metal surfaces underneath. I masked off some areas to spray Halfords black matt paint, again from a spray can, to give some variation with the Alclad finish. After the paint was allowed to dry I coated the whole lot with two coats of Kleer. I am just waiting on a delivery of Alclad to progress.
To be continued
..

litespeed
News Reporter England - North West, United Kingdom
Joined: October 15, 2009
KitMaker: 1,976 posts
AeroScale: 1,789 posts
Posted: Tuesday, March 06, 2012 - 08:04 AM UTC
Hi all
Applied a few coats of Alclad II aluminium [alc-101] over the under surfaces. As you can see the results are pretty good. Let the whole lot dry for 24 hrs before applying a couple of coats of Kleer by brush. The Lansen was left over the weekend to cure before masking off the under surfaces.
Tamiya olive drab [XF-62] was applied, I think I sprayed it 5-6 times building up the colour depth.
To be continued....


litespeed
News Reporter England - North West, United Kingdom
Joined: October 15, 2009
KitMaker: 1,976 posts
AeroScale: 1,789 posts
Posted: Thursday, March 08, 2012 - 08:23 AM UTC
Hi all
Making good progress with this build. Masked and painted the canopy and windscreen. I have not glued it just yet, the seats still need to be painted. Finished off the painting the nose and fin top black and applying some Alclad around the air intake lips.
I have used some oil paint to weather the paintwork, particularly the aluminium under surfaces.
Another coat of Kleer and I have started to apply the decals. They are responding very well to Micro Sol. The decals only need soaking for a few seconds before they are ready to slide. Do not play around with them too long otherwise they will break up. The first one I applied did split as I tried to straighten it up. Once applied and the Micro Sol has done its work the decals look superb.
To be continued.............


Merlin
Senior Editor 
#017
United Kingdom
Joined: June 11, 2003
KitMaker: 17,582 posts
AeroScale: 12,795 posts
Posted: Thursday, March 08, 2012 - 09:20 AM UTC
Hi Tim
Nice one! A fine build of an equally fine looking aircraft. I like the Alclad over alternate dark/light panels effect - I've never tried that (I've resorted to masking different shades of Alclad itself), and it's really effective.

All the best
Rowan
BEWARE OF THE FEW...
As I grow older, I regret to say that a detestable habit of thinking seems to be getting a hold of me. - H. Rider Haggard
British Columbia, Canada
Joined: September 03, 2009
KitMaker: 6,965 posts
AeroScale: 6,247 posts
Posted: Thursday, March 08, 2012 - 09:45 AM UTC
I had no idea that the Lansen was such a portly beast. I had always been under the impression it was much more svelte. One can really see the influence of the designers of the Tunnan

When once you have tasted flight you will walk the Earth with your eyes turned skyward.
For there you have been, and there you will always long to return.
-Leonardo Da Vinci
Merlin
Senior Editor #017
United Kingdom
Joined: June 11, 2003
KitMaker: 17,582 posts
AeroScale: 12,795 posts
Posted: Thursday, March 08, 2012 - 10:06 AM UTC
Hi Jessie
Come on, "portly"'s a bit unfair, isn't it? "Muscular" might be more apt - it looks like the love-child of a Sabre and Hunter on steroids, and it definitely fits the old "if it looks good, it'll fly well" axiom.
All the best
Rowan
BEWARE OF THE FEW...
As I grow older, I regret to say that a detestable habit of thinking seems to be getting a hold of me. - H. Rider Haggard
Sweden
Joined: March 07, 2012
KitMaker: 7 posts
AeroScale: 4 posts
Posted: Thursday, March 08, 2012 - 12:35 PM UTC
Quoted Text
I had no idea that the Lansen was such a portly beast. I had always been under the impression it was much more svelte. One can really see the influence of the designers of the Tunnan
Aww... now you´ve made it mad
Really cool progress Tim!!!
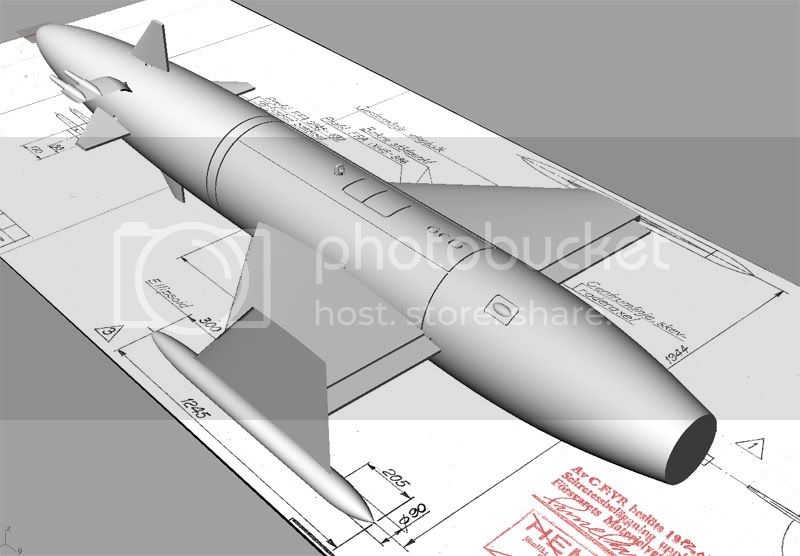
My work on the RB04´s is getting along:
/L
British Columbia, Canada
Joined: September 03, 2009
KitMaker: 6,965 posts
AeroScale: 6,247 posts
Posted: Thursday, March 08, 2012 - 01:24 PM UTC
Quoted Text
Aww... now you´ve made it mad
It's okay, I'll bribe it with Surströmming and Salmiakki candies.
When once you have tasted flight you will walk the Earth with your eyes turned skyward.
For there you have been, and there you will always long to return.
-Leonardo Da Vinci
Sweden
Joined: March 07, 2012
KitMaker: 7 posts
AeroScale: 4 posts
Posted: Thursday, March 08, 2012 - 04:46 PM UTC
Quoted Text
It's okay, I'll bribe it with Surströmming and Salmiakki candies.
British Columbia, Canada
Joined: September 03, 2009
KitMaker: 6,965 posts
AeroScale: 6,247 posts
Posted: Friday, March 09, 2012 - 05:36 AM UTC
And thus we see the reason why the Lansen is portly.
gd&r
When once you have tasted flight you will walk the Earth with your eyes turned skyward.
For there you have been, and there you will always long to return.
-Leonardo Da Vinci
litespeed
News Reporter England - North West, United Kingdom
Joined: October 15, 2009
KitMaker: 1,976 posts
AeroScale: 1,789 posts
Posted: Friday, March 09, 2012 - 09:58 AM UTC
Hi all
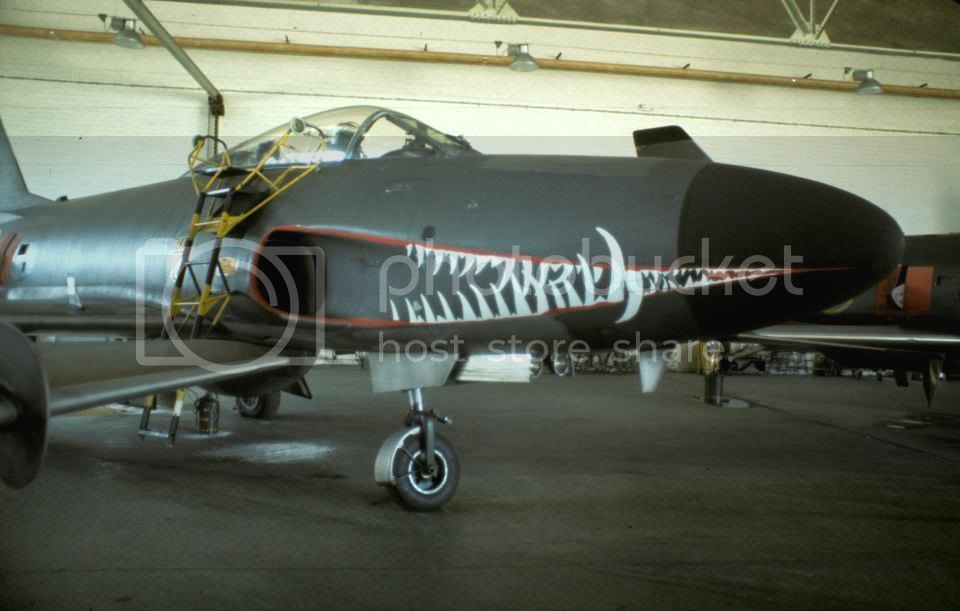
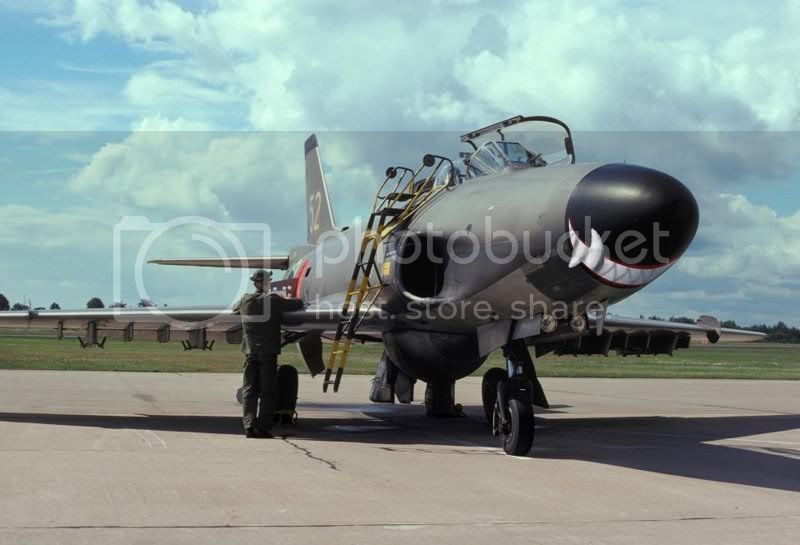
Great images of the toothy Lansens Lars. The grin on the nose looks like the dentures from Dick Dastardly's dog Mutley.
The RB04 anti ship missile will be a great item to hang under the Lansens wings. I look forward to seeing it.
Many thanks for posting the images Lars.

Hi Rowan, yes the black and grey primers worked well with the one shade of aluminium. Saves money to as well as less work using the air brush.
Hi Jess, portly hmmmm not sure that's fair, poor Lansen is highly offended


All the best.
tim
Sweden
Joined: March 07, 2012
KitMaker: 7 posts
AeroScale: 4 posts
Posted: Saturday, March 10, 2012 - 10:42 AM UTC
Yay!!!
Digital work on the RB04C/D missile is done!!:
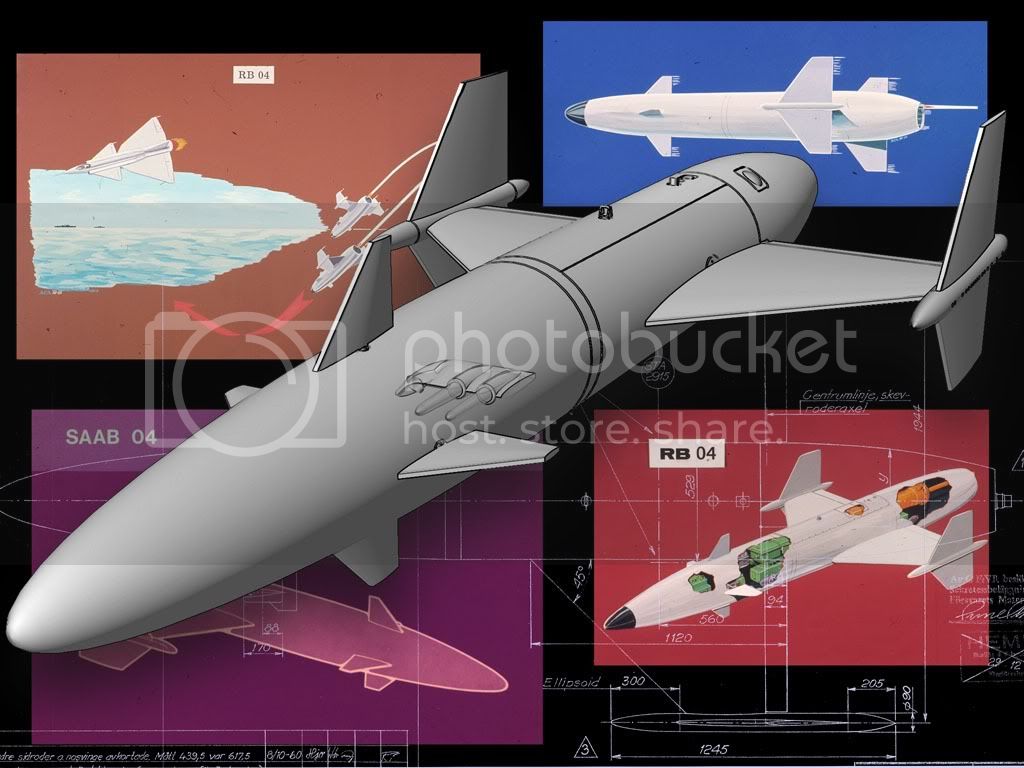
and now onto the Pylon!!!
/L
Ontario, Canada
Joined: March 29, 2010
KitMaker: 1,151 posts
AeroScale: 985 posts
Posted: Saturday, March 10, 2012 - 03:20 PM UTC
I see Gerry Anderson's hand in that...

litespeed
News Reporter England - North West, United Kingdom
Joined: October 15, 2009
KitMaker: 1,976 posts
AeroScale: 1,789 posts
Posted: Tuesday, March 13, 2012 - 06:57 AM UTC
Sweden
Joined: March 07, 2012
KitMaker: 7 posts
AeroScale: 4 posts
Posted: Tuesday, March 13, 2012 - 06:49 PM UTC
Nice to see her on her leggs and detailed up! I love the NMF/OD look
waiting for the next update Tim
/L
litespeed
News Reporter England - North West, United Kingdom
Joined: October 15, 2009
KitMaker: 1,976 posts
AeroScale: 1,789 posts
Posted: Monday, March 19, 2012 - 09:54 AM UTC
England - South East, United Kingdom
Joined: September 15, 2004
KitMaker: 4,728 posts
AeroScale: 1,351 posts
Posted: Monday, March 19, 2012 - 10:15 AM UTC
Nice work Tim, I like the idea of the different primers under the Alclad I'll have to give that a try. I'm very tempted to get me one of these as it follows those fine lines of other great aircraft that looked right even if the Lansen is less well known.
On the bench...
Italeri A129 Mangusta
British Bulldog Spitfire theme build
British Columbia, Canada
Joined: September 03, 2009
KitMaker: 6,965 posts
AeroScale: 6,247 posts
Posted: Monday, March 19, 2012 - 03:12 PM UTC
Aha! Those side views show the sleek and svelte Lansen I'm familiar with. What a spectacular model
When once you have tasted flight you will walk the Earth with your eyes turned skyward.
For there you have been, and there you will always long to return.
-Leonardo Da Vinci
Scotland, United Kingdom
Joined: June 01, 2006
KitMaker: 1,707 posts
AeroScale: 1,119 posts
Posted: Tuesday, March 20, 2012 - 06:17 AM UTC
Beautiful build mate, most excellent!
Remember the Lansen from my childhood, from the airbase in my hometown!
"I´m going back to the front to relax"
"THE BLACK CATS FLIES TONIGHT"
"Find your enemy and shoot him down - everything else is unimportant"
"When you're out of F-8's... You're out of fighters!"
litespeed
News Reporter England - North West, United Kingdom
Joined: October 15, 2009
KitMaker: 1,976 posts
AeroScale: 1,789 posts
Posted: Tuesday, March 20, 2012 - 10:01 AM UTC
Thanks all, it's very much appreciated.
All the best.
tim
Bayern, Germany
Joined: January 02, 2011
KitMaker: 279 posts
AeroScale: 239 posts
Posted: Sunday, April 29, 2012 - 08:28 AM UTC
Hi Tim

,
I just came across your nice Lansen! Well done! I think I will purchse one.
Thanks for sharing your experiences with this kit.
Best regards,
Sebastian
LtCol Henry Blake: "Radar, whatever it is: sign it, cancel it or order five more!"
litespeed
News Reporter England - North West, United Kingdom
Joined: October 15, 2009
KitMaker: 1,976 posts
AeroScale: 1,789 posts
Posted: Monday, April 30, 2012 - 09:48 AM UTC
Hi Sebastian
Thanks for the kind comments, it's much appreciated. Check out the Maestro Models detailing products for the kit to detail the cockpit and exterior of the kit. They are very good and I wish I had them when I built my Lansen. They will be going on my next build though.
Interior detail.
Exterior detail.
Ladder & FOD guard.
All the best.
tim


