_GOTOBOTTOM
Cold War (1950-1974)
Discuss the aircraft modeling subjects during the Cold War period.
Hosted by Tim Hatton
Revell/Matchbox 1/32 DH Sea Venom
c4willy
#305
_VISITCOMMUNITY
Christchurch, New Zealand
Joined: February 01, 2006
KitMaker: 1,673 posts
AeroScale: 1,517 posts
Posted: Monday, March 05, 2012 - 11:02 AM UTC
This is going to be my build log for the kit I'm building in the matchbox campaign being run by Aussie Reg. (Damian Rigby) If you get the chance drop by and take a look as the nostalgia is just about running off the pages!

warreni
_VISITCOMMUNITY
South Australia, Australia
Joined: August 14, 2007
KitMaker: 5,926 posts
AeroScale: 2,201 posts
Posted: Monday, March 05, 2012 - 01:43 PM UTC
I tackled this one in 2010 and the fit is not too bad at all. I built it OOB and you should have no troubles Chris.
Cheers
Warren
c4willy
#305
_VISITCOMMUNITY
Christchurch, New Zealand
Joined: February 01, 2006
KitMaker: 1,673 posts
AeroScale: 1,517 posts
Posted: Monday, March 05, 2012 - 07:24 PM UTC
Hey Warren thanks for the intel! I've got the engine together and the fit so far has been pretty much okay assuming I follow the instructions!

Okay well I've made some progress! I started where Revell wanted me too and I've put the engine together such as it is. Made a few errors too, which were easy to rectify as the glue hadn't set at all. The main blunder was assembling the inner parts of the engine thinking I could put the combustion chambers around it once I had, wrong! The engine needs to be assembled in the order specified for it to go together and fit well. So I disassembled it all and started over. Here's the result.

While I was at it I painted the interior of the fuselage and the landing gear. I used Humbrol's 78 interior green acrylic which I thinned to spray and I must say it sprayed damn well. It is however susceptible to Tamiya extra thin cement wrinkling like it'd been hit with paint stripper and peeling back. Once the glue was dry however it went back to being quite resilient. I also painted the cockpit and the interior walls now it's onto assemble the cockpit and hopefully the fuselage.

warreni
_VISITCOMMUNITY
South Australia, Australia
Joined: August 14, 2007
KitMaker: 5,926 posts
AeroScale: 2,201 posts
Posted: Monday, March 05, 2012 - 07:41 PM UTC
Don't forget the seam in the tailpipe..
And just to prove I did build it..

OEFFAG_153
_VISITCOMMUNITY
Västra Götaland, Sweden
Joined: February 19, 2010
KitMaker: 1,473 posts
AeroScale: 1,450 posts
Posted: Monday, March 05, 2012 - 10:26 PM UTC
This is one very cool looking aircraft – I'll follow this one with interest Chris.

@Warren – very nice

Best Regards

Mikael
c4willy
#305
_VISITCOMMUNITY
Christchurch, New Zealand
Joined: February 01, 2006
KitMaker: 1,673 posts
AeroScale: 1,517 posts
Posted: Tuesday, March 06, 2012 - 07:13 PM UTC
Hi Mikael welcome aboard!

@Warren: Nice Sea Venom!

Well time for an update. I've got the wings and fuselage together and all the wonderful pictures I took were erased by my youngest when she decided to borrow dads camera. Oh well c'est La Vie!

Just some information about the build so far then! I had trouble closing the fuselage halves with the engine inside nothing major and the fitting work was done in an hour or so with the help of my motor tool. The inside of the fuselage where the back wall attached to the motor sits needed work and I had to reduce the size of the firewall too. I reduced the size of the lip by half and took off about half a millimeter from the firewall and everything fit snugly and was set aside so I could assemble the cockpit.

once that was done I glued it into the left half of the fuselage and placed the motor against the same side and closed the fuselage up. I ran Tamiya thin cement into all the seams and then held everything tight with the liberal application of Tamiya masking tape. (Wonderful stuff!)

Everything lined up fairly well I then worked on the wing roots and glued the wing halves together and clamped them for a while to let the cement dry I then started to fit them to the fuselage. It became obvious that the fuselage curled inwards, however it was a simple matter to correct it by running thin cement between the wing joint and the fuselage then pressing the fuselage side against the wing and holding it there with a piece of scrap sprue braced against the engine till it had set. I also put the canon bay cover on to to provide a means of making sure I glued the front of the fuselage correctly and didn't narrow it. Now I need to paint the inside of the fuselage to match the cockpit. (See picture)

To strengthen everything up I then added the tail section of the fuselage and I decided to cover up the motor as well with all the extra panels on it's come up really well! Only a small amount of filing was needed to get everything to go together. There are no great gaps and it looks pretty darn good!
I've taken some pics of the completed fuselage and wing so you can see how it all fits together.


Now the seam that Warren is referring too (At least I think it's the seam that Warren means) is the fact that the Matchbox engineers put to very prominent location pins at almost the very end of the Goblin motor's exhaust which when seen from the rear give the opening a very distinct oval shape. I waited till the tail pipe had dried suitably and then just filed them away so that it looks pretty much round. See photos below to illustrate my point. The seams was filled with a smear of super glue and then sprayed with accelerator and lightly sanded.


c4willy
#305
_VISITCOMMUNITY
Christchurch, New Zealand
Joined: February 01, 2006
KitMaker: 1,673 posts
AeroScale: 1,517 posts
Posted: Tuesday, March 13, 2012 - 09:27 PM UTC
Okay I'm much further on now, the Venom is mostly assembled and the cockpit is together except for the bang seats which I'm now currently painting. There are some very nasty sink marks on this model. I'm unsure if they were present on the Matchbox moulding or not, but they certainly are on the Revell release!

As you can see in the pictures the long grey areas over the wing fold area this is where the major faults are. Top and bottom of both wings. The tail booms and nose area also needed filling, nothing to major but certainly in need of work. Easy enough to fill, just took a couple of fillings to do it. I need to mask off the canopy and paint it the interior colour first and then finish it off with extra dark sea grey.

There have been no really nasty fit issues and those fit issues I have had have been really easy to problem solve. Everything has fitted well and has gone together rather easily. Now I'll get some coats of paint on and then we can see how the decals perform. The ones I used in the cockpit behaved very well and the Microsol worked nicely on them, they softened and pulled down tight to the surface of the instrument panel even though I didn't remove the detail!

Okay progress pictures!

OEFFAG_153
_VISITCOMMUNITY
Västra Götaland, Sweden
Joined: February 19, 2010
KitMaker: 1,473 posts
AeroScale: 1,450 posts
Posted: Tuesday, March 13, 2012 - 10:32 PM UTC
Hi Chris,

NIce progress – and good to hear that the fit is good. It's a rather big bird by the looks of it?

BTW – is this kit in current release?

Best Regards

Mikael
c4willy
#305
_VISITCOMMUNITY
Christchurch, New Zealand
Joined: February 01, 2006
KitMaker: 1,673 posts
AeroScale: 1,517 posts
Posted: Wednesday, March 14, 2012 - 05:40 AM UTC
Hi Mikael,

I bought the kit a couple of years ago from my local hobby shop so all I can really say that it was recently released but the Revell website is not showing it currently. It's readily available on eBay and it might still be in some hobby shops.
c4willy
#305
_VISITCOMMUNITY
Christchurch, New Zealand
Joined: February 01, 2006
KitMaker: 1,673 posts
AeroScale: 1,517 posts
Posted: Friday, April 20, 2012 - 03:20 PM UTC
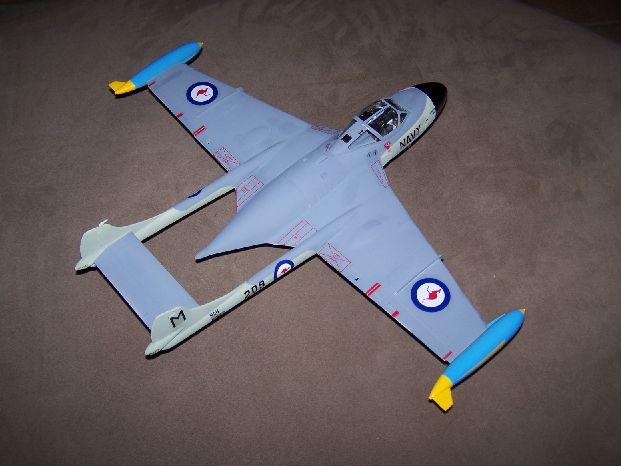
Well here we are Ladies and gents progress to date on my Sea Venom! I'm around 90 percent complete got a few things to add and some touch ups to be done. I'm really happy with the build it was easy not to complicated and the fit is pretty darn good, as long as you take your time and work through the assembly process. I do recommend that you follow the instructions when it comes to building and installing the engine as it really only goes together best in the order they would have you do it. I tried a couple of times to step outside this process to provide a flat mating surface only to find that intakes wont fit through the plate once assembled. (So much for that idea!) The engine goes together well with a minimum of fuss and it seems to set up pretty darn well. (Well at least mine did) I really like these old Matchbox kits they were a no frills easy build and they remind me of a simpler time when I built them as a young adult. (Mind you if you talk with my children I was apparently never young and my wife complains she has three kids, me being the biggest!)

litespeed
Staff MemberNews Reporter
AEROSCALE
_VISITCOMMUNITY
England - North West, United Kingdom
Joined: October 15, 2009
KitMaker: 1,976 posts
AeroScale: 1,789 posts
Posted: Friday, April 20, 2012 - 08:57 PM UTC
Hi Chris.
Your Sea Venom is looking excellent. Glad to read it's not been to bad building it. It has to be one of my favorite kits to build. Might not be the best kit of the Sea Venom ever, but the size and look never fails to impress. Great to see your progress.
All the best.
tim
c4willy
#305
_VISITCOMMUNITY
Christchurch, New Zealand
Joined: February 01, 2006
KitMaker: 1,673 posts
AeroScale: 1,517 posts
Posted: Saturday, April 21, 2012 - 06:58 PM UTC
Hi Tim good to see you here! Thanks for the encouragement, I quite like the old Matchbox 1/32nd scale kits, they may have hugely recessed panel lines but I like their elegant simplicity. Detailed without being over detailed where the amount of extra detail you put in is entirely up to you. I often wonder how many new entrants to our hobby are put off by what others have written about a certain kit? I applaud Revell for re-releasing the old matchbox kits so another generation can get to build them. (And Revell can make a few extra bucks! LOL) Okay here she is gloss coated, rockets added and aerials attached. Final touch ups done ..... now .... where was I going to put her?

AussieReg
Staff MemberAssociate Editor
AUTOMODELER
#007
_VISITCOMMUNITY
Victoria, Australia
Joined: June 09, 2009
KitMaker: 8,156 posts
AeroScale: 3,756 posts
Posted: Saturday, April 21, 2012 - 07:06 PM UTC
Super job on the old bird Chris, really well done mate !

Cheers, D
c4willy
#305
_VISITCOMMUNITY
Christchurch, New Zealand
Joined: February 01, 2006
KitMaker: 1,673 posts
AeroScale: 1,517 posts
Posted: Saturday, April 21, 2012 - 07:13 PM UTC
Hey D thanks buddy and it's all down to your campaign! It was great to get out the Matchbox kits and build them again I can smell the nostalgia from here!
Jessie_C
_VISITCOMMUNITY
British Columbia, Canada
Joined: September 03, 2009
KitMaker: 6,965 posts
AeroScale: 6,247 posts
Posted: Sunday, April 22, 2012 - 05:40 AM UTC
Those Revell decals look far superior to the ones that were in the original box.
c4willy
#305
_VISITCOMMUNITY
Christchurch, New Zealand
Joined: February 01, 2006
KitMaker: 1,673 posts
AeroScale: 1,517 posts
Posted: Sunday, April 22, 2012 - 06:31 AM UTC
Yes they are Jess a much better proposition. I had heard that the Matchbox ones were not that good, however I've not seen or used the ones that were in the original boxing. I'm unsure how much stencilling was provided from matchbox, the Revell offering has provided a good level of them. they applied well weren't to thick and reacted well to microset and microsol. They did however need a very good gloss coat to ensure there was no silvering.
Jessie_C
_VISITCOMMUNITY
British Columbia, Canada
Joined: September 03, 2009
KitMaker: 6,965 posts
AeroScale: 6,247 posts
Posted: Sunday, April 22, 2012 - 11:09 AM UTC
I think that the best way to describe them is to say that they weren't dire. The stencilling was the bare minimum. I can't even remember whether they provided the red NO STEP X markings which were so prominent on the Sea Venom. They provided the checkers fof the wing tanks, but they didn't conform to the shape very well, and also didn't react to the solvaset for ages.
 _GOTOTOP