_GOTOBOTTOM
Early Aviation
Discuss World War I and the early years of aviation thru 1934.
WiP (again!) - Roden 1:48 DH 9
BradCancian
_VISITCOMMUNITY
Queensland, Australia
Joined: August 30, 2006
KitMaker: 285 posts
AeroScale: 281 posts
Posted: Friday, March 30, 2012 - 09:44 PM UTC
Hello all,

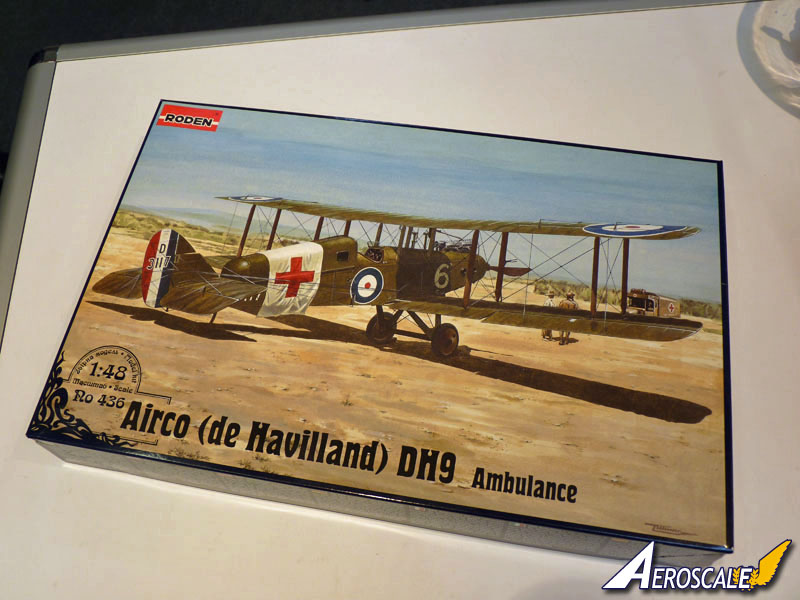
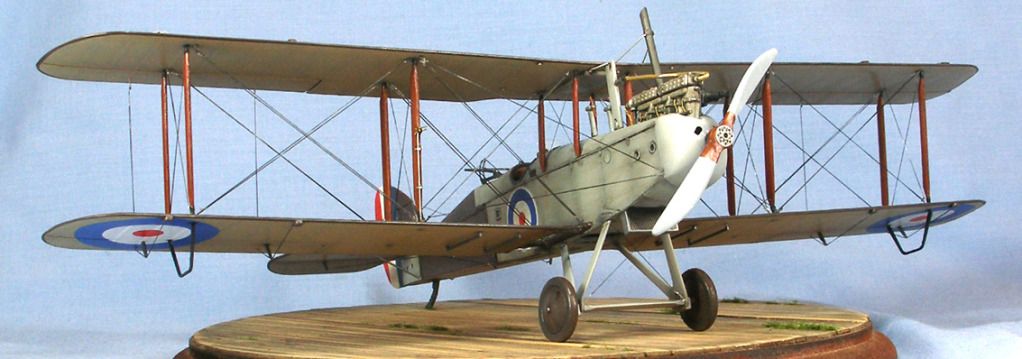
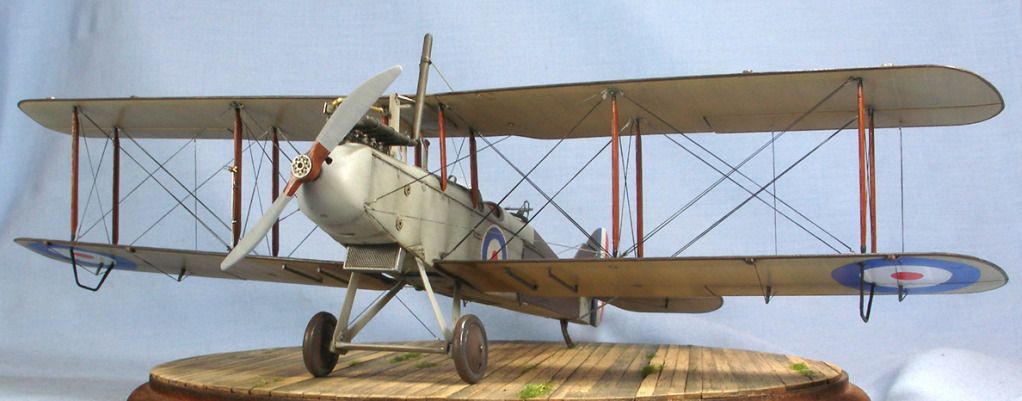
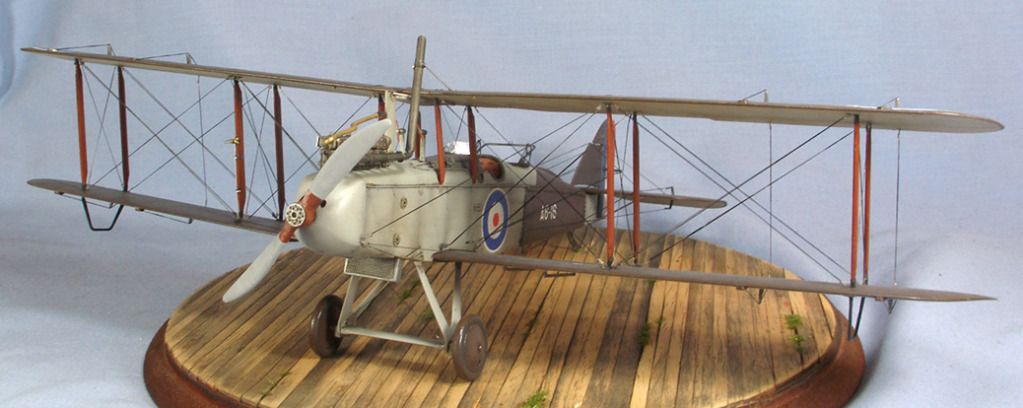
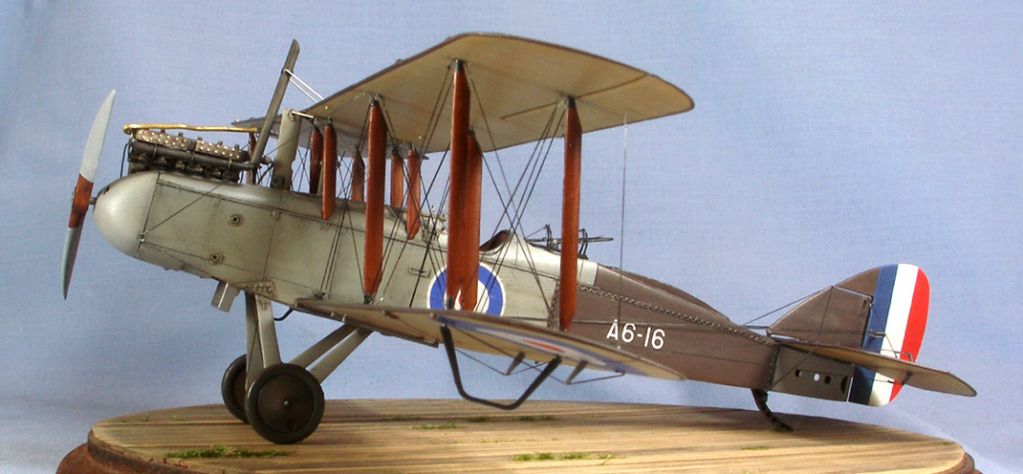
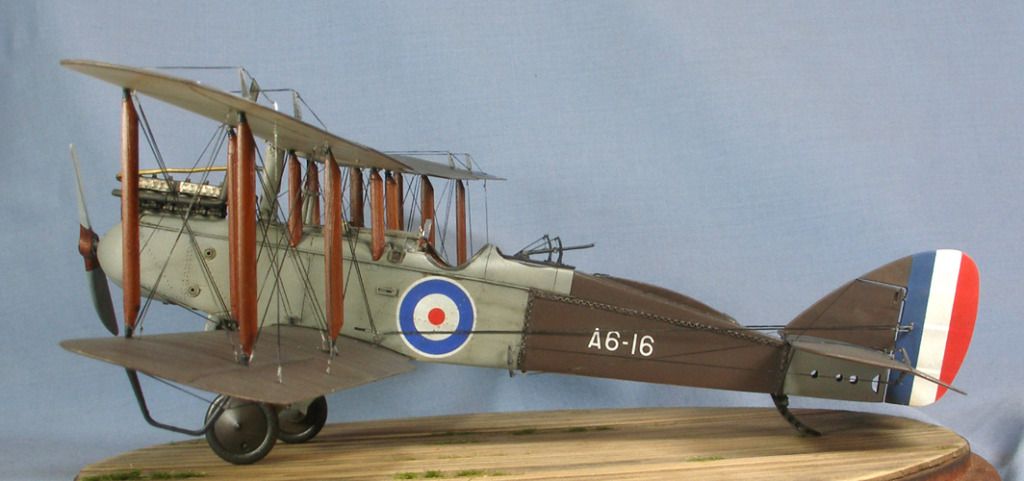
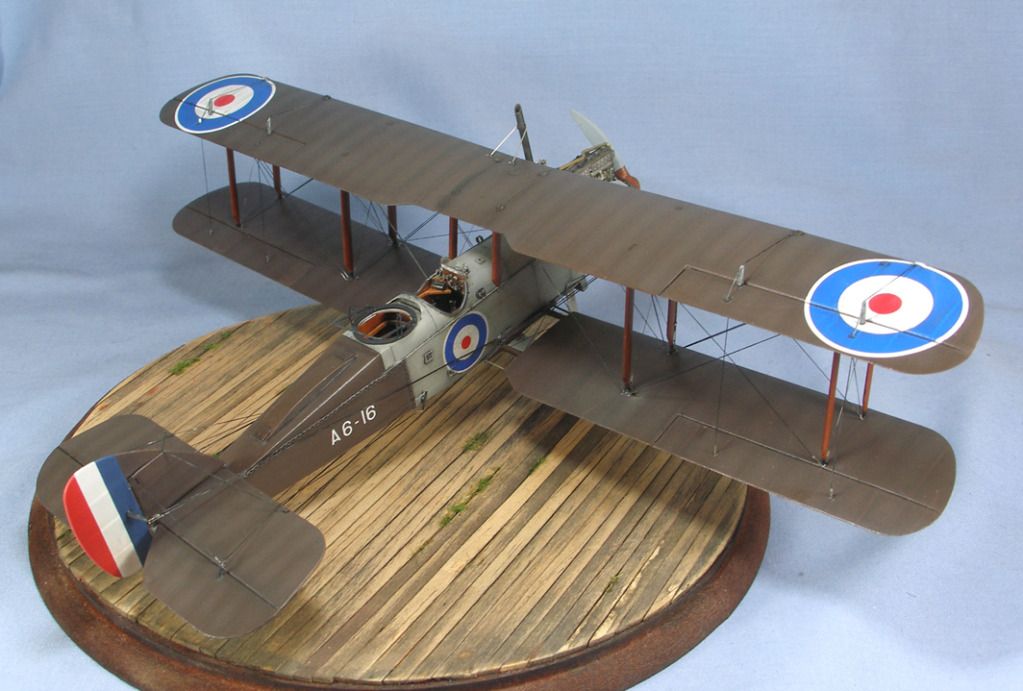
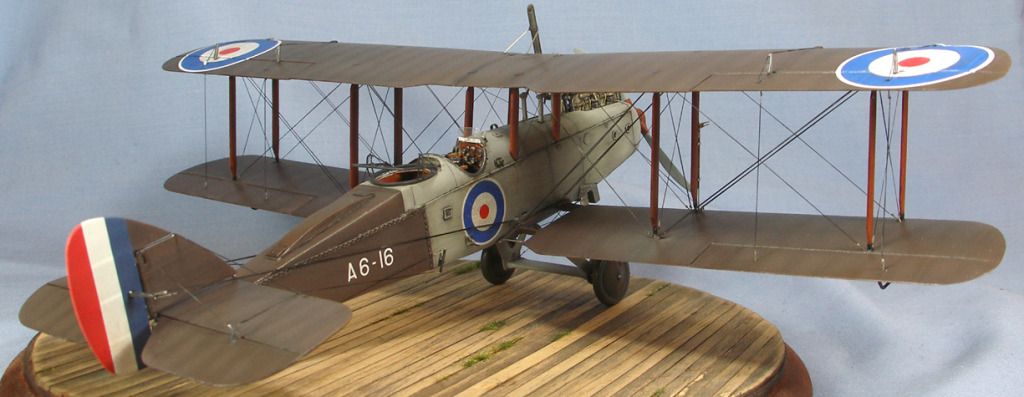
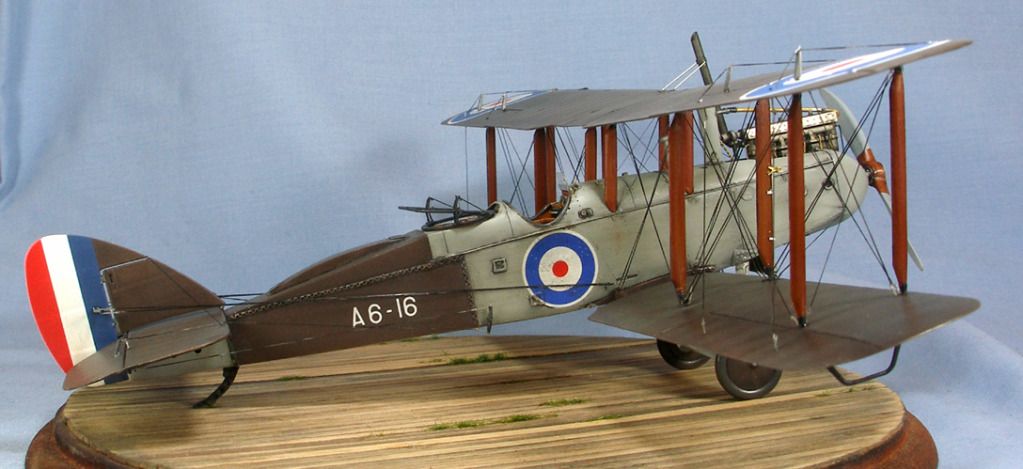
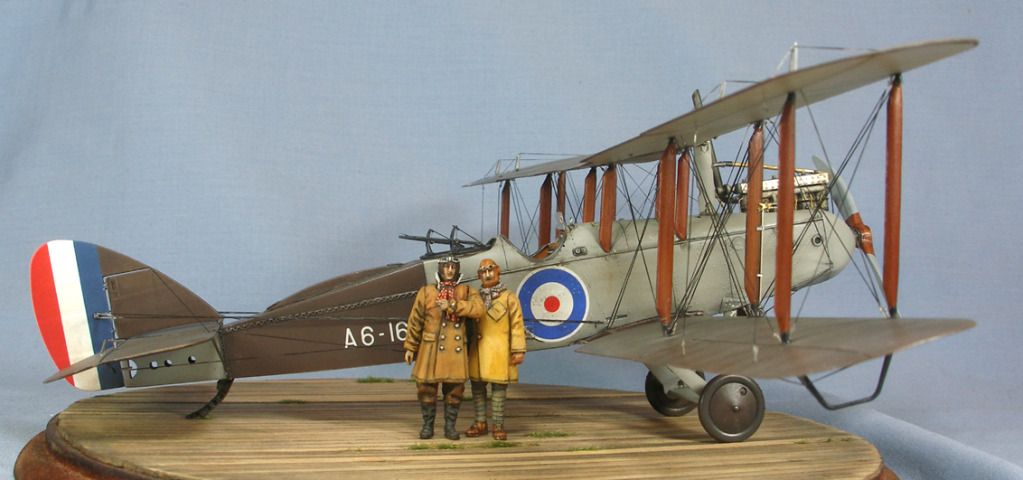
I have recently re-started on a project that I started back in 2010 - the 1:48 Roden DH-9, which I had planned to do as a post-war Royal Australian Air Force "Imperial Gift" machine from the early 1920s. I put this one back on the shelf a while back when it all started to get a bit ugly, and I was distracted by some other projects...

Here is what I had done previously:

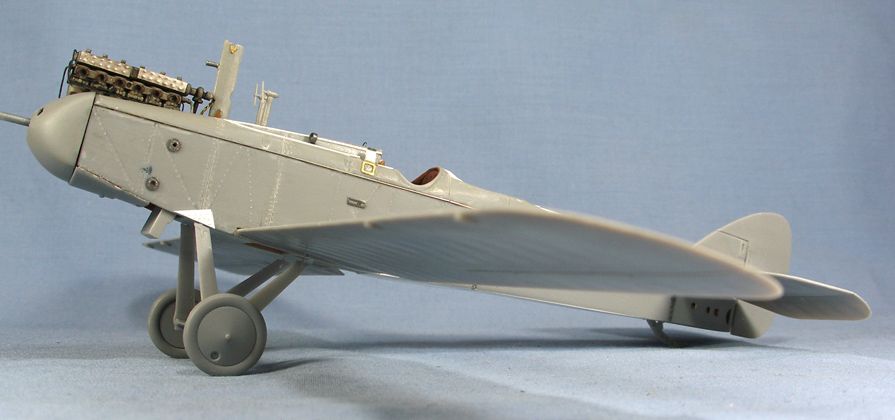
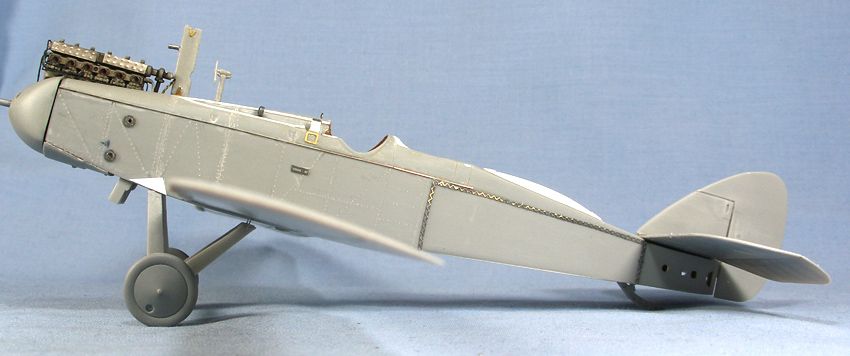
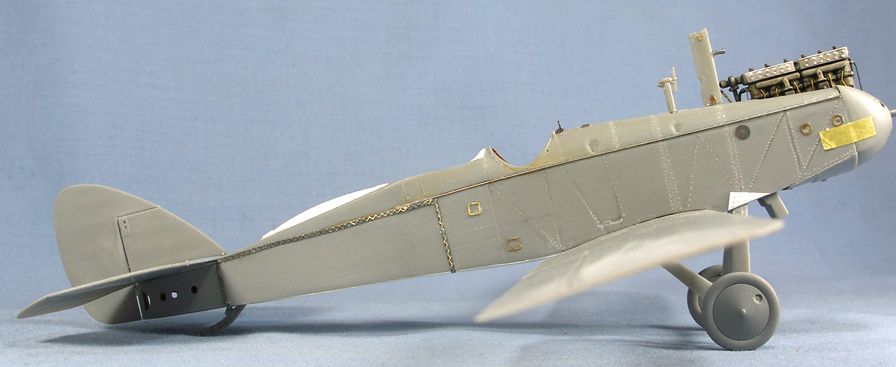
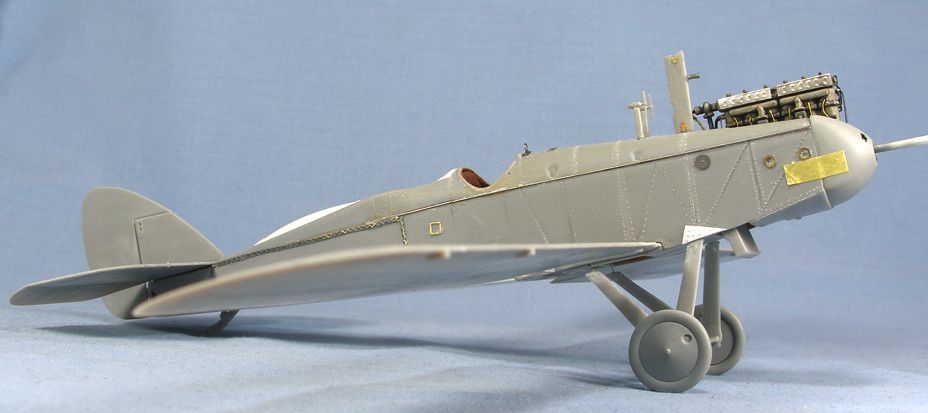
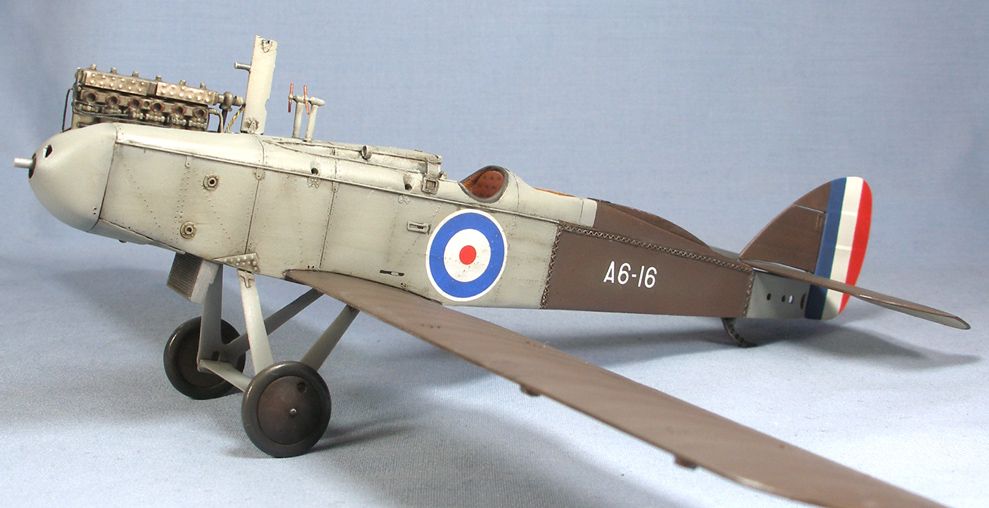
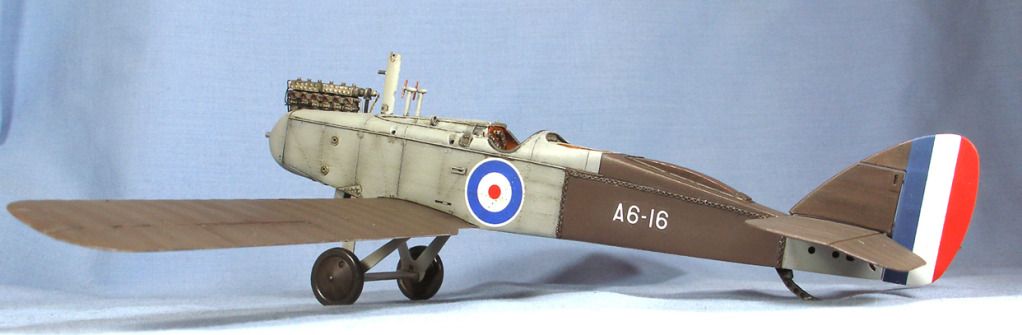
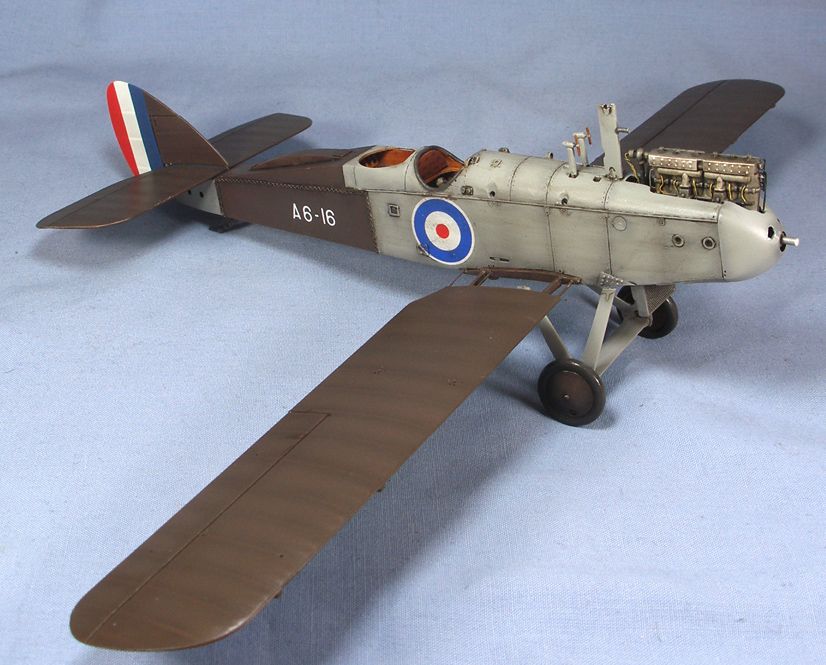
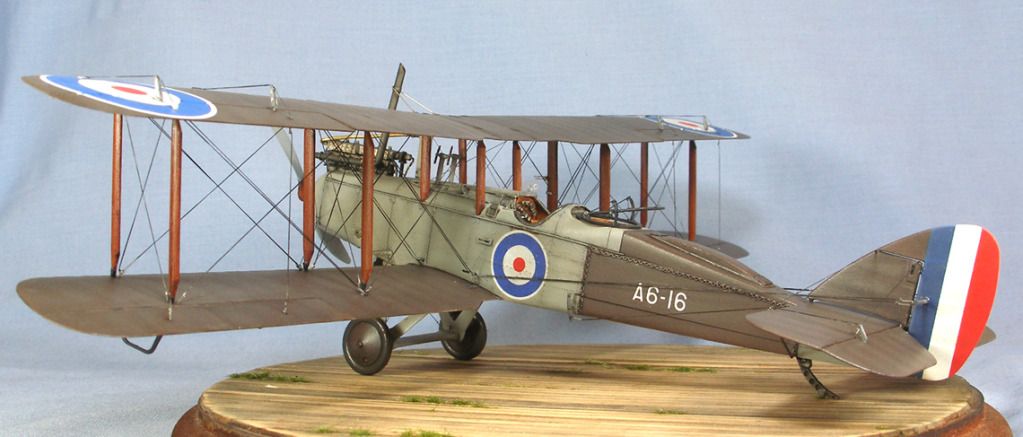
First, I had finished the 230hp Siddeley Puma engine. Not much was added as the only area that will be able to be seen is the top of the cylinders. I also modified the exhaust pipe - RAAF aircraft had a distinctive "chimney stack" exhaust, which I made from cut brass hollow tube. The engine is very un-inspirational colour wise, but all of the period photos show the engine and exhaust in a uniform metalic colour.


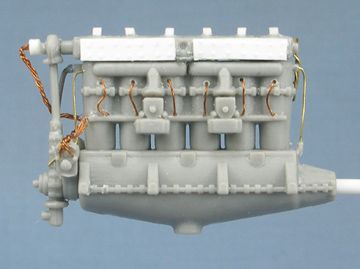
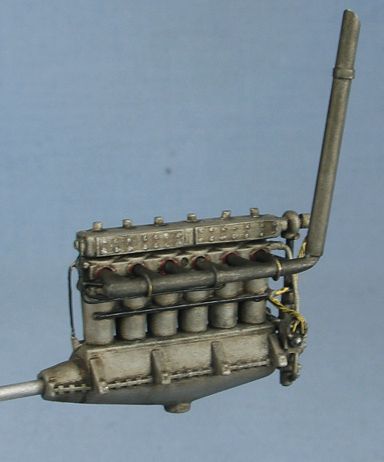
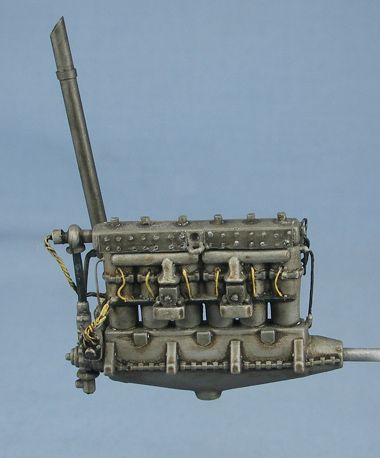
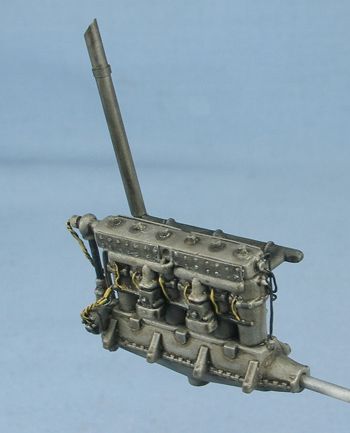
(though I have since added some better cylinder head block side panels from thin foil to cover up the ugly rivits I had left...)

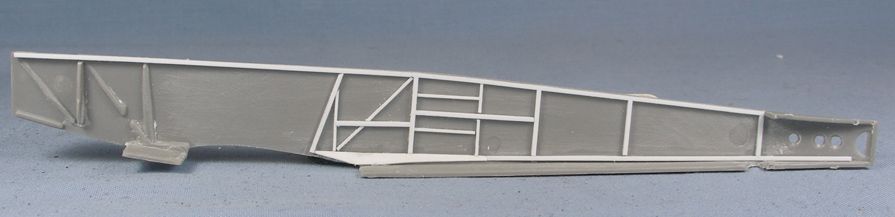
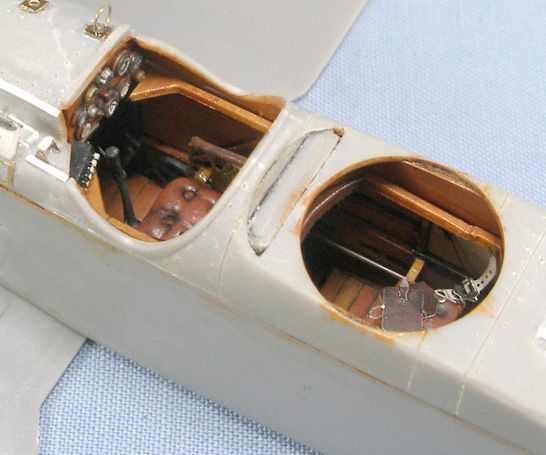
The fuselage halves suffer from sink marks on the inside surface, and sunken areas on the outer surface due to the plastic being removed from the mould while it was still warm. So I had filled the sink holes / sunken areas, and sanded it all smooth. I then re-built the internal structure (I will also have to restore the lost surface detail on the exterior at some point too).


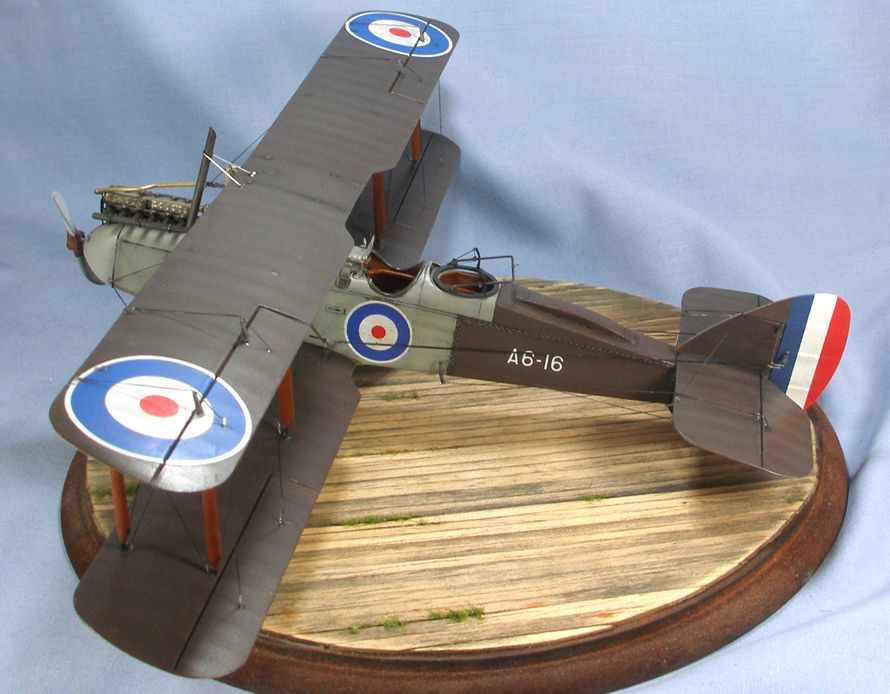
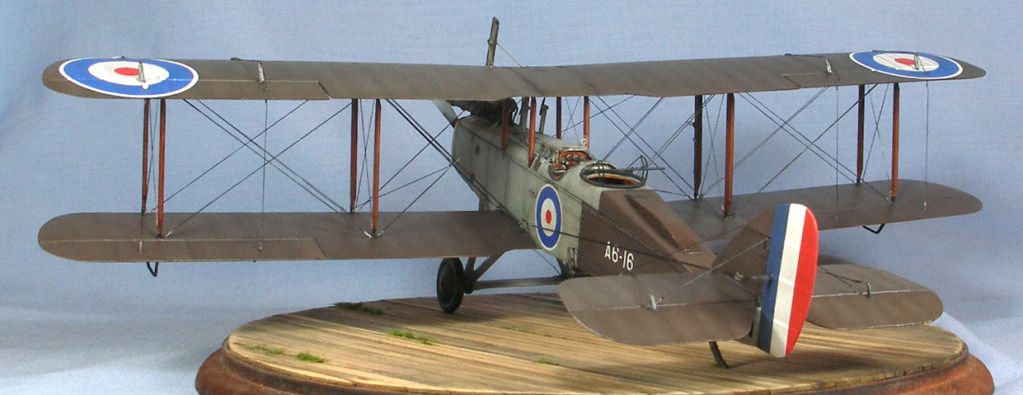
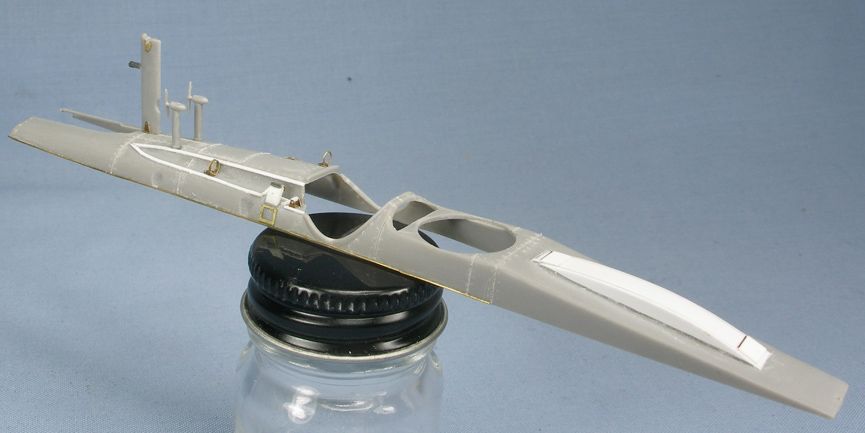
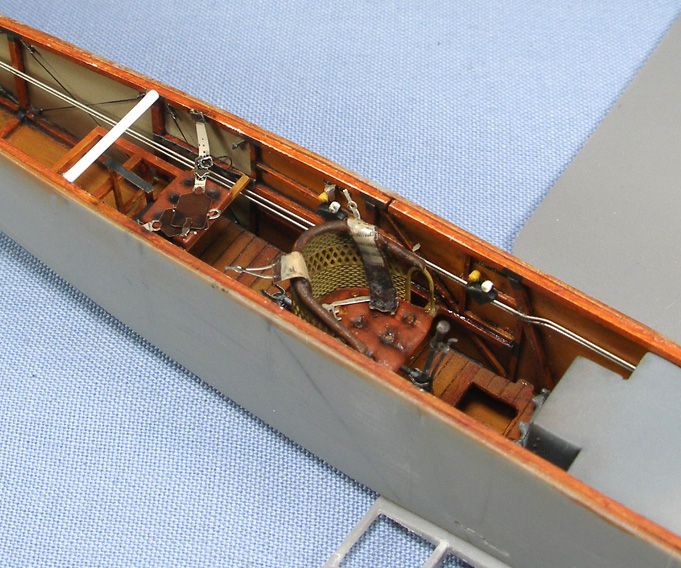
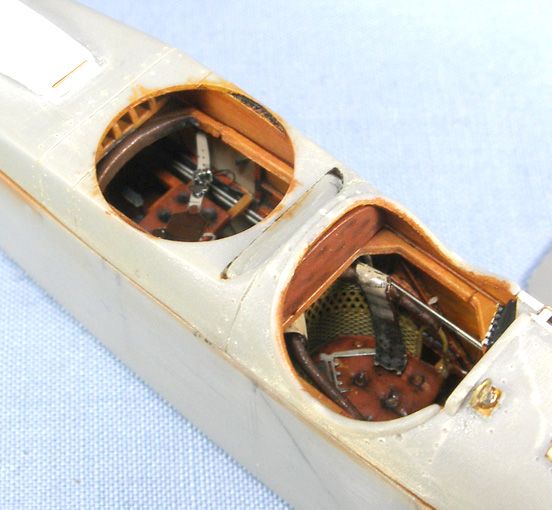
I had also made some minor additions to the upper decking. The decking part was rough and pebbly, and the panel lines were soft, so I sanded it all smooth and re-scribed the panels. The RAAF aircraft I intend to model was pictured without any armament and only one of the support rings for the Aldis sight, so this is how I modeled the decking. I also added the round object (storage container?) on the rear of the fuselage that was carried on some RAAF aircraft. Rivet detail was also added.


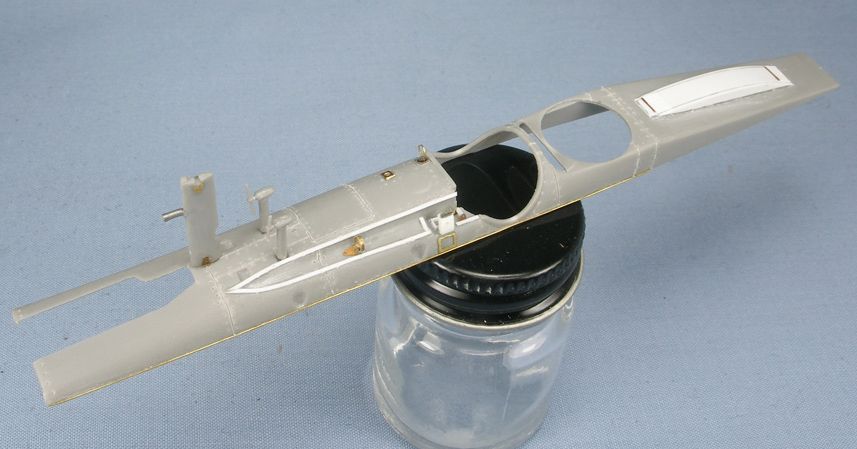
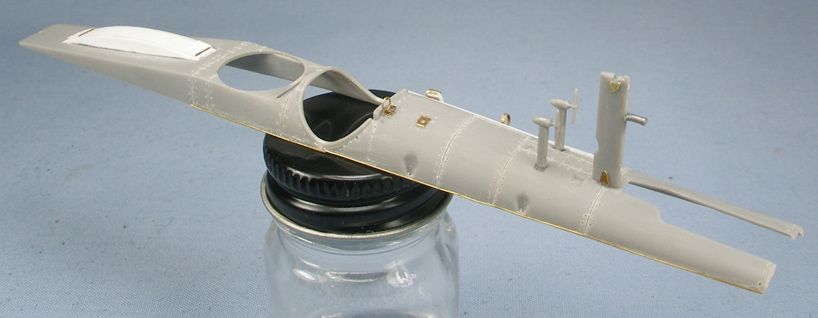
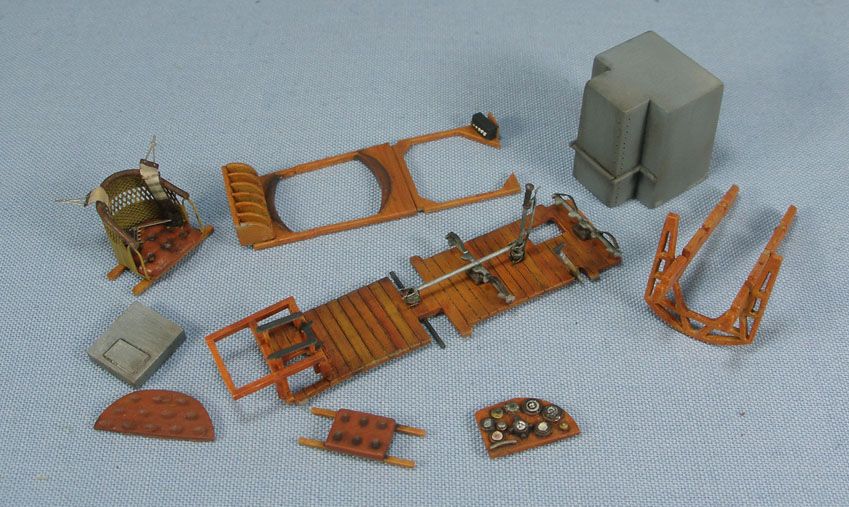
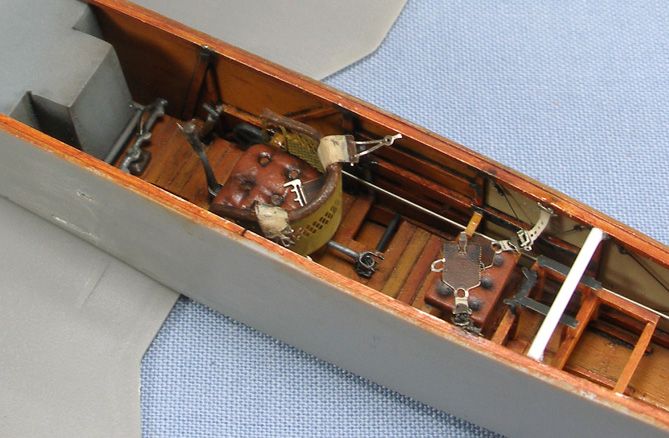
So that is where it was when I left it over a year ago. I have since finished the interior. Modifications included a new etched seat with putty seat cushion and Eduard belts, a modified floor, a mount for a camera (fictional as I had no reference pics) and other details. Luckily the cockpit of the DH-9 was quite sparse - these aircraft didn't even carry wireless sets post war, save for one or two experiments.


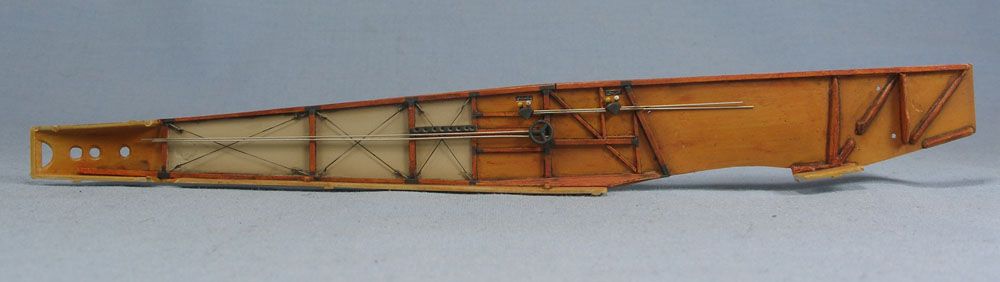
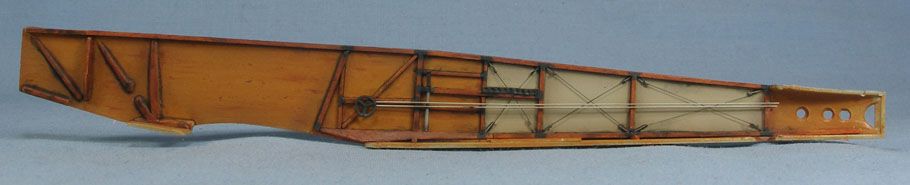
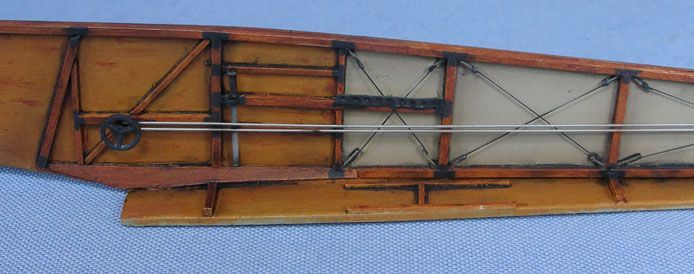
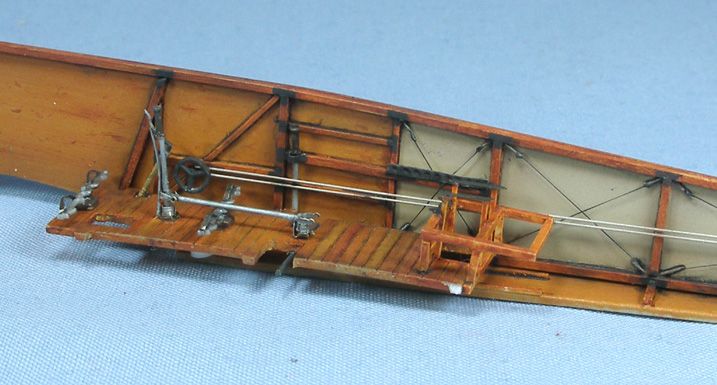
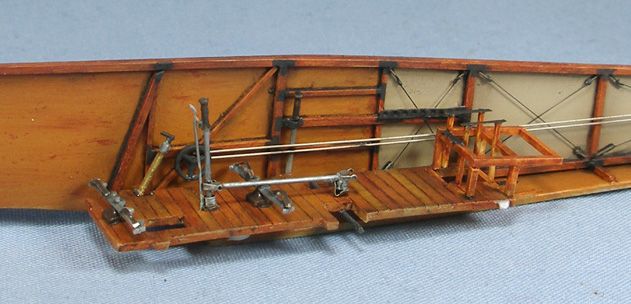
Due to the way Roden have structured the fuselage and the soft plastic, it "pinches" in at the top. Hence why I have had to use some rods to space it back out to the correct width.


Next I shall endeavour to get the fuselage completely buttoned up.... oh and I have since fixed up the stray wire I noticed after I took the photos... sigh!

All feedback welcomed!

BC
thegirl
_VISITCOMMUNITY
Alberta, Canada
Joined: January 19, 2008
KitMaker: 6,743 posts
AeroScale: 6,151 posts
Posted: Saturday, March 31, 2012 - 02:09 AM UTC
I remember this build , nice to see you back at it once again .

Very nice progress so far
JackFlash
_VISITCOMMUNITY
Colorado, United States
Joined: January 25, 2004
KitMaker: 11,669 posts
AeroScale: 11,011 posts
Posted: Saturday, March 31, 2012 - 03:05 AM UTC
And timely too. Roden just released the Ambulance version of this kit. #436.

SgtRam
Staff MemberEditor-at-Large
AEROSCALE
#197
_VISITCOMMUNITY
Ontario, Canada
Joined: March 06, 2011
KitMaker: 3,971 posts
AeroScale: 511 posts
Posted: Saturday, March 31, 2012 - 04:38 AM UTC
The wood work is amazing. Great job, can't wait to see the final product.
OEFFAG_153
_VISITCOMMUNITY
Västra Götaland, Sweden
Joined: February 19, 2010
KitMaker: 1,473 posts
AeroScale: 1,450 posts
Posted: Saturday, March 31, 2012 - 07:20 AM UTC
Nice to see this one again, its really looking great, looking forward to seeing it develop!

Mikael
Louis
_VISITCOMMUNITY
Bas-Rhin, France
Joined: May 21, 2006
KitMaker: 472 posts
AeroScale: 471 posts
Posted: Saturday, March 31, 2012 - 07:52 AM UTC
Hello Brad.

Very beautiful wood paint! I like it (especially the floor...).
How did you paint your engine? I love him too.

Regards.
BradCancian
_VISITCOMMUNITY
Queensland, Australia
Joined: August 30, 2006
KitMaker: 285 posts
AeroScale: 281 posts
Posted: Thursday, April 05, 2012 - 10:07 PM UTC
Thanks folks!

Louis - the engine was sprayed with Model Master metalisers (aluminium I think) and the other details touched up with humbrol silvers and other colours.

Now she is starting to look like a DH-9...


BC
thegirl
_VISITCOMMUNITY
Alberta, Canada
Joined: January 19, 2008
KitMaker: 6,743 posts
AeroScale: 6,151 posts
Posted: Friday, April 06, 2012 - 02:24 AM UTC
Very nice attention to the details
BradCancian
_VISITCOMMUNITY
Queensland, Australia
Joined: August 30, 2006
KitMaker: 285 posts
AeroScale: 281 posts
Posted: Thursday, April 26, 2012 - 03:34 PM UTC
Some paint has now been applied. Painted up as A6-16 of the Royal Australian Air Force, based at Point Cook in Victoria, circa 1923. A typically drab and uninteresting paint scheme, which is hard to paint and still look mildly interesting!


Don't ask me how many times I broke the starboard lower wing off painting and masking. The joint is very weak and doesn't stand up to too much handling. Ended up bracing it with some fuse wire but it's still flimsy...

BC

lcarroll
_VISITCOMMUNITY
Alberta, Canada
Joined: July 26, 2010
KitMaker: 1,032 posts
AeroScale: 1,025 posts
Posted: Friday, April 27, 2012 - 10:41 AM UTC
Brad,
Can you share your technique for the metal panel demarcations? Is it pigment or pastels or another "Cancian miracle"?!?
Beautiful work all round.
Cheers,
Lance
BradCancian
_VISITCOMMUNITY
Queensland, Australia
Joined: August 30, 2006
KitMaker: 285 posts
AeroScale: 281 posts
Posted: Friday, April 27, 2012 - 09:06 PM UTC
Thanks Lance - nothing special here All I did for the metal panels was lighten them slightly more than the plywood panels. I also gave the plywood panels slightly more Tamiya Smoke overspray. The difference is subtle, but I am glad you noticed

Thanks again!

BC
lcarroll
_VISITCOMMUNITY
Alberta, Canada
Joined: July 26, 2010
KitMaker: 1,032 posts
AeroScale: 1,025 posts
Posted: Saturday, April 28, 2012 - 12:26 AM UTC

Quoted Text

Thanks Lance - nothing special here All I did for the metal panels was lighten them slightly more than the plywood panels. I also gave the plywood panels slightly more Tamiya Smoke overspray. The difference is subtle, but I am glad you noticed

Thanks again!

BC


Just one small extra step in the process that makes a huge difference in the result. Very nice, good learning point for me.
Cheers,
Lance
OEFFAG_153
_VISITCOMMUNITY
Västra Götaland, Sweden
Joined: February 19, 2010
KitMaker: 1,473 posts
AeroScale: 1,450 posts
Posted: Saturday, April 28, 2012 - 02:50 AM UTC
Nice update Brad, I'mactualy quite partial to PC10 and Battleship grey, especially when its as well done as this!

Mikael
BradCancian
_VISITCOMMUNITY
Queensland, Australia
Joined: August 30, 2006
KitMaker: 285 posts
AeroScale: 281 posts
Posted: Sunday, May 06, 2012 - 02:07 PM UTC
Finished


This wasn’t an easy build and required some care to make sure it all went together with a minimum of issues. Points to watch out for are the soft bendy plastic, sink marks, warped fuselage halves and the weak lower starboard wing joint (mine needed pinning). Rigging on these brit planes is also a bit of a nightmare (mine was rigged with aeroclub elastic tied to “bob’s buckles” wire turnbuckles). I would recommend this kit for those with a couple of biplane builds (and a stiff drink) under their belt.

Feedback always welcomed!

Cheers,

BC
JackFlash
_VISITCOMMUNITY
Colorado, United States
Joined: January 25, 2004
KitMaker: 11,669 posts
AeroScale: 11,011 posts
Posted: Sunday, May 06, 2012 - 03:05 PM UTC
Splendid build!
Neptun
_VISITCOMMUNITY
Greece / Ελλάδα
Joined: April 01, 2012
KitMaker: 6 posts
AeroScale: 5 posts
Posted: Sunday, May 06, 2012 - 09:12 PM UTC
Amazing!Great job.
OEFFAG_153
_VISITCOMMUNITY
Västra Götaland, Sweden
Joined: February 19, 2010
KitMaker: 1,473 posts
AeroScale: 1,450 posts
Posted: Monday, May 07, 2012 - 06:15 AM UTC
A beautiful build Brad, very inspiring! Thanks for showing.

Mikael
BradCancian
_VISITCOMMUNITY
Queensland, Australia
Joined: August 30, 2006
KitMaker: 285 posts
AeroScale: 281 posts
Posted: Monday, May 07, 2012 - 10:41 PM UTC
Thanks guys!
 _GOTOTOP