SgtRam
 Editor-at-Large
#197
Ontario, Canada
Joined: March 06, 2011
KitMaker: 3,971 posts
AeroScale: 511 posts
Posted: Sunday, October 14, 2012 - 07:14 AM UTC
Just thought I would share my Typhoon in progress. It is the Hasegawa 1/48 kit, the Mk.IB.
The invasion stripes were airbrushed starting with white, then the black, then the camouflage. The process terrified me, as I masked each layer, and had no idea how it would turn out till I finished the paint.
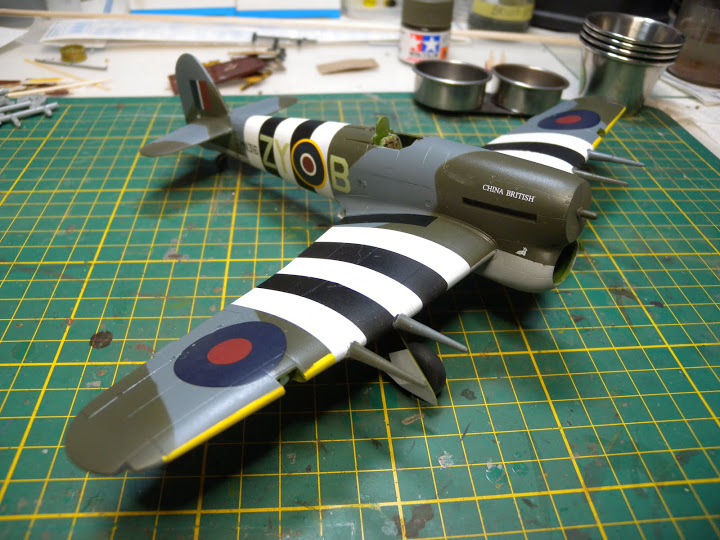
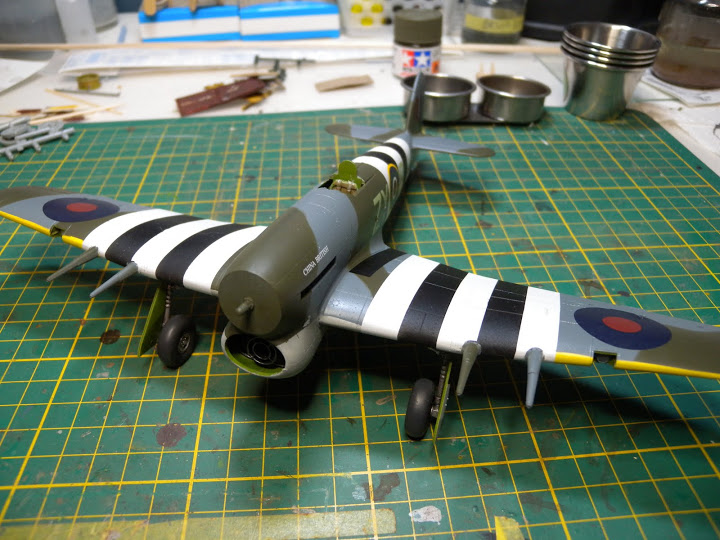
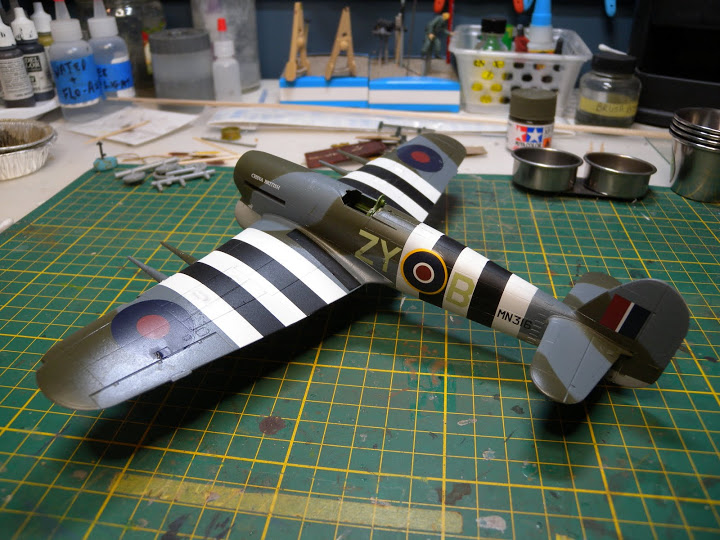
So just a few more details, then weathering left.
Kevin
Illinois, United States
Joined: October 14, 2012
KitMaker: 150 posts
AeroScale: 107 posts
Posted: Sunday, October 14, 2012 - 07:02 PM UTC
It's looking good, nice job with the stripes.
Georgia, United States
Joined: August 08, 2011
KitMaker: 410 posts
AeroScale: 409 posts
Posted: Wednesday, October 17, 2012 - 08:56 AM UTC
Looks good Kevin, masking seems to have turned out great!
I'm looking forward to the finished model, as this is a scheme I also plan to do someday

Doug
Tennessee, United States
Joined: September 20, 2005
KitMaker: 1,747 posts
AeroScale: 1,673 posts
Posted: Wednesday, October 17, 2012 - 01:03 PM UTC
Got to love the "Tiffy" or is it "Tiffie"? Great work there, Russell.
To Thine Own Self Be True
Siderius
A.K.A., RTA
British Columbia, Canada
Joined: September 03, 2009
KitMaker: 6,965 posts
AeroScale: 6,247 posts
Posted: Wednesday, October 17, 2012 - 01:43 PM UTC
That's quite a nice tiffie : )
You may wish to correct a small paint issue before you hang the prop. The inside of the radiator housing at the nose was the same colour as the exterior camouflage rather than being interior green.
Will it have the 4 blade prop?
When once you have tasted flight you will walk the Earth with your eyes turned skyward.
For there you have been, and there you will always long to return.
-Leonardo Da Vinci
Ontario, Canada
Joined: March 29, 2010
KitMaker: 1,151 posts
AeroScale: 985 posts
Posted: Wednesday, October 17, 2012 - 02:20 PM UTC
The interesting (but frustrating) thing is that the invasion stripes were painted on by hand, with ye old hog hair brushes. And depending on the bloke who did it. The stripes were pretty shabby.

Now I'm like you, I would be
compulsively driven to make perfect ones. Also it seems like making them look hand-painted would be an order of magnitudes more difficult than making them perfect. Don't think I could hack it....
SgtRam
 Editor-at-Large
#197
Ontario, Canada
Joined: March 06, 2011
KitMaker: 3,971 posts
AeroScale: 511 posts
Posted: Wednesday, October 17, 2012 - 11:22 PM UTC
Quoted Text
That's quite a nice tiffie : )
You may wish to correct a small paint issue before you hang the prop. The inside of the radiator housing at the nose was the same colour as the exterior camouflage rather than being interior green.
Will it have the 4 blade prop?
Jesse
thanks for the heads up in the rad intake. As for the prop, I am just using the kit provided 3-blade.
Kevin
Ontario, Canada
Joined: October 11, 2012
KitMaker: 141 posts
AeroScale: 139 posts
Posted: Thursday, October 18, 2012 - 01:04 AM UTC
That's looking great. Looking forward to seeing more. I am building the same kit and am documenting my progress on my blog
http://woodieswings.blogspot.ca/I am doing the 'sharkmouth' scheme using goodies from Avieology (decals), Ultracast (seat, 4 blade prop, wheels, exhausts and tempest tailplanes) and Aeries (gun bays).


Used Airscale decals on the panel.
"The music business is a cruel and shallow money trench,
a long plastic hallway where thieves run free,
and good men die like dogs. There's also a negative side."
Hunter S Thompson
Illinois, United States
Joined: October 14, 2012
KitMaker: 150 posts
AeroScale: 107 posts
Posted: Thursday, October 18, 2012 - 08:50 PM UTC
Quoted Text
The interesting (but frustrating) thing is that the invasion stripes were painted on by hand, with ye old hog hair brushes. And depending on the bloke who did it. The stripes were pretty shabby.

Now I'm like you, I would be compulsively driven to make perfect ones. Also it seems like making them look hand-painted would be an order of magnitudes more difficult than making them perfect. Don't think I could hack it....
An earlier use of black and white bands was on the Hawker Typhoon and early production Hawker Tempest Mark Vs. The aircraft had a similar profile to the Focke-Wulf Fw 190 and the bands were added to aid identification in combat. The order was promulgated on 5 December 1942. At first they were applied by unit ground crews, but they were soon being painted on at the factory. Four 12-inch-wide (300 mm) black stripes separated by three 24-inch (610 mm) white, underwing from the wingroots. From early 1943 the Typhoons also had a yellow, 18-inch-wide (460 mm) stripe on each of the upper wings, centred on the inner cannon. All of these markings were officially abandoned 7 February 1944.

Slightly different from the standard invasion stripes, and actually a pretty nice paint scheme for the Tif.
Holdfast
 President
#056
England - South West, United Kingdom
Joined: September 30, 2002
KitMaker: 8,581 posts
AeroScale: 4,913 posts
Posted: Saturday, October 20, 2012 - 08:17 PM UTC
Hi Kevin,
Very nice looking Tiffy

If you are going to fit this with rockets then this might be of interest?:
Storm Bringers 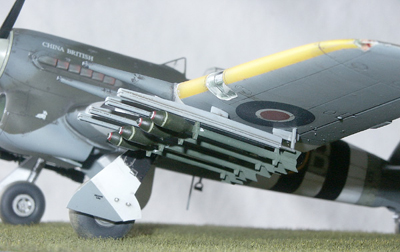
Just one small observation, there should be a Sky band around the tail, partially obscured by the rear invasion stripe

MAL the MASK
BULLDOG # 6 (President)
BEWARE OF THE FEW
Sappers: First in, last out. (UBIQUE)
It's not the same, better, but not the same.
SgtRam
 Editor-at-Large
#197
Ontario, Canada
Joined: March 06, 2011
KitMaker: 3,971 posts
AeroScale: 511 posts
Posted: Sunday, October 21, 2012 - 02:00 AM UTC
Quoted Text
Just one small observation, there should be a Sky band around the tail, partially obscured by the rear invasion stripe 
Yeah, I got lazy on this one, I know wish I would have attempted to paint in on, I did not like how the decal was going to fit. But shhh.....LOL.
Thanks for the rocket info, I did some research, and found most common used rockets were black, thus that is the color I went with.
Kevin
Holdfast
 President
#056
England - South West, United Kingdom
Joined: September 30, 2002
KitMaker: 8,581 posts
AeroScale: 4,913 posts
Posted: Monday, October 22, 2012 - 04:38 AM UTC
I'd be very interested to see that about black rockets, RAF ordnance was deep bronze green, I have never seen a reference to black rockets, or any RAF ordnance? Whatever the colour the fill bands would remain the same

MAL the MASK
BULLDOG # 6 (President)
BEWARE OF THE FEW
Sappers: First in, last out. (UBIQUE)
It's not the same, better, but not the same.
Ontario, Canada
Joined: October 11, 2012
KitMaker: 141 posts
AeroScale: 139 posts
Posted: Monday, October 22, 2012 - 06:51 AM UTC
I believe that Typhoons fitted with rockets also had the wing leading edge lights faired over. Something to bear in mind.
"The music business is a cruel and shallow money trench,
a long plastic hallway where thieves run free,
and good men die like dogs. There's also a negative side."
Hunter S Thompson
SgtRam
 Editor-at-Large
#197
Ontario, Canada
Joined: March 06, 2011
KitMaker: 3,971 posts
AeroScale: 511 posts
Posted: Monday, October 22, 2012 - 09:19 AM UTC
I found a schematic at one point and time, where is showed the HE version as black, but looking at pictures again, mostly black and white, and some colorized, they could of been dark bronze green.
As for the light, I missed that one when looking at pictures, but see it now. I also notice now that most did not have the yellow leading edge identification stripe either.
Thanks for the info, guess at some point I will have to build another for accuracy.
European Union
Joined: September 28, 2004
KitMaker: 2,186 posts
AeroScale: 1,587 posts
Posted: Monday, October 22, 2012 - 09:23 AM UTC
Quoted Text
The interesting (but frustrating) thing is that the invasion stripes were painted on by hand, with ye old hog hair brushes. And depending on the bloke who did it. The stripes were pretty shabby.

Now I'm like you, I would be compulsively driven to make perfect ones. Also it seems like making them look hand-painted would be an order of magnitudes more difficult than making them perfect. Don't think I could hack it....
My god! Imagine the criticism one would get presenting a model on a show with stripes like that


The mission: Beat the stash.
Almost conquered: MIG-29, Blackhawk, Skyray, Skyraider, fouga
Main battle:Demon, Skyhawk, F-14, CH-53
Stash reserve:Blackhawk, CH-46, 47 en 53; SU-7, Eurofighter, mohawk, hellcat, F-16D, 6x Fouga Magister, Voodoo
England - South East, United Kingdom
Joined: June 03, 2006
KitMaker: 397 posts
AeroScale: 384 posts
Posted: Monday, October 22, 2012 - 07:32 PM UTC
In all this talk of roughly-painted stripes, remember one thing - scale. If the painter deviates by a whopping 2" (that's 5cm,) in 1/48 scale that equates to 1mm; is it worth all of the effort?
Edgar
European Union
Joined: September 28, 2004
KitMaker: 2,186 posts
AeroScale: 1,587 posts
Posted: Tuesday, October 23, 2012 - 12:10 AM UTC
Quoted Text
In all this talk of roughly-painted stripes, remember one thing - scale. If the painter deviates by a whopping 2" (that's 5cm,) in 1/48 scale that equates to 1mm; is it worth all of the effort?
Edgar
Which brings us back to weathering and rivetting

The "rivets" many modellers put on their 1/48 (or smaller) scale models would be 24 mm thick bolts in real life

The mission: Beat the stash.
Almost conquered: MIG-29, Blackhawk, Skyray, Skyraider, fouga
Main battle:Demon, Skyhawk, F-14, CH-53
Stash reserve:Blackhawk, CH-46, 47 en 53; SU-7, Eurofighter, mohawk, hellcat, F-16D, 6x Fouga Magister, Voodoo
SgtRam
 Editor-at-Large
#197
Ontario, Canada
Joined: March 06, 2011
KitMaker: 3,971 posts
AeroScale: 511 posts
Posted: Tuesday, October 23, 2012 - 01:29 AM UTC
Quoted Text
Quoted Text
In all this talk of roughly-painted stripes, remember one thing - scale. If the painter deviates by a whopping 2" (that's 5cm,) in 1/48 scale that equates to 1mm; is it worth all of the effort?
Edgar
Which brings us back to weathering and rivetting 
The "rivets" many modellers put on their 1/48 (or smaller) scale models would be 24 mm thick bolts in real life 
Very true, but I have found in modeling some things need to be exateratied for effect. ie Panel Lines.
England - East Midlands, United Kingdom
Joined: June 03, 2006
KitMaker: 574 posts
AeroScale: 573 posts
Posted: Tuesday, October 23, 2012 - 06:13 AM UTC
exateratied? Do you mean exaggerated?
SgtRam
 Editor-at-Large
#197
Ontario, Canada
Joined: March 06, 2011
KitMaker: 3,971 posts
AeroScale: 511 posts
Posted: Tuesday, October 23, 2012 - 07:49 AM UTC
I was at work, and my mind sometimes does not work well there......oopsss

England - South East, United Kingdom
Joined: June 03, 2006
KitMaker: 397 posts
AeroScale: 384 posts
Posted: Tuesday, October 23, 2012 - 05:58 PM UTC
Quoted Text
I found a schematic at one point and time, where is showed the HE version as black, but looking at pictures again, mostly black and white, and some colorized, they could of been dark bronze green.
As for the light, I missed that one when looking at pictures, but see it now. I also notice now that most did not have the yellow leading edge identification stripe either.
In 1970, an IPMS, and former Typhoon Squadron, member sent details of his Squadron, plus a photo, for the Society magazine. He said that they retained their l/e yellow bands, and their rockets, including the warheads, were black; he also said that his Squadron (198) painted the rear of their rocket fins white, so that they showed up better on cine film.
Several years ago, I was shown round the RAF Museum's (then) storage facility at Cardington, where I found a rocket warhead, which was bronze green. From this it would seem possible that either green or black could be correct; with so many being made, probably by different factories, and the heads not being screwed onto the bodies until required, who can tell for sure?
Edgar
Holdfast
 President
#056
England - South West, United Kingdom
Joined: September 30, 2002
KitMaker: 8,581 posts
AeroScale: 4,913 posts
Posted: Tuesday, October 23, 2012 - 06:15 PM UTC
The Americans used yellow fill bands but the British used pale green, with red and white denoting semi armour piercing (red, white, red armour piercing), the stenciling was black, so I think that black bodies would be highly unlikely, unless the warhead was re-painted at Squadron level, then why would they bother to add a yellow band? Fill bands are a standard so all factories would have painted them the same, otherwise there would have been great confusion.
The colour of RAF ordnance was changed sometime just before the start of the war but earlier painted bombs, in yellow (and I think with red fill bands), were seen until those stocks ran out.
MAL the MASK
BULLDOG # 6 (President)
BEWARE OF THE FEW
Sappers: First in, last out. (UBIQUE)
It's not the same, better, but not the same.
SgtRam
 Editor-at-Large
#197
Ontario, Canada
Joined: March 06, 2011
KitMaker: 3,971 posts
AeroScale: 511 posts
Posted: Sunday, November 11, 2012 - 03:09 AM UTC


