_GOTOBOTTOM
Cold War (1950-1974)
Discuss the aircraft modeling subjects during the Cold War period.
Hosted by Tim Hatton
Airfix English Electric Canberra PR9
spaarndammer
_VISITCOMMUNITY
Noord-Holland, Netherlands
Joined: January 28, 2007
KitMaker: 1,945 posts
AeroScale: 388 posts
Posted: Thursday, February 14, 2013 - 09:30 AM UTC
Hi Jessie,

Thank you for your suggestion.

Yesterday I applied an extra coat of Humbrol Gloss Varnish and the surface feels already a bit smoother.

On Benelux.kitmaker.net someone suggested to wet sand with 2000 grit and I will do this as a final touch to smooth everything out. I maybe will apply again an extra coat of Humbrol gloss after sanding, just to be sure.

The Canberra starts to become a real 'to-learn-a-lot-project', will a lot of 'firsts'.


Jelger
phantom_phanatic309
#372
_VISITCOMMUNITY
United Kingdom
Joined: March 10, 2010
KitMaker: 2,568 posts
AeroScale: 1,619 posts
Posted: Thursday, February 14, 2013 - 10:18 AM UTC
I'm sure it will turn out ok.
The chaff pods arrived safe and sound this morning, so I'll be using those on my Canberra build soon. Thanks again.
spaarndammer
_VISITCOMMUNITY
Noord-Holland, Netherlands
Joined: January 28, 2007
KitMaker: 1,945 posts
AeroScale: 388 posts
Posted: Friday, February 22, 2013 - 11:49 PM UTC

Quoted Text

Hi Jessie,

Thank you for your suggestion.

Yesterday I applied an extra coat of Humbrol Gloss Varnish and the surface feels already a bit smoother.

On Benelux.kitmaker.net someone suggested to wet sand with 2000 grit and I will do this as a final touch to smooth everything out. I maybe will apply again an extra coat of Humbrol gloss after sanding, just to be sure.

The Canberra starts to become a real 'to-learn-a-lot-project', will a lot of 'firsts'.


Jelger


An update without pictures, indeed no major progress....

I have carefully wet sanded the surfaces and again applied a coat of Humbrol Gloss varnish. The surface is much smoother now and should be oke for the decals.

But then the next challenge presents it self. I have to apply big roundels on the upper surfaces of the wings, exactly on top of a row small protruding vortex generators. The decals seem to be a bit thick and thus applying these roundels can be a (set and sol) nightmare and it probably won't contribute to a nice finish of the model.

Now it happened that I saw on Britmodeller a build of a very nice Avro Lancaster and the builder painted the roundels using masks. Painting the roundels (with the use of masks) can be the solution for avoiding troubles with those vortex generators and after browsing the internet I found suitable masks from a company called Ad Astra Masks. I have ordered the set Tactical Roundels & Fin Flashes (High Viz Red/Blue & Low Viz Pink/Light Blue), which will contain the correct sizes.

I will keep you updated when I start spraying my roundels! So the mailman will be the bottleneck for progress


Jelger
spaarndammer
_VISITCOMMUNITY
Noord-Holland, Netherlands
Joined: January 28, 2007
KitMaker: 1,945 posts
AeroScale: 388 posts
Posted: Monday, March 25, 2013 - 09:16 AM UTC

Quoted Text


I will keep you updated when I start spraying my roundels! So the mailman will be the bottleneck for progress


Well, being a bottleneck was a bit understatement as until today the masks never arrived (I must admit that I never bothered myself to ask the company whether they have sent the masks anyway). As my GPU was almost finished and to keep some pace in this build, I decided to go for the decals.

The decals were horrible....

Their thickness is amazing, thick like pancakes. A lot of silvering with almost all decals, despite a nice gloss cote. Set and Sol hardly were able to improve anything.

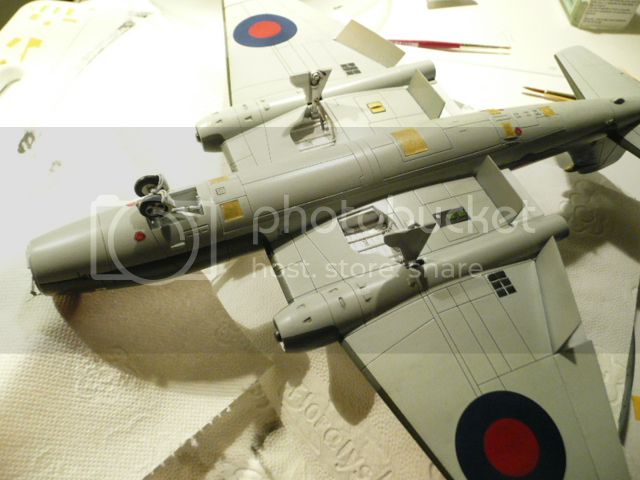
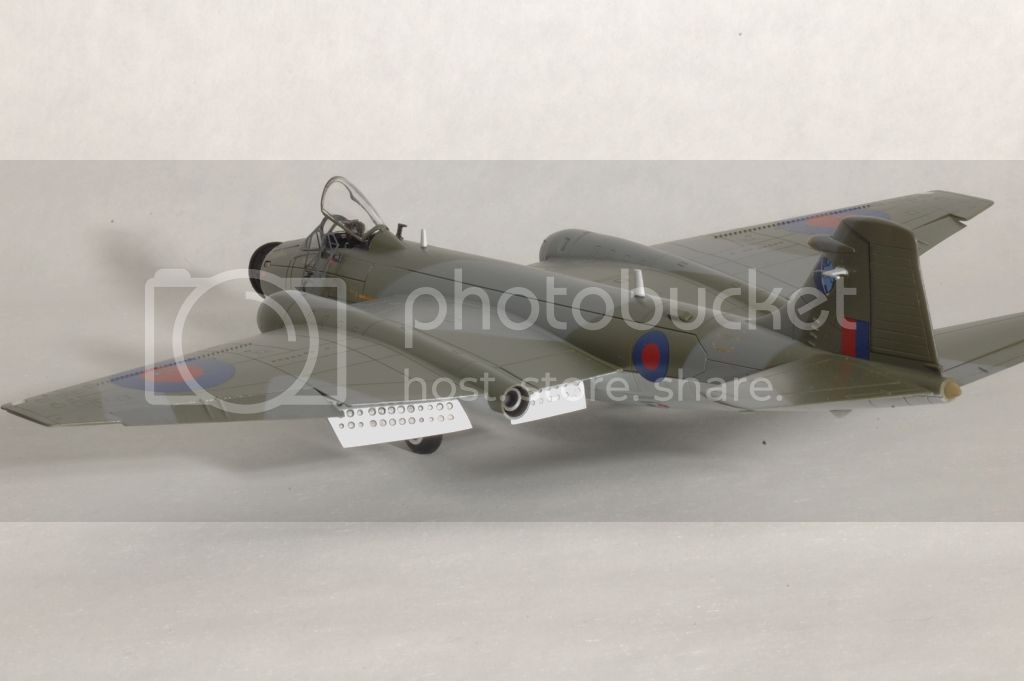
The first decals to be applied were the big roundles on top of the vortex generators. A lot of Sol was applied to cover a the little bumps in a decent way. This was as best I could get them on:


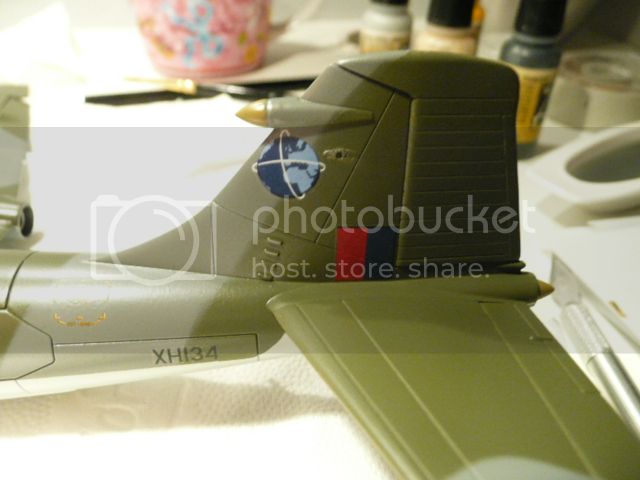
On this picture, the small antennas still have to be put back again.

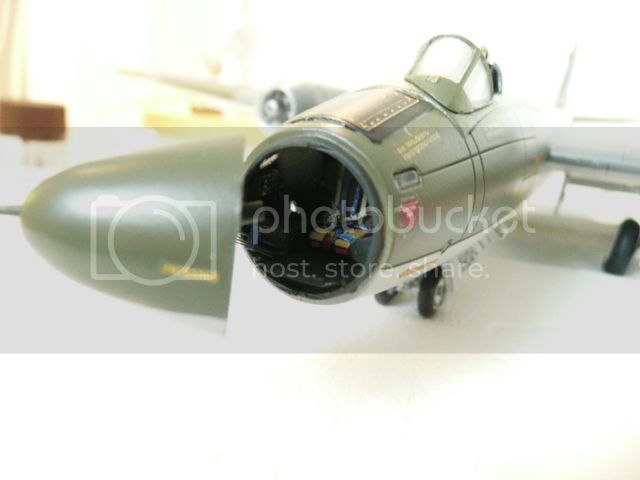
From experience I knew that covering decals with a cote of varnish (in this case satin varnish) silvering will be a bit reduced and luckily this happened.

I spray varnish from the can and unfortunately, I was a bit enthusiastic and sprayed too fast too much varnish on the model. As a result, a bit of varnish build up on the rear parts of the wing, resulting in some ugly spots. Maybe with a bit of ultrafine sanding and adding a new cote of varnish, I can reduce these spots. Suggestions are very welcome for this. (This build takes too long, I get impatient and errors build up.....)

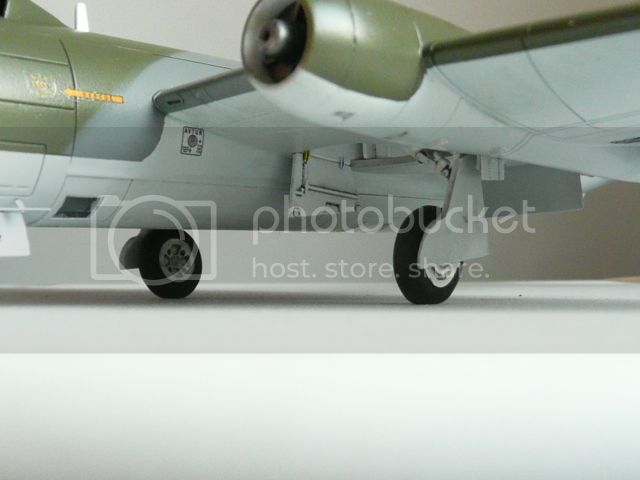
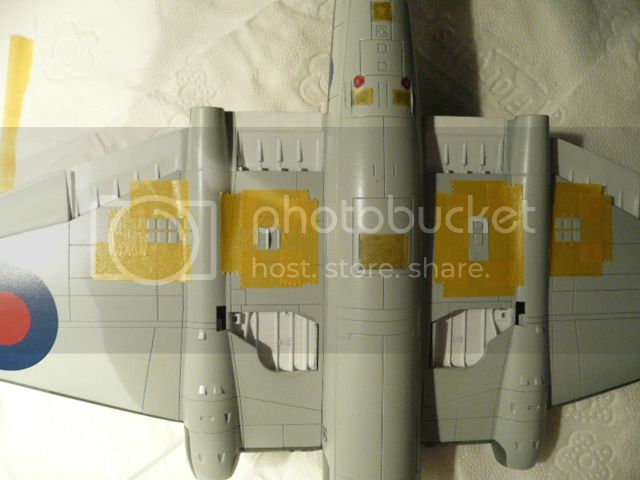
With the main steps of the build process being done, it is time for the finishing touches. After decalling (except for this one), this is one of the nicest things to do. It really makes the model alive. First thing to do were the radio panels on the bottom part of the wing.

A bit of masking:


Then brush painting:
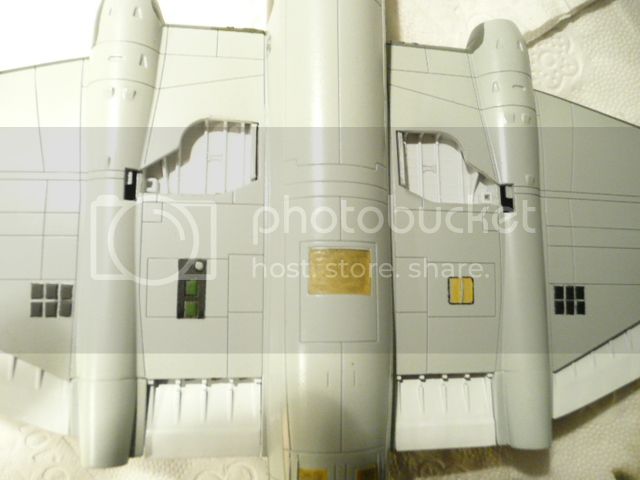

To be continued!


Jelger
Jessie_C
_VISITCOMMUNITY
British Columbia, Canada
Joined: September 03, 2009
KitMaker: 6,965 posts
AeroScale: 6,247 posts
Posted: Monday, March 25, 2013 - 09:25 AM UTC
Have you tried the boiling water trick on those roundels?
phantom_phanatic309
#372
_VISITCOMMUNITY
United Kingdom
Joined: March 10, 2010
KitMaker: 2,568 posts
AeroScale: 1,619 posts
Posted: Monday, March 25, 2013 - 09:54 AM UTC
Looks like Airfix have a lot to answer for those decals. A lot of them also look misaligned. And the dark ring around the edge of the roundel? That's unacceptable these days Airfix!
Jelger, that's no criticism of your build. I'm feeling for you buddy, to come so far and then be let down. I'm sure it will all come together in the end though.
I would try cutting a little slit around the vortex generators and ten trying hot water, micro-sol, and even prayer to see if they'll settle down around them. It'll probably need a little touching up afterwards. Some light sanding is about the only thing I can think of to remove the spots of varnish.

Best of luck
raypalmer
_VISITCOMMUNITY
Ontario, Canada
Joined: March 29, 2010
KitMaker: 1,151 posts
AeroScale: 985 posts
Posted: Monday, March 25, 2013 - 11:44 AM UTC
Oh I remember those type of decals... it's why I never bought 90's airfix. For them to be putting those in new boxings is disgraceful. Just when you thought they'd turned it around eh.

I'd write a letter to the sods with that photo and inquire as to what it is they think they're doing? Somedays I'm really impressed by airfix and others I just wish Eduard would continue to eat their lunch.
magnusf
_VISITCOMMUNITY
Stockholm, Sweden
Joined: May 02, 2006
KitMaker: 1,953 posts
AeroScale: 1,902 posts
Posted: Tuesday, March 26, 2013 - 07:56 AM UTC
Not much luck in this build Jelger! I feel for you! It does look good though in the photos and your'e getting close to finishing it!


Magnus
spaarndammer
_VISITCOMMUNITY
Noord-Holland, Netherlands
Joined: January 28, 2007
KitMaker: 1,945 posts
AeroScale: 388 posts
Posted: Tuesday, March 26, 2013 - 07:58 AM UTC
Thank you all for your feedback.

@ Jessica: I never heard about the boiling water trick. Can you tell a bit more about this?

As Stephan noticed, the decals are often misaligned as well, showing a white background color next to the original color. And indeed an ugly dark blue rim around the roundel. In other words, these decals are terrible. Airfix really made a mistake with this. The kit is not expensive, which is great, but I suspect that most people are willing to pay a bit extra to have good quality decals as this has a big impact on the finish of the model.

With these bad decals in mind, I am a bit worried about the decals of the RAF Benevolent Fund Hawk (from Airfix as well). I bought this kit, as I like the Union Jack tail and heart shaped roundel on the belly very much and the final look of this model heavily depends on the decals supplied. Well we will see.

It seems that Airfix now also supplies Cartograf decals, which is great if true.


Jelger
Jessie_C
_VISITCOMMUNITY
British Columbia, Canada
Joined: September 03, 2009
KitMaker: 6,965 posts
AeroScale: 6,247 posts
Posted: Tuesday, March 26, 2013 - 08:40 AM UTC
It's a really simple trick. I wonder why so many people haven't tried it. Boil some water in a pot or kettle, and then pour it into a cup. Dip a soft cloth or sponge into the just-boiled water and press it straight down onto the decal (make sure to protect your fingers from the heat). Don't apply any twisting or sideways force, just press straight on for about 20 - 30 seconds.

Before the boiling water

After the boiling water


You'll likely still need to do some touching up, but far less than if you'd just scraped the decal away from all those vortex generators. You may wish to pierce holes in the decal material between the generators to allow the trapped air to escape.
phantom_phanatic309
#372
_VISITCOMMUNITY
United Kingdom
Joined: March 10, 2010
KitMaker: 2,568 posts
AeroScale: 1,619 posts
Posted: Tuesday, March 26, 2013 - 11:34 AM UTC

Quoted Text

Thank you all for your feedback.

@ Jessica: I never heard about the boiling water trick. Can you tell a bit more about this?

As Stephan noticed, the decals are often misaligned as well, showing a white background color next to the original color. And indeed an ugly dark blue rim around the roundel. In other words, these decals are terrible. Airfix really made a mistake with this. The kit is not expensive, which is great, but I suspect that most people are willing to pay a bit extra to have good quality decals as this has a big impact on the finish of the model.

With these bad decals in mind, I am a bit worried about the decals of the RAF Benevolent Fund Hawk (from Airfix as well). I bought this kit, as I like the Union Jack tail and heart shaped roundel on the belly very much and the final look of this model heavily depends on the decals supplied. Well we will see.

It seems that Airfix now also supplies Cartograf decals, which is great if true.


Jelger


What worries me (and my bank account) is that I've got all four of the 1/48's and the decals look as crap as these after just giving them a look. So do those in my Nimrod. Not cheap I think.
I think Airfix have learned since releasing these. The new sheets by cartograf are amazing. I think they do advertise that those sheets are included in certain kits, so if that Hawk has them (and it is a fantastic looking model!) grab it!
spaarndammer
_VISITCOMMUNITY
Noord-Holland, Netherlands
Joined: January 28, 2007
KitMaker: 1,945 posts
AeroScale: 388 posts
Posted: Thursday, April 04, 2013 - 08:51 AM UTC
Hi all,

Although I appreciate your suggestions about improving the decals very much, I decided to continue with this build without applying them, as this build is already troublesome enough and I just have to live with it. But I keep them in mind for later builds.

I have a applied a wash for the bottom of the plane to suggest streaks from dirty air. This was kept to a minimum as most pictures of Canberras suggested that these birds were well maintained. The dirt wash was black with a little grey.

I also applied as wash for the landing gear, wheels and flaps. In addition to black and grey also a wash with brown was applied.


No wash was applied for the panellines as the panellines are already quite distinct and there is no need to emphasize this more.

After the washes it is time to glue the landing gear and flaps to the plane. I use superglue for this as this will result in a much stronger bond when compared with Tamiya glue.


The model is really getting alive now.

The next step is to add the nose cone and do some work on the canopy. After more than 1 year, this build is finally coming to an end. Perseverance ruled again!


Jelger
magnusf
_VISITCOMMUNITY
Stockholm, Sweden
Joined: May 02, 2006
KitMaker: 1,953 posts
AeroScale: 1,902 posts
Posted: Thursday, April 04, 2013 - 09:02 AM UTC
Well done Jelger!


Magnus
spaarndammer
_VISITCOMMUNITY
Noord-Holland, Netherlands
Joined: January 28, 2007
KitMaker: 1,945 posts
AeroScale: 388 posts
Posted: Sunday, April 07, 2013 - 05:25 AM UTC
Thank you Magnus!

This weekend I have made quite some progress and added quite a lot of stuff.

First of all were the wheels of the main undercarriage installed as well as the doors of the wheel wells. The wheels were attached by super glue to make a strong bond. I took care that the wheels were carefully aligned, but this morning I still found one of the wheels a bit misaligned. Also, in real life, the struts more and less protrude straight to the ground, whereas my struts have a bit of an angle. I took care that fit of struts in the wheel bays was good so I suspect that Airfix kit has the angle incorrect. Well, for future builds I know that I should take more care of such things.

Next was to finish the nose cone and install it on the plane. The whole nose cone is only attached to the main hull by a piece of PE of 2mm by 1mm. To help to attach the nose cone to the hull, I made some sort of a support for the nose cone to keep it in place while the glue was drying. After 45mins drying the result is that the nose cone happily hangs to the hull .

Finally, the bang seat of the pilot was put in place.


The finish is getting closer and closer. Small things have to be done on the plane, like the rearview mirror, the antennas on the tail. Also the FOD covers and the ladder have to be made from a Flightpath PE set.


Jelger
raypalmer
_VISITCOMMUNITY
Ontario, Canada
Joined: March 29, 2010
KitMaker: 1,151 posts
AeroScale: 985 posts
Posted: Sunday, April 07, 2013 - 12:43 PM UTC
I dunno guys. I think we might have a model of the month here.
magnusf
_VISITCOMMUNITY
Stockholm, Sweden
Joined: May 02, 2006
KitMaker: 1,953 posts
AeroScale: 1,902 posts
Posted: Tuesday, April 16, 2013 - 06:42 AM UTC
Hang in there! Done yet ?


Magnus
phantom_phanatic309
#372
_VISITCOMMUNITY
United Kingdom
Joined: March 10, 2010
KitMaker: 2,568 posts
AeroScale: 1,619 posts
Posted: Tuesday, April 16, 2013 - 08:14 AM UTC
Looking good. You must have the patience of a saint to attach that nose section.
spaarndammer
_VISITCOMMUNITY
Noord-Holland, Netherlands
Joined: January 28, 2007
KitMaker: 1,945 posts
AeroScale: 388 posts
Posted: Tuesday, April 16, 2013 - 11:04 PM UTC
Thanks for the nice remarks. To be honest, the photo's hardly show any mishaps (which is not on purpose), so what is shown doesn't always do justice to the complete finish.

But the nose cone is something that I am a bit proud of (with all modesty), as it took quite some effort, which was worth every minute. Nevertheless, also with this, things could have done a better (e.g. by applying washes, to emphasize things even more and also by less brush painting). But I keep that in mind for future builds.

The attachment of the nose cone went much easier than I expected, due to a kind of jig I made to rest the cone on when glue was drying. I am now busy with a support rod and cable bundle, which will complete the front part of the model. For these parts I have to do some dryfitting and everytime, I accidentally touch the nose cone, my nerves are cracking!

I will post an update soon, but with a lot cycling in the weekend (both practicing and watching on tv), time for building is sparse.


Jelger

By the way, Magnus, I have my Airfix T.11! The kit just looks great!
spaarndammer
_VISITCOMMUNITY
Noord-Holland, Netherlands
Joined: January 28, 2007
KitMaker: 1,945 posts
AeroScale: 388 posts
Posted: Saturday, September 14, 2013 - 10:42 PM UTC

Quoted Text

I dunno guys. I think we might have a model of the month here.


Well, not a Model of the Month (August entry), but that doesn't matter given the beautiful models entered. With the MoM August competition now over, it is time to show the photo's of my finished build. FOD covers and crew stairs are from Flightpath.


Jelger
Keeperofsouls2099
_VISITCOMMUNITY
Florida, United States
Joined: January 14, 2009
KitMaker: 2,798 posts
AeroScale: 2,443 posts
Posted: Sunday, September 15, 2013 - 11:19 AM UTC
Great job sir well put together!
Lucky13
_VISITCOMMUNITY
Scotland, United Kingdom
Joined: June 01, 2006
KitMaker: 1,707 posts
AeroScale: 1,119 posts
Posted: Sunday, September 15, 2013 - 01:35 PM UTC
Nice one mate!
magnusf
_VISITCOMMUNITY
Stockholm, Sweden
Joined: May 02, 2006
KitMaker: 1,953 posts
AeroScale: 1,902 posts
Posted: Monday, September 16, 2013 - 07:17 AM UTC
After all the trouble you've been through with this one it really turned out well! And the crew stairs and FOD-guards really adds interest!

Too bad we live so far away from each other otherwise we could have arranged for a PR-Canberra photo date !


Magnus
Jessie_C
_VISITCOMMUNITY
British Columbia, Canada
Joined: September 03, 2009
KitMaker: 6,965 posts
AeroScale: 6,247 posts
Posted: Monday, September 16, 2013 - 12:54 PM UTC
Kind of a pity that I've got a half-build Matchbox kit in the endless WIP pile. This one renders it redundant
chris1
_VISITCOMMUNITY
Auckland, New Zealand
Joined: October 25, 2005
KitMaker: 949 posts
AeroScale: 493 posts
Posted: Monday, September 16, 2013 - 04:56 PM UTC
Jelger
I've really enjoyed following your build,it's been very informative and also inspiring.

I'm considering getting a Canberra myself,however my local retailers only have the PR9 version and I'd like to build B(I)8 as we (RNZAF) operated them in Vietnam.

Does the PR9 include the non used parts for the B(I)8?


Thanks in advance
regards

Chris
spaarndammer
_VISITCOMMUNITY
Noord-Holland, Netherlands
Joined: January 28, 2007
KitMaker: 1,945 posts
AeroScale: 388 posts
Posted: Tuesday, September 17, 2013 - 02:03 AM UTC
Thank you all so much for your compliments. I appreciate this very much.

@ Jessica: I can recommend this kit, but fill those panel lines and use other decals .

@ Chris: I only know that the cockpit and navigator / bomber position in this kit are for the B(I)8, see the first page of this topic. For a PR9 with navigator position visible, I had to make some modifications to it.


Jelger
 _GOTOTOP