_GOTOBOTTOM
Early Aviation
Discuss World War I and the early years of aviation thru 1934.
KotS III GB Phönix D.I
phantom_phanatic309
#372
_VISITCOMMUNITY
United Kingdom
Joined: March 10, 2010
KitMaker: 2,568 posts
AeroScale: 1,619 posts
Posted: Monday, March 04, 2013 - 10:19 AM UTC
I'll be jumping in with Pegasus's 1/72 Phönix D1.
I did give some thought to doing Roden's F2b, but I've seen those done and this is something of a rarity. Thought everyone might enjoy something a little different.

Gratuitous sprue shot,

Quite a nicely made kit. I think it must have been one of Pegasus's later kits as is neatly moulded with little flash, something I can't say for their Spad I have in my stash.
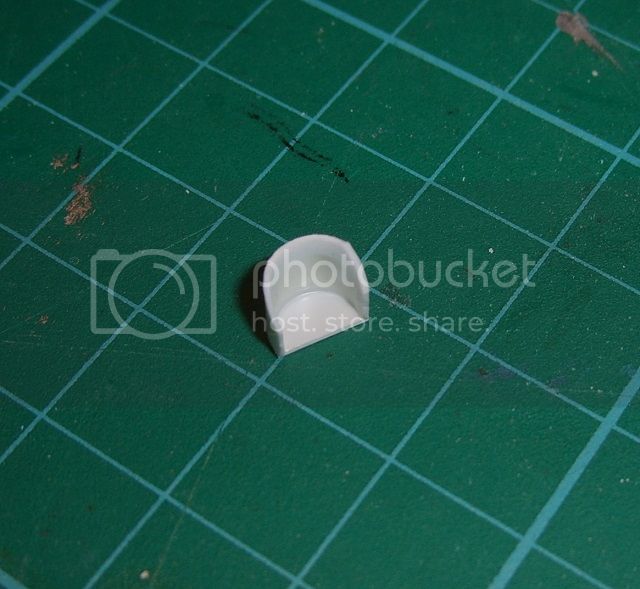
Some nicely detailed little cast metal parts are provided for the seat, cabane struts, landing gear and importantly the engine and radiator. These look to have everything but I'll make that little bit of extra detailing the campaign calls for. First step will be to research that. As usual it includes strut material to make up the main struts (templates are provided) and some rod to make up the water pipes etc..

As for markings, I plan to finish it as one of Frank Linke-Crawfords aircraft as seen in this full page artwork in Osprey's Aircaft of the Aces special. I'm lucky enough to have the emblem on a sheet produced by Formadecal.


Should be a fun little build.
Gremlin56
Joined: October 30, 2005
KitMaker: 3,897 posts
AeroScale: 564 posts
Posted: Monday, March 04, 2013 - 06:43 PM UTC
It's a very interesting choice of subject, I can't remember ever having heard of this aircraft before Nice looking machine though.
Cheers,
Julian
Kornbeef
_VISITCOMMUNITY
England - South East, United Kingdom
Joined: November 06, 2005
KitMaker: 1,667 posts
AeroScale: 1,551 posts
Posted: Monday, March 04, 2013 - 07:56 PM UTC
What an interesting subject. I look forward to following this. One of the designs overshadowed by the fame and reputation of the Fokker DVII no doubt.

On the strut material I think I'd go brass, maybe flattened tube with a pin support. But honestly I'd never attempt 1/72 its beyond my abilities these days and I admire those that can work at such a scale.

Keith
OEFFAG_153
_VISITCOMMUNITY
Västra Götaland, Sweden
Joined: February 19, 2010
KitMaker: 1,473 posts
AeroScale: 1,450 posts
Posted: Monday, March 04, 2013 - 08:02 PM UTC
NIce choice, I'd really like to see more Austro-Hungarian subjects!

Looking forward to your build.

Mikael
phantom_phanatic309
#372
_VISITCOMMUNITY
United Kingdom
Joined: March 10, 2010
KitMaker: 2,568 posts
AeroScale: 1,619 posts
Posted: Tuesday, March 05, 2013 - 05:03 AM UTC
Thanks guys. I'll do my best with it although I'm still on a learning curve with bipes.
Keith, thanks for the suggestion of brass. Whats in the kit is very short so won't leave much room for error and is a little flimsy anyway. I do have a pack of Aeroclub's plastic strut which includes some of about the right size but more sturdy. I'll see how I get on with that first and if that doesn't work, brass is plan B.

I've only had time for a brief google search last night. A few interesting pics and facts and figures but its not as well known as other types. It seems to have been one of the better Austro-Hungarian designs. It was a little tricky to handle but not as bad as the Camel. Its guns were fully enclosed in the fuselage, something I haven't seen on other types (although I think their licence built Albatross's had them partly covered). This should have reduced drag but the rather large radiator and engine would have cancelled that out! It still managed a respectable 112mph, comparable to the allied types it would have encountered.
phantom_phanatic309
#372
_VISITCOMMUNITY
United Kingdom
Joined: March 10, 2010
KitMaker: 2,568 posts
AeroScale: 1,619 posts
Posted: Tuesday, March 12, 2013 - 09:34 AM UTC
Unfortunately web searches have turned up little in the way of useful references. I suppose that's what I get for choosing something that wasn't built by Sopwith or Fokker There are a few photos of the Hiero 6-cyl engine preserved in museums, but most seem to be incomplete.
This page has some photo's of the improved D111 and seems about the most complete. Untill I find anything else, most of the details will be based on this example.
http://www.wwi-models.org/Photos/AH/Pho_DIII/index.html

First job has been to clean up the fuselage and cockpit parts. The openings for the cockpit and engine needed a lot of trimming and filing but the plastic is soft and easy to work with. Best advice I can give anyone working on a Pegasus kit is to test fit everything as you go.
The cast metal engine just needed the bottom filed flat and a quick sand over the cylinders and radiator piping to clean up. Nothing major there. I used epoxy to fix it to the floor making sure it was lined up properly and square. The kit does come with a very nice cast wicker chair for the pilot, but I wasn't sure if the Phonix had this and guessed that it would probably have had an aluminium seat similar to German built aircraft. The preserved example in the link seems to be missing its seat, as I don't for a second believe the pilot had just a plank to sit on! I made up a new seat from plastic tube and card cut and sanded to shape. Looks quite good I think. The wicker chair will go into my spares and will probably find a home in the Airfix RE8.


Next up I added some plastic strip to the fuselage interior. Still needs a little more detail adding so a good excuse to empty out the spares box.


Comments welcome.
eseperic
_VISITCOMMUNITY
Croatia Hrvatska
Joined: November 06, 2009
KitMaker: 624 posts
AeroScale: 609 posts
Posted: Tuesday, March 12, 2013 - 10:27 AM UTC
Hi Stephen,

Very nice choice of subject! If I ever finish my Albatros, I intend to make the younger brother of Phonix - Hansa Brandenburg D.I

However, you are progressing nicely! It's a small airplane, isn't it?

All the best,
Entoni
phantom_phanatic309
#372
_VISITCOMMUNITY
United Kingdom
Joined: March 10, 2010
KitMaker: 2,568 posts
AeroScale: 1,619 posts
Posted: Tuesday, March 12, 2013 - 10:51 AM UTC
Hi Entoni,
It is a tiny model and will just be under 9cm long when complete, and the front end is all engine!
I imagine he Hansa-Brandenburg D1 would be a challenging build with its odd strut arrangement. Who makes the kit then?
eseperic
_VISITCOMMUNITY
Croatia Hrvatska
Joined: November 06, 2009
KitMaker: 624 posts
AeroScale: 609 posts
Posted: Tuesday, March 12, 2013 - 10:59 AM UTC

Quoted Text

I imagine the Hansa-Brandenburg D1 would be a challenging build with its odd strut arrangement. Who makes the kit then?


It might be challenging due to different reason, i.e. it's the old sierra models vac kit in 1/48. The star-strutter arrangement could be tricky as well, but there will be no rigging (look on the bright side)

All the best,
Entoni
phantom_phanatic309
#372
_VISITCOMMUNITY
United Kingdom
Joined: March 10, 2010
KitMaker: 2,568 posts
AeroScale: 1,619 posts
Posted: Tuesday, March 12, 2013 - 12:03 PM UTC
Yikes! Being a larger scale should make it a little easier and no rigging is a blessing. Rigging is something I need to have a go at one day. I'll keep my eyes open for that build if you put it on here. It'll make a great model being one of the more unusual designs.
I've got a couple of vacs I'm eager to have a crack at in the stash, an A-3 Skywarrior and Convair Pogo. I might start one sometime over the next few months if I don't have anything else going on.
Ste
JackFlash
_VISITCOMMUNITY
Colorado, United States
Joined: January 25, 2004
KitMaker: 11,669 posts
AeroScale: 11,011 posts
Posted: Tuesday, March 12, 2013 - 01:16 PM UTC


I know that in the distant past this was thought to be Linke-Crawford's bird but I am pretty sure that was cleared up. The backwards "C" is actually a "J". A photo of Linke-Crawford was taken in profile and this aircraft was in the background. Let me do some digging. . .Oh, and the band was probably black and white not red & white.
phantom_phanatic309
#372
_VISITCOMMUNITY
United Kingdom
Joined: March 10, 2010
KitMaker: 2,568 posts
AeroScale: 1,619 posts
Posted: Wednesday, March 13, 2013 - 04:29 AM UTC
Cool, any help is appreciated.
I did wonder about it for a while as Crawford's Albatross's (or is that Albatri?) had a black eagle marking. Seemed an odd change. If its not his no matter I'll still go with it.
phantom_phanatic309
#372
_VISITCOMMUNITY
United Kingdom
Joined: March 10, 2010
KitMaker: 2,568 posts
AeroScale: 1,619 posts
Posted: Thursday, March 21, 2013 - 09:00 AM UTC
Engines painted up with Humbrol metalics. Looks a little bright at the moment and will definitely benefit from a black oil wash to grime it up a bit. The engine has pretty much everything moulded on and I'm not sure if there's anything else that does need adding, or will even be seen. Advice is appreciated.


Ste
phantom_phanatic309
#372
_VISITCOMMUNITY
United Kingdom
Joined: March 10, 2010
KitMaker: 2,568 posts
AeroScale: 1,619 posts
Posted: Tuesday, March 26, 2013 - 12:38 PM UTC
A little more research and getting hold of a copy of Ospreys Austro-Hungarian Aces has shed some light on the colour scheme.
Heres Crawford in his D1.

As JackFlash said, L coded and with a black band. Not that I ever doubted that little nugget of information anyway. It also looks like the engine cowling was left in unpainted aluminium.
And, here he is again with a D1 of an Oberleutnant Jansky in the background. I believe this was the photo that JackFlash referred to.

Its not as clear as the other photo, and it is hard to interpret colour on old BW images, but it does look like the band might have been a lighter colour? Or it might just be a trick of the light?
Regardless of whose aircraft this was, its still an attractive scheme and those decals won't use themselves

Thinking about the colour scheme, how was the mottle camouflage applied? Was it painted directly over the unpainted fuselage and wings? Or was lighter shade of brown or even green applied first? The profiles in the Osprey book are next to useless. They show dark olive aircraft but refer to mottle finishes in the text.

A lucky find in my spares box has been a complete set of struts which are exactly the right size as those in the kits plans. If they don't work out theirs always a plan-B.

Ste
JackFlash
_VISITCOMMUNITY
Colorado, United States
Joined: January 25, 2004
KitMaker: 11,669 posts
AeroScale: 11,011 posts
Posted: Tuesday, March 26, 2013 - 12:50 PM UTC
Excellent research thus far! Typically the paint loaded sponge - rag - brush finish was applied directly over the factory finish.
phantom_phanatic309
#372
_VISITCOMMUNITY
United Kingdom
Joined: March 10, 2010
KitMaker: 2,568 posts
AeroScale: 1,619 posts
Posted: Wednesday, March 27, 2013 - 10:56 AM UTC
Cheers. I suppose being field applied it would make sense to do that than to go the trouble of a complete repaint.
Did a little more work tonight. Mostly a little detail painting and cleaning up the wings and tailplanes. Barely worth photographing.
phantom_phanatic309
#372
_VISITCOMMUNITY
United Kingdom
Joined: March 10, 2010
KitMaker: 2,568 posts
AeroScale: 1,619 posts
Posted: Tuesday, April 02, 2013 - 06:09 AM UTC
Quick update for today.
A black wash on the engine has brought out some of the finer details and gave it a nice used look.


I gave the cockpit interior a streak of dark brown oil paint for a wood effect. Could have been better but it gives the effect I wanted. I also added an etched throttle and a primer pump made from plastic rod.


And lastly after being pinned to the window since before christmas, the kits once badly yellowed decals now look usable. For the time being I'll just be using the cockpit instruments and the Phonix manufacturers logo.

I do like the naval scheme that's provided with the kit and if this one turns out ok, I plan on getting another to do it.
Suggestions and comments welcome.
Ste
Mgunns
_VISITCOMMUNITY
Arizona, United States
Joined: December 12, 2008
KitMaker: 1,423 posts
AeroScale: 1,319 posts
Posted: Monday, April 08, 2013 - 07:05 AM UTC
Hello Stephen:

A very Esoteric project. Your reference photo's add a nice touch. I would go with the Red and white. It adds a little color, and who is to say it isn't correct: except someone who was there.
It always amazes me to see what folks can do in 1/72nd and your model is no exception. Looking forward to more.

Best

Mark
phantom_phanatic309
#372
_VISITCOMMUNITY
United Kingdom
Joined: March 10, 2010
KitMaker: 2,568 posts
AeroScale: 1,619 posts
Posted: Wednesday, April 10, 2013 - 03:49 AM UTC
Thanks Mark, I was thinking about going for the red. Its been a fun build so far. That may change when it comes to tackling those struts!
phantom_phanatic309
#372
_VISITCOMMUNITY
United Kingdom
Joined: March 10, 2010
KitMaker: 2,568 posts
AeroScale: 1,619 posts
Posted: Tuesday, April 16, 2013 - 08:05 AM UTC
I'm now calling the cockpit done. I added seat straps made from painted paper. I would've preferred to use ecth but had nothing that would work. Instruments are from the kits decal sheet. They adhered badly on the first attempt and needed to placed on with thinned down PVA glue. Some Microsol also worked, despite the instructions claiming that they react badly to setting solutions. I think for the sake of ease I'll use aftermarket sets for all other markings I need.


In other news all plastic parts have been cleaned up with the metal parts well on their way. Its progressing quite nicely so far.
Comments welcome.
OEFFAG_153
_VISITCOMMUNITY
Västra Götaland, Sweden
Joined: February 19, 2010
KitMaker: 1,473 posts
AeroScale: 1,450 posts
Posted: Friday, April 19, 2013 - 09:03 PM UTC
Nice yo see your progress Stephen – looking great too. The Tamiya paint jar is really bringing home the tiny size of this kit!

All the best!

Mikael
phantom_phanatic309
#372
_VISITCOMMUNITY
United Kingdom
Joined: March 10, 2010
KitMaker: 2,568 posts
AeroScale: 1,619 posts
Posted: Saturday, April 20, 2013 - 05:50 AM UTC
thanks Mikael, the tamiya paint pots make convenient stands to hold parts. I'm hoping to get the fuselage closed up this week.
FAUST
#130
_VISITCOMMUNITY
Noord-Holland, Netherlands
Joined: June 07, 2002
KitMaker: 8,797 posts
AeroScale: 190 posts
Posted: Sunday, April 21, 2013 - 07:07 AM UTC
Pretty neat work in this small scale. I never heard of this brand. Do all their kits have this Plastic white metal mix?
phantom_phanatic309
#372
_VISITCOMMUNITY
United Kingdom
Joined: March 10, 2010
KitMaker: 2,568 posts
AeroScale: 1,619 posts
Posted: Sunday, April 21, 2013 - 09:17 AM UTC
Cheers Robert.
Pegasus is a British short run manufacturer. They were pretty big in the late 80's and 90's from what I can gather. They're currently owned and and produced by Freightdog models. They tend to do the more unusual stuff that mainstream manufacturers didn't touch, although the likes of Roden are now touching on them. They also did a line of 1/48 under the brand name Blue Max. Most of the airframe parts are in plastic, engines props guns and some cockpit parts are in metal. The WWI subjects also provide strut material to scratch build them using diagrams in the instructions, as is the case with this build.
They do some nice stuff so worth looking out for and trying. Freightdog only have a small selection at the moment but I think they have plans to reissue more. They often come up on ebay, but the more rarer kits can go for a lot of money.
Currently I have their Spad VII, Brisfit, Albatros D.III, Oef Albatros D.III (Austrian built), Hansa Brandeberg W.29 and a Halberstadt D.II. So a lot of work for me in the future!
The current reissue of the DH5 now has the struts in PE. Hopefully the rest will follow suit as it will save a lot of time!
phantom_phanatic309
#372
_VISITCOMMUNITY
United Kingdom
Joined: March 10, 2010
KitMaker: 2,568 posts
AeroScale: 1,619 posts
Posted: Monday, April 22, 2013 - 08:42 AM UTC
Fuselage buttoned and its starting to look much more like an aeroplane.


I needed to trim a little from the cockpit insert to get a decent fit but no real trouble. A little filler will be needed but show me a kit that doesn't? I'm really starting to like these kits!
 _GOTOTOP