_GOTOBOTTOM
Early Aviation
Discuss World War I and the early years of aviation thru 1934.
D.VII first try
rochaped
_VISITCOMMUNITY
Lisboa, Portugal
Joined: August 27, 2010
KitMaker: 679 posts
AeroScale: 669 posts
Posted: Sunday, March 17, 2013 - 08:01 AM UTC
Hello all,

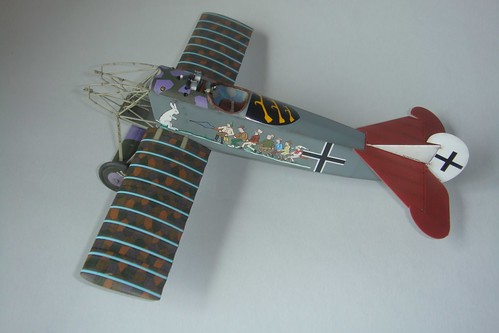
Being a WWII plane modeler for decades i decided i needed to try something out of the usual, so i ordered WingNuts Fokker as my first biplane experience.
The kit is a gem, and the few issues i had so far are most likely my own fault, not the kit. The choice was based on low rigging demanded and dozens of thrilling options available to model.

Since aeroscale has so many ww1 modelers, and damm good ones, i thought posting some build along photos might be a rewarding experience for me as a learning point.
So please feel free to comment and give some hints.

[url=http://www.flickr.com/people/rochinhas4/]rochaped38


[url=http://www.flickr.com/people/rochinhas4/]rochaped38

[url=http://www.flickr.com/people/rochinhas4/]rochaped38

Cheers
JackFlash
_VISITCOMMUNITY
Colorado, United States
Joined: January 25, 2004
KitMaker: 11,669 posts
AeroScale: 11,011 posts
Posted: Sunday, March 17, 2013 - 06:50 PM UTC
Looks like your off to a great start.
lcarroll
_VISITCOMMUNITY
Alberta, Canada
Joined: July 26, 2010
KitMaker: 1,032 posts
AeroScale: 1,025 posts
Posted: Monday, March 18, 2013 - 10:20 AM UTC
Looking at your progress and results so far I'd say you are having no problems at all with your first attempt at a WWI subject, beautiful work! I'll be following your Build as I have several of these in my stash and it looks like you are more a teacher then a student!
Cheers!
Lance
rochaped
_VISITCOMMUNITY
Lisboa, Portugal
Joined: August 27, 2010
KitMaker: 679 posts
AeroScale: 669 posts
Posted: Tuesday, March 19, 2013 - 10:41 AM UTC
Stephen and Lance, thank you for encouraging comments

Got a few more snaps from ongoing parts, such as upper deck of the cockpit (wich i kinda did by mere guessing, since i have no photographic evidence of the actual pattern), and gone 90% on the landing gear.

Any tips about the tires? the original brand is visible (Gothania if my eyes don't fool me), but i have no idea if it was painted or not
[url=http://www.flickr.com/people/rochinhas4/]rochaped38


[url=http://www.flickr.com/people/rochinhas4/]rochaped38


[url=http://www.flickr.com/people/rochinhas4/]rochaped38

Also had a small mishap with those flimsy elevator parts, cause one flew away under air pressure from my spray gun and got lost for eternity. Barely had i finished scratching a rather clumsy replacement when i noticed wingnuts have provide a spare part, or so it seems


[url=http://www.flickr.com/people/rochinhas4/]rochaped38

Cheers

OEFFAG_153
_VISITCOMMUNITY
Västra Götaland, Sweden
Joined: February 19, 2010
KitMaker: 1,473 posts
AeroScale: 1,450 posts
Posted: Tuesday, March 19, 2013 - 08:21 PM UTC
Very nice work Pedro, I think you've achieved a really great start here – very much looking forward to more!

Mikael
WoodshedWings
_VISITCOMMUNITY
Ontario, Canada
Joined: October 11, 2012
KitMaker: 141 posts
AeroScale: 139 posts
Posted: Wednesday, March 20, 2013 - 01:28 AM UTC
Those small control surface horns are so easy to lose. I had the same thing happen to me while building Eduard's 1/48 Walfisch. build here Pinged off into the ether, never to be seen again. Unfortunately Eduard don't offer a spare so a replacement was scratched from the end of a toothpick carved to shape. Your build is looking great by the way. Could we have more info on what techniques you are using.
Cheers, Mike.
rochaped
_VISITCOMMUNITY
Lisboa, Portugal
Joined: August 27, 2010
KitMaker: 679 posts
AeroScale: 669 posts
Posted: Thursday, March 21, 2013 - 11:33 AM UTC
Hi again,

Mikael, thanks for your words, i also follow your current thread with interest and i must say you are a far better detailer than i am Splendid work on that control stick and engine.

And Mike, sometimes it gets frustrating having so many work hours on a project just to see the carpet eat way some small plastic that just happens to be way visible on a finished model I was lucky to see that the sprues have an extra horn, but i also managed to lose the entire shoulder seatbelts! & this time no extra for sure

Anyway made some progress on the rudder section, but still some weathering to be added soon...

[url=http://www.flickr.com/people/rochinhas4/]rochaped38


[url=http://www.flickr.com/people/rochinhas4/]rochaped38


[url=http://www.flickr.com/people/rochinhas4/]rochaped38

When trying to insert the tubular mounting of the cockpit inside the fuselage i found that it might be a tad tight, so need to look for what might be causing it.
This is where it stops upon feeling some pressure...


[url=http://www.flickr.com/people/rochinhas4/]rochaped38

Cheers


Gremlin56
Joined: October 30, 2005
KitMaker: 3,897 posts
AeroScale: 564 posts
Posted: Thursday, March 21, 2013 - 08:51 PM UTC
Great paintwork, looks very realistic.
Cheers,
julian
OEFFAG_153
_VISITCOMMUNITY
Västra Götaland, Sweden
Joined: February 19, 2010
KitMaker: 1,473 posts
AeroScale: 1,450 posts
Posted: Thursday, March 21, 2013 - 09:41 PM UTC
Looking great Pedro, your textures and finishes are really top-notch! By the looks of it you're doing the "Sieben Swabians"?

It has been said by others that the tolerances are very tight in the cockpit department. You need to really get all the bits properly in place for the fuselage halves to close as they should...

Mikael
rochaped
_VISITCOMMUNITY
Lisboa, Portugal
Joined: August 27, 2010
KitMaker: 679 posts
AeroScale: 669 posts
Posted: Friday, March 22, 2013 - 03:02 AM UTC
Thanks for the feedback guys

Yes, i am building the Swabians cartoon Fokker. Once my daughters saw the decal sheet i ordered along with the kit, the question of "wich one will i build" got redundant they call it the 7 dwarfs plane.

Will try to get the cockpit fixed this weekend.

Cheers

Kornbeef
_VISITCOMMUNITY
England - South East, United Kingdom
Joined: November 06, 2005
KitMaker: 1,667 posts
AeroScale: 1,551 posts
Posted: Saturday, March 23, 2013 - 10:34 AM UTC
Sand a tiny amount off the top and bottom of the rear panel behind the seat, also sand any of the moulded details that back onto the fuselage sides off the frame work Pedro and it should slip in relatively easy with a gentle up and down wiggle of the assembly.


Lovely work by the way realy top notch paintwork.

I'll be scratching my shoulder harnesses out of lead sheet or paper when I get that far. You can always get eduard or HGW if the offending bit doesnt resurface, Albatros Pfalz or DRi or almost any German 4 point type will suffice

Keep at it.

Keith
Merlin
Staff MemberSenior Editor
AEROSCALE
#017
_VISITCOMMUNITY
United Kingdom
Joined: June 11, 2003
KitMaker: 17,582 posts
AeroScale: 12,795 posts
Posted: Saturday, March 23, 2013 - 09:07 PM UTC
Hi Pedro

That's looking fantastic! I want to see this as a frontpage Feature when it's complete.

All the best

Rowan
Jagdtiger46
_VISITCOMMUNITY
Missouri, United States
Joined: October 26, 2011
KitMaker: 291 posts
AeroScale: 13 posts
Posted: Sunday, March 24, 2013 - 12:42 AM UTC
This is looking quite excellent. I have the Albatros version to get at,...one of these days.
rochaped
_VISITCOMMUNITY
Lisboa, Portugal
Joined: August 27, 2010
KitMaker: 679 posts
AeroScale: 669 posts
Posted: Sunday, March 24, 2013 - 05:08 AM UTC
Hi everyone,

Keith, appreciate the hints, put them to use and it finally seems i manage to get all that cockpit frame inside and all good.

Regrettably, my troll hands managed to drop the entire section down on the floor, which almost caused me a heart stroke, followed by some 3 hour rage behaviour

No big harm done once all parts were glued back. Looking back, i advise anyone about to build this kit to glue the engine to it's mounts AFTER all section is properly enclose within the fuselage.
Makes all the handling far easier and keeps the darn tubular cockpit frame a lot lighter.

This kit sure has murphy's law written all over

Rowan, if this endeavour comes to a good end i'll be delighted to provide the feature

Cheers
rochaped
_VISITCOMMUNITY
Lisboa, Portugal
Joined: August 27, 2010
KitMaker: 679 posts
AeroScale: 669 posts
Posted: Sunday, May 19, 2013 - 04:15 AM UTC
Hi all,

been awhile since i last updated something, but life has been demanding and not much time for the hobby.

Nevertheless some work progress...

[url=http://www.flickr.com/people/rochinhas4/]rochaped38


[url=http://www.flickr.com/people/rochinhas4/]rochaped38


[url=http://www.flickr.com/people/rochinhas4/]rochaped38


[url=http://www.flickr.com/people/rochinhas4/]rochaped38


[url=http://www.flickr.com/people/rochinhas4/]rochaped38


[url=http://www.flickr.com/people/rochinhas4/]rochaped38

as seen above, i had to remove the engine from it's mountings due to some misalignment that caused the propeller to be slightly to port side.
The same incidence occurs on the landing gear, as u can see on the image above. i believe this last one will be fixed when i put the wirings that may help stiffen the assembly.

thanks for any feedback,

Cheers
Pedro
JackFlash
_VISITCOMMUNITY
Colorado, United States
Joined: January 25, 2004
KitMaker: 11,669 posts
AeroScale: 11,011 posts
Posted: Sunday, May 19, 2013 - 04:23 AM UTC
The twist in the landing gear will take some small work, other wise you have solid work. Clean build. Model On!
CaptainA
_VISITCOMMUNITY
Indiana, United States
Joined: May 14, 2007
KitMaker: 3,117 posts
AeroScale: 2,270 posts
Posted: Sunday, May 19, 2013 - 11:08 PM UTC
Pedro, Seven Swabians is one of my favorites. I started putting away my nickles and dimes to do this one myself.

Your build looks fantastic. We are always our own harshest critics. But the guys and gals around here don`t lie. If we all like it, it must be good. I agree that this should go front page.
rochaped
_VISITCOMMUNITY
Lisboa, Portugal
Joined: August 27, 2010
KitMaker: 679 posts
AeroScale: 669 posts
Posted: Tuesday, May 21, 2013 - 09:18 AM UTC
Thanks on your encouragement words, Stephen and Carl

1/32 biplanes are really not my thing, so been having some bumps here & there, as expected i suppose. One thing is certain, this fokker clearly pushed me out of my comfort zone and that is a positive thing

Managed to close the engine room, not without some compromises...had to do a bit of surgery by sanding thin some ports plus removing a pipe that connected 2 other main ones.
All in all, i blame my clumsy approach upon building the interior frame bar. This airframe skeleton has a bigger importance in achieving a trouble free (or at least a bit less harsh) assembling of exterior parts of the frame than i anticipated, so there you go...a lesson i will not forget if i decide to give it another go at some other DVII version further ahead...


[url=http://www.flickr.com/people/rochinhas4/]rochaped38


[url=http://www.flickr.com/people/rochinhas4/]rochaped38

now it's time for some retouches, semi-gloss finish and further weathering before tackling the landing gear and upper wing

Cheers
Pedro
JackFlash
_VISITCOMMUNITY
Colorado, United States
Joined: January 25, 2004
KitMaker: 11,669 posts
AeroScale: 11,011 posts
Posted: Tuesday, May 21, 2013 - 12:01 PM UTC
Just a suggestion but you may want to add lt. blue edge tapes on the wings. There was not any taping on the ailerons.
GhostHawk
_VISITCOMMUNITY
Cordoba, Argentina
Joined: January 27, 2011
KitMaker: 268 posts
AeroScale: 264 posts
Posted: Tuesday, May 21, 2013 - 12:19 PM UTC
Hi,

Nice looking bird...!!!

Congrats Pedro...!!!

Diego

P/D: Very Usefull data Mr. Lawson....! Thanks, I will use on my Fokker... (Some Day)

rochaped
_VISITCOMMUNITY
Lisboa, Portugal
Joined: August 27, 2010
KitMaker: 679 posts
AeroScale: 669 posts
Posted: Tuesday, May 21, 2013 - 12:28 PM UTC
Fact noted thanks, will apply them. Really appreciate that information, cause i had some doubts whether or not that was standard use

Cheers
Pedro
 _GOTOTOP