_GOTOBOTTOM
Early Aviation
Discuss World War I and the early years of aviation thru 1934.
KotS III GB Fok. D.VII Schwerin
JackFlash
_VISITCOMMUNITY
Colorado, United States
Joined: January 25, 2004
KitMaker: 11,669 posts
AeroScale: 11,011 posts
Posted: Friday, June 21, 2013 - 11:00 AM UTC
Here is ts folks!


The top image is the current build of the Part of Poland S48-127 kit and of course the bottom is one I have done previously.
JackFlash
_VISITCOMMUNITY
Colorado, United States
Joined: January 25, 2004
KitMaker: 11,669 posts
AeroScale: 11,011 posts
Posted: Friday, June 21, 2013 - 11:06 AM UTC
Here is the front page of the instructions S48-127.


Here is the initial breakdown of the frets as I began.

JackFlash
_VISITCOMMUNITY
Colorado, United States
Joined: January 25, 2004
KitMaker: 11,669 posts
AeroScale: 11,011 posts
Posted: Friday, June 21, 2013 - 11:11 AM UTC
The basic fuselage construction.


JackFlash
_VISITCOMMUNITY
Colorado, United States
Joined: January 25, 2004
KitMaker: 11,669 posts
AeroScale: 11,011 posts
Posted: Friday, June 21, 2013 - 11:15 AM UTC
Two more views. The plastic tail extension not only completes the fuselage length but gives the builder a hand hold to work with the delicate photoetch.

JackFlash
_VISITCOMMUNITY
Colorado, United States
Joined: January 25, 2004
KitMaker: 11,669 posts
AeroScale: 11,011 posts
Posted: Friday, June 21, 2013 - 12:48 PM UTC
These frets are like any photoetch sets they are not meant to stand alone. PoP recommends that you use these frets to augment / enhance the Roden 1:48 plastic Fokker D.VII kit.
JackFlash
_VISITCOMMUNITY
Colorado, United States
Joined: January 25, 2004
KitMaker: 11,669 posts
AeroScale: 11,011 posts
Posted: Friday, June 21, 2013 - 04:04 PM UTC


My prevgious diorama “Spoils of War G/Br2/14" was based on Fokker D.VII 368 /18 an early Schwerin production type flown by Ltn. Hans Schultz of Jasta 18 when he was brought down and made a POW on 6 June 1918 by Lt. C. H. R. Lagesse of 29 sqdn RAF. Given the British capture number G/Br2/14. It was displayed with other captured aircraft in the agriculture hall in Islington. All of which had half or more of their coverings removed to display internal structures to public view for the price of 1 penny. Proceeds went to the RAF Hospital Fund.

Eventually after its addition to the display all of the fuselage fabric was taken off this aircraft. The right side elevator, lower right wing and upper right side of the top wing were left covered by then.

JackFlash
_VISITCOMMUNITY
Colorado, United States
Joined: January 25, 2004
KitMaker: 11,669 posts
AeroScale: 11,011 posts
Posted: Friday, June 21, 2013 - 04:38 PM UTC
The following images are meant to show the Fok.D.VII framing from various angles.

First is a modern reproduction.


Next is a crashed & flipped over Fokker D.VII that the trophy hunters have stripped.


Here is a Fokker D.VII frame that has had the motor & wings removed then flipped over & burned.
JackFlash
_VISITCOMMUNITY
Colorado, United States
Joined: January 25, 2004
KitMaker: 11,669 posts
AeroScale: 11,011 posts
Posted: Friday, June 21, 2013 - 04:45 PM UTC
Next though not the greatest quality this image shows one of the fuselage assembly sheds at Schwerin / Gorries.


And finally here is another storage shed at Schwerin / Gorries with a mixed bag of unfinished fuselages. mostly Fokker D.VII & D.VIII airframes and on Fokker V.7 triplane in the far right corner.
FAUST
#130
_VISITCOMMUNITY
Noord-Holland, Netherlands
Joined: June 07, 2002
KitMaker: 8,797 posts
AeroScale: 190 posts
Posted: Friday, June 21, 2013 - 10:24 PM UTC
I wish I had not seen this thread. Now I want to have that set as well. In fact I wished I had not even seen the brand of Part from Poland because now I checked and see they have extensive PE sets for the 1:72 Roden aircraft as well. My life just got a bit more expensive.
That said... Looking at your work I have to say that it really looks good. Love that hammered metal finish.
JackFlash
_VISITCOMMUNITY
Colorado, United States
Joined: January 25, 2004
KitMaker: 11,669 posts
AeroScale: 11,011 posts
Posted: Saturday, June 22, 2013 - 03:27 PM UTC
Thanks Robert for the the input. Part of Poland has been my some of my favorite photoetch materials for years. Though I like Mirage's PE as well. I just wish someone would do wings in PE like our friend and master modeler Wotjek Fajga did for the Eduard DH 2.

Ok here is the build up for the flooring and attached details.


This of course is from the "Flugsport" magazine.
JackFlash
_VISITCOMMUNITY
Colorado, United States
Joined: January 25, 2004
KitMaker: 11,669 posts
AeroScale: 11,011 posts
Posted: Monday, June 24, 2013 - 06:35 AM UTC


When working with the PoP PE you will note that smaller parts are detailed in builds A-Z and then included in a step thats bring everything together. So you should familarize yourself with all the steps before beginning. I recommend doing all small parts first and keeping them secured in a jewel case (small plastic type that holds pins & etc).

Remember the the work space 101 thread? The small flip open box is a jewel case.


here.
JackFlash
_VISITCOMMUNITY
Colorado, United States
Joined: January 25, 2004
KitMaker: 11,669 posts
AeroScale: 11,011 posts
Posted: Monday, June 24, 2013 - 06:58 AM UTC
Here even though I have already attached the upper / spine of the fuselage skeletal we see the step for the minor additions.

FAUST
#130
_VISITCOMMUNITY
Noord-Holland, Netherlands
Joined: June 07, 2002
KitMaker: 8,797 posts
AeroScale: 190 posts
Posted: Monday, June 24, 2013 - 07:03 AM UTC
Ola Stephen

great progress. I'm well known with the PoP PE sets. I am working for a few years now on a 1:35 C7P recovery tractor with 5 Part PE sets. Overengineered yes but extremely beautiful in the end.
JackFlash
_VISITCOMMUNITY
Colorado, United States
Joined: January 25, 2004
KitMaker: 11,669 posts
AeroScale: 11,011 posts
Posted: Monday, June 24, 2013 - 07:17 AM UTC
Thank you Robert!


Note we will discuss the outer fuselage facades later. More on the interior with the instrument panel (Typical OAW type) You might want to scratchbuild a Schwerin version.


The single large bezeled instrument panels in this image are (ex-Jager) resin Schwerin types. Note also the drilled out portions of the Roden kit upper cowlings for the ammunition feed and empty belt tubes. The HGW bezels are coming in very handy.

review here.
JackFlash
_VISITCOMMUNITY
Colorado, United States
Joined: January 25, 2004
KitMaker: 11,669 posts
AeroScale: 11,011 posts
Posted: Monday, June 24, 2013 - 09:57 AM UTC
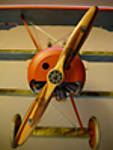
Here is the cockpit of the Deutsches Museum original Schwerin Fokker D.VII 4404/18. The gun position has been fared over but the front gun mounts are still inplace. Note the position of the compass as attached to the control column. The interior is overpainted a medium green (probably post war as a method to keep deterioration of the fabric down to a minimum. The instrument panel was painted black and may be a metal replacement item too. But note the instruments and their locations.


This D.VII was found after World War 2 in a barn, probably originating from the Deutschen Luftfahrt Sammlung. Although wearing the registration 4404/18, it is not sure if this is the aircraft's true identity. During restoration it was found that there were many 'non-World War I' modifications, and the Dutch MLD-serial 'D-20' was found.


The center image has a clear, hinged "sneeze guard" over the cockpit.


Fokker D.VII airframes built by Schwerin / Gorries factory.

Fok.VII 227-229/18 prototypes, V.11 and two V.18 brought up to Fok.D.VII production standards.
Fok.D.VII 230 to 526/18.
Fok.D.VII 4250 to 4449/18. Some D.VIIF with BMW IIIa engines.
Fok.D.VII 5050 to 5149/18. Some D.VIIF machines.
Fok.D.VII 7604 to 7805/18. some Fok.D.VIIF machines.
Fok.D.VII 10347 to 10300/18. 37 made, delivered after 11/11/18.
DrIAce
_VISITCOMMUNITY
California, United States
Joined: August 14, 2011
KitMaker: 59 posts
AeroScale: 56 posts
Posted: Wednesday, June 26, 2013 - 02:31 AM UTC
As always, thanks for posting the pics of your models and the real a/c.

Ed
JackFlash
_VISITCOMMUNITY
Colorado, United States
Joined: January 25, 2004
KitMaker: 11,669 posts
AeroScale: 11,011 posts
Posted: Sunday, July 07, 2013 - 04:28 AM UTC
Thanks Ed,


The central bezel mounted on the PE crossbar is for the tachometer on the OAW or Albie built versions. For the Schwerin version the tach was mounted in instrument panel.


This version was modified by Aeroscale member Brad Cancian in his build of an early production Schwerin kit. The red circles note my suggestions to drill out feeds and tubes for detailing. The actual placement for the late versions should have the tach placed centrally and the magneto guages to the right of the tach one ontop of the other.


The black faced smaller guage may be a "Swiss" oil pump guage added post war.
eseperic
_VISITCOMMUNITY
Croatia Hrvatska
Joined: November 06, 2009
KitMaker: 624 posts
AeroScale: 609 posts
Posted: Monday, July 08, 2013 - 06:23 PM UTC
Hi Stephen,

I don't have any particular comment... I am sure you hold some aces up the sleeve, but I cought myself thinking how neatly organized you must be! If I only had an opportunity to sneek into your (I think) severly organized stash! What a learning opportunity...

All the best,
Entoni
JackFlash
_VISITCOMMUNITY
Colorado, United States
Joined: January 25, 2004
KitMaker: 11,669 posts
AeroScale: 11,011 posts
Posted: Monday, July 08, 2013 - 07:52 PM UTC
Greetings Entoni!

Here is a bit of a taste on that subject. I hope you find it useful.

Work Space tips 101
JackFlash
_VISITCOMMUNITY
Colorado, United States
Joined: January 25, 2004
KitMaker: 11,669 posts
AeroScale: 11,011 posts
Posted: Tuesday, July 23, 2013 - 12:53 PM UTC
Though this modern replica the instrument arrangements may help the modeler may get a better feel for the project.

OEFFAG_153
_VISITCOMMUNITY
Västra Götaland, Sweden
Joined: February 19, 2010
KitMaker: 1,473 posts
AeroScale: 1,450 posts
Posted: Wednesday, July 24, 2013 - 10:40 PM UTC
I always thoght of you as the master of Etch Stephen, and you certainly don't dissapoint. Most impressive!

Mikael
Mcleod
_VISITCOMMUNITY
Alberta, Canada
Joined: April 07, 2010
KitMaker: 1,028 posts
AeroScale: 939 posts
Posted: Thursday, July 25, 2013 - 01:19 AM UTC
Just wondering about these 'Part' etch fuselage frames, Stephen.

Are these soldered or glued together?
JackFlash
_VISITCOMMUNITY
Colorado, United States
Joined: January 25, 2004
KitMaker: 11,669 posts
AeroScale: 11,011 posts
Posted: Thursday, July 25, 2013 - 07:17 AM UTC

Quoted Text

Just wondering about these 'Part' etch fuselage frames, Stephen.

Are these soldered or glued together?


Thanks Mikael! Greetings Ben, These items are way too delicate for soldering. Cyano works just fine.
thehannaman
_VISITCOMMUNITY
New York, United States
Joined: April 04, 2006
KitMaker: 279 posts
AeroScale: 194 posts
Posted: Sunday, August 11, 2013 - 11:36 AM UTC
Awesome work as usual Stephen! A quick question about the Hammered-look paint: Did you spray that straight from the rattle-can or did you decant it and airbrush it?

Thanks in advance!
JackFlash
_VISITCOMMUNITY
Colorado, United States
Joined: January 25, 2004
KitMaker: 11,669 posts
AeroScale: 11,011 posts
Posted: Sunday, August 11, 2013 - 11:51 AM UTC

Quoted Text

Awesome work as usual Stephen! A quick question about the Hammered-look paint: Did you spray that straight from the rattle-can or did you decant it and airbrush it?

Thanks in advance!


Hey Justen!
It came straight from the rattle can.
 _GOTOTOP