

Quoted Text
Very nice work Joel, loving the engine!
Kind regards.
Sven, thanks so much for the kind words.
Joel

Very nice work Joel, loving the engine!
Kind regards.


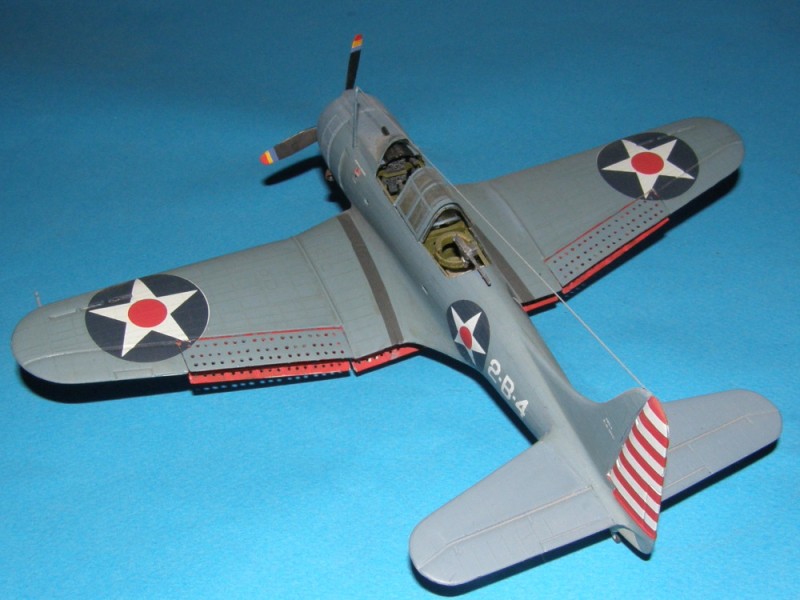
Ben, Actually the interior is quite weathered between dry brushing and a few washes with Flory Dark. The problem is my photography technique. The Flash is still too strong even though I've decreased it's intensity, so the washes get a little washed out. The interior is actually quite dark at this point.
Mark, I was quite pleased at the fit of the tub into the fuselage. I was prepared for it being rather sloppy, but in fact, it fits very snuggly, and right where it was intended to be. My only complaint if you can call it that, is that it wasn't nearly as detailed as what we've come to expect with the latest 1/48 scale releases.
Thanks guys for taking the time to post your thoughts and comments.
Joel


Hi Joel you have got a fair bit done since I last looked. It seems to be coming together nicely Have fun Phil


Impressive. You have more patience with putty and little pieces of styrene than I do!
I'm curious, why did you use the Hasegawa kit for this? I built AM's kit and it was without a doubt the best model kit I ever built. Was it simply a matter of building what was on hand, or does this make a better foundation for your (awesome) work?


I'm enjoying following your build Joel but I think you have more patience than me Have fun Phil


I'm curious, why did you use the Hasegawa kit for this? I built AM's kit and it was without a doubt the best model kit I ever built.
Gaston, thanks so much for the detailed comparison. Seems that I lucked out with the Hasegawa kit.
The Cowl flaps were certainly on the thick side. I did thin them out, then cut them into individual flaps so they could be positioned in the open position. As I mentioned, I needed to add some sheet plastic to each one to compensate for the saw cutting.
As for the tailplanes, they're so thin you can almost see through them.
I would re-consider just using a black wash to simulate the holes in the dive flaps. The dimples are rather shallow and large enough in dia. to make it hard to make them look as though they're actually holes. If you're not going to open the dive flaps up, why not just drill them out in the closed position? I'll grant you that 300 holes does take some time, but the end result is well worth the effort.
Joel
Quoted TextBen, Actually the interior is quite weathered between dry brushing and a few washes with Flory Dark. The problem is my photography technique. The Flash is still too strong even though I've decreased it's intensity, so the washes get a little washed out. The interior is actually quite dark at this point.
Mark, I was quite pleased at the fit of the tub into the fuselage. I was prepared for it being rather sloppy, but in fact, it fits very snuggly, and right where it was intended to be. My only complaint if you can call it that, is that it wasn't nearly as detailed as what we've come to expect with the latest 1/48 scale releases.
Thanks guys for taking the time to post your thoughts and comments.
Joel
Try using a gauze pad gently taped over the flash unit (leaving about a finger's width between the flash face and the gauze pad). It might diffuse the light enough...
 |


