_GOTOBOTTOM
Cold War (1950-1974)
Discuss the aircraft modeling subjects during the Cold War period.
Hosted by Tim Hatton
Skyraider A-1H
bdanie6
_VISITCOMMUNITY
New Hampshire, United States
Joined: November 09, 2008
KitMaker: 615 posts
AeroScale: 459 posts
Posted: Saturday, August 24, 2013 - 01:02 AM UTC
I just finished up a long complicated build for the EOD2 campaign over on Armorama and just wanted to do something, if not easy, at least more relaxing.


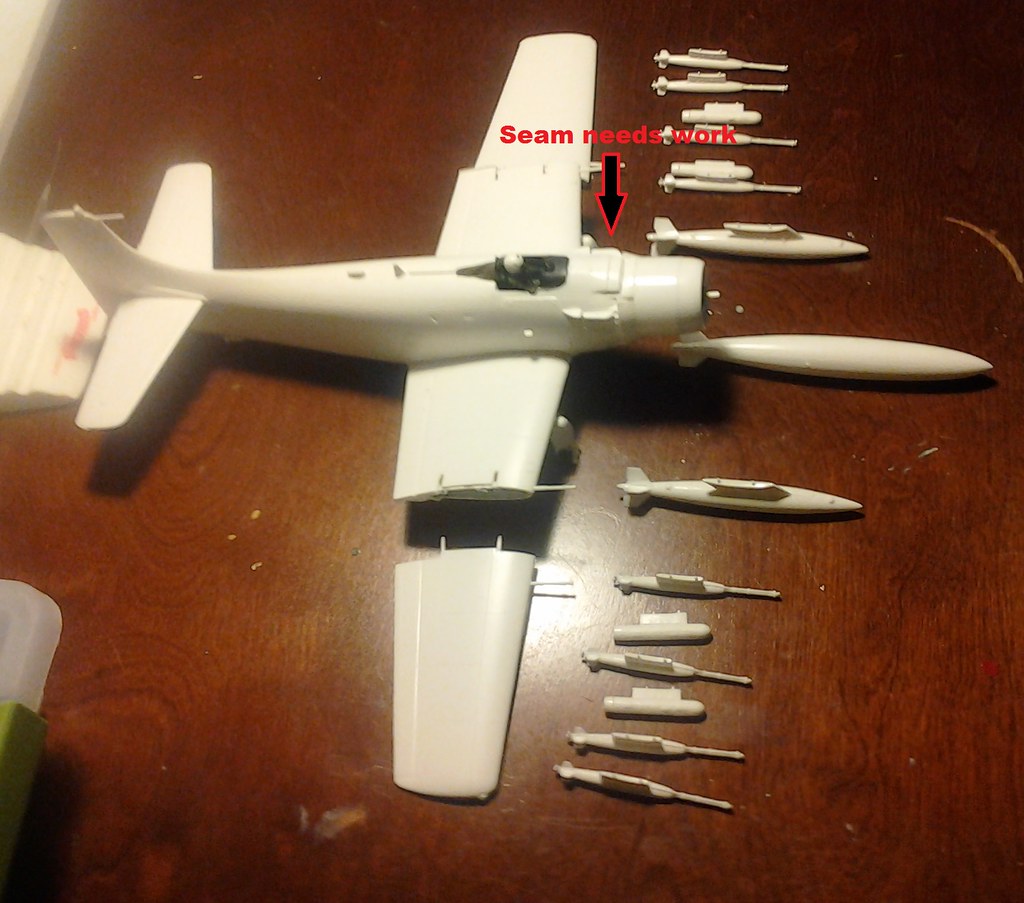
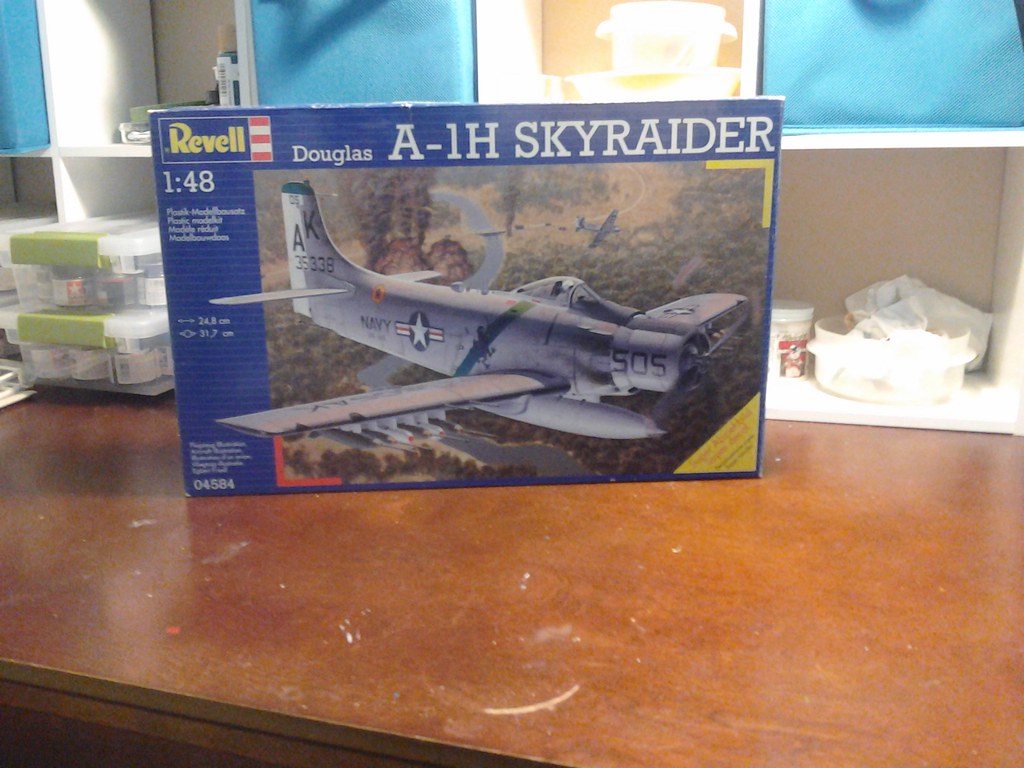
So, this is Revell of Germany's reboxing of Monogram's A-1H Skyraider. Altho an older kit (raised panel lines)it is still a viable alternative to Tamyia in accuracy and options. This thing has a full weapons load-out and folding wings. Well the wings are folded or raised, but I believe that is the same in the Tamyia kits.

Included in this kit are decals for 3 a/c. A Navy Raider, an Air Force Spad and a French Raider.

On to the pictures!

Of course what you see on the shelf

This, of course is the one I'm going to do.


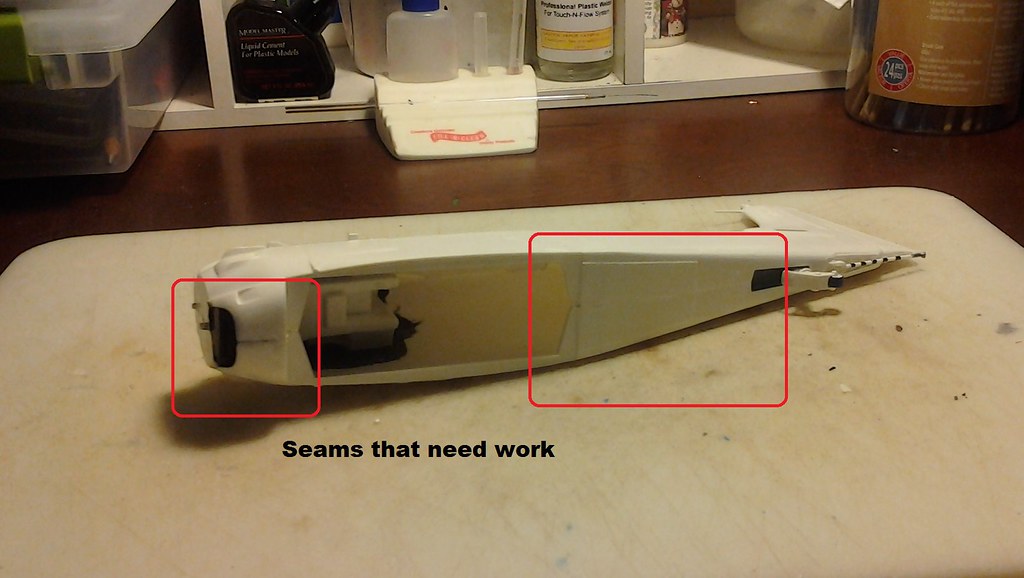
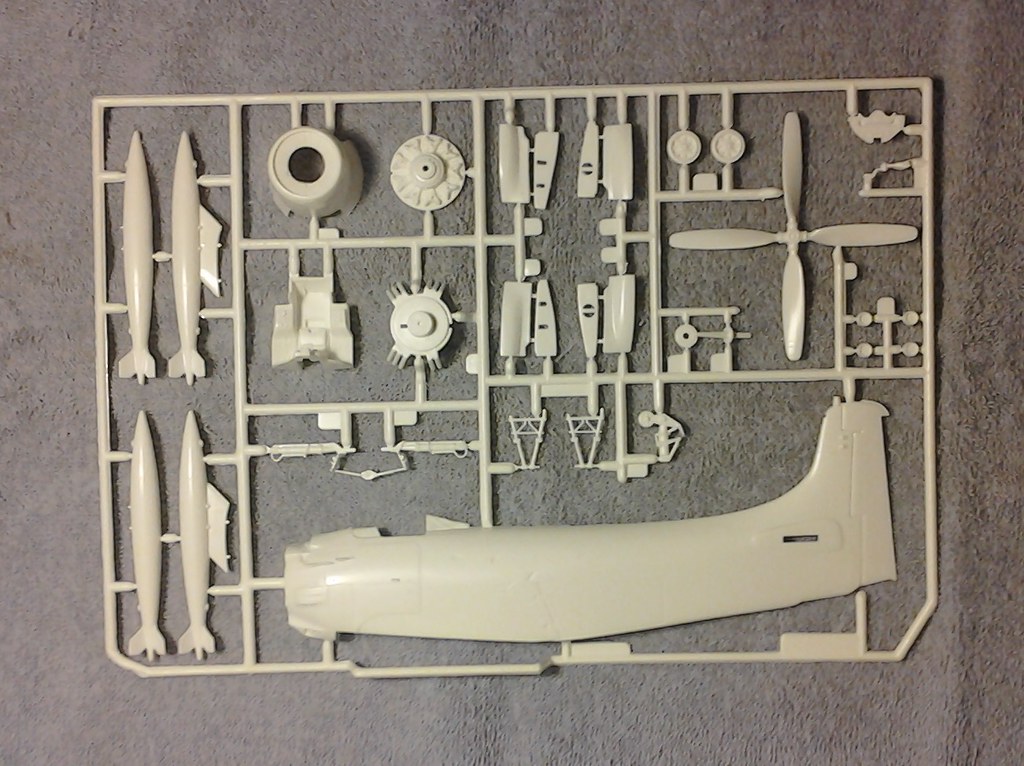
The first sprue. This one has all the weapons on it as well as the a fuselage half. The only flash I found on the kit was on this sprue around a few of the weapons.


The next sprue is engine, drop tanks, and cockpit as well as the other fuselage half.


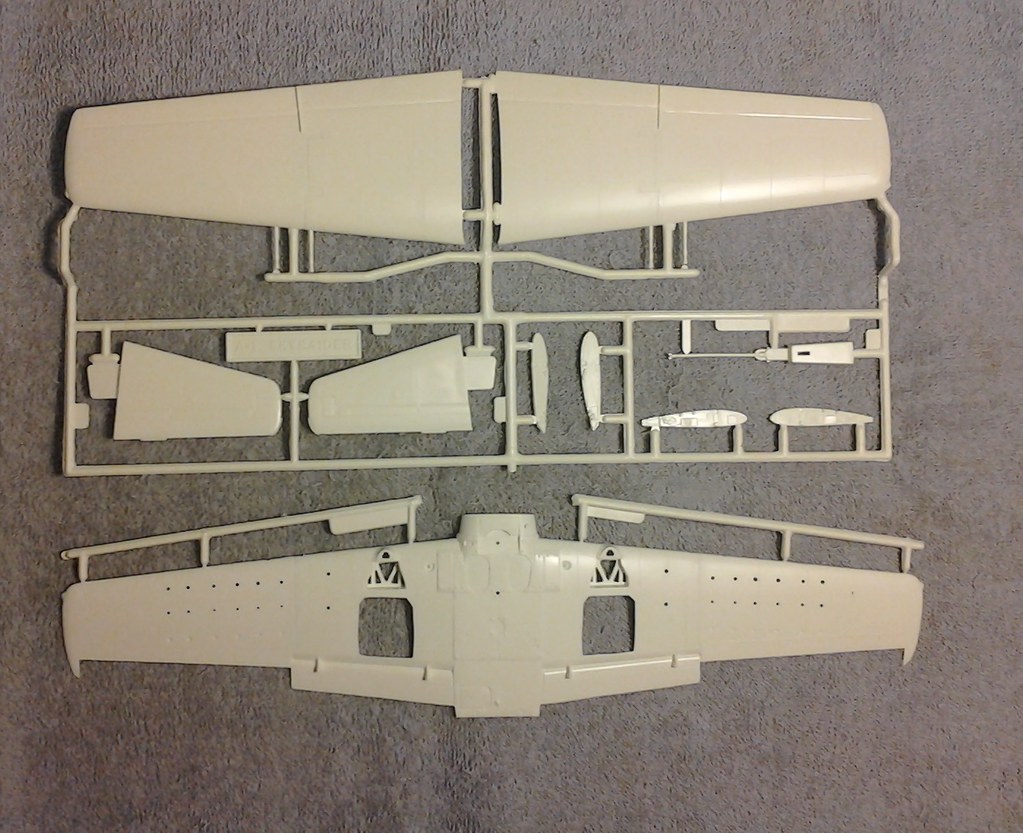
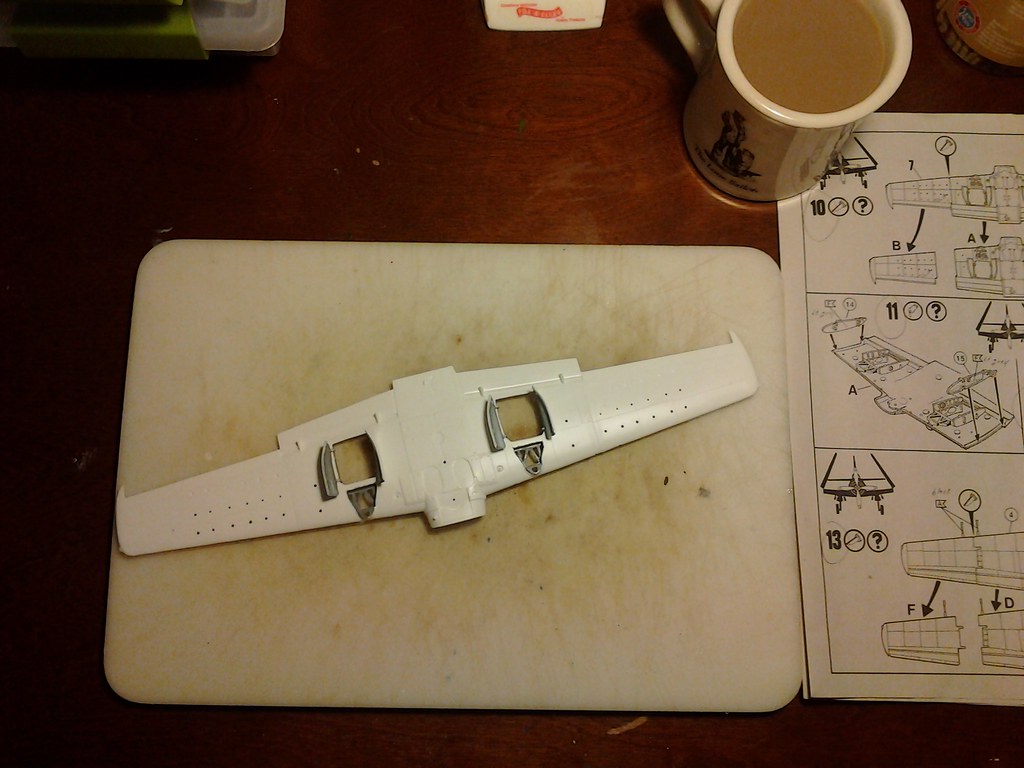
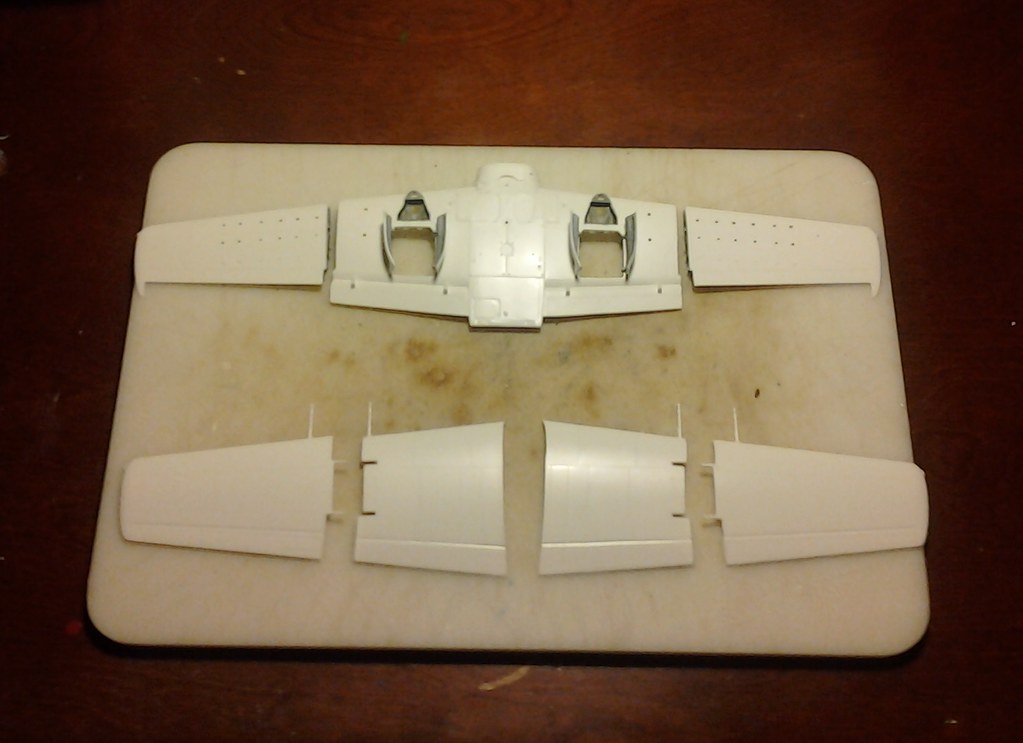
Wings, of course. The cut lines, if you want to fold the wings are, of course, on the interior sid. We'll see how well this works since I plan on folding the wings.


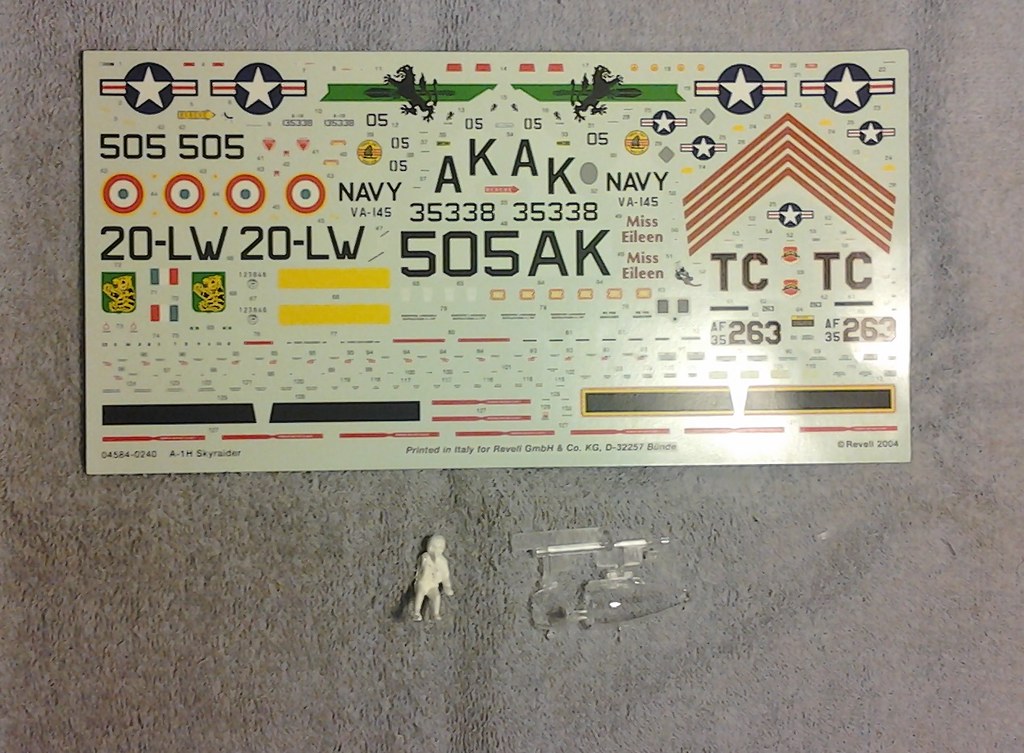
A comprehensive decal sheet with unit markings, a/c stencils and weapons stencils. Also, the only part detached from the sprues, the pilot. The clear sprue consists of 3 pieces, windscreen, canopy and gunsite. I was disappointed in that the clear sprue was loose in the bag of parts where it could, and did get scratched. Luckily enough after a coat of Future (which is SOP for me) the scratches disappeared.


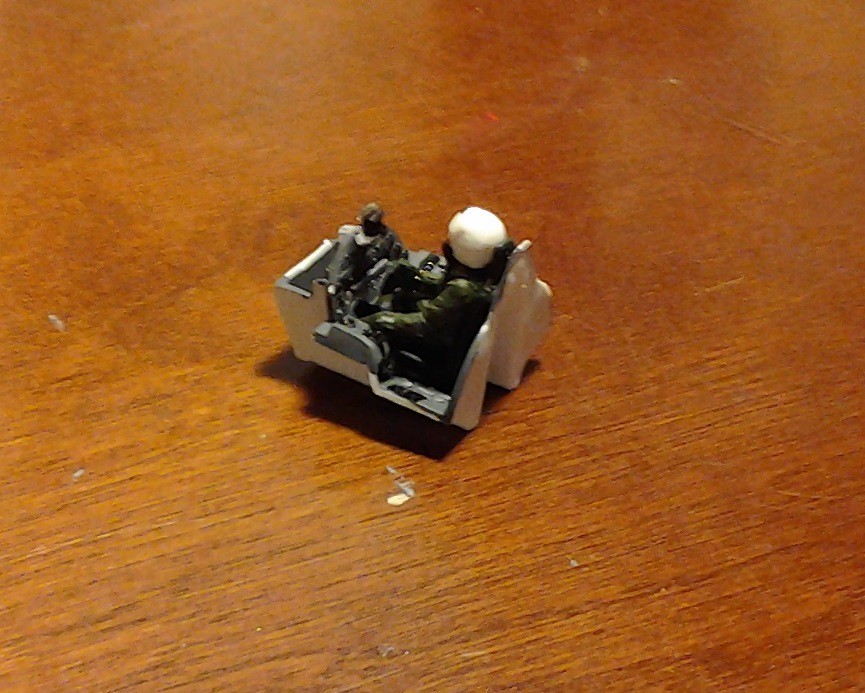
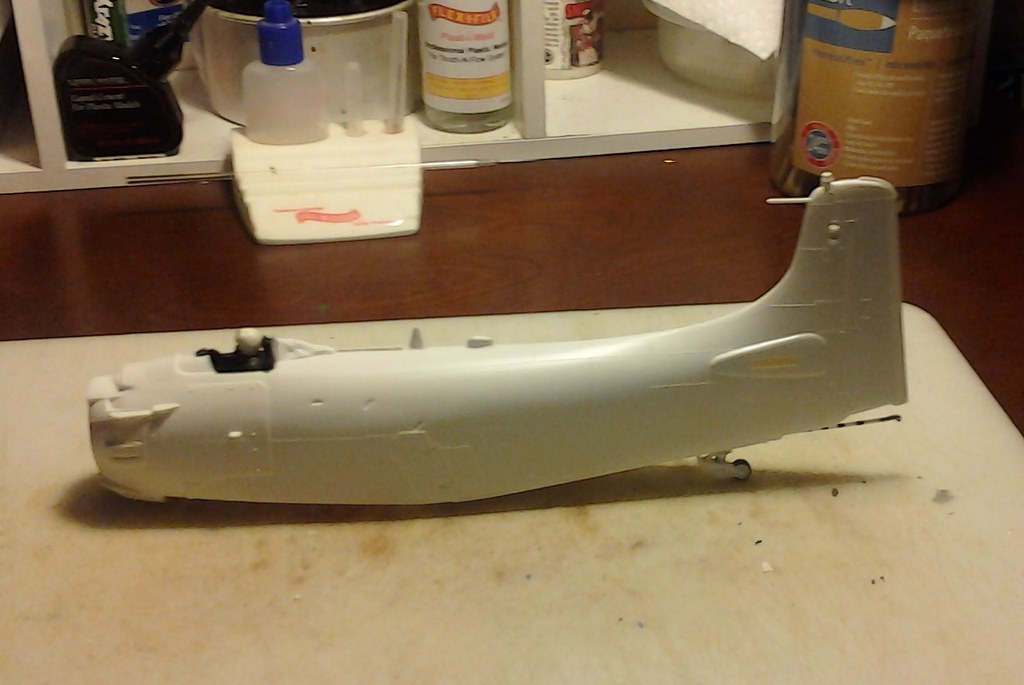
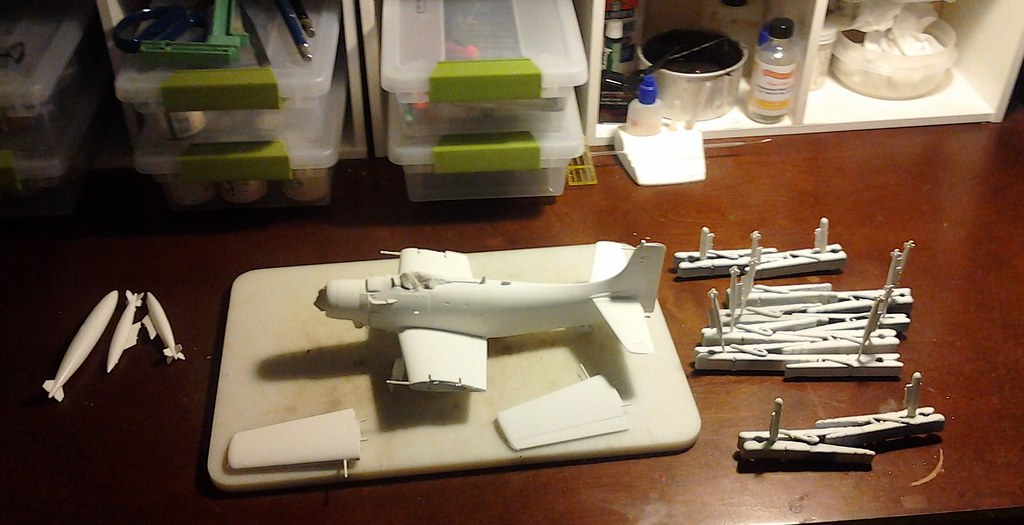
And step one completed, the finished cockpit.

I'll keep updating as I go along. This is supposed to be a relaxing build, strictly OOB.

Later
Tango88
_VISITCOMMUNITY
England - South West, United Kingdom
Joined: November 23, 2009
KitMaker: 14 posts
AeroScale: 12 posts
Posted: Saturday, August 24, 2013 - 03:53 AM UTC
An interesting project, Bruce! It's interesting how a lot of the old Monogram kits that I remember from my previous modelling existence still provide the basis for a good build project. I have always fancied doing a SPAD so I will be following your build with interest. Do you intend to rescribe the panel lines or is the existing raised detail adequate?
Looking forward to subsequent instalments!
Ray
Berwickboy
_VISITCOMMUNITY
England - East Midlands, United Kingdom
Joined: April 27, 2013
KitMaker: 450 posts
AeroScale: 387 posts
Posted: Saturday, August 24, 2013 - 06:38 AM UTC
The thing to be wary of is the cowling, it shows the protective cover closed which only happens when the aircraft is parked, they are there to prevent seawater ingress. for an'active' spad you need to open these up
Merlin
Staff MemberSenior Editor
AEROSCALE
#017
_VISITCOMMUNITY
United Kingdom
Joined: June 11, 2003
KitMaker: 17,582 posts
AeroScale: 12,795 posts
Posted: Saturday, August 24, 2013 - 08:40 AM UTC
Hi Bruce

Nice one. Please - hold on to your sprue and build shots and submit this as a Review when you're done - we need more Full-Builds in the database.

All the best

Rowan
Jessie_C
_VISITCOMMUNITY
British Columbia, Canada
Joined: September 03, 2009
KitMaker: 6,965 posts
AeroScale: 6,247 posts
Posted: Saturday, August 24, 2013 - 10:08 AM UTC

Quoted Text

The thing to be wary of is the cowling, it shows the protective cover closed which only happens when the aircraft is parked, they are there to prevent seawater ingress. for an 'active' spad you need to open these up


This is not terribly difficult to do. Simply scribe around the outside of the cover, then scribe the dividing lines between the "petals", press and snap out each one. If you've done it carefully you can save them but if not don't worry, because it's simple to make them out out of plastic card, and they're practically invisible when they're folded into the sides of the cowling anyway.
bdanie6
_VISITCOMMUNITY
New Hampshire, United States
Joined: November 09, 2008
KitMaker: 615 posts
AeroScale: 459 posts
Posted: Saturday, August 24, 2013 - 03:26 PM UTC
@Ray, one of the "neat" things about aircraft is that at 1/1 scale you can't see panel lines from 5 feet away. All you see are tonal differences, so raised lines, scribed lines, as long as some kind of differential is there I'm good.
A fellow club member of mine once took a Monogram P-61, sanded off all the panel lines, polished the plastic to a high gloss and then rescribed the entire aircraft. You can still visit him at the Sunny Grove Sanitarium between 1 and 6 every day but Sunday

@Mike, I want to show this one with the wings folded so the engine "petals will be closed anyway.

@Rowan, will do boss. All my photos are in Flickr anyway. When I finish this up, I'll redo this and post it there. Actually, Jess gave me the idea to do this build here in the first place. I believe she mentioned the need for more build blogs in one of the campaigns.

Later
Joel_W
Staff MemberAssociate Editor
AUTOMODELER
_VISITCOMMUNITY
New York, United States
Joined: December 04, 2010
KitMaker: 11,666 posts
AeroScale: 7,410 posts
Posted: Sunday, August 25, 2013 - 02:55 AM UTC
Bruce, Looking forward to following your build, as the Skyraider is a personal favorite. Interesting decision to use the old Monogram kit.

A few years ago I built the Tamiya 1/48 scale offering, and the kit practically fell together. The fit was that good. Of course the decal sheet had the famous Bumble Bee version. Can't honestly remember if Tamiya has the option to fold the wings or not.

Here's a picture of the Tamiya kit finished. All paints are Tamiya Acrylics.
Joel

bdanie6
_VISITCOMMUNITY
New Hampshire, United States
Joined: November 09, 2008
KitMaker: 615 posts
AeroScale: 459 posts
Posted: Tuesday, August 27, 2013 - 03:59 AM UTC
@Joel, beautiful Sandy, I hope my build comes out half as good. *sigh* Almost makes me want to quit now

Nope so on with the work!

Fuselage is together now. There was a bit a fit issue here. When I dry fit the halves together there were a multitude of gaps, nothing great, just not a great fit (or even a good one). I took a course sanding stick to both sides and then opened up the cut outs for the antennas. It actually takes longer to tell about it than to do it.


just the side view of the fuselage buttoned up. I managed to snap off the end of the pitot tube so that wil have to be replaced.


The only issue at this point was the chin radiator and the ventral dive brake. The radiator actually needed filler (I use Tamyia white putty)and the brake had two sink holes and a step. Filling and sanding and filing and sanding again took care of that problem. Now, onto the wings!

Later
Jessie_C
_VISITCOMMUNITY
British Columbia, Canada
Joined: September 03, 2009
KitMaker: 6,965 posts
AeroScale: 6,247 posts
Posted: Tuesday, August 27, 2013 - 06:07 AM UTC
The old Revellogram Spad is a quite decent model. It costs much less than the Tamiya kit, and while it's slightly more challenging to build, looks nearly as good when finished properly.
bdanie6
_VISITCOMMUNITY
New Hampshire, United States
Joined: November 09, 2008
KitMaker: 615 posts
AeroScale: 459 posts
Posted: Tuesday, August 27, 2013 - 02:50 PM UTC
Jessie, so I'm finding out Next up, according to directions, is cutting up the wings so they can be displayed folded.
Later
Tomcat31
#042
_VISITCOMMUNITY
England - North East, United Kingdom
Joined: November 18, 2006
KitMaker: 2,828 posts
AeroScale: 1,720 posts
Posted: Wednesday, August 28, 2013 - 12:17 AM UTC
A little inspiration for you...

Tamiya A-1J Skyraider
Joel_W
Staff MemberAssociate Editor
AUTOMODELER
_VISITCOMMUNITY
New York, United States
Joined: December 04, 2010
KitMaker: 11,666 posts
AeroScale: 7,410 posts
Posted: Thursday, August 29, 2013 - 03:31 AM UTC
Allen, a really outstanding build on the J ver. the camo is perfect.
Joel
bdanie6
_VISITCOMMUNITY
New Hampshire, United States
Joined: November 09, 2008
KitMaker: 615 posts
AeroScale: 459 posts
Posted: Friday, August 30, 2013 - 02:03 AM UTC
@Hi Allen, see, that's what I mean, most people here turn out museum quality work. Your Spad is a case in point, along with Joels' Sandy. That is something I'll never be able to achieve. So I just build for myself, and hope for the best.

As far as my Sandy goes, it goes slow.
Evidently one needs to actually go to "work" to pay for this hobby

Todays update, therefore is rather small. This photo also shows why one must take colour call out in instructions with a grain of salt. I always stress "Check your references" which I seem to have forgotten when assembling the lower wings. The instructions called for light gray wheel wells and gear doors. Nope, not quite right. Well, when I prime the plane later on that'll get fixed.


Next was to separate the wings. Using a sharp #11 Xacto knife I made passes thru the wing hinge lines on the outer surface of the upper and lower wings. One note of warning here. When you cut out the upper wing sections be careful around the hinges themselves, as until you cut thru them completely, they are rather fragile to any pressure on the plastic. Go ahead, ask me how I know
A little plastic weld and superglue later....


Next up is attaching the wings.
Later
Joel_W
Staff MemberAssociate Editor
AUTOMODELER
_VISITCOMMUNITY
New York, United States
Joined: December 04, 2010
KitMaker: 11,666 posts
AeroScale: 7,410 posts
Posted: Friday, August 30, 2013 - 03:29 AM UTC
Bruce, the separate wings pieces look clean and neat. Work like that takes quite a long time to actually accomplish. Believe me I know as it felt like days to cut the dive flaps on my SBD-4 project.

Joel
Keeperofsouls2099
_VISITCOMMUNITY
Florida, United States
Joined: January 14, 2009
KitMaker: 2,798 posts
AeroScale: 2,443 posts
Posted: Friday, August 30, 2013 - 02:36 PM UTC
Looking good can't wait till the end nice job on the cutting

@Allen show off! nice build my man
Keeperofsouls2099
_VISITCOMMUNITY
Florida, United States
Joined: January 14, 2009
KitMaker: 2,798 posts
AeroScale: 2,443 posts
Posted: Friday, August 30, 2013 - 02:38 PM UTC
B are you going to the orlando ipms show?
bdanie6
_VISITCOMMUNITY
New Hampshire, United States
Joined: November 09, 2008
KitMaker: 615 posts
AeroScale: 459 posts
Posted: Friday, August 30, 2013 - 03:32 PM UTC
@Justin, sorry my friend, I will be working to feed my plastiholic habit . If I did go it would be just to look around anyway. I just don't do the contest thing.
Later
Keeperofsouls2099
_VISITCOMMUNITY
Florida, United States
Joined: January 14, 2009
KitMaker: 2,798 posts
AeroScale: 2,443 posts
Posted: Friday, August 30, 2013 - 03:59 PM UTC
Never done the contest thing either figured I'm there why not what's the worst that could happen
bdanie6
_VISITCOMMUNITY
New Hampshire, United States
Joined: November 09, 2008
KitMaker: 615 posts
AeroScale: 459 posts
Posted: Friday, September 06, 2013 - 12:30 AM UTC
Sorry for the lag time between posts. No excuse really, just involved with other stuff from time to time. Right now I am waiting for the primer to dry on bits and pieces. While that is going on, I thought I'd get some progress pictures up

First up, I got the TFOA's assembled and lined up with their stations. These are centerline fuel tank, 2 drop tanks, 4 500lbs "Daisy cutters" per side and 2 chaff/flare dispensers on each side


When I attached the upper air scoop for the engine, there was a bit of a gap, so that needs to be filled.


So far, I've primed the weapons and drop tanks and outer wing panels. I have yet to mask off the cockpit, oil radiator and engine front. After that I am just waiting to head to the LHS or send a purchase order to my favorite online store for more paint!

Later
Joel_W
Staff MemberAssociate Editor
AUTOMODELER
_VISITCOMMUNITY
New York, United States
Joined: December 04, 2010
KitMaker: 11,666 posts
AeroScale: 7,410 posts
Posted: Friday, September 06, 2013 - 12:46 AM UTC
Bruce, looking good. Should really start to come together with the basic camo paint scheme.
Joel
bdanie6
_VISITCOMMUNITY
New Hampshire, United States
Joined: November 09, 2008
KitMaker: 615 posts
AeroScale: 459 posts
Posted: Tuesday, October 29, 2013 - 08:58 PM UTC
Wow, it's been awhile since I've posted here, so here is a small update. I found a few problems on the plane after the primer cured which made necessary some reworking. While doing that my club president asked me to do a Grumman Goose for the memorial display we are doing, so I got distracted with that.
At this point both are now primed and waiting for their first colour coat.


more to come
Later
Joel_W
Staff MemberAssociate Editor
AUTOMODELER
_VISITCOMMUNITY
New York, United States
Joined: December 04, 2010
KitMaker: 11,666 posts
AeroScale: 7,410 posts
Posted: Wednesday, October 30, 2013 - 02:09 AM UTC
Bruce, glad to see that the A-1H didn't become a shelf closet Queen. Looking forward to seeing it with it's paint on.
Joel
chris1
_VISITCOMMUNITY
Auckland, New Zealand
Joined: October 25, 2005
KitMaker: 949 posts
AeroScale: 493 posts
Posted: Wednesday, October 30, 2013 - 06:13 AM UTC
Hi Bruce
I'll be following this with interest as I have the Hasegawa 1/72nd 2 kits in one box (ltd edition)
on the bench at present.

photos to follow


Chris
bdanie6
_VISITCOMMUNITY
New Hampshire, United States
Joined: November 09, 2008
KitMaker: 615 posts
AeroScale: 459 posts
Posted: Wednesday, October 30, 2013 - 09:05 AM UTC
@Joel, not a hanger queen by intent, but rather budget and other commitments. Hopefully I'll get back to it full time now.

@Chris, thank you for the interest, I hope I can do the kit justice. I'm shooting for half as good as Joel and Allens 'Raiders

Later
tinbanger
_VISITCOMMUNITY
Ontario, Canada
Joined: February 04, 2008
KitMaker: 2,507 posts
AeroScale: 1,814 posts
Posted: Wednesday, October 30, 2013 - 09:40 AM UTC
Hi Bruce.
Picked up this thread late in the game.
I am following!
 _GOTOTOP