_GOTOBOTTOM
Modern (1975-today)
Discuss the modern aircraft age from 1975 thru today.
Monogram 1/48 Hawker Harrier Build
didgeboy
_VISITCOMMUNITY
Washington, United States
Joined: September 21, 2010
KitMaker: 1,846 posts
AeroScale: 103 posts
Posted: Sunday, October 06, 2013 - 12:11 PM UTC
Another kit from my childhood. This one was purchased at D&J hobbyshop back in the good old days about 1982 (when I was 12) for probably less than $10. My dad was with me when I bought it so there is a bit of nostalgia associated with this kit since he is no longer with me. This kit has been traveling with me for years, always intending to build it and simultaneously knowing that this is probably not a great kit. But it has recently been sitting on a shelf close to the desk and I thought why the hell not, one more project to add to the list, which currently consists of:
Dragon M1A1 AIM for the Thunder Run Museum Build
Trumpeter FAUN Tank Transporter, for the TT Campaign
Tamiya 1/48 A-10, that was picked up for $6 at a show
and now this.

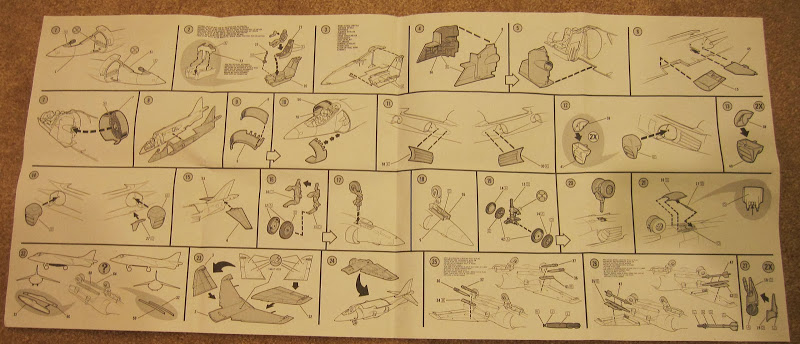
After sorting through the box and taking out all of the "other" parts that ended up there from other kits I still needed instructions as those are no where to be seen. TGF the internet and Google Images. Instructions will be posted for those that want to follow along. This is going to be an OOB build which means that at some point along the way I will decide that there is need of some scratch building and or detail element. . . .at least I am consistent.

Although I assumed that I had started this kit, looks like I had not, other than removing some parts from the trees. I cannot see that any cleanup of those parts even happened so this is going to be a start to finish project. The goal being to get this done, do a good job and get more practice on the wingy thigs, as I am an armor guy (mostly).

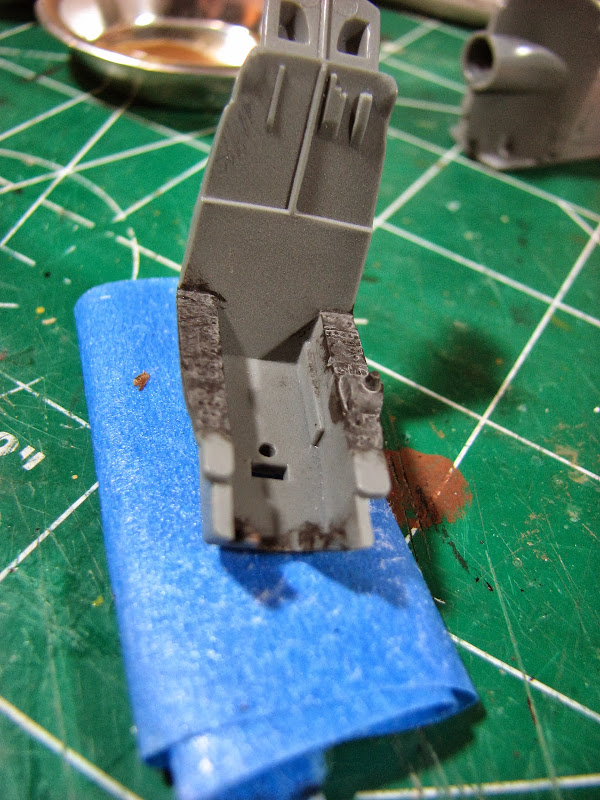
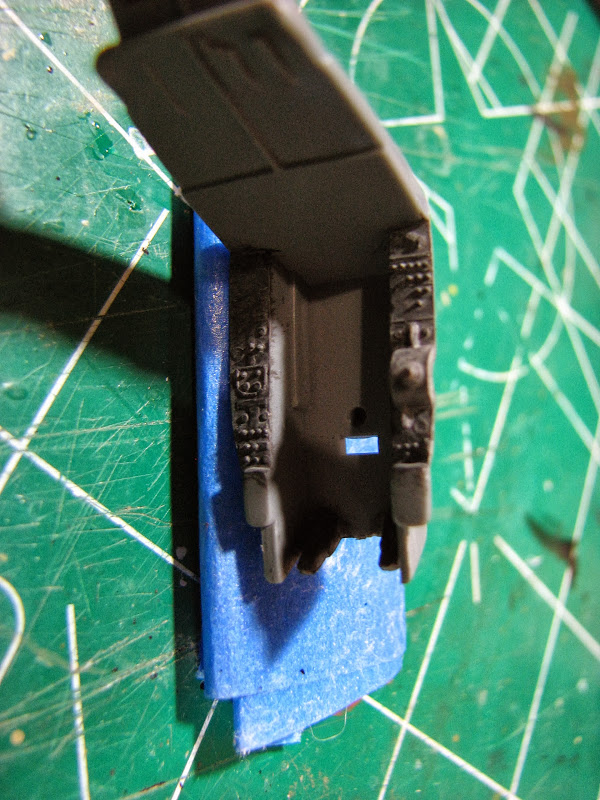
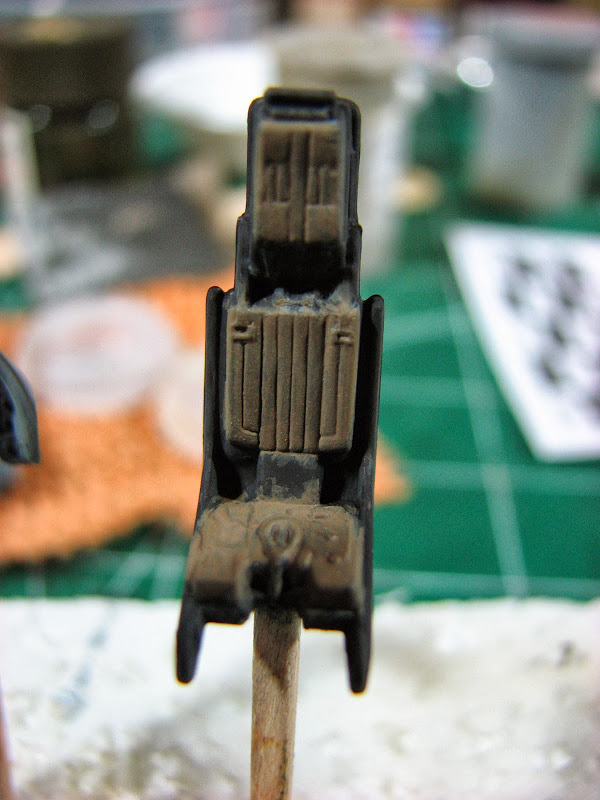
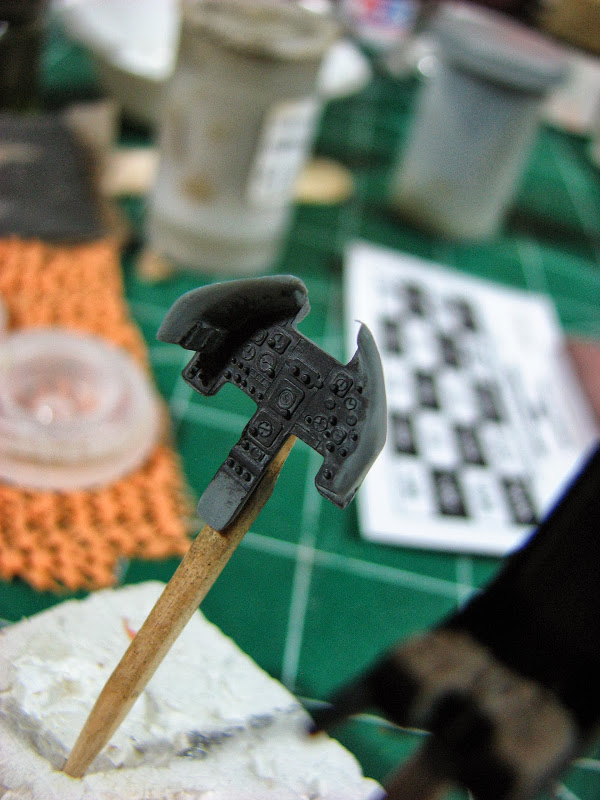
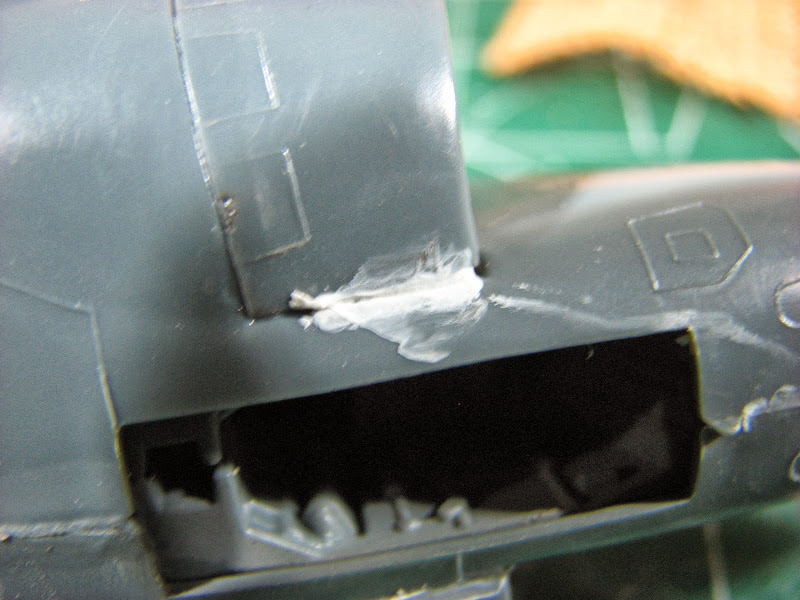
So, knowing that all planes need to have their interior done first I began with sanding the cockpit parts, 20, 21, 22 and 23 which are the tub, seat, stick and instruments respectively. I then glued the two halves of 66 together and sanded that a bit. Once I realized or rather accepted that painting the cockpit is my next logical step I also realized that I needed to wash the whole mess to get 30 years of grease and dust off. Parts are drying as I write this.

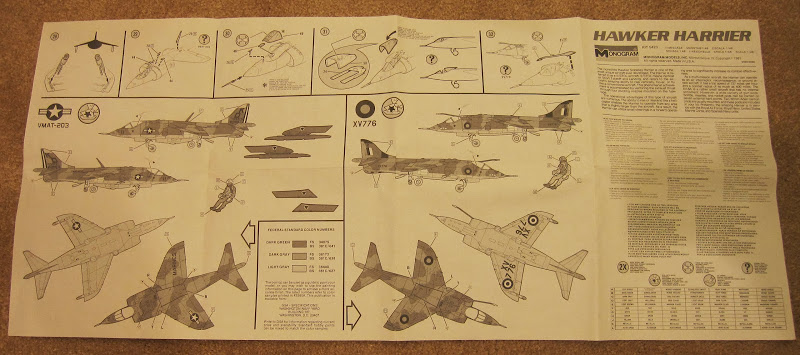
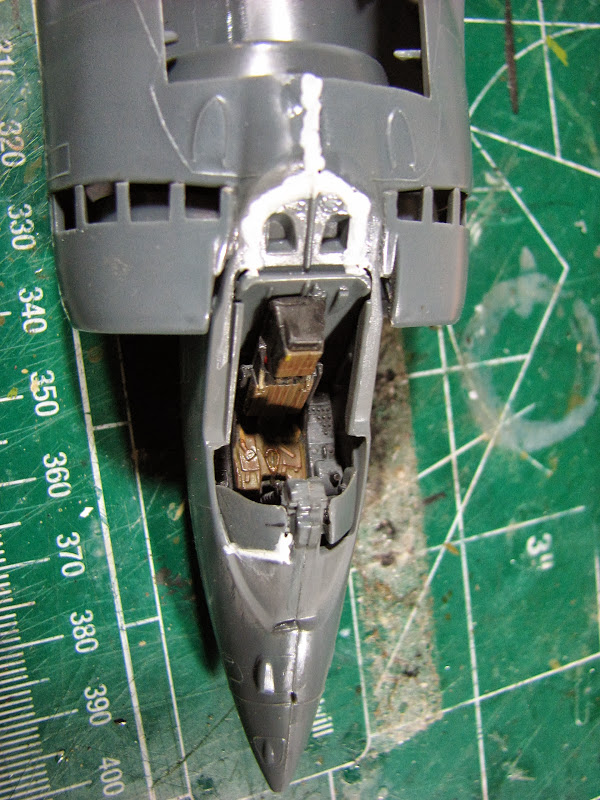
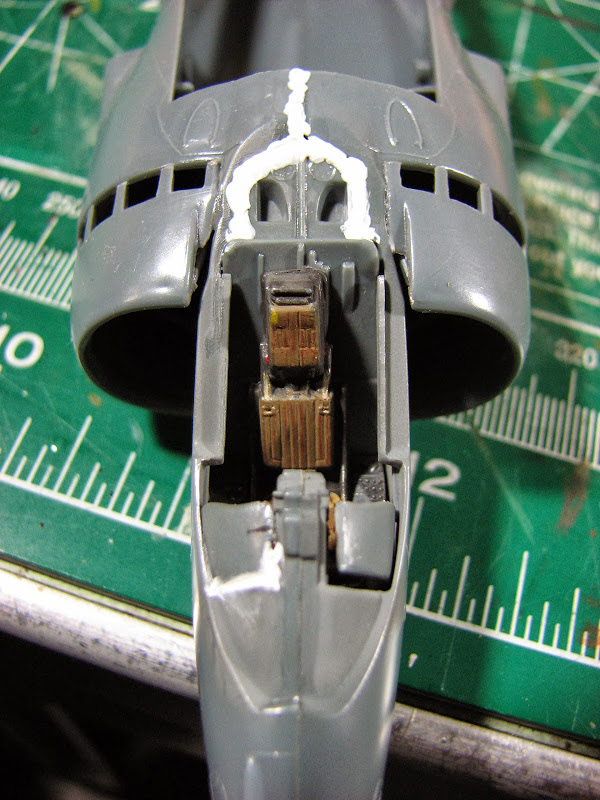
Now, having told you all of that I really do not build aircraft, have only finished one that was marginal at best and I do not build in 1/48. Having said all of that I have 4 1/48 kits including this that need to be built, one of which is a B-1B that I got when I was 16. Because this is a new scale for me I am sure the learning curve will be slightly steeper than I am used to and the need for carefulness even more so. With that being said I am studying the online images of the AV-8A cockpit and hoping that I can find the right shade of grey for the interior. Wish me luck. Cheers.


Jessie_C
_VISITCOMMUNITY
British Columbia, Canada
Joined: September 03, 2009
KitMaker: 6,965 posts
AeroScale: 6,247 posts
Posted: Sunday, October 06, 2013 - 12:21 PM UTC
This kit, like many from Monogram's heyday, is quite well detailed right out of the box. The only things you might wish to add to the cockpit are the throttle and nozzle controls for the left side console, and possibly a set of seat belts. RAF aircraft usually have their cockpits painted in Admiralty Grey, but Harriers got pretty beaten up with all the use they got, so any medium grey will work under the weathering you'll want to do.
chrism
_VISITCOMMUNITY
United States
Joined: January 05, 2012
KitMaker: 160 posts
AeroScale: 156 posts
Posted: Sunday, October 06, 2013 - 01:48 PM UTC
I grew up building many of the Monogram kits, it's nice to see many of them being re-released by Revell (thanks Hobbico!). Although they have raised panel lines and are not up to today's standard, they are fun to build and bring back memories. Best wishes on your build!
didgeboy
_VISITCOMMUNITY
Washington, United States
Joined: September 21, 2010
KitMaker: 1,846 posts
AeroScale: 103 posts
Posted: Sunday, October 13, 2013 - 04:29 PM UTC
This week has been crazy busy at work, cooking class and a private dinner kept me busy most of the week, not to mention the day to day and the new recipes we are creating. Anyway, last week I washed all of the parts that I had, and looks like all is there (save part 17 which is a little fin on the right side behind the first nozzle, which seems to be missing) and managed to get them dry and begin on the cockpit. I laid down a mix of grey that I came up with that seems to be close to the interior grey that was used and shot this on all of the cockpit pieces and let those dry. I then went over all of the instruments with a drybrush of black to pick out the individual panels and it looked "good" but not great. ALso got a coat of color on the seat that seems to be close. And that was where things were left until today.
Today I managed to get the cockpit "done" at least with everything other than oil washes, but that will come later. Confident that I can do that using a spot or pin wash before adding the canopy. Picked out some detail on the seat with red, yellow and some drybrush silver. Also hit the seat belts but not too happy with the results, we will see. Got the cockpit tub assembled and mounted the hole deal to the right side fuselage half. Since I had gotten that far I decided to get the whole deal going.
SO I shot the turbo fan with some black and then did a dry brush of silver. Mounted this and the front wheel well to the back of the tub and once set I started on the big air intakes forward of the fan. Once these were assembled they were mounted to each half of the fuselage. The two halves were mated and glued in sections. Once I had began to glue I realized quickly there would be need for filling. The cockpit instrument panel does NOT mate up with the left side fuselage well and a BIG gap is created that I have chosen to fill with AV Putty, building it up in layers. I have used the AV (Vallejo) putty on all of the seams that need filling and sanding too. The air intakes needed some minor gaps filled as did the fuselage top and bottom, especially the area around the tail probe as the two halves did not mate well here. The other area on the bottom was the area around the air brake housing, one side did not meet up with the fuselage, so putty to the rescue.
All four nozzles are assembled and putty on the seams waiting for sanding. The deflectors on the rear nozzles were mounted today as well. All of the gear is off the trees, wheel halves glued. The rear gear strut is cleaned up and ready for paint as are the wheels. The two wingtip gear are cleaned up as well. The canopy glass has just received a future dip and is drying.
So, things progressing well and steadily. I would like to get the build finished on this and hold for painting as I have two other big kits that are needing to be done by years end for campaigns and group builds. Photos to follow soon. Cheers.
JPTRR
Staff MemberManaging Editor
RAILROAD MODELING
#051
_VISITCOMMUNITY
Tennessee, United States
Joined: December 21, 2002
KitMaker: 7,772 posts
AeroScale: 3,175 posts
Posted: Monday, October 14, 2013 - 12:46 AM UTC
I never built this model but as far as I'm concerned, Monogram kits from that era are competitive with Tamigawa kits of today.
didgeboy
_VISITCOMMUNITY
Washington, United States
Joined: September 21, 2010
KitMaker: 1,846 posts
AeroScale: 103 posts
Posted: Wednesday, October 16, 2013 - 06:58 AM UTC
Its not a "bad" kit but I would not say that it is up to the Hasegawa/Tamiya (original-not repops) level of fit and or detail, but maybe I am biased (severely).

So photos below, I painted the interior of the front wheels well gloss white, really to test my Iwata CMC+ knock off to see if it was working again or not, turns out, no, looks like a bad O ring. Ordered a new O ring from Chicago Airbrush Supply as well as a new crown cap (one corner chipped off when my daughter knocked it off the stand), should be here in a few days.
I have all of the nozzels put together, seams filled and sanded and waiting for install. Landing gear is also waiting. Think I will paint the gear ahead of instal to help with the painting issues. So without further ado here you go.


didgeboy
_VISITCOMMUNITY
Washington, United States
Joined: September 21, 2010
KitMaker: 1,846 posts
AeroScale: 103 posts
Posted: Friday, October 18, 2013 - 03:37 AM UTC
Last night I mounted the wing pylons in preparation for painting. I needed to paint some of the landing gear pieces , such as the forward strut so that I could assemble with out overspraying the tires, which were done on sunday. While I still had some paint in the cup I shot the bottom seams and the wing roots, to see how the joints looked. Well, one good one not so good, so out came the putts and tomorrow I will sand it down and see. I also ran some sand paper over the joint just forward of the front gear. The fit is a bit off with one side having a lip. I think I took care of this and hopefully once the primer is on it will be good to go. All for now, cheers.
didgeboy
_VISITCOMMUNITY
Washington, United States
Joined: September 21, 2010
KitMaker: 1,846 posts
AeroScale: 103 posts
Posted: Monday, October 21, 2013 - 02:39 AM UTC
Managed to shoot vallejo white primer on the harrier last night after masking off the cockpit and front wheel well with som tissue and tape, mostly tissue.i hope to get the underside sprayed in light grey tonight and recheck all the seam especially the wing roots, top and bottom. The base coats are on the gear and the open air brake, at least the inner surface. The gear needs to have the detail painting done as well as the interior surfaces of the bays and the cockpit trim, which appears to be that zinc chromate around the glass. Moving quickly but still plenty to do. Cheers.
didgeboy
_VISITCOMMUNITY
Washington, United States
Joined: September 21, 2010
KitMaker: 1,846 posts
AeroScale: 103 posts
Posted: Tuesday, October 22, 2013 - 05:04 PM UTC
Got the primer on the other night, trusty vallejo grey, no problems. Tonight I did my pre shading, never tried this before, and seemed to go well. Once I get the base colors on I will see how it works out. Picture tomorrow.
didgeboy
_VISITCOMMUNITY
Washington, United States
Joined: September 21, 2010
KitMaker: 1,846 posts
AeroScale: 103 posts
Posted: Thursday, October 24, 2013 - 04:01 AM UTC
Got her painted yesterday. Yay me! But I have to say that I absolutely HATE Model Master Acryl, that stuff SUCKS!!! All of the paint I laid down looks great except for the MMA. It totally peels off! Laid down the Vallejo primer, which is great and help create a really good surface for most paints to hold on to but not the MMA. The Tamiya holds beautifully. Even with Frog tape, "sensitive" style, it peeled off, so now I have to do touch ups on the bottom, for a third time. Yes, third. Not excited about this. But I promised pics so here you go, let me know.


didgeboy
_VISITCOMMUNITY
Washington, United States
Joined: September 21, 2010
KitMaker: 1,846 posts
AeroScale: 103 posts
Posted: Friday, October 25, 2013 - 06:32 AM UTC
All of the camouflage has been done free hand with no masking of any kind and just following a small print out of the monogram instructions as a guide. The Tamiya formula of XF20 + XF2 is NOT an exact match for the MMA colour. The MMA colour seems to be a bit more toward the tan ish/ buff range and the Tamiya mix leans toward the grey spectrum. In reality the Tamiya looks closer to the pictures and real planes I have seen, but what are you gonna do? So hit the spots that needed fixing yesterday with the Tamiya mix and I might need to go back over the whole under side of the plane to make it match but not sure I really want to do that.
didgeboy
_VISITCOMMUNITY
Washington, United States
Joined: September 21, 2010
KitMaker: 1,846 posts
AeroScale: 103 posts
Posted: Sunday, October 27, 2013 - 04:26 PM UTC
Today I learned a few things, or rather re learned some.
1). If all else fails, follow directions.
2). Check your references, at least twice if not more.
3). Plan ahead.

So after I had banged out the nice paint job and had all the issues with the peeling paint and retouches, etc. I realized that I had left a few items off, fun. So got those pieces on, only to realize that a few of the pylons were not totally cleaned of seam lines and further more are the wrong colour. Turns out they go with the grey on those.

But I did manage to get all of the rest of the items on save the payload, but those need to be painted before they go in place. Once those are on, future then decals, then future then oils. Will post some pics soon. Cheers.
Jessie_C
_VISITCOMMUNITY
British Columbia, Canada
Joined: September 03, 2009
KitMaker: 6,965 posts
AeroScale: 6,247 posts
Posted: Sunday, October 27, 2013 - 04:34 PM UTC
If you haven't glued the pylons, don't do it until after the underwing decals go on. If you've glued them, you're in for an entertaining trimming session
didgeboy
_VISITCOMMUNITY
Washington, United States
Joined: September 21, 2010
KitMaker: 1,846 posts
AeroScale: 103 posts
Posted: Sunday, October 27, 2013 - 04:43 PM UTC
Those are done, so looking forward to that now. . . .
didgeboy
_VISITCOMMUNITY
Washington, United States
Joined: September 21, 2010
KitMaker: 1,846 posts
AeroScale: 103 posts
Posted: Sunday, November 17, 2013 - 04:38 AM UTC
Decals arrived last night so work will begin once I have some free time again, not sure when that is going to be. Updates to follow hopefully soon.
didgeboy
_VISITCOMMUNITY
Washington, United States
Joined: September 21, 2010
KitMaker: 1,846 posts
AeroScale: 103 posts
Posted: Saturday, November 23, 2013 - 04:10 AM UTC
Decal application has started, slowly. One of the tail decals had a bit of an issue but got it mostly straightened out. Pics and more progress later. Cheers
Holdfast
Staff MemberPresident
IPMS-UK KITMAKER BRANCH
#056
_VISITCOMMUNITY
England - South West, United Kingdom
Joined: September 30, 2002
KitMaker: 8,581 posts
AeroScale: 4,913 posts
Posted: Saturday, November 23, 2013 - 08:59 PM UTC
Nice work Damon
If you haven't already fitted the undercarriage, make the centre leg able to slide up and down, that way you will be able to make it sit on all of its wheels
didgeboy
_VISITCOMMUNITY
Washington, United States
Joined: September 21, 2010
KitMaker: 1,846 posts
AeroScale: 103 posts
Posted: Sunday, November 24, 2013 - 06:13 PM UTC
It's gonna lean to one side just like the real deal, unfortunately. Why does the word "Marines" seem to be such a problem for me? Seriously no other problems with decals other than that one, this time on the wing. Damn! Only other issue is that I placed a wing pylon decal where the ejection seat decal goes. A now I feel kinda stupid. But what are you gonna do. Cheers
modelguy2
_VISITCOMMUNITY
Ohio, United States
Joined: March 09, 2002
KitMaker: 818 posts
AeroScale: 137 posts
Posted: Monday, November 25, 2013 - 04:28 AM UTC
Wait!! those 2 rearward facing scoops on top of the fuselage don't belong

YumaAV8A-WF158368-2 copy
Jessie_C
_VISITCOMMUNITY
British Columbia, Canada
Joined: September 03, 2009
KitMaker: 6,965 posts
AeroScale: 6,247 posts
Posted: Monday, November 25, 2013 - 04:49 AM UTC
That's because they're supposed to be the forward facing scoops just behind the intake blow-in doors. The model even has scribed-in position marks for them.
modelguy2
_VISITCOMMUNITY
Ohio, United States
Joined: March 09, 2002
KitMaker: 818 posts
AeroScale: 137 posts
Posted: Monday, November 25, 2013 - 02:11 PM UTC

Quoted Text

That's because they're supposed to be the forward facing scoops just behind the intake blow-in doors. The model even has scribed-in position marks for them.


Which is weird because the kit has those scoops as separate parts?
Jessie_C
_VISITCOMMUNITY
British Columbia, Canada
Joined: September 03, 2009
KitMaker: 6,965 posts
AeroScale: 6,247 posts
Posted: Monday, November 25, 2013 - 02:15 PM UTC
Monogram kits of that era were generally pretty accurate but the odd mistake did creep in from time to time
didgeboy
_VISITCOMMUNITY
Washington, United States
Joined: September 21, 2010
KitMaker: 1,846 posts
AeroScale: 103 posts
Posted: Monday, November 25, 2013 - 02:51 PM UTC
I think I mounted those correctly, little cold to sit in the garage tonight and do more decaling, but will try to get some pics up soon and you can let me know how I am doing,
didgeboy
_VISITCOMMUNITY
Washington, United States
Joined: September 21, 2010
KitMaker: 1,846 posts
AeroScale: 103 posts
Posted: Friday, November 29, 2013 - 05:21 PM UTC
Decals coming along slowly, but can only manage an hour or so each day with the biting cold right now. Most of the top side are done but still have the under wing decals to worry about next round. Still no pics yet.
didgeboy
_VISITCOMMUNITY
Washington, United States
Joined: September 21, 2010
KitMaker: 1,846 posts
AeroScale: 103 posts
Posted: Sunday, December 01, 2013 - 06:02 PM UTC
Ok, been promising pics for a few weeks now and finally got around to not only taking some but actually getting them loaded up too. Let me know how it looks. Cheers.


 _GOTOTOP