This year I plan a project for which I most likely will have to make (first time) all the decals myself. When more or less successful I also want to share what I learn in a feature.
Before starting, I would highly appreciate it if anyone having experience with decal printing would share it with me by answering to this topic.
Links to good existing articles are also very welcome of course.
Hosted by Jim Starkweather
Decal printing: call for information
drabslab

Joined: September 28, 2004
KitMaker: 2,186 posts
AeroScale: 1,587 posts

Posted: Tuesday, January 07, 2014 - 08:19 PM UTC
Posted: Tuesday, January 07, 2014 - 11:47 PM UTC
Quoted Text
This year I plan a project for which I most likely will have to make (first time) all the decals myself. When more or less successful I also want to share what I learn in a feature.
Before starting, I would highly appreciate it if anyone having experience with decal printing would share it with me by answering to this topic.
Links to good existing articles are also very welcome of course.
Info on making paint masks would also help.
Richard

Posted: Wednesday, January 08, 2014 - 12:23 AM UTC
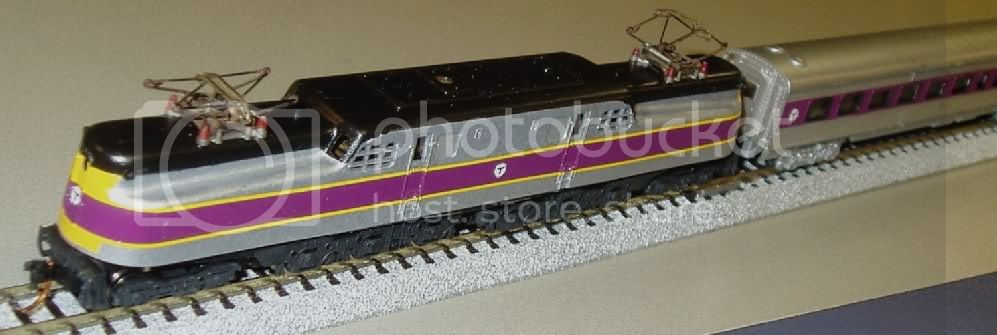
Ive been designing and printing my own decals for a couple of years. I started with this N gauge passenger car

white text on a red rectangle, printed on clear film over a cream painted body.
this was printed on Testors clear film for ink jet, on an Epson inkjet printer. Ink will wash right off the film if you put it in water, you have to coat the finished decal with a clear fixative. Testors has a spray fixitive product as well as clear and white films. I dont care for the Testors film, it is thick and a bit elastic. There are other products out there.
Since them I have settled on Microscale films. Ive use their trimfilm, stripes,letter sets, and decals for railway work for many years.
the clear film is super thin and supple, but does have a slight yellow cast which is a little disappointing on a gloss white model
Ive settled on Krylon rattle can clear gloss for fixing the ink, it dries thin and pliable.
you must cut out close around the decal design, as of course the whole sheet is coated film.
My printer is a HP 2020 color laser jet, but there are many perfectly good similar color laser printers for under $500.
a full set of color toner cartriges cost about $160.
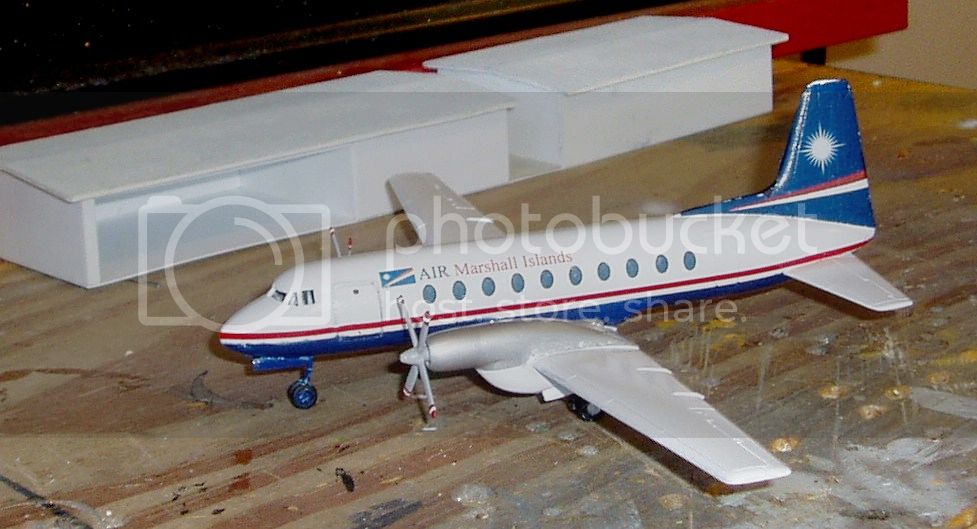
for graphic design you are on your own. I am not a design professional. I happen to have MS office Word, excel, and Publisher. I often use MS Paint to create simple designs. I find what I need like the Marshall Islands star and flag, on Wikipedia and import the images into a Word or Publisher document. both of these have excellent image scaling functions
I waste alot of plain paper test printing my designs, adjusting scale by trial and error.
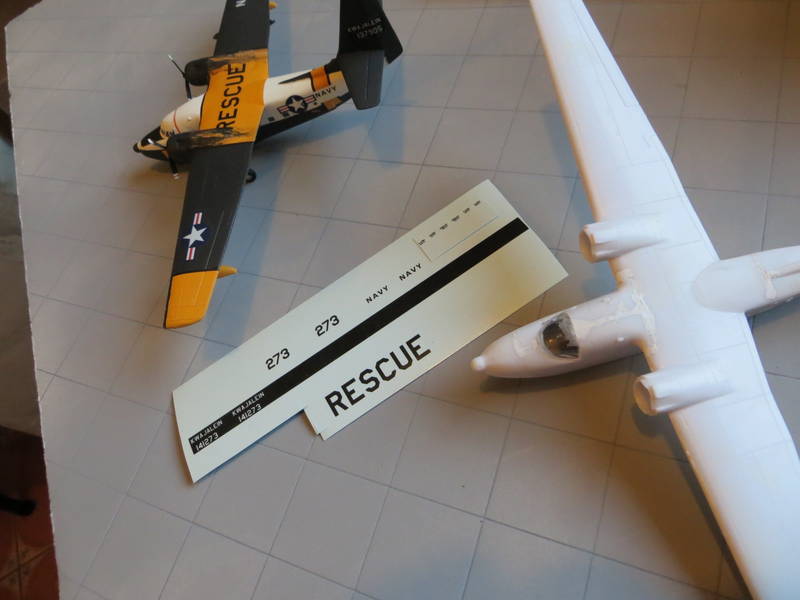
I printed a second set of these HU-16 Rescue decals for a second model. thats a Word document, just using different fonts, font sizes, background colors.
that will do for a start. ask any questions you might think of.

white text on a red rectangle, printed on clear film over a cream painted body.
this was printed on Testors clear film for ink jet, on an Epson inkjet printer. Ink will wash right off the film if you put it in water, you have to coat the finished decal with a clear fixative. Testors has a spray fixitive product as well as clear and white films. I dont care for the Testors film, it is thick and a bit elastic. There are other products out there.
Since them I have settled on Microscale films. Ive use their trimfilm, stripes,letter sets, and decals for railway work for many years.

the clear film is super thin and supple, but does have a slight yellow cast which is a little disappointing on a gloss white model

Ive settled on Krylon rattle can clear gloss for fixing the ink, it dries thin and pliable.
you must cut out close around the decal design, as of course the whole sheet is coated film.
My printer is a HP 2020 color laser jet, but there are many perfectly good similar color laser printers for under $500.
a full set of color toner cartriges cost about $160.
for graphic design you are on your own. I am not a design professional. I happen to have MS office Word, excel, and Publisher. I often use MS Paint to create simple designs. I find what I need like the Marshall Islands star and flag, on Wikipedia and import the images into a Word or Publisher document. both of these have excellent image scaling functions
I waste alot of plain paper test printing my designs, adjusting scale by trial and error.
I printed a second set of these HU-16 Rescue decals for a second model. thats a Word document, just using different fonts, font sizes, background colors.

that will do for a start. ask any questions you might think of.
Posted: Wednesday, January 08, 2014 - 03:43 AM UTC
I have done a small amount of this using Microscale film and an inkjet printer but my problems are white, can't print it and can't cut it, and light colours, tend to show a dark substrate through the print. Dark decals on a light background are fine

Mcleod

Joined: April 07, 2010
KitMaker: 1,028 posts
AeroScale: 939 posts

Posted: Wednesday, January 08, 2014 - 04:30 AM UTC
Posted: Wednesday, January 08, 2014 - 04:39 AM UTC
yes you cant "print" white. that is the achille's heal of desktop printing. the trick is choose a background color that matches the base color of the model. this has to be done on a trial and error basis. then with that color as a background in the design anything "white" font color etc, the printer will leave empty, so that the white of white film or another color will show through.
I have had some success at this, see the first example.
and less successful attempts, see the tail of the Albatross.
ink jet ink is unfortunately quite transparent, laser ink less so. this must be adjusted for, again on an experimental basis.
I have had some success at this, see the first example.
and less successful attempts, see the tail of the Albatross.
ink jet ink is unfortunately quite transparent, laser ink less so. this must be adjusted for, again on an experimental basis.
StukaJr

Joined: April 26, 2010
KitMaker: 346 posts
AeroScale: 292 posts

Posted: Thursday, January 09, 2014 - 07:06 AM UTC
This is what I currently use:
http://www.bare-metal.com/Experts-Choice-Decal-Film.html
I test colors on Photostock or Photopaper, until I get the color / brightness I want. Arrange multiple decal designs "backups" on one page, in case things go upside down in a hurry and you need to try again.
As per instructions on the page. At least two applications of Liquid Decal film (allow printed paper to "rest" for at least couple of hours) applied with non-overlapping strokes with flat wide brush (no back and forth). Apply over gloss painted white are wet with MicroSet, spread and get rid of airbubbles with brush and more Microset. When almost dry, I use Microsolve in 2 passes and let dry overnight.
Current CONS:
I use cheapy inkject Kodak printer and it flips out when I set quality to "Best", so I have to settle for "Notmal" which is not using the most ink. Printing at 600 dpi - feels a bit transparent and I assume it's the quality setting.
As decals set, they split in places, revealing the underlying (white) color. As decals are rather transparent (inkjet, settings), they tend to not patch very well. I imagine this may be helped once I find way for printer to use more ink / apply more Liquid film passes
Thinks to note:
Entire sheet of paper is carrier film, so you need to cut as close as possible to the image.
This paper edges like to roll on themselves when you try to curve edge over a corner - watch it and continue spreading over with a brush.
Less messing with setting decals the better, except for where things need attention - resulting decals are quite fragile but film is strong... Currently looking for ways to strengthen the decals themselves.
StukaJr

Joined: April 26, 2010
KitMaker: 346 posts
AeroScale: 292 posts

Posted: Thursday, January 09, 2014 - 07:13 AM UTC
These are results of my trials in 1/48 scale, with Eduard kits:
Lt. Bruno Stachel's DR.I

Willi and Bruno's DR.I's

Bruno Stachel's Pfalz D.III

Self made template for the shapes and decals.
Lt. Bruno Stachel's DR.I

Willi and Bruno's DR.I's

Bruno Stachel's Pfalz D.III

Self made template for the shapes and decals.
Posted: Thursday, January 09, 2014 - 07:40 AM UTC
FWIW, here's how I salvaged the decals for my Kingfisher.
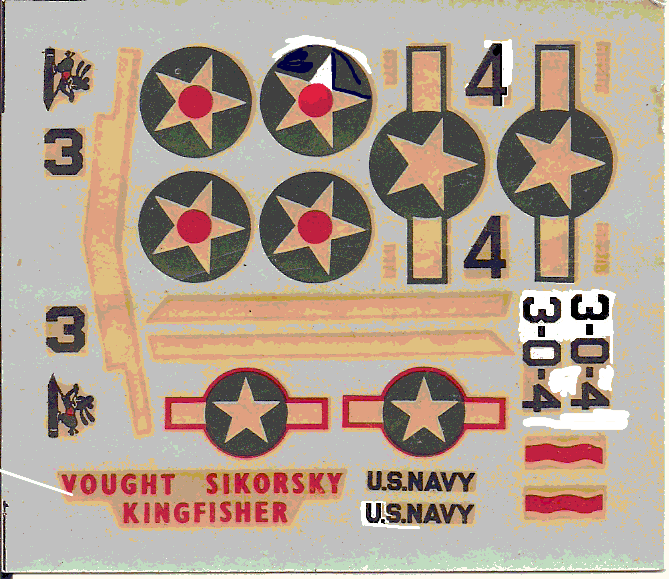
I scanned the original sheet into a MS Paint compatible format. Went into Paint, and turned off every pixel that didn't belong. Turned every pixel I wanted to keep into black. (Salvages the U.S.Navy, 3-0-4 and 4 markings) Blew away everything else. Printed (HP ink jet) onto a sheet of Testor's clear decal film. And promply touched and smeared the ink trying to get it out of the printer.... Ran it again and let it sit on the printer for a long time, they sprayed it with Testor's decal bonder. let that set overnight. I also sprayed a section of clear film with black paint for the wing walks. Results weren't terribly bad:
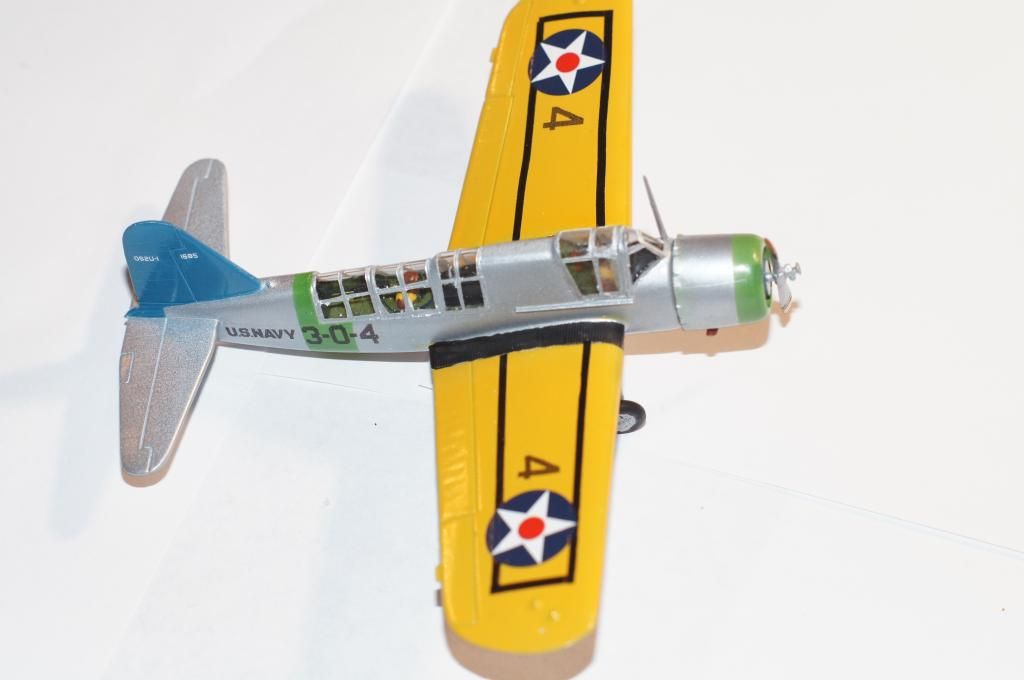
There is white film out there, but yes it ouly helps if there is an outline for the white.


I scanned the original sheet into a MS Paint compatible format. Went into Paint, and turned off every pixel that didn't belong. Turned every pixel I wanted to keep into black. (Salvages the U.S.Navy, 3-0-4 and 4 markings) Blew away everything else. Printed (HP ink jet) onto a sheet of Testor's clear decal film. And promply touched and smeared the ink trying to get it out of the printer....
 Ran it again and let it sit on the printer for a long time, they sprayed it with Testor's decal bonder. let that set overnight. I also sprayed a section of clear film with black paint for the wing walks. Results weren't terribly bad:
There is white film out there, but yes it ouly helps if there is an outline for the white.

Posted: Thursday, January 09, 2014 - 07:54 AM UTC
nice work!
MS Paint is a simple but capable tool.
Microscale sells black film, and sheets of different widths of black lines ( and many other colors), which i find very useful
MS Paint is a simple but capable tool.
Microscale sells black film, and sheets of different widths of black lines ( and many other colors), which i find very useful
StukaJr

Joined: April 26, 2010
KitMaker: 346 posts
AeroScale: 292 posts

Posted: Thursday, January 09, 2014 - 06:53 PM UTC
GIMP is also an open source (free) alternative to Photoshop - you need mad pixel blotting skills to make things look good in MS Paint - not knocking it, just takes more dedication than some of us have 


robot_

Joined: March 08, 2009
KitMaker: 719 posts
AeroScale: 691 posts

Posted: Thursday, January 09, 2014 - 09:36 PM UTC
I would suggest a vector illustration programme for designing decals- then if you need them in a scale (or three) larger, then there is no problem with resolution.
Inkscape is a free and open source alternative to Adobe Illustrator.
I have done a lot of my own decal printing, as I like building particular aircraft, rather than a box scheme.
Here is the local Police helicopter I am (very slowly) building in 1/72:
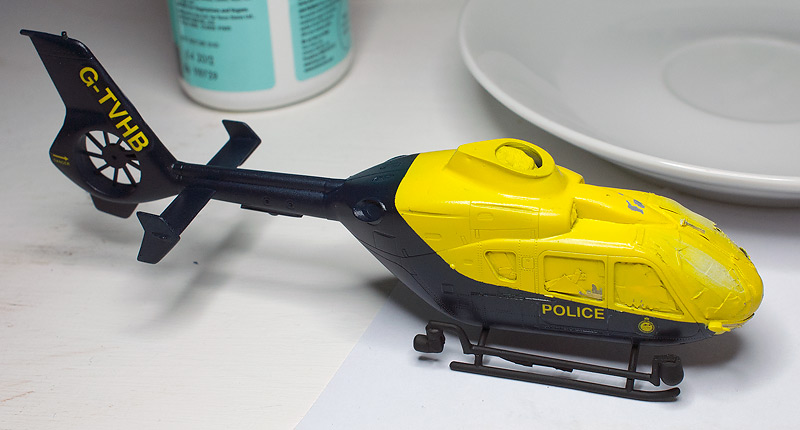
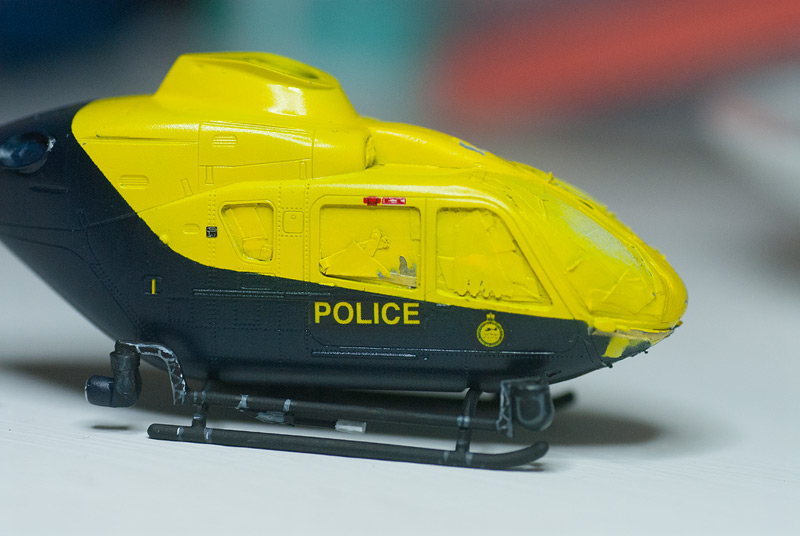
Here is a thread on Britmodeller on the subject.
I describe my technique somewhere in the middle of the thread.
Inkscape is a free and open source alternative to Adobe Illustrator.
I have done a lot of my own decal printing, as I like building particular aircraft, rather than a box scheme.
Here is the local Police helicopter I am (very slowly) building in 1/72:


Here is a thread on Britmodeller on the subject.
I describe my technique somewhere in the middle of the thread.
gawrycht

Joined: March 04, 2010
KitMaker: 14 posts
AeroScale: 0 posts

Posted: Wednesday, June 03, 2015 - 12:20 AM UTC
Did you say your "rescue" decals were in Word font? Would you, by any chance, be willing to share that file???
I am just finishing a PBY Catalina for my father, in 1/72 scale, as the rescue version stationed at Pensacola NAS and have not been able to find a font that looks right anywhere after weeks of googling! Yours looks exactly like what I am looking for. If you can't share the file, can you tell me where you got the font? Many thanks!
Tom
Posted: Wednesday, June 03, 2015 - 12:24 AM UTC
Quoted Text
Did you say your "rescue" decals were in Word font? Would you, by any chance, be willing to share that file???
I am just finishing a PBY Catalina for my father, in 1/72 scale, as the rescue version stationed at Pensacola NAS and have not been able to find a font that looks right anywhere after weeks of googling! Yours looks exactly like what I am looking for. If you can't share the file, can you tell me where you got the font? Many thanks!
Tom
sure. I can send you a printable file. I can send you the font as well.
Posted: Wednesday, June 03, 2015 - 03:09 AM UTC
Kevlar06

Joined: March 15, 2009
KitMaker: 3,670 posts
AeroScale: 833 posts

Posted: Wednesday, June 03, 2015 - 06:19 AM UTC
Everything stated above is correct, I frequently print my own serials, warnings, placards or squadron insignia for 1/32 scale WWI aircraft, . Microscale, Bare Metal Foil and Testors all make clear decal paper, Testor's also makes white decal paper. You can pre-paint decal paper any color you want, including white, and bubble jet print over it. The key is having a dead flat finish on the paper to print on-- a glossy finish won't let the ink set properly. I've used Testor's Dullcoat in the spray can, but I prefer airbrushing it from the bottle, thinned with lacquer thinner at about 50%. Here's my method:
1) spray by "misting" the decal paper with dullcoat and let it dry for at least an hour.
2) Print the decal paper with what ever design you've come up with on your computer.
3) Let the printed decals dry for at least another hour
4) overcoat the decals with either dullcoat or glosscoat by misting again depending on what effect you're after. Remember, the idea is to put a gradual light fixative coat on the decals, not to put on a heavy coat.
5) Remember, you can airbrush decal paper in any color or combination of colors and designs you want before you print if you're after a colored background. If you want to print over a painted surface, just be sure it's a dead flat base you're printing over. One other thing-- always print your designs on plain paper first to check for sizing and color-- no sense wasting expensive decal paper!
VR, Russ
 |


