_GOTOBOTTOM
Pre-Flight Check
Constructive critique of your finished or in-progress photos.
AM P-51 'Betty Jean' build
PeeJay74
#363
_VISITCOMMUNITY
Pennsylvania, United States
Joined: January 08, 2014
KitMaker: 425 posts
AeroScale: 401 posts
Posted: Saturday, January 11, 2014 - 01:56 AM UTC
Hi all. I thought I would try my hand at a build log. I am going to build Accurate Miniatures' P-51 using some AMS goodies:

Eagle Strike's markings for P-51 s/n 41-37367 'Betty Jean', 154th RS, Sicily, 1943 from their Early 'Birdcage' P-51/P-51Bs set
Squadron vacuum formed canopy
Ultracast resin seat w/ harness
Quickboost 20mm cannon barrels

I built AM's A-36 about 6 months ago when I first picked up the glue again, but I did a straight OOB build and didn't weather/fade the finish at all. I like it, but an early Mustang wearing 100 mission markings shouldn't look "factory fresh". I am hoping to do more with this one, and want to try out some techniques to fade the paint, open the cockpit, and add weathering. I have never used pastels or vax canopies so it should be interesting to try.

Here is the A-36 Apache...


...and what I'm working with this time.


Please feel free to offer insights/suggestions as I go, I appreciate anyone loaning me some knowledge.
PeeJay74
#363
_VISITCOMMUNITY
Pennsylvania, United States
Joined: January 08, 2014
KitMaker: 425 posts
AeroScale: 401 posts
Posted: Saturday, January 11, 2014 - 12:29 PM UTC
Already ran into a snag doing research.

I have several good references on early Mustangs and found photos of 'Betty Jean' in three of them. (S/SP In Action No. 211, Walk Around 5513, and P-51 Mustang 6070) Two photos label her as a P-51 of the 111th TFS, and the third has her as an F-6A of the 154th. The decal sheet straddles the fence, labeling her as a P-51 of the 154th. AM only included the camera with the F-6A kit, so I was hoping to find proof she was a plain P-51 and not need it. The two decent photos of 'Betty Jean'...


photos are from Squadron/Signal references

...neither of which show her port side or offer a decent view through the rear cockpit to prove the camera was mounted. Wings of Fame Volume 1 states North American built 150 P-51's armed with 20mm Hispanos for England, 55 of which the US kept and fitted with cameras redesignating them F-6A's. I don't have access or desire to look up all of the serial numbers, but I did find a gent who had already done it for me. Google turned up a post by Revi16 on 12oclockhigh.net that broke down the serial numbers and their dispositions:

Quoted Text

British ordered 150 aircraft, NA-91/P-51, 41-37320-37469, FD418-FD567.

93 aircraft where shipped to England as Mustang IA
FD438/41-37340 - FD449/41-37351
FD465/41-37367
FD470/41-37372-FD509/41-37411
FD528/41-37430-FD567/41-37469

55 retained by USAAC for photo recon variant P-51-1NA, later F-6A.

2 aircraft retained for Merlin modification (NA-101, XP-51B).
FD450/41-37352 & FD519/41-37421


'Betty Jean' (s/n 41-37367) is specifically listed as not being converted over, so I think all misprints and misidentified photo captions aside I am safe assuming she was indeed a P-51 without the camera mod. Sorry to bore everyone with all of that, I'm not a rivet counter but I at least wanted to know I had the right markings for the kit!

As for building, I am hoping to get some work done on her soon.
Joel_W
Staff MemberAssociate Editor
AUTOMODELER
_VISITCOMMUNITY
New York, United States
Joined: December 04, 2010
KitMaker: 11,666 posts
AeroScale: 7,410 posts
Posted: Sunday, January 12, 2014 - 03:11 AM UTC
Paul,
Your A-36 Apache looks like a very well built model. No need to explain why it wasn't weathered. Every aircraft at one time looked new, simply because they were. The degree of weathering is up to you.

Will be following your build of AM's P51-A. You've more them proved that the aircraft you're modeling wasn't converted to a F-6A.
Joel
PeeJay74
#363
_VISITCOMMUNITY
Pennsylvania, United States
Joined: January 08, 2014
KitMaker: 425 posts
AeroScale: 401 posts
Posted: Sunday, January 12, 2014 - 01:08 PM UTC
Quick update...

I detached the main parts and cleaned them up for test fitting. The wings are warped, if I connect the tips the roots have a 1/4 inch gap. If I connect the roots, ditto a gap at the tips. Taping them together caused the barrel shrouds to pop 1/16 inch gap!

I'll add a pic of the warping when I get to the wings.


Main parts cleaned up and laid out.

I glued the front and rear sections of each fuselage side together, then taped the sides together to keep everything straight. Doing this makes installing the cockpit a bit more difficult but allows me to avoid alignment problems later that might be really hard to fill without destroying the surface detail.

I made a spreader bar out of sprue and inserted it between the wing roots inside the fuselage to keep them in line with the fuselage while the glue set. They kept wanting to curve in on me, and I didn't want gaps when I attach the wings later.


Couldn't get my camera to focus well, but you can see where I stuck the bar between the very front of the wing roots to keep them seperated.

That's all I managed to accomplish today. I hope to get the cockpit bits painted this week.
MichaelSatin
Staff MemberCampaigns Administrator
AEROSCALE
_VISITCOMMUNITY
Colorado, United States
Joined: January 19, 2008
KitMaker: 3,909 posts
AeroScale: 2,904 posts
Posted: Sunday, January 12, 2014 - 01:25 PM UTC
I remember the huge (and well deserved!) brouhaha when these kits came out. I stocked up on several of them. They are really fine models and having just acquired the Valiant Wings book on early Mustangs I'm thinking seriously of dragging some of them out again. Nice to see you building one after your excellent Tamiya D build!

Michael
PeeJay74
#363
_VISITCOMMUNITY
Pennsylvania, United States
Joined: January 08, 2014
KitMaker: 425 posts
AeroScale: 401 posts
Posted: Sunday, January 12, 2014 - 01:29 PM UTC
Is that Valiant Wings book worth it, Michael? I keep debating picking it up after I saw the review here.
Joel_W
Staff MemberAssociate Editor
AUTOMODELER
_VISITCOMMUNITY
New York, United States
Joined: December 04, 2010
KitMaker: 11,666 posts
AeroScale: 7,410 posts
Posted: Monday, January 13, 2014 - 02:35 AM UTC
Paul, Interesting solution to the fuselage issue. Once you glue in the cockpit, it should hold the fuselage in the correct orientation. Hopefully the wing roots will then be a snug fit. I would certainly glue up the upper and lower wings before attaching to the fuselage as this will allow you to make whatever adjustments you need to make to the upper wing roots.

The warping issues sounds more vertical the twisting. If there is a hollow space between upper and lower wing panels, you can always epoxy some stiff rod to force the wings into the correct orientation. Twisting is a lot more difficult issue to deal with.

Joel
PeeJay74
#363
_VISITCOMMUNITY
Pennsylvania, United States
Joined: January 08, 2014
KitMaker: 425 posts
AeroScale: 401 posts
Posted: Wednesday, January 22, 2014 - 02:13 AM UTC
I managed to get the interior painted, washed, and drybrushed. Unfortunately something went wrong and my wash seems to have eaten into my underlying paint. The fuselage, sidewall inserts, and resin seat look fine but I need to strip the radios, batteries, and instrument panel and repaint them. I'll try to get pics up this week.
PeeJay74
#363
_VISITCOMMUNITY
Pennsylvania, United States
Joined: January 08, 2014
KitMaker: 425 posts
AeroScale: 401 posts
Posted: Thursday, January 23, 2014 - 03:11 PM UTC
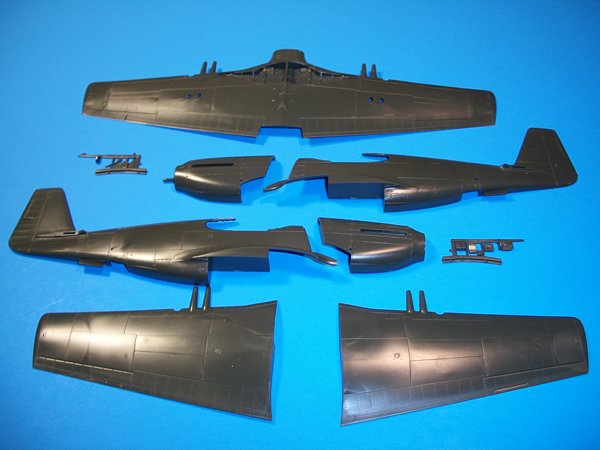
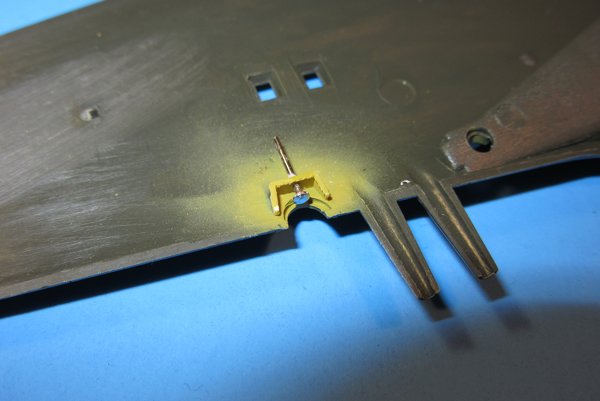
I managed to get some work done on it the last two weeks. I did not change much in the cockpit other than to cut off the oxygen regulator hose on the left side. The kit part is rather flat so I wanted to replace it with coiled wire to add a little depth to the side. I made the hose by gripping a .015" rod and a length of 34 gauge jeweler's wire in a pin vise, and then just slowly spinning the vise to tightly coil the wire around the rod. Once I had enough I just removed them from the vise and pulled out the rod, leaving a nice tight coil.


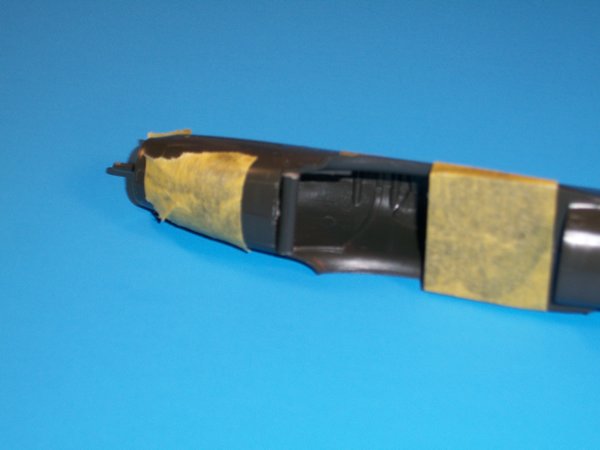
Original kit sidewalls, note the barely there oxygen hose.


Making a replacement that won't be as flat against the sidewall.

The sidewalls were tacked to the fuselage halves with a dab of clear parts cement to make painting easier. I painted all of the cockpit parts Interior Green using Tamiya XF-3 and XF-5 2:1 with a drop or two of XF-1 added in, thinned 50/50 with isopropyl alcohol. I painted the Ultracast seat zinc chromate (Tamiya XF-4) along with the tail wheel well and doors, and the rear spare inside the main wheel wells. There are a lot of opinions on proper colors for P-51 wheel wells, but I tend to go with Tom Cleaver's argument and paint them aluminum lacquer with the rear spar in zinc chromate. I had color photos of P-51 seats in NMF, zinc chromate, and interior green. I chose zinc chromate for mine to give the cockpit some color other than interior green. I let all of that cure for 24hrs and then removed the sidewalls, masked off the green and painted all of the radios black with Tamiya XF-1, along with the transmitter and receiver banks, the instrument panel, and bits on the control stick. I took a 20/0 brush and hand painted the seatbelts with Testor's Dark Tan (the little bottles) and picked out the buckles with Vallejo Model Air aluminum. I let everything cure for 24hrs and then permanently attached the sidewalls before spraying a coat of Future to prep for the cockpit wash.

I let the Future cure for 24hrs and then ran a wash around the parts. I was feeling pretty good about everything at this point, but 18hrs later when I went to remove the wash I had trouble. I used my usual pin wash I use on panel lines (gloss black enamel and dark earth enamel, 1:1, thinned down about 10:1 with enamel thinner) but for some reason this time it had eaten into a good bit of my paint. I guess I needed to give the Future more time to cure. The sidewalls were okay and the seat actually looked great, but the IP, floor, batteries and radio banks were a mess. I drybrushed highlights on everything and picked out details with a toothpick hoping to diffuse some of the bleaching, but it didn't help much. It actually made the IP far worse, to where I thought I would need to scrap the instrument decal and strip all the paint, then repaint it and try to detail it with drybrushed gauges.

Rather than get impatient and make things worse, I took a break and came back the next day with an idea. I thinned down MM Acryl flat black about 10:1 with water and then sludge washed the radio banks, batteries, and IP. I gave it a couple of hours to dry and then repeated the wash. This actually worked out great, especially with the IP, and everything seems fine now to my eye. I sealed it all up with Micro Flat and called it a day.


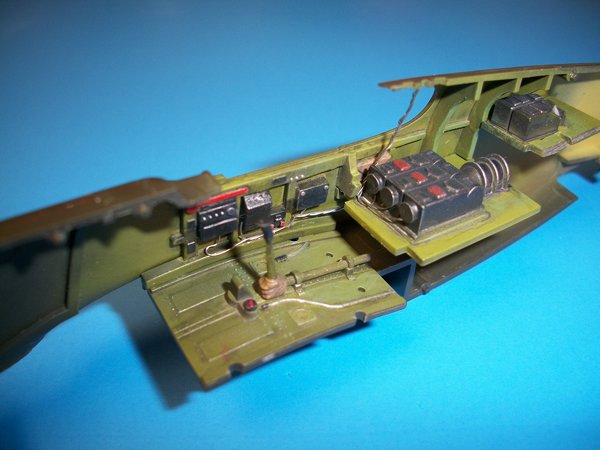
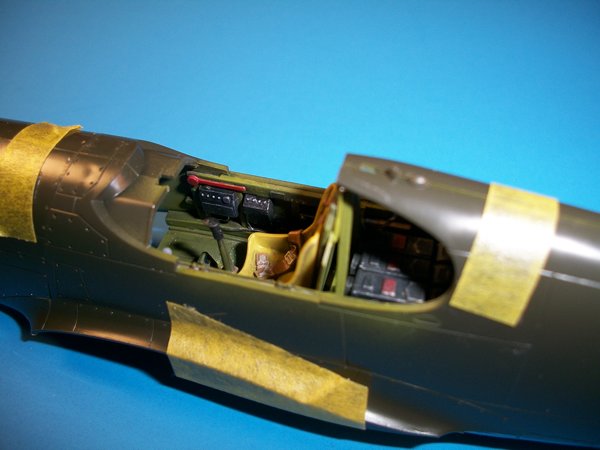
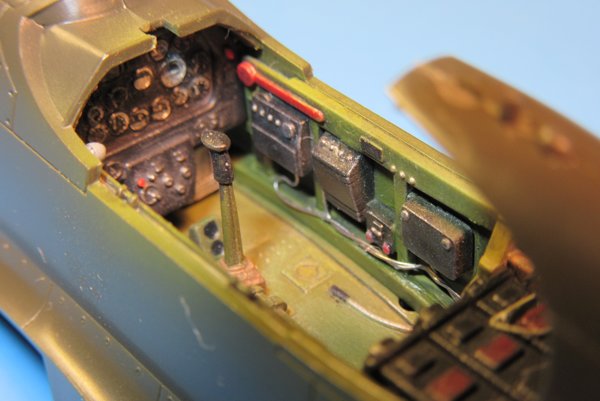
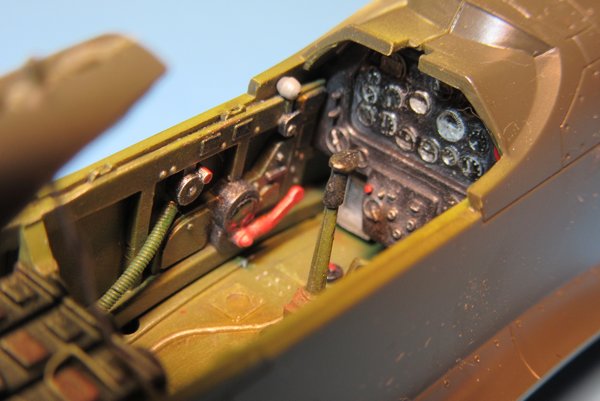
Sidewalls after painting, wash, highlights, and a little touch up with some thinned black. I'll add the oxygen regulator hose during assembly.


Floor with control stick and the radio banks. The floor is a bit overdone but when all of the pieces are put in it isn't that visible and comes off well-used rather than sloppy.


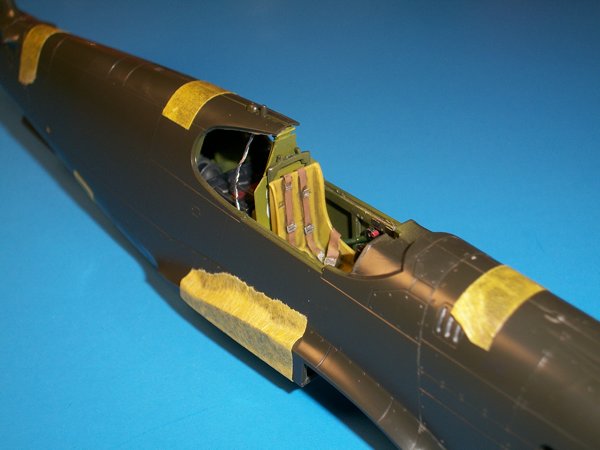
The Ultracast seat and the IP, which after 2 washes of thinned black around all of the gauges came out pretty good. This is the first resin seat I've used, the detail blows the kit seat away but its as expensive as an entire Eduard Zoom set.


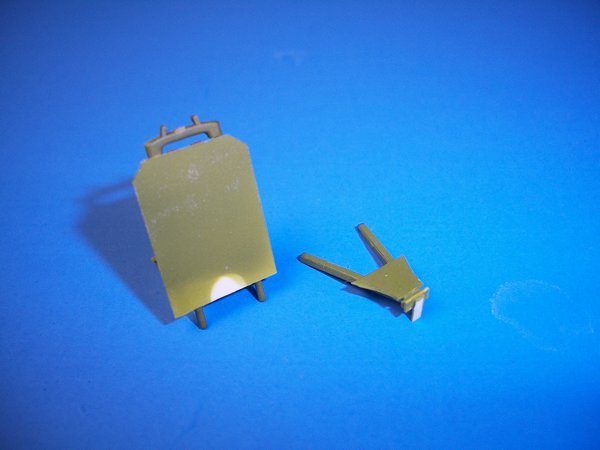
Main wheel well painted after a wash and highlights were added. I had to do some corrective work here as well due to paint being eaten.

Next week I plan to mount the radio banks and the cockpit floor to the right side of the aircraft, and then add a little bit of wiring detail before I close it all up. The radio banks should be pretty visible through the vac canopy so I'd like to put a work into them.

I think I'm going to switch my wash up, I have never had an issue before but this one almost ruined a week's worth of work.
Mcleod
_VISITCOMMUNITY
Alberta, Canada
Joined: April 07, 2010
KitMaker: 1,028 posts
AeroScale: 939 posts
Posted: Thursday, January 23, 2014 - 04:32 PM UTC
You certainly are doing a superb job of it, Paul.

I just wanted to mention a technique that I'm now employing, and I often read others are using in their work. It involves painting the base coat of various parts with a solid metalizer first. Personally, I'm using Alclad. After the metalizer is applied, the parts are given the top coat color. This allows for the dried top coat to be gently rubbed with an appropriate thinner to reveal hints of the metalizer underneath. I'm finding its a great way to weather seats and such.
I've read some are using the technique on aircraft exteriors with success, and in place of dry brushing or in combination with it. I tried it on the exterior of an Airfix Typhoon, and was not unhappy. Though, I have troubles gauging my heavy hand in the Q-tip rubbing.
Just another option to keep in the arsenal.
PeeJay74
#363
_VISITCOMMUNITY
Pennsylvania, United States
Joined: January 08, 2014
KitMaker: 425 posts
AeroScale: 401 posts
Posted: Friday, January 24, 2014 - 03:54 AM UTC
Thanks for the compliment Ben. I plan to do some chipping with the finish so mat have to try using that alclad method.
PeeJay74
#363
_VISITCOMMUNITY
Pennsylvania, United States
Joined: January 08, 2014
KitMaker: 425 posts
AeroScale: 401 posts
Posted: Sunday, February 02, 2014 - 05:30 AM UTC
I managed to get some work in the last two weeks. I wanted to add a few details to the cockpit since I am going to use a vac canopy and open it up. Things are a bit tight in the P-51 but a lot of it will be visible, and the kit could use a little help inside. I broke down and bought the Valiant Wings book on the early P-51. Everyone here seems to have good things to say about it so I decided to get it and see if it would help me in the cockpit.

Comparing the new book to my old SSP references, it's nice but I'm not sure it was $40 nicer than what I had. Time will tell.

I started out in the cockpit by adding wiring to all of the equipment on the right sidewall, using 34 gauge jeweler's wire and some CA. Once I had that in, I decided the radio receiver bank needed some work. I was not happy with my original paint job of it. I stripped the receiver bank and repainted it, using Tamiya XF-69 nato black and some drybrushed highlights in silver and red. The paint job now much improved, I drilled a small hole in the end of each bank and CA'd wire which I am going to run up to the mast in the ceiling. I covered the holes with thin discs I made by slicing sprue and gluing them to the ends of each bank. The receiver bank now looks very close to a color rendering in my SSP walk around, and much better than the plain kit part. I glued the floor, receivers, and batteries to the right side of the fuselage and then taped the fuselage up to make sure the parts stayed aligned properly. The batteries did not fit and required some surgery to get the fuselage to close. They are all but invisible once things are closed up, I should have just left them out.


Right side of fuselage after the glue set. The wiring is basic but I think it adds a lot to the cockpit.

Now that I was happy with the radios and electronics, I turned to the seat. The Valiant Wings book has several nice shots of the seat armor plates, which the kit conspicuously has left out of the cockpit. Looking at the photos and comparing them with my already completed A-36, I decided it really needed the armor. I scratched a plate for the seatback and another for the roll cage from 0.010" evergreen sheet, then painted them interior green with my Tamiya mix I had already used on the cockpit. I glued these in place after consulting the books to try and match the photos for alignment of the two halves. The new armored seat looks much better.


Seat and roll cage with armor added from 0.010" Evergreen sheet.

At this point I added the oxygen regulator hose I had made from wire to the left sidewall along with some small levers provided in the kit. The kit has 2 levers provided, but photos of P-51 cockpits show only a single lever in red. The top lever should be a gauge. I drilled this out and made a gauge face with a drop of clear parts cement. Accurate Miniatures use a common cockpit for all of their Alison Mustangs, so I had to check to see which things belong and which should go for the P-51. I was done with the cockpit at this point so I closed everything up and did some test fitting before glue.


The fuselage closed up and taped to check how everything fit. Not much of my work is visible, but I think it does add a lot to it nonetheless.


The seat and roll cage test fitted, which is where I came across a small problem I needed to fix...

When I tried to fit the roll cage inside, I discovered it was a bit short and left a noticeable gap at the roof of the cockpit. I solved this by adding two shims of 0.010" evergreen to the top of it (you can see them in the earlier photo of the armor plates). Once these dried, I checked the fit again and everything was perfect. I pulled the seat and roll cage out and set them aside. I will add them at the end after I get the painting done to avoid any damage with my clumsy fingers.

That's as far as I have managed to get. I like what I have done with the cockpit, when I manage to get around to doing a P-51A I will have a much better plan on how to improve the kit's interior with what I learned here.

Joel_W
Staff MemberAssociate Editor
AUTOMODELER
_VISITCOMMUNITY
New York, United States
Joined: December 04, 2010
KitMaker: 11,666 posts
AeroScale: 7,410 posts
Posted: Monday, February 03, 2014 - 04:14 AM UTC
Paul,

Don't know how I missed the 1st update, as I really enjoy following your detailed builds. Ok, I'll confess, I file a lot of what you do away for future use. How you made your oxygen hose is far superior then my crude ones.

Your cockpit detailing & weathering is really suburb. Just enough to make it look realistic, but not overly done making it a maze of meaningless wires, bits & pieces. Well done on the armor plate, an often overlooked piece of the cockpit that adds so much.

I've started either modifying or using resin seats, as they just blow away the stock seats that come with nearly all kits. That Ultracast seat is one of the best I've ever seen. Well worth the price. As far as your decision to go with Zinc chromate rather then Interior Green, is an issue I've had myself. My take on the variations of color is due to the constant wear and tear it gets from the pilot getting in & out, moving about once in it, and the belts and harness wearing away paint where ever they contact the seat. So I guess any color is right.

You're certainly a braver man then me with going with a full vacuum canopy. Does that include the side windows?

Your wheel wells look spectacular. Just enough detail added to make it interesting, and then the weathering finished them off to perfection. Well done.

Looking forward to your next update.

Joel
Joel_W
Staff MemberAssociate Editor
AUTOMODELER
_VISITCOMMUNITY
New York, United States
Joined: December 04, 2010
KitMaker: 11,666 posts
AeroScale: 7,410 posts
Posted: Monday, February 03, 2014 - 04:16 AM UTC
I also really like Ben's weathering ideas with using metalizers as a basecoat. I'll been trying that myself to some degree where I think it will be most useful. It certainly sounds like a more realistic way to duplicate wear and tear then the dry brush method for everything.
Joel
PeeJay74
#363
_VISITCOMMUNITY
Pennsylvania, United States
Joined: January 08, 2014
KitMaker: 425 posts
AeroScale: 401 posts
Posted: Monday, February 03, 2014 - 06:22 AM UTC
Thanks for the kind words Joel. Funny thing about the electrical wiring and oxygen hose, I got the idea after looking at your P-61A build. I just assumed that's how you made them!

The vac canopy is indeed a full canopy setup. I am not sure yet if I will use the whole thing, or use the kit windscreen and rear windows and then the vac parts to open it up. I am a little leary of it to be honest. I saw a good tip online somewhere (ARC maybe?) to fill the vac canopy with plaster mix from a craft store and then cut it apart after that cures. I guess having it filled solid makes it much easier to work with, and the plaster will not stick or react with the plastic so it comes right off. I may try that in combination with the how-to that Jessica wrote here.

I am keen to try Ben's idea for an Alclad base coat. I planned to chip up the wing leading edges, the gun/ammo bays, the props and the wing roots for sure. The photos of 'Betty Jean' show how rough the desert was on her, and I'd like to reproduce some of that. Maybe a combination of Alclad for the larger areas like the wing edges and a silver pencil for details like the bay doors.

Before I get to that I have to solve my wing issues though. The warping isn't as bad as I thought. Nothing that some tape or clamps after glue won't quickly fix. The guns are the issue. The Quickboost 20mm Hispanos are just so much better than the kit guns, its no contest. But the shrouds are too narrow to accept them. I am going to have to try to drill them out wider once I have the wings assembled. I'm just hoping I don't mess it up and ruin the wings, LOL.
Mcleod
_VISITCOMMUNITY
Alberta, Canada
Joined: April 07, 2010
KitMaker: 1,028 posts
AeroScale: 939 posts
Posted: Monday, February 03, 2014 - 06:51 AM UTC

Quoted Text

I am keen to try Ben's idea for an Alclad base coat. I planned to chip up the wing leading edges, the gun/ammo bays, the props and the wing roots for sure.


Glad you like the idea, Paul. I just want to caution that I'm not sure all paints are compatible applied over Alclad. I use Tamiya with little problem, other than it scratches easier. Curing time is very important. Its best to experiment on scrap first.
And I just thought I'd post a photo on what the technique looks like.


Notice the table top, gun, and seat. This is the results when you have an overly heavy hand, like me. Still looks OK, I think. It just takes care and practice.
PeeJay74
#363
_VISITCOMMUNITY
Pennsylvania, United States
Joined: January 08, 2014
KitMaker: 425 posts
AeroScale: 401 posts
Posted: Monday, February 03, 2014 - 07:01 AM UTC
Hrmm, I use Model Master enamels for my exteriors, acrylics always seemed to peel when I masked them and switching to enamels solved the problem. I'm not sure how easily they will want to "chip" once they cure, or if the thinner will wear into the Alclad. I have used Alclad plenty of times lately, the stuff is practically bulletproof after it cures. I've never had problems when I did an enamel wash in panel lines so maybe it will be ok.

I wish I had known about Gunze Sangyo Aqueous before I invested in about 30 different bottles of Model Master enamel.
Mcleod
_VISITCOMMUNITY
Alberta, Canada
Joined: April 07, 2010
KitMaker: 1,028 posts
AeroScale: 939 posts
Posted: Monday, February 03, 2014 - 07:13 AM UTC
Well, I believe Alclad is tougher than enamels. I also feel drugstore alcohol will work well as the rubbing medium for enamels. Like I said though, its best to experiment on scrap.
On my recent DC-3 build, I found that Walthers Solvaset eats through Alclad if it's left sitting to long. Just saying, be careful.
Joel_W
Staff MemberAssociate Editor
AUTOMODELER
_VISITCOMMUNITY
New York, United States
Joined: December 04, 2010
KitMaker: 11,666 posts
AeroScale: 7,410 posts
Posted: Tuesday, February 04, 2014 - 05:56 AM UTC
Paul,
Glad a few of my wacky ideas work for others. And yes, that's how I made my oxygen hoses. The big difference is that you used a chuck to hold the two wires, I wound by hand, and it wasn't completely uniform. Will be using your technique from here on it.

I'm thinking that rather then using Alcad's which are very expensive, Model Master's line of Metallics would be a cheaper way to go, and are readily available. I've used them in the past, and they work great. I would opt for the non-buffing type.

I've settled on Tamiya Acrylics thinned with their X20-A, but lately have started to thin them with lacquer thinner for certain colors, and they go on as smooth as enamels. The only reason I've switched from enamels is the long drying times. Although, I do have some MM enamels that I use and love.

As for the vac canopy, I used sections of one on my Devastator build. Not the easiest thing to work with. Cutting it was easy, sanding it to shape was a very long process because I cut it so far from the frame line. Your idea of filling it with hobby plaster is the only way to go. Once hard, you can cut it without it flexing, but you still need to be very careful with the knife. Mask where you can. I would also coat the inside of the canopy with cooking oil just to play safe. With my luck the plaster would stick.

Can't see why you would have any issues drilling out the wings for the AM gun barrels. Should be a snap.

Ben your example is exactly the look I'm after.

Joel
PeeJay74
#363
_VISITCOMMUNITY
Pennsylvania, United States
Joined: January 08, 2014
KitMaker: 425 posts
AeroScale: 401 posts
Posted: Friday, February 07, 2014 - 10:12 AM UTC
Hoping to get some bench time on Sunday, I've been swamped lately between work/family/fiance. The fiance surprised me with an awesome birthday present in the mail. I want to scratch together some basic landing lights in the wings and get the barrels put in this weekend.

Here's what I was talking about with the Quickboost vs. kit guns...


The kit guns looked okay to me until I had the resin ones in my hands. Now those look like 20mm Hispano barrels.

Anyway, more to come this weekend I am hoping.
Joel_W
Staff MemberAssociate Editor
AUTOMODELER
_VISITCOMMUNITY
New York, United States
Joined: December 04, 2010
KitMaker: 11,666 posts
AeroScale: 7,410 posts
Posted: Monday, February 10, 2014 - 02:41 AM UTC
Paul, the difference is amazing.
Joel
PeeJay74
#363
_VISITCOMMUNITY
Pennsylvania, United States
Joined: January 08, 2014
KitMaker: 425 posts
AeroScale: 401 posts
Posted: Monday, May 19, 2014 - 01:25 PM UTC
Back after a 3 month break! I had to take some time away from hobbies to get married and do a few other things. I don't think she would have been happy if our wedding took a backseat to styrene. I'm a lucky guy though.

I couldn't seem to get myself back to models until this week, but I am hoping to log some regular bench time now. I want to have the P-51 done so I can make time for some campaigns this summer. Bombers, Grumman, and Seaplanes I hope.

I did manage to work on her a bit; I wanted to fix the landing lights. The kit detail is totally lacking, they are just empty holes in each wing. I boxed them in with some sheet styrene, shaped them to fit the top wing, and then sprayed them yellow zinc chromate w/ Tamiya XF-4. The lenses were made by drilling a small hole through the styrene and threading a #17 dress maker's pin through, then cutting away the excess pin shaft. After adjusting the head flush with the edge of the wing, a little CA locked it in. I need to add a drop of clear cement to each for the glass, but the pins are nice and shiny. With the wing closed up this area looks much better.


A little added detail goes a long way towards filling an empty hole.
Joel_W
Staff MemberAssociate Editor
AUTOMODELER
_VISITCOMMUNITY
New York, United States
Joined: December 04, 2010
KitMaker: 11,666 posts
AeroScale: 7,410 posts
Posted: Tuesday, May 20, 2014 - 02:45 AM UTC
Paul,
Was wondering where you've been. Congratulations on getting married.

That wing light detailing is coming out great. Just might borrow that technique.

Joel
PeeJay74
#363
_VISITCOMMUNITY
Pennsylvania, United States
Joined: January 08, 2014
KitMaker: 425 posts
AeroScale: 401 posts
Posted: Saturday, May 24, 2014 - 03:55 AM UTC
Thanks Joel.

Memorial Day weekend here in the States so I should get to log in some bench time with the P-51. I did some experimenting with new glue on the wings; a Tenax clone and one of touch-n-flow applicators. It's good stuff but evaporates so fast its tough to work with.

I got the wings glued together and then bored out the barrel shrouds to accept the Quickboost 20mm guns. It took me about 30min using 4 different bits, but it worked. The plastic is paper thin now so I'll need to be careful i don't mishandle it and break something. I test fit the barrels when I was done and am very pleased with the results. The 20mm cannon are arguably the biggest distinguishing feature on this P-51 subtype, so spending $6 to get accurate guns was well worth it to me.


The wings joined and barrel shrouds bored out. I'll touch up the seams with Mr. Surfacer 500 before paint. The simple landing light came out great. No ugly black hole in the wing now.


Test fit of the Quickboost 20mm Hispano barrels.

I tucked the barrels away for safekeeping and went to work joining the wing to the fuselage. There is a bit of a seam at the root, but otherwise it won't need much work. Just as I went to glue it up I realized the IP was still taped to my small parts board. Oops! Thankfully I caught it in time, I don't want to think of how much damage I'd have done trying to get it in afterwards. Thank God for test fitting.

If you have never built an AM P-51 and wonder what I am talking about, the instrument panel is glued in place by sliding it up through the bottom of the fuselage between the wingroots after the fuselage halves are joined. Its odd but works great, as long as you don't forget to put it in! I fixed my oversight by CAing the panel in, and then gluing the wing in place.


She is starting to look like an airplane.

On a side note, my wife and I bought a better camera for our honeymoon, which has paid off with better pics for my build log. It has a much better focal length and zoom for up close work. I swear I was only thinking about taking nice pictures of the tropics when I bought it!


A much better shot of the cockpit now that the panel is in place. A little added wiring goes a long way to improve the detail.[i]


[i]The left side showing the oxygen hose installed.


Well, more to come this weekend. I want to get the seams cleaned up and maybe work on the vac canopy, I am still kind of intimidated by it. The landing gear, props, guns, and other small bits are already painted; I just need to get the major bodywork done and then put her in the paint booth so I can add all of those things to her.
Joel_W
Staff MemberAssociate Editor
AUTOMODELER
_VISITCOMMUNITY
New York, United States
Joined: December 04, 2010
KitMaker: 11,666 posts
AeroScale: 7,410 posts
Posted: Saturday, May 24, 2014 - 12:14 PM UTC
Pete,
So where's the pictures of the tropics that you bought the camera for

The Accurate Miniature's cockpit really looks quite nice. Outstanding work on those gun shrouds. those Quickboost 20mm guns barrels look perfect once installed in those shrouds.

Sure seems that married life really agrees with you.

Joel
 _GOTOTOP