_GOTOBOTTOM
World War II
Discuss WWII and the era directly before and after the war from 1935-1949.
Hosted by Rowan Baylis
1/72 Revell supermarine "night'fire Mk Vb
Antoni
_VISITCOMMUNITY
England - East Midlands, United Kingdom
Joined: June 03, 2006
KitMaker: 574 posts
AeroScale: 573 posts
Posted: Thursday, March 13, 2014 - 05:18 AM UTC
Was it a night fighter or nightmare? Well the nightmare just got worse. I hope you are sitting down because you really are not going to like this. The spitfire never looked like the model. It is a fiction invented by those that prefer making things up to finding things out.

I was never convinced of this scheme, why paint it black and then apply 'look at me, I'm over here' markings? Nor was 41 Squadron a night fighter squadron. No squadron history that I can find makes any mention of them being used in the night fighter role or having black Spitfires. On the contrary, in 1942 they are described as being involved in cross-channel sweeps etc. My suspicions always worsen when, as in this case, there does not seem to be a photograph of the subject of the profile.

As if often the case, I found 'the' photograph when looking for something else.
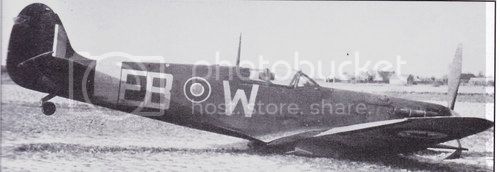


Not really surprised that it is in the Day Fighter Scheme, not painted black. That is confirmed by Andy Saunder's scrapyard photograph here, which also shows it was named 'Peggy'.

http://forum.keypublishing.com/showthread.php?118991-41-Squadron-RAF-history

It was shot down on 12th April 1942 during Circus 122, escorting 12 Bostons. It was a bad day for the squadron as they lost no less than four aircraft. Wojtek Matusiak identifies it as W3654, the pilot A van Rood taken PoW.

The small roundels are the type applied experimentally to night fighters and 'C' type roundels did not start to appear until the middle of April 1942, but generally from mid-May. So there is nothing odd about the 'A' type roundels under the wings. The most sensible explanation for the small roundels on the fuselage would be that it was transferred from a night fighter squadron.

The four candidates have the following histories.

W3852 12 MU 14/9/41, 41 Sqn 26/941

W3654 8 MU 7/8/41, 616 Sqn 16/8/41, 129 Sqn 5/10/41, 65 Sqn 31/10/41, 41 Sqn 6/1/42

W3450 8 MU 9/7/41, 111 Sqn 22/8/41, ROS 12/10/41, 129 Sqn 11/10/41, 41 Sqn 3/3/42

BL595 38 MU 9/1/42, 41 Sqn 10/2/42, 81 Sqn 12/2/42

81 Squadron looks like a mistake of some kind as all four failed to return 12/4/42 and it seems that 81 Squadron was 'up north' at that time. Perhaps it was 'on loan' or transferred back but not recorded.

Off the four, two served with a night fighter squadron, W3654, 65 Squadron, and W3450 111 Squadron. As W3450 did not go directly from 111 Squadron to 41 Squadron and has been identified as 'H' we are left W3654. I have to agree with Mr M that W3654 is the most likely identity for 'Peggy'. The photograph has sometimes been identified as AD504 but AD504 was fitted with an early type windscreen and bulbous Rotol spinner. This may explain why the profiles have a spurious Rotol bulbous spinner.

cliffnetherlands
_VISITCOMMUNITY
Zuid-Holland, Netherlands
Joined: September 25, 2013
KitMaker: 86 posts
AeroScale: 83 posts
Posted: Thursday, March 13, 2014 - 08:01 AM UTC
OK. don't know what to say really. I thought a article in a well known German magazine on classical aircraft. And a mentioning of the same aircraft at an IPMS site would be enough to be sure.

But i also noticed reading the wikipedia page on the 41th for a subtitute code. There was no mentioning of the nightfighter thing. One of the reasons i didn;t want to go for the EB/Z. And you are right. There were no pictures of a black EB fighter. The Only one i saw was the JU/H.

Oh well. Then i had a good practise doing it all. And the project is now turned into a what if. Still a bit of a shame though. Although i don't aim for a perfect copy of a specific plane (yet), i don;t like beein that far off.

Thanks for the info. Do you mind if i share your reaction on the dutch site i posted this build too? I would copy it as is. No tweaks or translations.
Antoni
_VISITCOMMUNITY
England - East Midlands, United Kingdom
Joined: June 03, 2006
KitMaker: 574 posts
AeroScale: 573 posts
Posted: Thursday, March 13, 2014 - 08:20 AM UTC
Go ahead and post it. It's high time it was debunked. I have a large file of fairy tales like this one and modeling magazines are the worst offenders. You can always build another 'correct' one to show the difference between right and wrong. At least it was a Dutch pilot. Some more imformation can be found in these places.

http://aircrewremembered.com/van-der-stok.html

http://brew.clients.ch/pilotsw.htm

http://en.wikipedia.org/wiki/Bram_van_der_Stok

http://acesofww2.com/netherlands/vanderstok/

http://www.rafcommands.com/forum/showthread.php?10256-Dutch-Pilot-Albert-(-Peter-)-van-Rood-RAFVR-111131
cliffnetherlands
_VISITCOMMUNITY
Zuid-Holland, Netherlands
Joined: September 25, 2013
KitMaker: 86 posts
AeroScale: 83 posts
Posted: Thursday, March 13, 2014 - 08:31 AM UTC
It wasn't even a modelling magazine. It was Flugzeug classic. So a magazine like Aeroplane or Flypast. Ohh well.

I'm gonna leave the rebuild. Doing the same kinda thing four times (three goes at the fairytale one and another one for the real thing) is getting a wee bit boring.

Let's say i have a unique model of a fairytale plane. Or as we dutch would call it: "een broodje aap" (Yep that does translate to a monkey sandwich.)

Remind me to give you a PM before i build the next unique plane
I still had fun building it. That didn;t change. (Although i have to admit. I'm a bit grumpy getting tricked.)
cliffnetherlands
_VISITCOMMUNITY
Zuid-Holland, Netherlands
Joined: September 25, 2013
KitMaker: 86 posts
AeroScale: 83 posts
Posted: Thursday, March 13, 2014 - 08:45 AM UTC
The link to the Modelbrouwers site.
http://www.modelbrouwers.nl/phpBB3/viewtopic.php?f=224&t=42475&p=834982#p834982
Gonna be intresting for me to see how they are gonna react. Thanks again for the info Antoni. I learned something again. make sure you have photograpic proof of a specific plane. (although wasn't there the case of the 6 engine Junkers that never was....but only on a propaganda picture...)
stooge
_VISITCOMMUNITY
South Australia, Australia
Joined: June 20, 2013
KitMaker: 210 posts
AeroScale: 210 posts
Posted: Sunday, March 16, 2014 - 11:52 AM UTC
What a wonderful report. A hilarious story all round.

I was wondering about the black Spitfire story after reading the start of this thread as I had never heard of them prior & I have been reading WWII aviation bumff for 40 years.
Joel_W
Staff MemberAssociate Editor
AUTOMODELER
_VISITCOMMUNITY
New York, United States
Joined: December 04, 2010
KitMaker: 11,666 posts
AeroScale: 7,410 posts
Posted: Monday, March 17, 2014 - 09:09 AM UTC
Cliff,
I just carefully read through your entire build blog. A massive effort for sure. 1st off your perseverance, and positive attitude should be commended. No matter what, you reached your goal of finishing the Spitfire. Congratulations. In my early learning years of modeling, it would have long been in the landfill.

Speaking as a experienced modeler, you would best be served to learn and get comfortable with just a few procedures at a time. You tried to learn and master every basic procedure with one model. It's nearly impossible as one is usually dependent on the previous procedures.

Go out and buy 2 of the same 1/72 scale kits. Get the best fitting kit you can. Read the reviews here or google them. The idea is to pick at kit that isn't going to fight you.

I would break down your learning curve to 1st basic assembly. Leave the cockpit stock or even out. Your goal is to be able to produce a perfect model ready for painting. Build one. Then build it again. Both should look identical, and you should have had a much easier time with the 2nd model.

Now that both kits are built to completion, it's time to learn how to fill seams. For small seams I actually use CA glue and a accelerator. Let it set for 5 min, then sand with #320,then #600, then polish. I use a # 4,600 pad. for larger openings I use Green Stuff. After I polish it. I clean it with ISO Alcohol, then a coat of CA glue to seal it. Then I polish with #600 paper followed by a 4,600 pad

For masking canopies, it's a lot harder in 1/72 scale then in my preferred 1/48 scale. Using a light box seems the logical choice for that scale. Don't use masking tape. It's too thick, and too sticky. Buy the two smaller sizes of Tamiya tape. BTW, use the Tamiya tape to mask painted areas, but 1st apply the tape to the back of your hand or arm. This will further reduce the tackiness. You won't be pulling paint off the models anymore as long as the surface is properly prepared.

When done masking, fit, trim, and glue to the fuselage.

Get ready for painting with a air brush. Wipe down both models with a clean lint free towel soaked in Iso Alcohol. Put them both in a shoe box with a lid and let them air dry.

For air brushing here's the basics. I use a Paasche single action gun with a #3 needle and cone. I use it for 95% of my modeling needs. Do not change needles because you're changing paint. That's not what they're for. The smaller needles are for water colors, & inks, and the larger needles for thicker based paints. You won't be using either of these. So just use the default needle and cone that came with your gun. take it completely apart and clean it so that there isn't any paint particles on the needle. Test the gun with ISO to make sure it works perfectly.

Since you're using acrylics, stick to one brand for now. I suggest Tamiya paints. Buy a bottle of X20A thinner. Tamiya paints are thinned basically 50/50. Your rough texture to your paint most likely was caused by the paint being to thick, so you compensated by opening up the flow more, and increasing the PSI. That's not why you should change your PSI.

Every setup is different, so the PSI settings change. You should be somewhere between 17-20 psi with the mixture I recommended. You add the thinner 1st to the cup, then the paint, not the other way around.

Practice 1st on some scrap plastic or the printed cover of the model box. You don't want a surface that will just absorb the excess paint. Test the gun on a piece of paper towel open up the needle till you can paint a nice straight line. That's your starting point. Now start to spray before the box and continue in a smooth motion till your past the box. If you want a wider coverage, open up the needle some.
Continue to add light coats till you have the coverage you want. I you get a shinny spot, just apply air. The paint will dry in a few seconds.

The coat of paint should be consistent, flat, and smooth. Let it dry for a full day.

You'll note that I skipped priming. when I prime I use Tamiya gray primer, but it's a lacquer based paint. Not sure you want to deal with it nor the smell yet. So if you need to prime because of what color you'll be applying, try just a neutral gray for now.

I would pick a paint scheme for your 1st few models that are one top color and one bottom color. It will make your life much easier.

Decaling comes next. Lets get through the painting stages, then dealing with decals is going to be a walk in the park.

Joel
 _GOTOTOP