Decals - before or after construction?
Taipei, Taiwan / 台灣
Joined: February 23, 2014
KitMaker: 44 posts
AeroScale: 38 posts
Posted: Monday, February 24, 2014 - 12:35 AM UTC
Since I found decals very difficult to get right with my first model. It seems like it would be easier to put them on before I put the model together but, figured I'd ask here before doing it myself and probably messing everything up

So, best to apply before or after?
Cheers

#259
Massachusetts, United States
Joined: October 23, 2011
KitMaker: 2,265 posts
AeroScale: 1,715 posts
Posted: Monday, February 24, 2014 - 12:53 AM UTC
it depends, if you are painting, and if you want to hide all the joins. if you want to fill the joins with compound and sand them down smoothly this must be done before painting, and after construction. so decals must be last step.
what difficulty did you find when applying decals?
Alberta, Canada
Joined: April 07, 2010
KitMaker: 1,028 posts
AeroScale: 939 posts
Posted: Monday, February 24, 2014 - 12:54 AM UTC
Decals are usually put onto a glossy surface after all filler, sanding, polishing and painting and futuring are done.
Your right, it would be easier to place decals before the model is built. Although, it would be hard to do all that other stuff when the decals are already on.
To prevent being called an 'expert', screw something up good every now and again.
#243
England - North East, United Kingdom
Joined: March 21, 2008
KitMaker: 996 posts
AeroScale: 915 posts
Posted: Monday, February 24, 2014 - 01:40 AM UTC
Decals, apart from any in the cockpit, are definitely just about the last item on most builds, make sure you cut the sheet into single decals, soak decals one at a time for 30 sec to a minute, the decal should slide easily without forcing, position by sliding onto the finished surface from the backing paper. Pat dry when the position is right. If you need to move one again a drop of water dabbed on will usually mobilise it again. Get that right first, then you can explore setting solutions, which mainly improve the look rather than the application. Different manufacturers decals handle and apply differently and are of notably different quality. I recently used a set of Frog decals that must be well over 40 years old and they went on perfectly, where a set of Roden decals a couple of years ago just fell apart. The key is, work one decal at a time and take your time.
Andrew
Pfalz DIIIa, Eduard 1/48 Uffz Max Hitschler Jasta 18 Late 1917
Taipei, Taiwan / 台灣
Joined: February 23, 2014
KitMaker: 44 posts
AeroScale: 38 posts
Posted: Monday, February 24, 2014 - 01:56 AM UTC
Quoted Text
it depends, if you are painting, and if you want to hide all the joins. if you want to fill the joins with compound and sand them down smoothly this must be done before painting, and after construction. so decals must be last step.
what difficulty did you find when applying decals?
Getting the decals on either side perfectly symmetrical was a bit difficult. I thought I had done it only to realise one was lower than it's opposite side. Also I accidently lost a decal when I picked the model up to fit another, must have accidently rubbed it whilst it was still wet and it fell off (Lesson learned, wait for the decal to fully dry before putting others on

)
Sounds like waiting until the models complete is the way to go. Even though putting the decals on before assembling would be a bit easier, it sounds like it will make other stuff much more difficult.
Thanks everyone!
Also, to save making a different thread, does anyone have any tips on improving decals toughness/quality? My Tu-22M model is from 1987 (and judging by the dust and smell of the box has been on the shops shelf since then). After reading amegan's post about Roden decals a few years old falling apart, I'm wondering if there's any way to stop that happening.
British Columbia, Canada
Joined: September 03, 2009
KitMaker: 6,965 posts
AeroScale: 6,247 posts
Posted: Monday, February 24, 2014 - 02:20 AM UTC
I tend to apply the decals before the very last bits, which are the landing gear, antennae and anything else which may snap off as I'm handling the model putting the decals on. When I'm doing a biplane, the decals mostly go on before the top wing does.
If you're worried about the decals breaking up, you can get a product called
Microscale Liquid Decal Film. Brush it over the decals on the sheet and let it dry. Then cut each decal out and apply it like you would any other decal.
Decals work best when they're applied to a glossy surface. It keeps 'silvering' to a minimum, and allows you to slide them into place a little easier. Getting them lined up with each other takes a bit of looking back and forth at both sides while the decals are still wet. Apply the decal where you think it ought to go, then look at the model from the top and from the nose/tail. Rock it from side to side slightly so that you can see both decals at once, then move the decal until it lines up with the one on the other side.
When once you have tasted flight you will walk the Earth with your eyes turned skyward.
For there you have been, and there you will always long to return.
-Leonardo Da Vinci
#243
England - North East, United Kingdom
Joined: March 21, 2008
KitMaker: 996 posts
AeroScale: 915 posts
Posted: Monday, February 24, 2014 - 02:27 AM UTC
Quoted Text
After reading amegan's post about Roden decals a few years old falling apart, I'm wondering if there's any way to stop that happening.
I use Liquid Decal if required but most decal sheets have decals you don't need, if in doubt, I try one of those onto spare plastic to see how it handles. If okay, carry on, otherwise try the Liquid Decal film
Andrew
Pfalz DIIIa, Eduard 1/48 Uffz Max Hitschler Jasta 18 Late 1917
Joel_W
 Associate Editor
New York, United States
Joined: December 04, 2010
KitMaker: 11,666 posts
AeroScale: 7,410 posts
Posted: Tuesday, March 04, 2014 - 02:53 AM UTC
Jack,
Think of decaling as part of the painting process,just before the weathering process starts. Here's the basic sequence you should follow:
Build/paint/seal with gloss/decal/seal with gloss/weathering washes/dry brushing/flat coat
There are many variations to the above procedure, but for a beginner stick to the basics.
Joel
On my Workbench:
Monogram 1/24 scale 427 Shelby Cobra
Just Completed:
Beemax 1/24 scale BMW M3 E30 1992 Evolution II
Taipei, Taiwan / 台灣
Joined: February 23, 2014
KitMaker: 44 posts
AeroScale: 38 posts
Posted: Wednesday, March 05, 2014 - 12:43 AM UTC
Quoted Text
Jack,
Think of decaling as part of the painting process,just before the weathering process starts. Here's the basic sequence you should follow:
Build/paint/seal with gloss/decal/seal with gloss/weathering washes/dry brushing/flat coat
There are many variations to the above procedure, but for a beginner stick to the basics.
Joel
Thanks
Although, I've been painting before building the model so far. Haven't done any weathering yet. That's for my next model after I've given panel lines a go

Maybe I'm using the wrong sort of gloss (Tamiya X-22) or maybe I applied it wrong but when I last used it, it looked very bad. Like made the painted parts look plastic.
British Columbia, Canada
Joined: September 03, 2009
KitMaker: 6,965 posts
AeroScale: 6,247 posts
Posted: Wednesday, March 05, 2014 - 05:35 AM UTC
Gloss coats do make the parts look wrong. The reason we use it is to avoid "silvering" when we apply the decals. The reason is that decals stick best to smooth glossy surfaces. If you look really closely at a matte surface, you'll see that it's actually quite rough. When you apply a decal to the matte surface, it traps air beneath it which makes the decal film apparent when the decal is dry. Gloss surfaces don't have this problem.
Once the decals are dry, we overcoat with matte or semi-gloss to give the model its final finish and make it look like a model again rather than a toy.
When once you have tasted flight you will walk the Earth with your eyes turned skyward.
For there you have been, and there you will always long to return.
-Leonardo Da Vinci
Taipei, Taiwan / 台灣
Joined: February 23, 2014
KitMaker: 44 posts
AeroScale: 38 posts
Posted: Friday, March 07, 2014 - 05:20 PM UTC
I'll have a read up more on applying gloss so I don't screw it up again. Thanks
Also, one more question has popped up with my new Hawker Tempest set. A few of the decals require sticking on top of each other to complete. Is this best done before I put them on the aircraft or after?
Thought I would ask before doing it myself and messing everything up
British Columbia, Canada
Joined: September 03, 2009
KitMaker: 6,965 posts
AeroScale: 6,247 posts
Posted: Friday, March 07, 2014 - 06:54 PM UTC
Quoted Text
Also, one more question has popped up with my new Hawker Tempest set. A few of the decals require sticking on top of each other to complete. Is this best done before I put them on the aircraft or after?
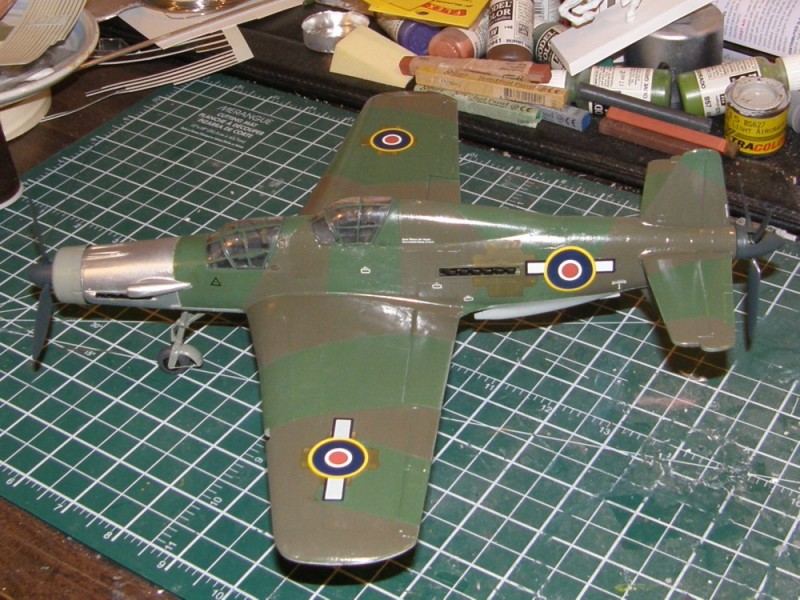
The best way to do this is to apply the first decal (the one the other decal gets applied on top of) first and allow it to dry. Then you can apply the second decal on top. Here's the sequence on one of my models that I used 3 decals on top of each other (it was a captured aircraft):
First decals
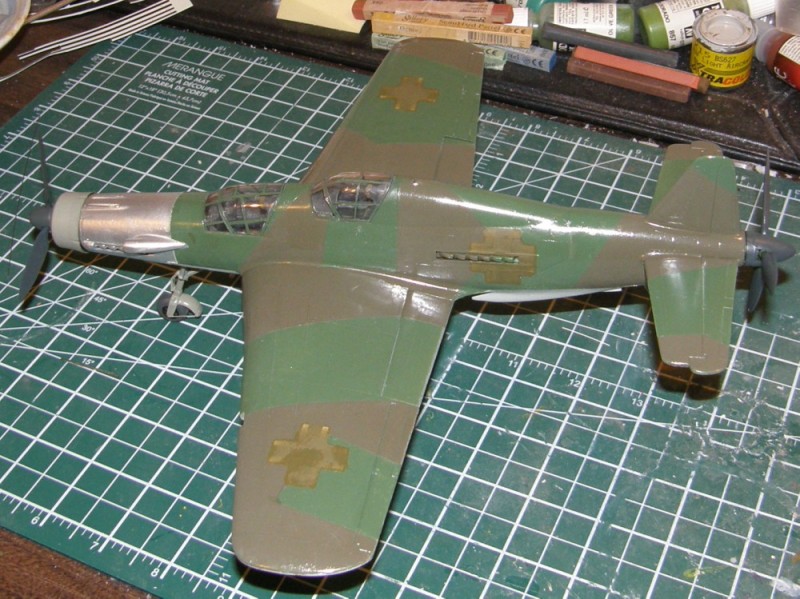
Second decals on top of the first
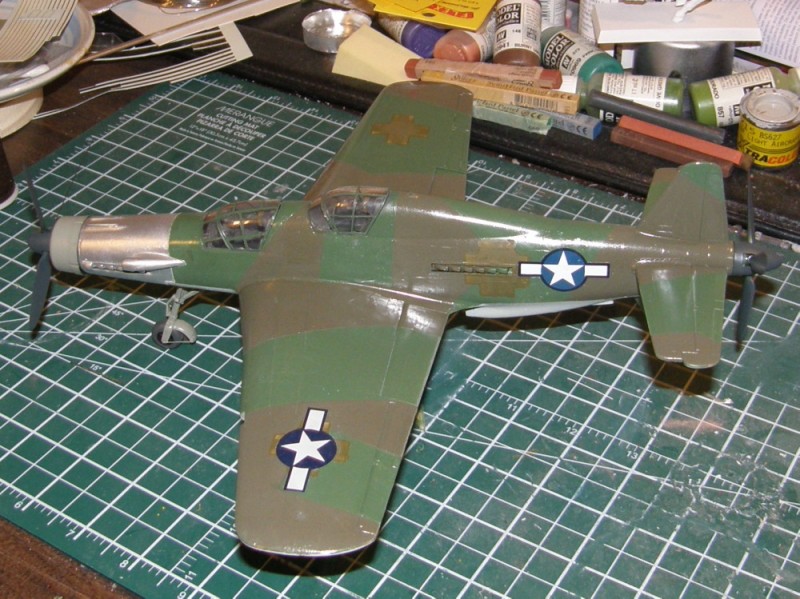
Third decals on top of the second
When once you have tasted flight you will walk the Earth with your eyes turned skyward.
For there you have been, and there you will always long to return.
-Leonardo Da Vinci
Quebec, Canada
Joined: January 01, 2004
KitMaker: 7,600 posts
AeroScale: 121 posts
Posted: Friday, March 14, 2014 - 04:00 AM UTC
What? Did the Brits capture the plane from the US who captured it from the Germans? Good thing the Russians weren't involved!
On the subject of decaling, I recently built an RPM kit (I wouldn't normally touch RPM with a 12' pole, but it is their 1/48 WWl Ford Model T ambulance, which is a real gem) and found that their very crappy decals spoil an otherwise great model. Decal film is thick and not very flexible; all the subjects are printed on one continuous film sheet requiring cutting close to the subject for minimal clear film; but the worst is that it took over an hour soaking for the decal film to loosen from the backing! If I could have used better quality decals, I would have. But RPM's were particular to this vehicle, and there are no alternatives.

Sør-Trøndelag, Norway
Joined: October 23, 2012
KitMaker: 189 posts
AeroScale: 142 posts
Posted: Tuesday, July 15, 2014 - 05:39 AM UTC
One tip I learned that I still use is to always pick up the wet decals with a clean brush and "float" them into the spot they fit on either water or a decal fluid (depending on the decals, som companies have decals that tend to stick better than others) Then I just siphon off the superfluous liquid with the brush, and once the decals are semi-dry add some setting solution on top if needed.
Secondly, the problem with you "rubbing" off decals when handling the model is best solved with doing the prosess in stages. I usually do(on a plane) the underside of the wings, when those have had a few hours to set, I do the top of the wings. After a night of setting, i finish with the fuselage. By then the decals on the wings should be quite impervious for accidental removals.
Building the world, one piece at the time.
European Union
Joined: September 28, 2004
KitMaker: 2,186 posts
AeroScale: 1,587 posts
Posted: Tuesday, July 15, 2014 - 08:17 PM UTC
Quoted Text
Also I accidently lost a decal when I picked the model up to fit another, must have accidently rubbed it whilst it was still wet and it fell off (Lesson learned,
a good trick is to make a frame to put the model on that you can moe around without touching the model. You can also put the model upside down on such thing.
Hard thermal insulation polyurethane is perfect for the job. Easy to cut to measure, soft enough to not scratch the model.
The mission: Beat the stash.
Almost conquered: MIG-29, Blackhawk, Skyray, Skyraider, fouga
Main battle:Demon, Skyhawk, F-14, CH-53
Stash reserve:Blackhawk, CH-46, 47 en 53; SU-7, Eurofighter, mohawk, hellcat, F-16D, 6x Fouga Magister, Voodoo
Joel_W
Associate Editor New York, United States
Joined: December 04, 2010
KitMaker: 11,666 posts
AeroScale: 7,410 posts
Posted: Wednesday, July 16, 2014 - 02:20 AM UTC
I tend to decal is several sessions so I don't have to actually handle the model, and accidently touch/move/ruin a decal or two.
For a decaling stand I just use a deep enough cardboard box so that the tail doesn't hit the bottom when turned over. I drap a soft towel over the sides so I don't scratch the clearcoat or decals from an earlier session.
Sessions:
tops of the wings
Bottoms of wings
Both sides of the fuselage. Separately if each side has a lot of decals and or is complicated like it was on my F-4B build.
All the little separate pieces that need decals like gear doors, access hatches, etc.
I use the same "stand" for applying the protective Glosscoat coat which is done in a min of two sessions.
Then the weathering processes start.
Joel
On my Workbench:
Monogram 1/24 scale 427 Shelby Cobra
Just Completed:
Beemax 1/24 scale BMW M3 E30 1992 Evolution II
New Jersey, United States
Joined: May 01, 2013
KitMaker: 60 posts
AeroScale: 56 posts
Posted: Tuesday, August 05, 2014 - 08:14 AM UTC
Quoted Text
Quoted Text
Also, one more question has popped up with my new Hawker Tempest set. A few of the decals require sticking on top of each other to complete. Is this best done before I put them on the aircraft or after?
The best way to do this is to apply the first decal (the one the other decal gets applied on top of) first and allow it to dry. Then you can apply the second decal on top. Here's the sequence on one of my models that I used 3 decals on top of each other (it was a captured aircraft):
First decals
[img]
Second decals on top of the first
[img]
Third decals on top of the second
[img]
Another question regarding this: if decals are layered like that, is it ok to use solutions like Micro Sol and Micro Set on a dried decal to prep for the next one? Or will that make the previously applied decal loosen a bit? I'm almost inclined to spray a quick coat of Future on top of a decal before I layer another one on top of it.
On the Bench:
Eduard 1/48 F6F-5 Hellcat
Tamiya 1/48 A6M3 Zero
British Columbia, Canada
Joined: September 03, 2009
KitMaker: 6,965 posts
AeroScale: 6,247 posts
Posted: Tuesday, August 05, 2014 - 12:48 PM UTC
It might make the applied decal a little soft, but as long as you don't touch it, it'll dry out just as good as it was before.
When once you have tasted flight you will walk the Earth with your eyes turned skyward.
For there you have been, and there you will always long to return.
-Leonardo Da Vinci
New Jersey, United States
Joined: May 01, 2013
KitMaker: 60 posts
AeroScale: 56 posts
Posted: Tuesday, August 19, 2014 - 12:32 PM UTC
Quoted Text
It might make the applied decal a little soft, but as long as you don't touch it, it'll dry out just as good as it was before.
Thanks! That certainly saved me the effort of layering Future over one decal before applying a second one on top of it.

However, I have now encountered another problem: several decals are heavily crinkled despite the use of MicroSet and MicroSol. I've tried re-applying those solutions on the decals in question, but I've had no luck in flattening them out. Is there any way to try and correct it?
On the Bench:
Eduard 1/48 F6F-5 Hellcat
Tamiya 1/48 A6M3 Zero
British Columbia, Canada
Joined: September 03, 2009
KitMaker: 6,965 posts
AeroScale: 6,247 posts
Posted: Tuesday, August 19, 2014 - 03:53 PM UTC
The mother of all decal softening solutions is freshly boiled water. Take a makeup sponge or soft cloth, dip it into just-boiled water (be careful not to scald your fingers) and press gently but firmly down onto the decal. Do not allow any sideways motion, only press straight on at right angles to the model's surface. Press for about 30 seconds; that should kill even the most stubborn wrinkle.
When once you have tasted flight you will walk the Earth with your eyes turned skyward.
For there you have been, and there you will always long to return.
-Leonardo Da Vinci
New Jersey, United States
Joined: May 01, 2013
KitMaker: 60 posts
AeroScale: 56 posts
Posted: Saturday, August 23, 2014 - 12:35 PM UTC
I think that may have backfired pretty badly... it looks like the boiled water may have melted the Future or paint or something because the whole area I tried it on has become really discolored, hopefully I can recover the model at this point. I wouldn't be so concerned about wrinkled decals if they weren't the very prominent roundels on the top of the wings. I really don't understand why both of these came out so badly because every other decal on the model is fine.

On the Bench:
Eduard 1/48 F6F-5 Hellcat
Tamiya 1/48 A6M3 Zero
Joel_W
Associate Editor New York, United States
Joined: December 04, 2010
KitMaker: 11,666 posts
AeroScale: 7,410 posts
Posted: Sunday, August 24, 2014 - 04:05 AM UTC
Kevin,
There is no reason to have to seal between each decal when layering. Just make sure that the previously layered decal is completely dry. And yes, it's ok to use the Micro system, just try not to use more then you need too. The previous decal(s)may soften, but will dry to their previous position.
Compound curved areas create wrinkles, moving the decals while applying setting solutions, or resetting a decal back into position often causes wrinkles because you're distorting the original shape of the decal. The less you touch a decal, the better off you are.
I've never used the boiling water method as I would have some concern to how the clearcoat and paint would be effected by the intense heated moisture. I would have used a piece of sponge a tad smaller then the decal so as not to touch any of the surrounding areas. Let everything just dry for a few days, then re-gloss. Hopefully that will even out the colors.
The worse case scenario is to have to remove the damaged decal, then replace it. It's happened to all of us at one time or another. As long as you don't seal the decals, they can be removed.
Joel
On my Workbench:
Monogram 1/24 scale 427 Shelby Cobra
Just Completed:
Beemax 1/24 scale BMW M3 E30 1992 Evolution II