_GOTOBOTTOM
World War II: Germany
Aircraft of Germany in WWII.
Hosted by Rowan Baylis
Meng 1/32 Me163 "Komet"
DougN1
_VISITCOMMUNITY
Georgia, United States
Joined: August 08, 2011
KitMaker: 410 posts
AeroScale: 409 posts
Posted: Friday, May 16, 2014 - 08:16 AM UTC
For my next build, after being inspired by Les and other's builds, I decided I would try my hand at this kit:


This kit has significant interior detail and is designed to allow the builder to have access panels off, and even the rear fuselage removed to show off the rocket motor. This seems to be a common trend these days, which I am guessing is fueled by some CAD designers wanting to show off their skills As I like my models all "buttoned up" it should be an interesting challenge to get it all to fit without problems.

Getting started with the cockpit, out of the box it looks quite nice, but there is room for a little improvement. To start, the kit tub is missing the horizontal strap that runs along each side. Although there are nice PE sets out there that allow you to replace all the straps if you desire, I opted to just use some styrene strip to add it to my kit. Additionally, there are two fuel lines that run from the cockpit side tanks up and through the back cockpit wall to the engine. The kit has a raised line to represent this. In this pic, I have added the horizontal straps and scraped off one of the molded fuel lines:


There are also some control linkages/rods that are next to the seat. Here you can see the first attempt at adding the linkages as well as the completed fuel lines:


I didn't really like the linkages, so I decided to try again and am happy with these:


I got the appropriate bits attached and then painted everything flat black as a base for my RLM66 cockpit color:


That's it for now.

Thanks for looking! Comments/critique/questions always welcome!

Doug
redcap
_VISITCOMMUNITY
England - East Midlands, United Kingdom
Joined: November 06, 2005
KitMaker: 753 posts
AeroScale: 311 posts
Posted: Friday, May 16, 2014 - 11:05 AM UTC
Doug. This is my 'to do' pile so I shall follow your build with interest.

Great start!
Gary
thegirl
_VISITCOMMUNITY
Alberta, Canada
Joined: January 19, 2008
KitMaker: 6,743 posts
AeroScale: 6,151 posts
Posted: Friday, May 16, 2014 - 11:44 AM UTC
Definitely off to a great start Doug . I wish they would release this in 48 scale .


Terri
Joel_W
Staff MemberAssociate Editor
AUTOMODELER
_VISITCOMMUNITY
New York, United States
Joined: December 04, 2010
KitMaker: 11,666 posts
AeroScale: 7,410 posts
Posted: Friday, May 16, 2014 - 11:50 AM UTC
Doug,
Nice start to upgrading the cockpit. Will be subscribing and following your build.
Joel
DougN1
_VISITCOMMUNITY
Georgia, United States
Joined: August 08, 2011
KitMaker: 410 posts
AeroScale: 409 posts
Posted: Sunday, May 18, 2014 - 02:38 AM UTC
Thanks everyone!

A bit more progress. The kit provides the option for either a standard plastic instrument panel (IP), with very nice molded details, or a plastic panel with PE covers. The kit also provides decals for the instruments, however these somehow were reversed to be white faces with black details, rather than the correct black faces with white details. Fortunately, Airscale provide some very nice instrument decals, so I decided to use those.

As they are individual decals, it might be a challenge to get them aligned correctly with the holes in the PE covers. So, after painting the plastic part of the IP RLM66 and clear coating it in preparation for decals, I simply laid each PE cover part in place, and then used a fine tip marker to trace a circle where each instrument should go:


After I was done I had a nice "map" to place the decals on:


I then applied the decals, and coated again with clear coat and then applied the PE covers:


The kit also provides PE seat belts, which I decided to try and see how they would look. After painting and attaching to the seat I decided they looked fine so I went with them:


I also painted up the rest of the cockpit parts, and got them all ready for final assembly and installation when the time comes. Overall I am pleased with the outcome, although I may weather it just a tiny, tiny bit (as the Komet was not in service for very long at all) before it's installed:


That's it for now. Thanks for looking, comments/critique/questions always welcome!

Doug
Joel_W
Staff MemberAssociate Editor
AUTOMODELER
_VISITCOMMUNITY
New York, United States
Joined: December 04, 2010
KitMaker: 11,666 posts
AeroScale: 7,410 posts
Posted: Sunday, May 18, 2014 - 03:06 AM UTC
Doug,
Nice job on the IP and seat belts. I always envy guys building in 1/32 scale when it comes to those type of details. Still, 1/48 is way bigger then when I struggled with 1/72 scale in my younger days.
Joel
berndm
_VISITCOMMUNITY
Niedersachsen, Germany
Joined: March 26, 2014
KitMaker: 844 posts
AeroScale: 630 posts
Posted: Thursday, May 22, 2014 - 12:50 AM UTC
Hi Doug
Great start on your "Kraftei" ! A very clean built, i will watch this closely. I did not have a Meng Me 163, but this
will inspire me, to start my Dragon kits in 1/48.

Bernd
DougN1
_VISITCOMMUNITY
Georgia, United States
Joined: August 08, 2011
KitMaker: 410 posts
AeroScale: 409 posts
Posted: Thursday, May 29, 2014 - 03:06 AM UTC
Had a bit of a delay in updating, as I was out of town visiting the beach with the family. Busy getting caught up with work, but wanted to take a quick break and update this build blog

As mentioned, I plan to build this one all sealed up, so with that in mind, I am only assembling the minimum necessary to do so. While the kit provides a very nicely detailed fuselage interior, with fuel tanks, engine, ammo trays, etc., I am leaving most of that out. I think this is the minimum I need for the rocket motor and more importantly, the fuselage support:


I'm not going to bother painting it as only the end of the rocket motor will be seen, and there is a "cap" part that is the visible part anyway.

In reading other builds, it seem getting the wings attached properly without the fairing sticking out too far, and the front/rear fuselage join are the biggest challenges with this build. In order to minimize fit issues, I've spent a lot of modeling time thinking about the best way to go about assembling this kit. The instructions would have you go about it in the usual way, assembling the forward fuselage, and then the rear, attaching the wings, etc.

After this process, I've decided to try adding the wings to each forward fuselage half, then adding the rear fuselage half, and then finally joining the two fuselage halves together. We'll see how that turns out

One builder comment that stuck out was the idea that the wings were a bit too "fat" to fit properly. So before joining the wings, I paid careful attention to them to see if that was the case. I noticed that the inner "support" on the top and bottom wing parts near the wing root seemed to have a "rough" surface, as it seem there are some sort of ejector marks on it:


Looking at the two wing halves dry fit, there is indeed a gap there:


So, before joining, I sanded the support down a bit and I think this improved the fit of the wingroot fairing to the fuselage.


Another interesting thing is the MK108 30mm canons. The instructions have you assemble them and would have you attach one to each wingroot as shown here:


However, the keen-eyed amongst you will note that the tubes on each barrel have an angle to them. It would seem clear that the angle is designed to match the curve of the wing leading edge, but if you assemble/install them as instructed, they would be the opposite. Since I had already put the attachment supports on mine I simply installed them in the opposite sides. I would recommend to future builders to install the opposite supports on each canon so that they are oriented properly. Note that this does not apply to the 20mm canons, as those barrels stick out of the wing.


That's all for now, thanks for looking! Comments/questions/critique always welcomed!

Doug
matrixone
_VISITCOMMUNITY
Oregon, United States
Joined: February 07, 2004
KitMaker: 869 posts
AeroScale: 862 posts
Posted: Thursday, May 29, 2014 - 04:25 AM UTC
Looks very good so far Doug.

On my build I too intended to have mine sealed up and ready for flight but still built and painted the rocket motor, it was so well detailed I could not resist. Building and painting the rocket motor took a little time to do and afterwards it felt like the hardest part of the build was over with but I was glad I built it.

What I don't understand is why is it that Meng was able to produce such amazing detail on the rocket motor but something simple like the decals for the instruments they get completely wrong. Very strange

Les
DougN1
_VISITCOMMUNITY
Georgia, United States
Joined: August 08, 2011
KitMaker: 410 posts
AeroScale: 409 posts
Posted: Saturday, June 07, 2014 - 10:37 AM UTC
@ Les, yes I know what you mean. In wish they had designed the kit to be easier to build all closed up, but I have to work with what you have. Building this kit has made me even more appreciative of your results with this kit! Feel free to chime in here if you have a better way to do something based on your build experience

On to the update!

I've made some progress on this beastie. Unfortunately, it's not pretty. With the kit being engineered to be all opened up, I expected to have some fit challenges of course. As mentioned above, other builds have indicated that getting the wings and tail attached to the fuselage is a challenge, so I did some dry fitting and found that I could get a good fit on the wings if I was able to put pressure on the join from the inside of the fuselage.

So, as mentioned above, I decided to be a bit unorthodox and build this kit by attaching the completed wings to each fuselage half, and then attach each tail section to each half, and finally join the two halves of the aircraft together.

But, before I could do that, I had to do a couple other things. I finished off the cockpit by adding the control rods to the control horns I made previously:


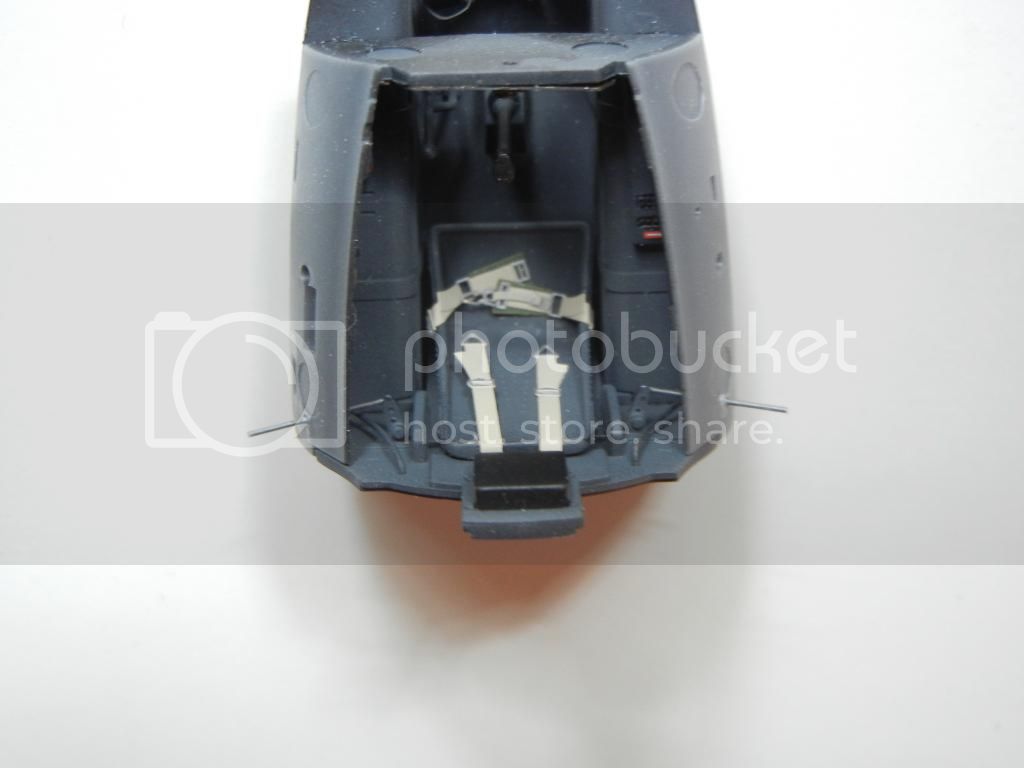
Although you could probably fit the rear quarter windows pretty easily when the build is finished, I decided to play it safe and attach them now. One note of caution, the plastic Meng uses is pretty brittle, so trim the part from the sprue leaving plenty of "stub" and then sand that down to remove it. Otherwise you could end up fracturing the clear part. I also noticed that the Gunze "type S" cement I use turns all the Meng plastic whitish where applied, and as such, the join between the clear part and the fuselage was a bit whitish as well. So, I masked by cutting some thin strips of Tamiya tape and outlining the clear part just inside of the join. I then filled that in with liquid mask:


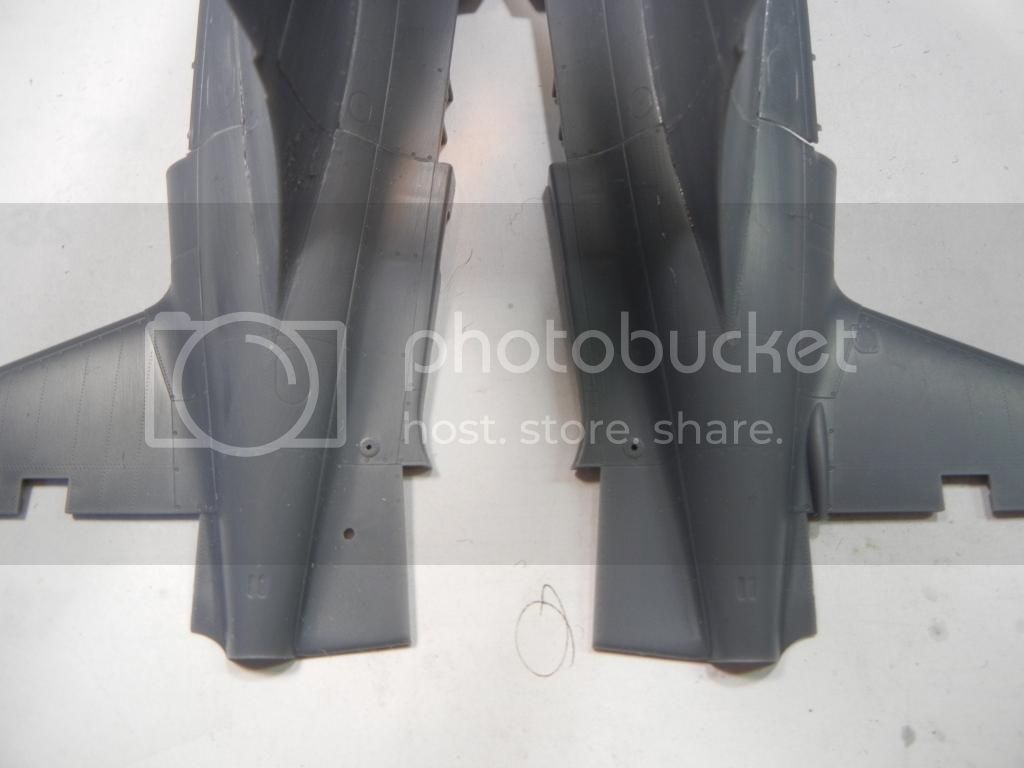
Now that part is over, the fun part can begin. I started by attaching the wings to each fuselage half. As this required at least 5 hands and 80 fingers, I didn't manage to get a photo of it as things were moving pretty quickly as I had to manually apply pressure on the join to get it to fit. The good news is I am pretty happy with the fit, and the wing fillets don't stick out as much as they do on some other builds.

I then attached the tail (and tail fillet) to the wing/fuselage half and got two aircraft halves. Good for mounting on a plaque I guess 
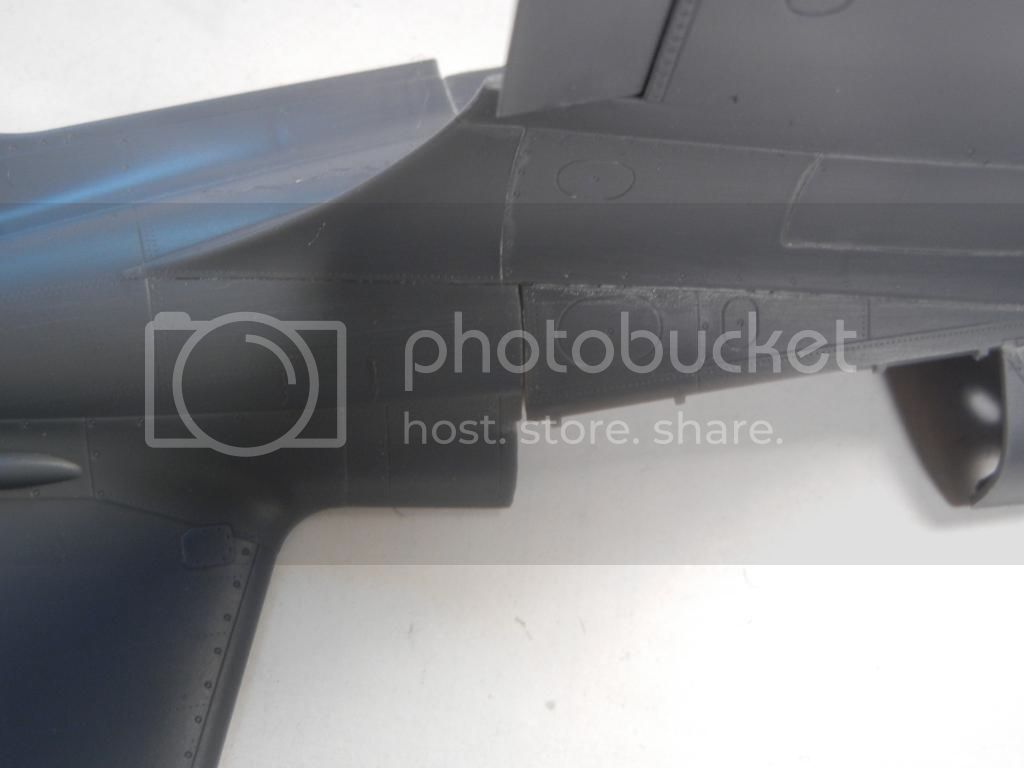
As you can see the fit is not prefect but it's pretty good considering:


I left the upper rear fuselage join between the fuselage and tail loose as I'll need to be able to pull it in to fit the spine cover once the fuselage is joined:


Since I was "on a roll" I stuffed everything inside the fuselage that needed to be there and glued them together. Starting to look like a "Komet" now!


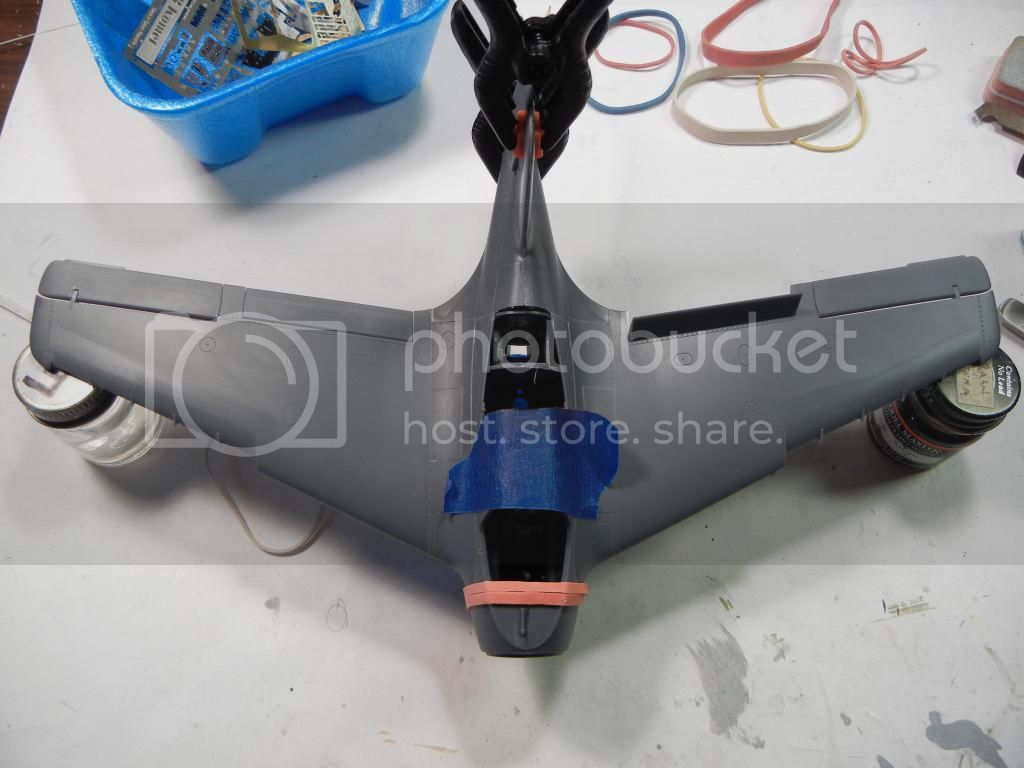
I'm pretty happy so far as I've managed to get a pretty decent fit without filler so far, and after I get things wrapped up I am certain I can correct the few small issues with a little Mr. Surfacer. The good news is that my model will probably have a better panel fit than the real thing, in spite of the Meng's engineer's efforts to the contrary

Sorry I didn't photographs of all the stages, hopefully the ones above are enough to illustrate what I am describing.

Thanks for looking! Comments/critique/questions always welcome!

Doug
matrixone
_VISITCOMMUNITY
Oregon, United States
Joined: February 07, 2004
KitMaker: 869 posts
AeroScale: 862 posts
Posted: Sunday, June 08, 2014 - 06:46 AM UTC
Doug,
It looks like you are finding the exact same fit problems I had with my kit.
I feel the best way to deal with the poor fit of some the parts is using Mr. Surfacer to fill the small gaps and then smoothing them out with Mr. Thinner, this way very little of the superb surface detail will be lost.
Its clear this kit was intended to be built opened up as it looks like the fit of some of the panels was an afterthought similar to the 1/48 scale Eduard Fw 190A/F kits.

Matrixone
DougN1
_VISITCOMMUNITY
Georgia, United States
Joined: August 08, 2011
KitMaker: 410 posts
AeroScale: 409 posts
Posted: Thursday, June 12, 2014 - 06:32 AM UTC
Thanks Les, I'm glad it's not just me having some fit issues I plan to do exactly as you've described and deal with any remaining gaps with my good friend Mr Surfacer

Anyway, a small update today. I've lost one of the spine cover parts and have been spending my modeling time trying to find it - with no luck

There are 3 spine "covers" in the kit. As expected, they don't quite fit right, but we can address that pretty easily. First, I attached one side of the first spine cover to starboard side of the opening, and let that dry. As you can see, there is a gap on the port side in the photo below:


I then pulled/pushed the spine cover and the port fuselage side together to get a good fit. I tacked it in place with superglue, and when dry, finished it off with regular glue to get a good fit:


I'll replicate this with the second spine cover, and then the third (if I ever find it) to get everything fit together. Once I get this done the major assembly work will be done and we will be ready for paint!

Thanks for looking (and feel free to help look for the missing part), comments/questions/critique always welcomed!

Doug
StukaJr
_VISITCOMMUNITY
California, United States
Joined: April 26, 2010
KitMaker: 346 posts
AeroScale: 292 posts
Posted: Thursday, June 12, 2014 - 06:45 AM UTC
Very neat build process and take on the subject - I was hoping to some day build this kit OOB but now considering it won't be enough.

Watching with interest!
Joel_W
Staff MemberAssociate Editor
AUTOMODELER
_VISITCOMMUNITY
New York, United States
Joined: December 04, 2010
KitMaker: 11,666 posts
AeroScale: 7,410 posts
Posted: Thursday, June 12, 2014 - 07:50 AM UTC
Doug,
You're making excellent progress.

Sorry to hear that the carpet monster left my modeling room, and is currently paying you an extended visit. All I can tell you is that while he was here, he ate very quite well. I'm still looking for a few missing parts.

I'll be more then happy to come on down from LI NY, and help you negotiate with the Carpet Monster. Of course you'll have to cover the airfare both ways.

Joel
Holdfast
Staff MemberPresident
IPMS-UK KITMAKER BRANCH
#056
_VISITCOMMUNITY
England - South West, United Kingdom
Joined: September 30, 2002
KitMaker: 8,581 posts
AeroScale: 4,913 posts
Posted: Thursday, June 12, 2014 - 06:51 PM UTC
I too will be building mine all closed up so I am watching this closely I like your approach and will be employing these fixes on my kit. So many thanks Doug, on sussing these fixes out and I hope that you can persuade the carpet monster to give up the missing hatch! If not it will be interesting to see how Meng deal with it?
DougN1
_VISITCOMMUNITY
Georgia, United States
Joined: August 08, 2011
KitMaker: 410 posts
AeroScale: 409 posts
Posted: Friday, June 13, 2014 - 12:27 AM UTC
Thanks guys My modeling "area" is a corner of the basement, so no carpet

I'm glad you find it useful Mal, my goal in doing a build blog for any kit is to pass on anything I learn about building to kit to anyone else who might be interested. In this case, I don't know if I really gained anything by attaching the wings to the fuselage halves, but it was worth a try

Quick update: So after looking for 4 days (including dumping and going through the full trash can next to my modeling desk), I decided to take the part from a second kit to keep the build moving along.

I cut the part from the sprue and placed it on the model roughly in position, put the sprue back in the box, looked at the model and saw the missing part about 3 inches away from the model, in plain sight. No way I missed that looking for 4 days...

So... back on track and hope to get some more done today. Next step is applying some Mr Surfacer to selected areas and getting the remaining bits on so we can get to painting.

Doug

Doug
Merlin
Staff MemberSenior Editor
AEROSCALE
#017
_VISITCOMMUNITY
United Kingdom
Joined: June 11, 2003
KitMaker: 17,582 posts
AeroScale: 12,795 posts
Posted: Friday, June 13, 2014 - 08:52 AM UTC
Hi Doug

I'm glad you said there's no carpet - because I'm equally plagued by a lino-monster! Whoever thoughtfully put down a floor of mottled blue-grey disruptive pattern linoleum in what is now my model room has a lot to answer for!

You honestly couldn't choose a better sort of flooring to hide any and every piece that's dropped! (And since suffering from RSI and being as clumsy as hell, most pieces get dropped more than once! ) I've actually installed a lamp at floor level to help find the blessed things!

All the best

Rowan
DougN1
_VISITCOMMUNITY
Georgia, United States
Joined: August 08, 2011
KitMaker: 410 posts
AeroScale: 409 posts
Posted: Friday, June 13, 2014 - 09:30 AM UTC
LOL Rowan - my basement floor is grey, and with most kits having grey plastic parts it can be hard to find things. I really should just paint the floor white or something one of these days

I actually keep a flashlight off to the side just to look for dropped parts - so it would seem great (or old) minds think alike, lol

Doug
Joel_W
Staff MemberAssociate Editor
AUTOMODELER
_VISITCOMMUNITY
New York, United States
Joined: December 04, 2010
KitMaker: 11,666 posts
AeroScale: 7,410 posts
Posted: Friday, June 13, 2014 - 02:00 PM UTC
Dough,

Congrats on having the part show up. Rest be assured that the monster returned it after you opened up a 2nd kit. I'm still finding parts from models I built a few years ago.
Joel
Holdfast
Staff MemberPresident
IPMS-UK KITMAKER BRANCH
#056
_VISITCOMMUNITY
England - South West, United Kingdom
Joined: September 30, 2002
KitMaker: 8,581 posts
AeroScale: 4,913 posts
Posted: Friday, June 13, 2014 - 06:07 PM UTC
I spent weeks looking for the canopy for a 1/48 Bf109E and eventually posted on here asking if anyone had a spare. I found it in a kit box that I know that I looked in at least twice! The floor in my man cave is light wood, but dropped parts still seem to be well camouflaged; however I have found everything, so far

Attaching the wings to the fuselage might not have gained much but it didn't lose anything either, so it will likely be the way that I go
DougN1
_VISITCOMMUNITY
Georgia, United States
Joined: August 08, 2011
KitMaker: 410 posts
AeroScale: 409 posts
Posted: Monday, June 16, 2014 - 06:34 AM UTC
Thanks guys!

After finding the missing part, I wasted no time in sticking on the model before it disappeared into the void again

I was able to attach it the same way I did the other two sections, which was to attach one side, let it dry, and then push/pull the other side into position. Here we have the finished result, before any filler is applied:


I then applied my friend Mr Surfacer 500 to the joins. After letting it dry a few hours, I went back and using a Q-Tip with some Mr Color thinner on it, I wiped down and removed the excess Mr Surfacer. Here you can see the starboard side with the excess removed, and the port side awaiting the same treatment:


Here all ready for some primer:


And a final "glamour" shot, starting to look like an aircraft:


Thanks for looking! Comments/questions/critique always welcome!

Doug
DougN1
_VISITCOMMUNITY
Georgia, United States
Joined: August 08, 2011
KitMaker: 410 posts
AeroScale: 409 posts
Posted: Monday, June 23, 2014 - 07:56 AM UTC
I guess better get another update done, as the Komet keeps getting pushing down to page 2

Small update today. Still sticking things on to get the model ready for paint.

I added the PE flaps to the bottom of the wing. Fit is a little tricky as I've always found it hard to glue a flat piece of PE to a shallow recess without the superglue causing it to push up a bit. But, they are on and looks fine.


I also thought about the main canopy, and whether to leave the clear bit off, or attach it now. Painting will be easier with the frame on since it gets mottled along with the fuselage. In the end, I decided to leave the clear part off and just attach the frame. The fit of the clear part to the frame seems quite good and leaving it off lets me clean out any gunk that gets in the smaller rear windows.


I also added the "slat" parts to the wing leading edge. As these are fixed and not movable, the join line needs to be eliminated as well. So I just blobbed on some Mr Surfacer 500 and sanded it out when dry to eliminate the seam.


I'll do a last check to be sure, but I think this model is ready for some paint!

Thanks for looking, comments/questions/critique always welcome!

Doug
surgeon01
_VISITCOMMUNITY
Berlin, Germany
Joined: February 20, 2005
KitMaker: 204 posts
AeroScale: 99 posts
Posted: Monday, June 23, 2014 - 08:12 AM UTC
Hi Doug,
very nice progress on your Komet. Looking forward to your paintjob. Meng's Komet isn't that easy but in the end you will see it's really impressive.
The fit between the canopy and the frame is very good, I used thinned PVA for this.

greetings ro
Joel_W
Staff MemberAssociate Editor
AUTOMODELER
_VISITCOMMUNITY
New York, United States
Joined: December 04, 2010
KitMaker: 11,666 posts
AeroScale: 7,410 posts
Posted: Monday, June 23, 2014 - 09:02 AM UTC
Doug,
Really nice progress. You should be ready for a coat of primer. Once you get that 1st coat of primer on, it starts to look like a real aircraft.

Joel
DougN1
_VISITCOMMUNITY
Georgia, United States
Joined: August 08, 2011
KitMaker: 410 posts
AeroScale: 409 posts
Posted: Friday, June 27, 2014 - 12:30 AM UTC
Thanks guys, getting things finished up and ready for paint!

I added the PE latches to the fuselage spine panels. As with most of the kit, they are designed to be shown opened up, but you need to fold them up to have them in the closed position. I think they are a little thick because of this.


I sprayed some primer over the whole airframe, will check for any issues and then on to paint!


That's it for now, thanks for looking! Comments/questions/critique always welcomed!

Doug
 _GOTOTOP