

I have just completed my first model. An Italieri Sabre F 86. Made a lot of mistakes but great learning curve. Got a lot of help and in particular Joel W. for which I am most grateful. I did that model in BMF and I used rub n buff which was interesting but difficult to use. Joel has urged me to get into airbrushing and now I have a Paasche H airbrush and a compressor. I am going to start trying to learn how to use it shortly.
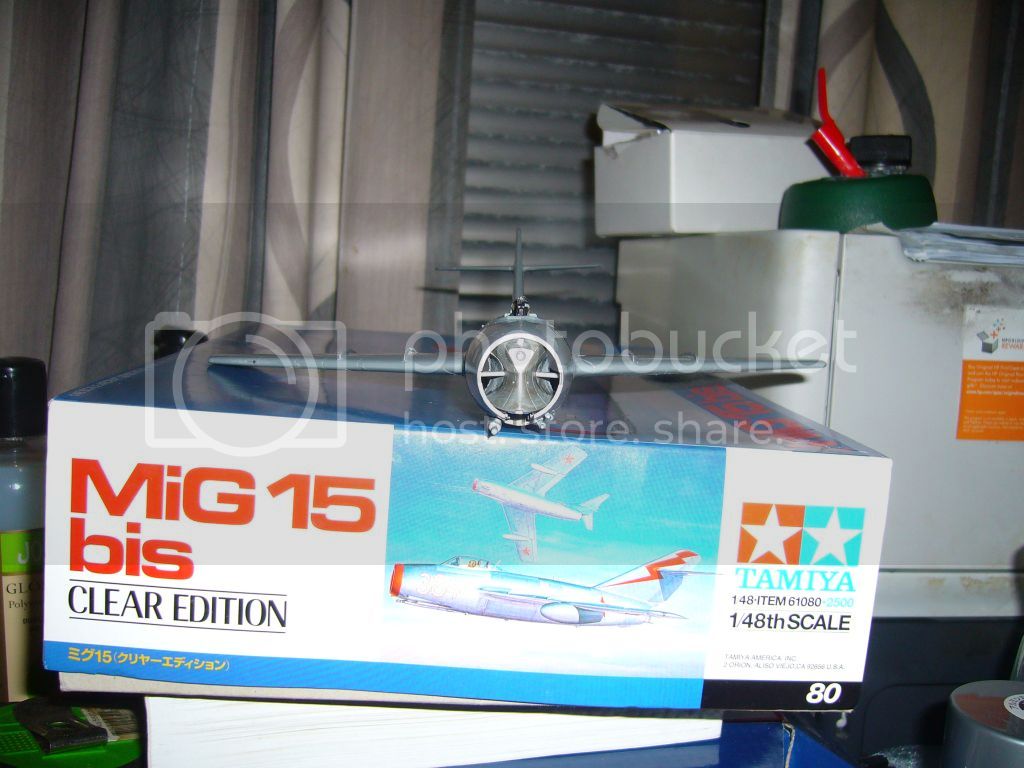
This model is the clear edition although you dont have to use the clear parts. I will not use the clear parts as I want the model to look a little bit real. The colour suggestion is a Chinese camaflouge but I will do it in BMF. They also suggest doing the undercarriage and some other parts in a light blue. I thought that was a strange colour so I did some googling and saw that in some of the real life photos some of the undercarriage was done in a light blue. I dont like the look as silver and light blue just doesnt look right. Many of the other photos including original MIGS and some re builds just use a BMF. Also there is a long list of suggested Tamiya paints and whilst I am starting to get a small collection of paints there are a few like brown (for the pilot suit and pink for his face that I dont have. I think I will do the pilot suit in Khaki but not sure how I am going to do the face. Maybe I will pretend he was an Korean pilot with a bad case of jaundice and do it yellow or maybe red and he was badly sun burnt. I suppose if you mix red and white ( which I have) I can get some wort of skin pink colour(only kidding) That is what I will do.I intend to buy some Alclad paints and give them a try.
The kit quality appears to my untrained eye to be very high and is much better than the Italieri Sabre kit. You have to construct an engine with quite a few parts but it will be hidden in the fuselage as I wont be using the clear parts. It was obviously made for the clear edition purpose.
I started painting a few items on the sprue. Wow those pilots are small and you have to paint the oxygen mask and seat belts different colour. I am using a needle point brush and a magnifying glass and sill having trouble.
Will post a few pictures when the build progresses.
Pre-Flight Check
Constructive critique of your finished or in-progress photos.
Constructive critique of your finished or in-progress photos.
Hosted by Jim Starkweather
Tamiya MIG 15 bis 1/48th scale

Sheehan1

Joined: May 27, 2014
KitMaker: 135 posts
AeroScale: 124 posts
Posted: Thursday, July 24, 2014 - 11:41 AM UTC

JPTRR

#051


Joined: December 21, 2002
KitMaker: 7,772 posts
AeroScale: 3,175 posts
Posted: Thursday, July 24, 2014 - 12:42 PM UTC
Laurie,
Good to read about your next project. Can't have a Sabre without a MiG-15!
Glad you got the airbrush. Plenty of a.b. experience here on the site.
Good to read about your next project. Can't have a Sabre without a MiG-15!
Glad you got the airbrush. Plenty of a.b. experience here on the site.

JPTRR
#051
Joined: December 21, 2002
KitMaker: 7,772 posts
AeroScale: 3,175 posts
Posted: Thursday, July 24, 2014 - 03:01 PM UTC
Laurie,
Just finished the rest of your post.
Flesh tones are, if this makes sense, both easy and nearly impossible! I still have some old figures from my youth, painted with commercial "flesh", a pale pink with a pinch of yellow that looks stupid. Eventually I started mixing my own, mainly orange and tan, dabbing a bit on my thumb webbing to check authenticity.
Today my flesh color is a tan, with hints of ocher and sienna mixed as needed. For a 1/48 eastern pilot, I'd use a desert tan, lightly wash in shadows, and then a wisp of white for highlights - but only if you want to get fancy. Otherwise, a tan.
Sheehan1
Joined: May 27, 2014
KitMaker: 135 posts
AeroScale: 124 posts
Posted: Thursday, July 24, 2014 - 03:20 PM UTC
Thanks for the assistance Fred. The amount of skin between his head cap and his air tube is so small I dont think it is worth the trouble. I think a little pink will have to do. Maybe he was one of those Russians who used to pilot these MIGS for the Koreans. Than you have his eyes. Brown. Bit like micro brain surgery with this small pilot. Hard enough for me to do the gloves let alone some of his other features.
I agree with you about the Sabre and Mig. I recall watching many movies of these dog fights. Great bit of history with the MIG v. Sabre. I recall the early Sabres were a bit of a nightmare and badly made. One Sabre pilot was saying bit and piece kept falling off and engines stopping. The later Sabres didnt have this problem and were a great plane. I read the the MIGs were superior in some aspects but the biggest reason why the Sabres prevailed was the quality of the pilots. Both great looking planes. Wish I could fly one. I have a friend who used to be in the Australian Airforce and he flew the last Australian Sabre to Malayasia. We gave all our Sabres to Malaysia and I think we got the Mirage (might be wrong there). I heard on the news that that just rolled out the new F 75 that Australia has just bought from the USA. Wont be available to fly for another few years apparently. Hope I am stil alive when it comes out in kit form.
I agree with you about the Sabre and Mig. I recall watching many movies of these dog fights. Great bit of history with the MIG v. Sabre. I recall the early Sabres were a bit of a nightmare and badly made. One Sabre pilot was saying bit and piece kept falling off and engines stopping. The later Sabres didnt have this problem and were a great plane. I read the the MIGs were superior in some aspects but the biggest reason why the Sabres prevailed was the quality of the pilots. Both great looking planes. Wish I could fly one. I have a friend who used to be in the Australian Airforce and he flew the last Australian Sabre to Malayasia. We gave all our Sabres to Malaysia and I think we got the Mirage (might be wrong there). I heard on the news that that just rolled out the new F 75 that Australia has just bought from the USA. Wont be available to fly for another few years apparently. Hope I am stil alive when it comes out in kit form.
Joel_W
Joined: December 04, 2010
KitMaker: 11,666 posts
AeroScale: 7,410 posts
Posted: Friday, July 25, 2014 - 09:35 AM UTC
Laurie,
Just saw your 2nd build thread, and I'll be following along to it's conclusion.
Australia just purchased 58 Joint Strike Fighters, better known as the Lockheed Martin F-35 Lightning II. Deliveries will start sometime in 2018. So there's no reason that you won't be around to build a few of the new Australian F35s.
This should make a interesting build for your learning curve. While I've never built the kit, nor even read any build reviews on it, there are some issues that you should be aware of, and do some google searches to see if it is in fact issues that you'll need to resolve.
1st is the fact that the model is made from clear plastic. Clear canopies are usually more brittle then colored plastic, so I'm going to assume that this is also the case with these clear parts. That makes the parts easier to crack or break cutting them off their respective sprue trees. Gluing is also less effective as the plastic doesn't fuse like regular plastic. It will also be a little harder to sand and polish.
The kit has split fuselage halves so that you can display the engine. Since you're not interested in that option, I would suggest that you glue the front and back sections together for each side. That will give you essentially two regular fuselage halves. Any joint gaps when you join the two sides together can be taken care of in the usual manner.
The intake and exhaust from the engine needs to be painted, weathered, and installed so that you can't see through either end.
Joel

Sheehan1
Joined: May 27, 2014
KitMaker: 135 posts
AeroScale: 124 posts
Posted: Friday, July 25, 2014 - 10:47 AM UTC
Hi Joel
Yes I got the number wrong F. 35. I heard on the news that they will costs $100M each. Wow I will be paying tax for them for the rest of my life. Apparently it is part of some defence pact with the USA and some other countries. They had some pictures of the plane on TV last night. It looks very impressive. Apparently it reaches speeds of 2000mph
The Mig is a clear edition but it has ordinary parts as well so you just make it as normal which I will be doing.
Not sure what you mean about the two halves of the fuselage.
Also how do you do the weathering?
Regards
Laurie
Joel_W
Joined: December 04, 2010
KitMaker: 11,666 posts
AeroScale: 7,410 posts
Posted: Friday, July 25, 2014 - 12:06 PM UTC
Quoted Text
Hi Joel
Yes I got the number wrong F. 35. I heard on the news that they will costs $100M each. Wow I will be paying tax for them for the rest of my life. Apparently it is part of some defence pact with the USA and some other countries. They had some pictures of the plane on TV last night. It looks very impressive. Apparently it reaches speeds of 2000mph
The Mig is a clear edition but it has ordinary parts as well so you just make it as normal which I will be doing.
Not sure what you mean about the two halves of the fuselage.
Also how do you do the weathering?
Regards
Laurie
Laurie,
Congress will be cutting the defense budget next year, and thus the number of F35s will be reduced. So Lockheed Martin has been aggressively marketing the plane to other countries that the defense dept would like to upgrade their inventory. Same here. We're taxed nearly to death. Come to think of it, they still tax you after you're dead.
What I meant about the fuselage is that it's split in four pieces so that you can show the engine when the model is done. Since you're not going to be doing that, it's easier to glue up the two parts for each side on a flat surface, so that you end up with basically the traditional right and left fuselage halves. way too often the rear section of these split fuselages just don't mate up very well with the front, so you have a nasty seam around the whole fuselage. this way, the worst you'll have to deal with is a top and bottom seam just as if it was a two piece fuselage assembly.
Weathering comes after the Mig is painted, and decaled. You'll learn the basics of it then. Lets get to that stage 1st.
Joel
Sheehan1
Joined: May 27, 2014
KitMaker: 135 posts
AeroScale: 124 posts
Posted: Friday, July 25, 2014 - 01:44 PM UTC
Hi Joel
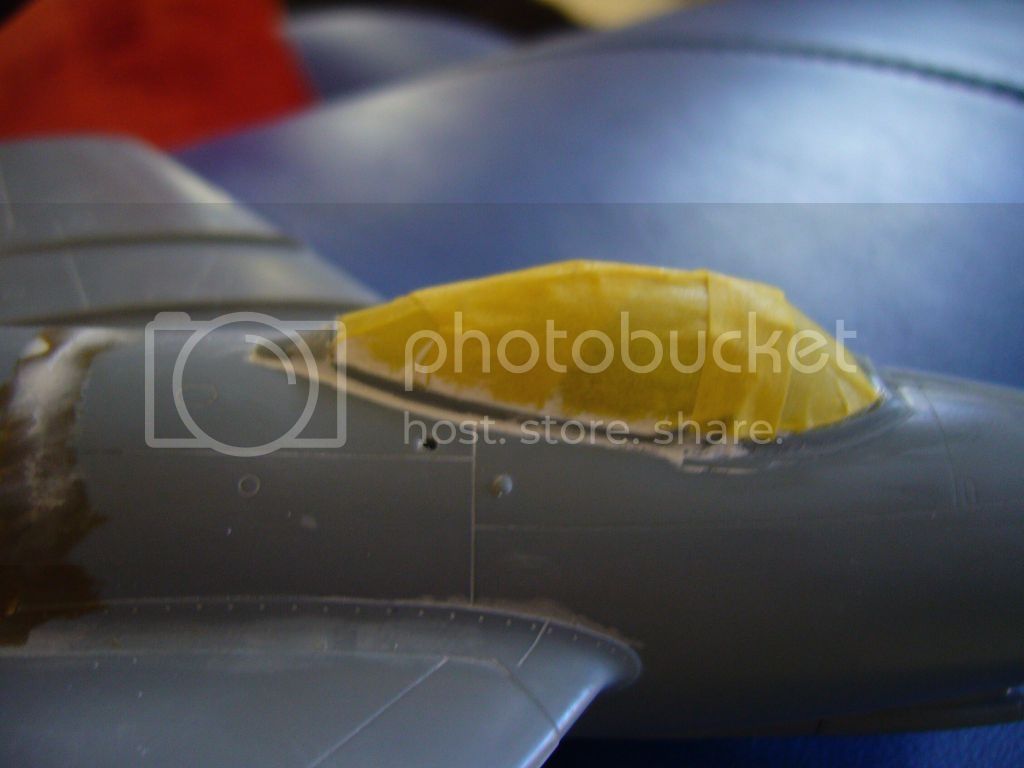
I have completed the cockpit and fitted the front fuselage.
The instructions now say fit the canons and then fit the wings and then attach the drop tanks.
I am going to try Alclad Aluminium 101 for the first time. My thoughts were not to attach the canons or the drop tanks until after I have completed painting the wings and fuselage. What colour would you suggest I do the drop tanks. Are they the same colour as the fuselage (` 101) or would you do another shade of metal colour?
Are my thoughts right about not adding on the little bits and pieces like undercarriage, wheels, canons and drop tanks until completion of the painting?
Regards
Laurie
Joel_W
Joined: December 04, 2010
KitMaker: 11,666 posts
AeroScale: 7,410 posts
Posted: Saturday, July 26, 2014 - 11:09 AM UTC
Laurie,
Didn't know that you started the Mig15 yet. I would glue the cannons to the fuselage before you paint. Test fit everything as you might have to putty and sand them to fit correctly. You can always hand paint the barrels later.
The drop tanks from doing a few quick Google searches seem to have been Aluminum as well, so you can paint them Al #101. Since the undersides of the aircraft will be Aluminum and not light Blue, you can paint the gear doors, and gear at the same time. Then paint the details as you need to like the Oleos, which should be highly polished steel (Chrome works well for this).
How about posting some pictures of your cockpit interior.
And how are you handling the split fuselage halves?
Joel
Sheehan1
Joined: May 27, 2014
KitMaker: 135 posts
AeroScale: 124 posts
Posted: Saturday, July 26, 2014 - 12:12 PM UTC
Hi Joel
Here are some photos of my progress

I tried to fit the engine into the aricraft but when I tried to fit the rear fuselage it just didnt want to fit properly. So I decided not to fit the engine. As it wasnt going to be seen it seemed pointless in including it anyway and I read some posts in Model madness where there were weight issues with the engine installed
So i fitted the rear fuselage and you can see there is a slight misfit on the top. I tried to get a better fit before glueing but it just didnt want to sit right. So I imagine I just fill the gap with plastic putty and said it back to make it smooth.
I find this Tamiya kit far better than the Italieri. Everything seems to fit well except for that rear fuselage section and whilst the picture might show it to be a big gap it is not that bad. The rear fuselage part is slightly raised above the front fuselage which creates the gap.
BTW: The picture is of one of my dogs who got sick of the plastic cement fumes and decided to have a break from the modeling.
You would think he is a female but he isnt. He had surgery and he lost his privates. It was very unusual but he was mating with his wife and couldnt separate. They were joined for about an hour and when they separated his privates was swollen and was starting to go black. I took him to the vet who said that the blood circulation had been cut off for too long and that the skin was dying so he recommended to cut it off. My eyes were watering thinking about it. Anyway he went into the hospital and had it cut off and they did a few plumbing alterations and he know relieves himself like a female dog. Took him a while to adjust but he is pretty good at lifting the leg without getting the inside of his leg all sprayed.
Regards
Laurie

Here are some photos of my progress


I tried to fit the engine into the aricraft but when I tried to fit the rear fuselage it just didnt want to fit properly. So I decided not to fit the engine. As it wasnt going to be seen it seemed pointless in including it anyway and I read some posts in Model madness where there were weight issues with the engine installed
So i fitted the rear fuselage and you can see there is a slight misfit on the top. I tried to get a better fit before glueing but it just didnt want to sit right. So I imagine I just fill the gap with plastic putty and said it back to make it smooth.
I find this Tamiya kit far better than the Italieri. Everything seems to fit well except for that rear fuselage section and whilst the picture might show it to be a big gap it is not that bad. The rear fuselage part is slightly raised above the front fuselage which creates the gap.
BTW: The picture is of one of my dogs who got sick of the plastic cement fumes and decided to have a break from the modeling.
You would think he is a female but he isnt. He had surgery and he lost his privates. It was very unusual but he was mating with his wife and couldnt separate. They were joined for about an hour and when they separated his privates was swollen and was starting to go black. I took him to the vet who said that the blood circulation had been cut off for too long and that the skin was dying so he recommended to cut it off. My eyes were watering thinking about it. Anyway he went into the hospital and had it cut off and they did a few plumbing alterations and he know relieves himself like a female dog. Took him a while to adjust but he is pretty good at lifting the leg without getting the inside of his leg all sprayed.
Regards
Laurie
Joel_W
Joined: December 04, 2010
KitMaker: 11,666 posts
AeroScale: 7,410 posts
Posted: Saturday, July 26, 2014 - 12:47 PM UTC
Laurie,
You're flying through this build. So far it looks pretty good. As for the fuselage seam, it's flush on the bottom. Wasn't there a way of having the opening on the bottom, and flush on the top? From the side it looks like the aft end is higher then the fore end of the fuselage. That will be more difficult to fix then the seam itself.
You didn't post any pictures of a head on view, so I can't tell if you can see through the intake and out the exhaust, or even see the bottom of the cockpit.
Wow, that some strange story about your dog. Glad he's ok, and has adopted to new stance.
Joel
Sheehan1
Joined: May 27, 2014
KitMaker: 135 posts
AeroScale: 124 posts
Posted: Saturday, July 26, 2014 - 05:15 PM UTC
Hi Joel
Yes the aft end of the fuselage where it joins is slightly higher but it is perfectly level underneath. So I am not sure what the problem was. I sanded it a bit so it is not as raised as much. I can live with it on my second build
When you look through the intake you dont see anything and same at the exhaust. There is a block in their that sits behind the cockpit with some weights in it that stops the view.
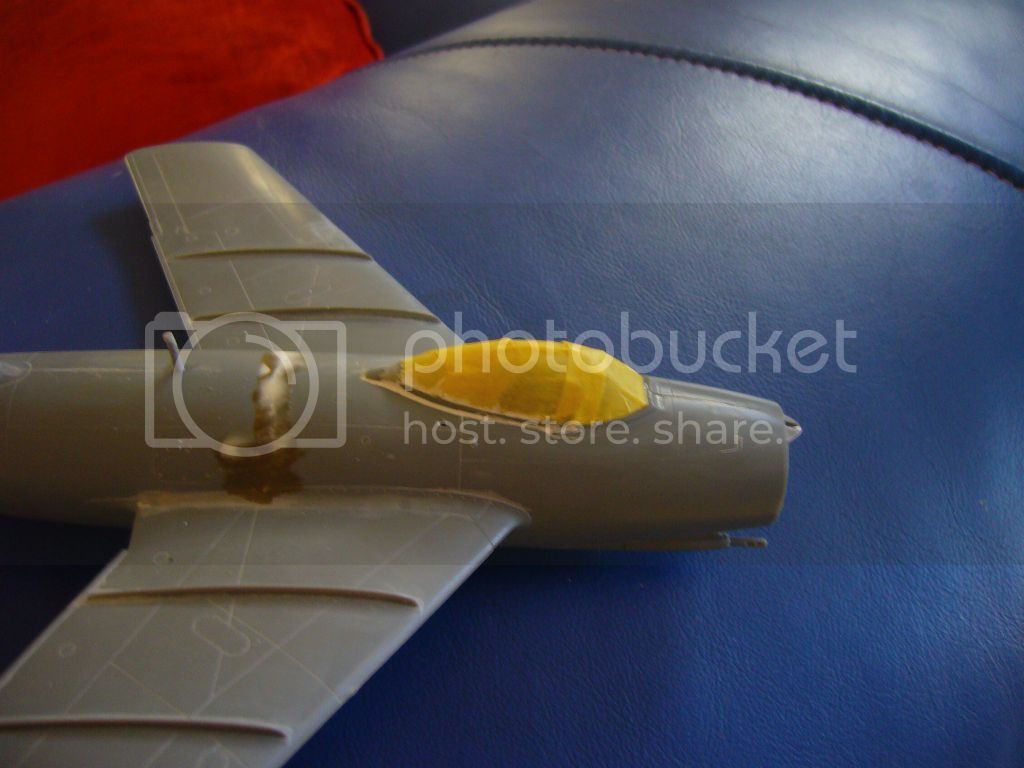
Here a a few more pictures.
As far as the painting is concerned I take it you mean to paint the drop tanks and undercarriage whilst on the sprue and paint the fuselage and wings separately. Then attach the drop tanks and fuselage and touch up the suspension etc.


PS: There was a little antenna sitting just behind the gap you will see it is now missing. I must have knocked it off when I was sanding it back. I did the same on the Sabre. Those little flimsy antenna. I thought I might be the only idiot to do this but I see on the MIG review on Modelers Madness that one reviewer had the same experience and said "I wonder if I am the only one that keeps breaking off these antennae?" I have a little thin bit of plastic which would you use to leave the airbrakes open. I am not keep on leaving these open anyway so I might use it. I just have to drill a small hole with my pin vise and then stick it in.
I also am undecided about leaving the flaps down. I am a bit undecided. I suppose if I have the flaps down it would be better to have the air brakes open. What are your thoughts. Hope to get some practice with the airgun next week. Having trouble finding those pipe cleaners. Went to a tobacco store and asked them and she said she didnt carry them. So I said have you got cigarettes and she said yes. She missed my joke. There was a John Cleese skit years ago about the Cheese shop. Not sure if you have ever seen it but John Cleese goes into a cheese shop and asks for some blue vein. The shop keeper says "We have got any blue vein" So JC says "Well I will have some Gruyere cheese" The shop owner says "We have got any Gruyere" Anyway it goes on like that for about 6 cheese and JC says "Have you got any cheese at all" Shop keeper says "No" JC says "Well what the bloody hell have you got a cheese shop for" Cant remember the response but you get my train of humer. When this girl said she didnt have pipe cleaners I couldnt believe it. There is another tobacconist at another shopping centre and I will try there.. I will have a go at spraying some Tamiya acrylics and then clean the airgun. So you use lacquer thinners on both enamels and acrylics as a flusher?
Regards
Laurie
Yes the aft end of the fuselage where it joins is slightly higher but it is perfectly level underneath. So I am not sure what the problem was. I sanded it a bit so it is not as raised as much. I can live with it on my second build
When you look through the intake you dont see anything and same at the exhaust. There is a block in their that sits behind the cockpit with some weights in it that stops the view.
Here a a few more pictures.
As far as the painting is concerned I take it you mean to paint the drop tanks and undercarriage whilst on the sprue and paint the fuselage and wings separately. Then attach the drop tanks and fuselage and touch up the suspension etc.


PS: There was a little antenna sitting just behind the gap you will see it is now missing. I must have knocked it off when I was sanding it back. I did the same on the Sabre. Those little flimsy antenna. I thought I might be the only idiot to do this but I see on the MIG review on Modelers Madness that one reviewer had the same experience and said "I wonder if I am the only one that keeps breaking off these antennae?" I have a little thin bit of plastic which would you use to leave the airbrakes open. I am not keep on leaving these open anyway so I might use it. I just have to drill a small hole with my pin vise and then stick it in.
I also am undecided about leaving the flaps down. I am a bit undecided. I suppose if I have the flaps down it would be better to have the air brakes open. What are your thoughts. Hope to get some practice with the airgun next week. Having trouble finding those pipe cleaners. Went to a tobacco store and asked them and she said she didnt carry them. So I said have you got cigarettes and she said yes. She missed my joke. There was a John Cleese skit years ago about the Cheese shop. Not sure if you have ever seen it but John Cleese goes into a cheese shop and asks for some blue vein. The shop keeper says "We have got any blue vein" So JC says "Well I will have some Gruyere cheese" The shop owner says "We have got any Gruyere" Anyway it goes on like that for about 6 cheese and JC says "Have you got any cheese at all" Shop keeper says "No" JC says "Well what the bloody hell have you got a cheese shop for" Cant remember the response but you get my train of humer. When this girl said she didnt have pipe cleaners I couldnt believe it. There is another tobacconist at another shopping centre and I will try there.. I will have a go at spraying some Tamiya acrylics and then clean the airgun. So you use lacquer thinners on both enamels and acrylics as a flusher?
Regards
Laurie
Joel_W
Joined: December 04, 2010
KitMaker: 11,666 posts
AeroScale: 7,410 posts
Posted: Sunday, July 27, 2014 - 02:27 AM UTC
Laurie,
I was pretty sure that the big air deflector in the nose would block just about the whole view, but I wasn't completely sure.
That nasty fuselage seam looks pretty good. the 1st picture looks like the seam area is concave. Use a straight edge to make sure that there is no light showing through as you work your way from wing to wing.
If there is no concave issues, the next step is to brush on some Tamiya Gray primer, what you're looking for is the seam line/putty to disappear. It will also seal the putty. You'll see any areas that need redoing. Just let it dry for several hours, then using 600 grit paper, sand the primer till it's almost gone. What remains are the imperfections. Some times the primer will fill and correct sanding issues, other times you need to re-putty or use CCA glue. Correct, then check again. Once you're satisfied with the seam, you'll be polishing it. For a NMF the surface has to be as perfect as you can get it.
As for the pipe cleaners, if you can't find them, you can use those little in between tooth brushes you buy at a pharmacy.
Another resource is go online, and Google them. Look for online Australian tobacconists that you can order them from. When I buy them locally, I buy just about their whole supply. They're also getting harder and harder to find here.
Joel
Sheehan1
Joined: May 27, 2014
KitMaker: 135 posts
AeroScale: 124 posts
Posted: Sunday, July 27, 2014 - 06:51 PM UTC
Hi Joel
I think I have that joint really smooth. I think I have reach the point of waiting till I am comfortable with my airbrush skills. I also bought some of those inter denture brushes and they look like they should do the job.
I have a couple of painting questions.
Firstly when you use the airbrush I think you said you like to hold the brush about 4-6 inches from the surface. I have read where you press down on the air control and then pass it across the surface and when you have reached the other end you turn if off. I have read when you dont use a wristy action by just hold the wrist firm and use your arm.
First question I imagine you move the brush at a medium pace to avoid having the paint run.
Secondly how many passes do you make before letting it dry and reapplying the second coat. I imagine you just do it so that there is colour covering the model.
Then do you allow a few days for that coat to dry and bite and then apply the second coat like you applied the first
I have also read that Windex (which is an Aussie glass cleaner) is a good flushing and liquid for the airbrush if you are using acrylics.
I hopefully will have my first test run on Thursday (wife goes our for dinner with a friend and she has bad lungs and I dont want to upset her to the point where she sticks the compressor and airbrush in the bin)
Regards
Laurie
Joel_W
Joined: December 04, 2010
KitMaker: 11,666 posts
AeroScale: 7,410 posts
Posted: Monday, July 28, 2014 - 02:42 AM UTC
Laurie,
1st and foremost, congrats on getting the Mig to the level you want for painting. Now comes your 1st few lessens with your airbrush.
By default, it should have come with a #3 tip, needle & cone. For 99% of your work, you're never going to change the tip. For 75+% you're going to use the #3 needle & cone. As I said earlier, when I switch to the #1 needle & cone, I still use the #3 tip.
Since your wife has respiratory issues, invest in box type window fan for now, and it will be a quickie, homemade paint booth. Turn the fan so it sucks out air, not pull air in. Try your best to setup in front of it.
After you've connected your hose to the compressor, as well as to the air brush, I leave it connected until I need to clean the tank out. Like I said, I have quick disconnects on mine, which I used all the time when I still had two guns.
turn on the compressor and adjust the top regulator knob to 15-16 psi. Once the tank fills up, it should shut off. You can paint before that, but wait for now.
My 1st H Paasche gun had a control adjustment knob that regulated how far down I could depress the trigger button. The new gun doesn't have one. If you do have one, set it so that the button will open the air flow to the max limit. Very gently turn the cone down till it's closed. Now depress the trigger and air should still come out.
Now using a piece of paper towel to paint, attach the paint bowl. Fill the bowl 1/2 way with plain old water using the eye dropper to get use to it.
Close the cone down, now open one turn and try to paint the water on the towel. Open up the cone a little at a time till you get a nice smooth controlled flow of water. The water won't clog your tip, so there isn't any clog issues for now. Just get use to the spray pattern for a few mins. Open up the cone more and more, then less and less, and see the difference. Just keep on "painting" a dry section of the towel so you can see the pattern.
Set the cone to approx. a 1 inch pattern. hold the gun about 4 inches or so from the paper towel, start from before one side and slowly paint a line across the whole towel, don't stop till you get past the other side. You move your whole arm, not your wrist. That way the distance and pattern stays the same. You'll quickly learn when to break that rule, as well as the full pass rule. But for now, stick with it, and make your life easier.
Also, fully depress the trigger. For the vast majority of time you will be using full air. Once you're comfortable with the basics, feathering the trigger is very easy for detail work.
Watch the regulator gauge every time you depress the trigger button for the drop till the tank refills. You'll quickly figure out how much time you have till the refill, and how long it takes to refill to the max.
BTW, since the bowl is on the left side, it's more comfortable to hold the gun in your right hand. I'm left handed, and can't use my right hand for anything, but I do paint with the gun in my right hand. Go figure.
When you're comfortable with those basics, it's time to learn how to shoot paint. I already sent you the procedures I use to clean the gun, so I won't repeat them here. The only advice I'll give you is to use either Alcohol or Lacquer Thinner to clean the air gun. With Windex-D, which I use to clean out Pledge, I still then have to run water through it. Instead of water, I use LT.
Buy a box of the cheapest plastic white spoons you can. That's what you're going to practice painting on. The more spoons the better.
paint lesson 1:
Tamiya any Gray and their X20-A.
Close down the cone, then open 1 turn.
Use the cup again
mark a 1/2 inch or 10 ml line on the eye dropper.
Now add that amount of Thinner to the cup.
After mixing the bottle of paint so that there is no pigment still on the bottom, add the same amount of paint to the bowl. Now mix with a small metal or plastic stick. I've used the same mini screw driver for 35 years!
Turn on the compressor, and set the regulator to 16psi.
Wear a plastic glove if you don't want to get paint on your left hand, or tape the spoon to a holding stick. You want to hold the spoon at a angle so that you can keep the gun at about 90 degrees to the surface of the spoon, but not so steep that the paint runs out of the bowl. It will take a while to get comfortable with various angles for various jobs.
Now using a paper towel under the spoon depress the trigger button and slowly open the cone till the paint starts to come out. You might get some Alcohol at 1st, that's ok. If you added the paint 1st, you would have already clogged the cone tip. Adjust till you get a smooth flow and a approx. a inch 2.5 ml band. Now paint easy passes on the back of the spoon. Slowly build up the color with several passes. the paint should start to look shinny but not run. Then stop as the paint needs to dry. I cheat, and close the cone, then just shooting air I dry the paint. Then open the cone again, and continue to add light layers of paint. When I satisfied with the coverage. I'm done.
Now do the same thing with the front of the spoon. It's totally different because you're painting a concave surface. For this, you'll need to learn how to rotate the spoon while moving the air brush at angles so that you can get to all areas. Use shorter strokes both is distance and time. Do a few spoons till you're comfortable doing that.
Now comes lessen 2:
Learning to make circles of all sizes, and learning how to draw a line down to a fine line. This is the 1st step on learning the basics of a free hand camo paint scheme.
But 1st master painting a spoon till the painting on both sides is consistent and smooth. You need to be able to duplicate it spoon after spoon.
You can also go to Utube and do a search for plastic model air brushing, there are hundreds of videos. Watch a few. The ones with the most views are usually the best.
Once you're use to your air brush, you'll use it more and more. I hardly every paint with a brush anymore where a air brush would do a better job of it.
Joel
Sheehan1
Joined: May 27, 2014
KitMaker: 135 posts
AeroScale: 124 posts
Posted: Wednesday, July 30, 2014 - 03:15 PM UTC
Hi Joel and others
My Alclad arrived. I have Aluminium 101. Magnesium, Dark Aluminium, Gloss Black and Clear Glosss Coat (Kote?) Bloody yank spelling????
I also had my first trial run with the airbrush. Went well. I havent bought any plastic spoons yet so I just painted the plastic top of a spray can in flat khaki acrylic. I thinned it 50/50 and all went well. I than poured some acrylic thinners into the bowl and sprayed it through a couple of times. I than took out the needle and soaked it and the cone in some thinners and than wiped it clean with some paper toweling. All seemed nice and clean.
I will give the spoons ago on Sunday probably. Looking forward to painting the MIG.
I have a couple of questions.
First I imagine that it is better to spray without the cockpit canopy on. I thought it would be cleaner. I intend to just cover the pilot and cockpit with some Tamiya masking tape. I havent fitted the undercarriage yet. I am thinking of painting that on the sprue.
I see the bottle of black undercoat suggests giving it two coats.
How many coats of the final coat is usual. 3 or 4?
BTW I have another question Joel. You said before something about holding the airbrush at 90 degrees to the model. I am a bit confused as to what you mean. Do you mean the brush is held virtually in pointing from the sky to the ground but just tilted a little to stop the paint pouring out of the cup. So that you are painting down onto the model. Or do you mean that the brush is held level with the model so you are airbrushing from the side and parallel to the ground?
Regards
Laurie
Are my thoughts OK so far.
Joel_W
Joined: December 04, 2010
KitMaker: 11,666 posts
AeroScale: 7,410 posts
Posted: Thursday, July 31, 2014 - 01:14 AM UTC
Laurie,
Congratulations on the air brush, and your 1st test session. See, I told you it's a lot easier then what you see and read. Do invest in the box of white spoons as the convex/concave shapes are a needed learning experience. You'll quickly find out that the front and back of the spoon will require a different spray pattern to get complete, consistent, coverage, and no runs. Additional uses for those spoons (which I still do), are for testing out colors either primed or not primed, especially custom mixes since Tamiya doesn't make a whole lot of colors in my preferred subject matter.
As for your cleaning, what exactly is Acrylic Thinners? Are you using Tamiya X20-A, Iso Alcohol, or another brand name? You didn't mention running anything to clean out the insides of the various pcs. Be careful about this as it's easy to build up a little left over paint each time. I over clean, but that's just me.
As for painting direction. You want to paint where the direction of the spray is as close to perpendicular to the surface as possible. This will give you max paint control, reduce overspray/splatter, and let you draw a finer line. To accomplish this you need 3 hands, sometimes 4!! I accomplish this by a combination of holding the model, using a stand that you can rotate the model on, adjusting the angle you are holding the gun. That's one of the reasons why I never fill the bowl much more then 1/2 to 3/4 max. If you need to use an angle that will cause the paint to over flow the open bowl, then use either a cap you said you can get, or the screw jar. Just remember that you need a lot more paint in the jar then the cup to do the same job. And I never put back thinned paint into the unthinned paint jar.
As for the canopy. Here's your 1st can of worms. The vast majority of windscreens fit ok, but not perfectly. They will need some light to moderate work for a near perfect fit, then you need to blend the seam in, but it doesn't disappear, as the seam is generally there in real life. Just no gaps, bumps, humps, etc. I do that these days with Vallejo white putty. You can use White Glue, or a craft white glue (stickier/tackier) like Aleene's. Blend in with a moist Qtip vs sanding Green stuff. I use that when there are major fit issues that sanding won't cure. I usually mask the windscreen 1st. And I use a combination of thin strips of Tamiya tape, or I cut a mask depending on the shape. I will then stuff some tissue or foam behind it, then tape across the back. The cockpit varies greatly depending on the plane.
Take a look at my P-61A-5 build, specifically the greenhouse. It was a nightmare as the fit in places was horrendous. I even needed to use sheet plastic to get everything lined up and blended in.
Most WW11 cockpits can just be taped over. Same with most early jets. Some take a good deal of taping. And some like the A-6E will be painted with the canopy tacked on as the rear deck just can't be covered with all the details there.
You have all the colors of Alcads you're going to need for sometime. The Kleer Kote is just their product name. When I use their Black Gloss, It's over Tamiya Gray primer that I polished with a piece of old cotton tee shirt. I just keep on doing lite, even mist coats, then bingo !! the surface starts to look very shinny and black. Then do one little heavier coat to smooth it out, and that's that. Don't over paint with Alcads. Less is better, especially with the metalizers. Their products are much easier to airbrush then Acrylic paints.
Joel
Sheehan1
Joined: May 27, 2014
KitMaker: 135 posts
AeroScale: 124 posts
Posted: Thursday, July 31, 2014 - 09:37 AM UTC
Hi Joel
Thanks for your help again. I meant Lacquer thinners not acrylic. I took out the cone and needle and wiped them with the LT and used the inter denture brush. I also soaked them in a bottle of LT for a while and wiped them again.
So when you say you try and get the airbrush as perpendicular as you can you mean you are always painting downwards with the paint actuallly falling down onto the model. and not level. Most of the youtubes I watched they were painting cars at a level.
So you suggest I put a coat of Tamiya primer before the black gloss. I have a rattle can of surface primer. Cant seem to find bottles of the primer in Australia, just the rattle cans. So when you say you polish the primer with a cotton t-shirt you dont use any liquid polish but just rely on the material of the shirt to buff the surface of the primer slightly. I imagine the grey primer would allow you to check for any surface imperfections again.
I am having mixed emotions about using the airbrush for the first time. A bit excited but also a bit worried that I will stuff it up.
BTW I note what you say about the canopy but I am still a little confused. Are you saying you fit the canopy, mask it with tamiya masking tape and then fill in the gaps where it meets the fuselage with white glue or whatever. Are you saying you paint your models after fitting the canopy? Sorry for being a bit slow on the uptake.
Regards
Laurie
Joel_W
Joined: December 04, 2010
KitMaker: 11,666 posts
AeroScale: 7,410 posts
Posted: Thursday, July 31, 2014 - 10:14 AM UTC
Laurie,
Lacquer thinner is perfect. You actually spent more time cleaning then I do.
As for painting, I brace the model at angles so that I can paint at as near as 90 degrees to the surface as possible. I can't shoot straight down. But I do paint at between 45-60 degrees, which is comfortable for me. Like I said you just tilt, twist, the model as needed. I have a model stand that helps. That why I said a 3rd hand is really needed quite often in this hobby.
Don't worry about shooting the Alcads, they're easier then acrylics. Use an eyedropper to fill the cup, don't pour directly from the jar. No matter what you do, the paint will drip down the side of the bottle and cup. It's way to expensive to waste like that. Just use nice easy lite coats, you won't see anything at 1st, then the Aluminum will just pop out on the Black. More lite coats, and it gets brighter, don't apply a final wet coat, you'll ruin the metallic look to the finish. Go to the Alcad site, and read their procedures.
This is another reason I suggested the white spoons. You can prime, polish, Gloss black, then Alcad without using much paint. You'll get a feel for convex and concave surfaces, and you'll be holding the spoon. You won't even notice that you're actually twisting it.
I'm not really polishing per say. What I'm doing is knocking down the high spots on the flat primer, making it smoother for the Gloss Black. After polishing, don't forget to wipe the surface down with a damp towel with Alcohol. You'll see just how much comes off. I also have the full range of Micro Mesh pads that I polish with.
You can also lightly polish the Gloss Black. The smoother it is, the smoother your Aluminum finish is. For the gloss black you need to use polishing pads. I prefer a flatish finish as on an operational aircraft. My brother goes for a museum finish. He even did a 1/32 scale F8 Bearcat with a gloss finish that was the equal to my car's finish. It was that good. His NMF's are the same way.
Don't give into the temptation of using a rattle can over your air brush. If you don't have Tamiya Gray primer in a bottle, you can decant the rattle can. You can use Tamiya Gray Acrylic paint instead as a last resort, but don't wipe down with Alcohol, you will rub the paint off.
Joel
Sheehan1
Joined: May 27, 2014
KitMaker: 135 posts
AeroScale: 124 posts
Posted: Thursday, July 31, 2014 - 11:24 AM UTC
Hi Joel
I just found this at an Australian Hobby shop
http://www.aussiehobbies.com.au/tamiya-87075-liquid-surface-primer-grey-40ml.html
Will this work as the base coat?
Regards
Laurie
I just found this at an Australian Hobby shop
http://www.aussiehobbies.com.au/tamiya-87075-liquid-surface-primer-grey-40ml.html
Will this work as the base coat?
Regards
Laurie
Joel_W
Joined: December 04, 2010
KitMaker: 11,666 posts
AeroScale: 7,410 posts
Posted: Thursday, July 31, 2014 - 11:48 AM UTC
Quoted Text
Hi Joel
I just found this at an Australian Hobby shop
http://www.aussiehobbies.com.au/tamiya-87075-liquid-surface-primer-grey-40ml.html
Will this work as the base coat?
Regards
Laurie
Laurie,
That's the stuff.
Joel
Heatnzl

#435

Joined: February 14, 2013
KitMaker: 480 posts
AeroScale: 478 posts

Posted: Thursday, July 31, 2014 - 12:45 PM UTC
Hi Laurie. Are you sure your dog is not high from the fumes?
My eyes are watering from laughing at what must surely be a first for a modelling thread; "Converting A Dog..."
The airbrushing stuff is great too, by the way.
Cheers
Karl.
My eyes are watering from laughing at what must surely be a first for a modelling thread; "Converting A Dog..."
The airbrushing stuff is great too, by the way.
Cheers
Karl.
Sheehan1
Joined: May 27, 2014
KitMaker: 135 posts
AeroScale: 124 posts
Posted: Thursday, July 31, 2014 - 03:26 PM UTC
Hi Karl
Glad you can see the humour in the dog conversion. After paying the veterinary hospital $5K I wasnt laughing.
The vet told me it is not uncommon. I am glad us humans dont have that problem. It musdt be very uncomfortable being stuck in that position for a long time.
I am very excited about the airbrushing but like all new things I am scared I am going to stuff something up. I have to wait a bit for my primer as I just ordered the Alclad and I will wait till I get a few more things I need otherwise I am just paying too much freight for individual orders.
Good to see a Kiwi neighbour on the forums. I suppose you have the same problem with getting supplies in NZ
Regards
Laurie
Sheehan1
Joined: May 27, 2014
KitMaker: 135 posts
AeroScale: 124 posts
Posted: Thursday, July 31, 2014 - 04:20 PM UTC
Hi Joel
Here are some recent photos. I masked the canopy and fitted it. I used some plastic putty to fill in a few gaps between the canopy and the fuselage. It is quiet smooth and after primer I think it will be invisible. These macro shots sometimes make things look a bit messy but it seems ok to me.
You will note that there is an aerial back in place. I found a bit of plastic not used in the Sabre and I drilled a hole and did a bit of sanding and fitted it. I have to be a bit more careful with these small aerials. That is the second one I have knocked off. Clumsy barstard.
As I said above I will order some primer but it is not just worth just ordering it by itself as the freight makes it a bit dear. I will just wait for something else to order and perhaps order a few things. Maybe I need some more colours I havent got. I have blacks, greys, green, yellow, red white. May be you can suggest some others I might order. I have a mixture of enamels and acrylics.


Regards
Laurie
Heatnzl
#435
Joined: February 14, 2013
KitMaker: 480 posts
AeroScale: 478 posts
Posted: Thursday, July 31, 2014 - 04:53 PM UTC
Hi Laurie.
Poor dog, but lucky to have a caring owner. Whole thing makes me wince though.
NZ is along way from suppliers and when it comes to materials I tend to improvise. Auto suppliers and the like are good for paints and solvents, very cheap compared to "brand" model products. Art suppliers are your friend. Acrylics in tubes can be made very friendly with a 'liquifying medium' which alters the viscosity of paint. And your colour palette becomes infinite.
I do not stint on tools though. Brushes will last for donkey's IF fastidious care is taken cleaning and storing them. And the types, riggers, flats, designers give great performance depending on task. My airbrush is used when it is needed, as are cotton-buds, sponges et al. I have no set rules.
As for paint...Anything from the Humbrol I grew up with to gouache. It's all grist...
It's all about fun, isn't it.
cheers
Karl.
 |

WEB HOSTING BY


Copyright ©2021 AeroScale and Kitmaker Network, a subsidiary of Silver Star Enterprises
All Rights Reserved. Please read our Conditions of Use and Privacy Policy.
All Rights Reserved. Please read our Conditions of Use and Privacy Policy.