Mike,
Glad to see another update. It sure looks like one tough kit to build. Aeroscale should award you a metal for your rock solid mindset. I can assure you that if I was building the Dragon kit, it long ago would have been heading to the town landfill.
I see that you decided not to fill the upper wings recessed panel lines and rivets. Most of the large scale builds I've seen left it as is including all three of my brothers builds on LSP.
Joel
World War II
Discuss WWII and the era directly before and after the war from 1935-1949.
Discuss WWII and the era directly before and after the war from 1935-1949.
Hosted by Rowan Baylis
Dragon 1/32 P-51K Mustang
Joel_W

Joined: December 04, 2010
KitMaker: 11,666 posts
AeroScale: 7,410 posts

Posted: Sunday, August 09, 2015 - 05:39 AM UTC
WoodshedWings

Joined: October 11, 2012
KitMaker: 141 posts
AeroScale: 139 posts

Posted: Sunday, August 09, 2015 - 08:28 AM UTC
Hi Joel. Your brother built 3 of these?? That's a particular kind of madness!
Joel_W

Joined: December 04, 2010
KitMaker: 11,666 posts
AeroScale: 7,410 posts

Posted: Sunday, August 09, 2015 - 06:37 PM UTC
Quoted Text
Hi Joel. Your brother built 3 of these?? That's a particular kind of madness!
Mike,
Not a chance, as he's much smarter then me. He built 3 of the Tamiya 1/32 scale P-51s, then went back and stripped one and redid it to even a higher standard. You'll find him as Peterpools.
Joel

WoodshedWings

Joined: October 11, 2012
KitMaker: 141 posts
AeroScale: 139 posts

Posted: Saturday, September 19, 2015 - 02:04 AM UTC
After many happy hours trying to get a smooth finish, it was time to do the NMF. I used Alclad alluminium for the overall colour. It seems that I didn't get the surface as smooth as I would have liked as the Alclad finish is a bit patchy. But to my eye, it breaks up the monotone of the single colour metal finish and makes the airframe look a bit patinated and worn which I think looks quite good.
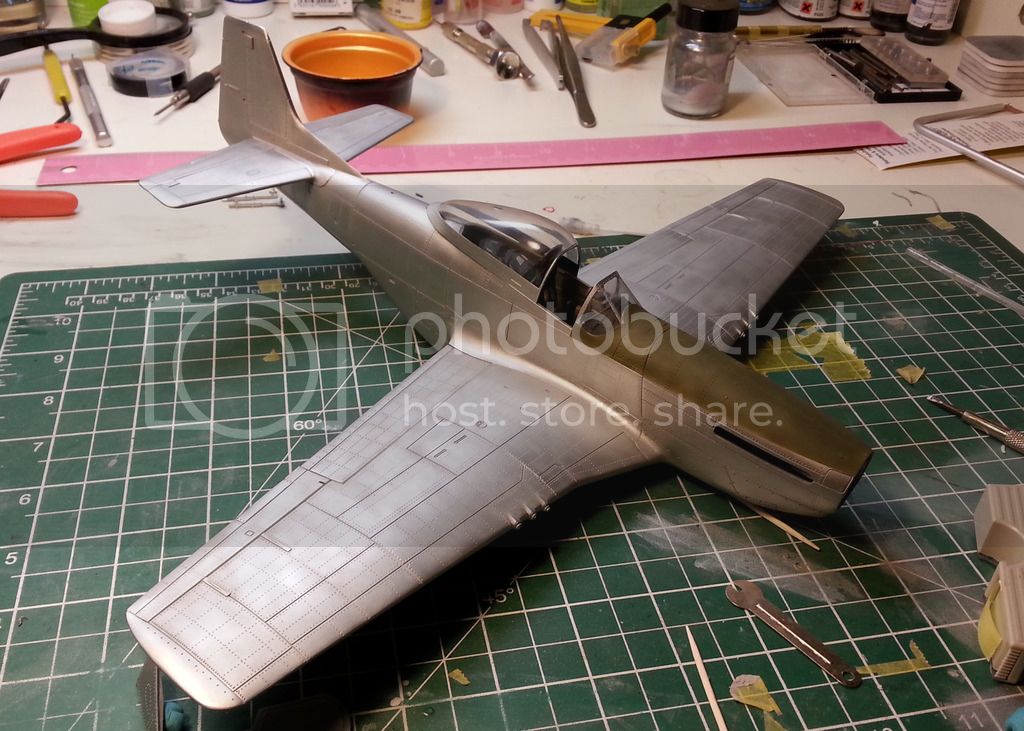
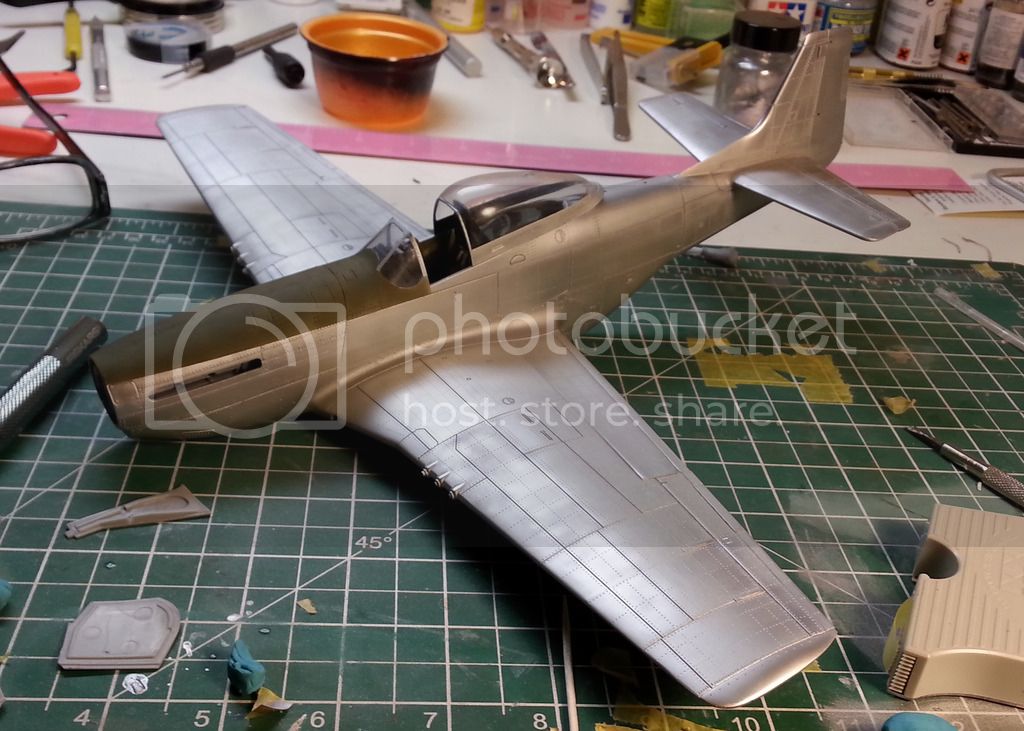
I feel a bit of a cheat as I seem to have achieved the effect I was after, accidently. Oh well, I'm not complaining. I masked and sprayed the olive drab anti glare panel on the cowling and will be spraying select panels in various shades of Alclad to break up the surface colour even further.


I feel a bit of a cheat as I seem to have achieved the effect I was after, accidently. Oh well, I'm not complaining. I masked and sprayed the olive drab anti glare panel on the cowling and will be spraying select panels in various shades of Alclad to break up the surface colour even further.
Joel_W

Joined: December 04, 2010
KitMaker: 11,666 posts
AeroScale: 7,410 posts

Posted: Saturday, September 19, 2015 - 02:42 AM UTC
Mike
Your Aluminum NMF really looks quite good to me. The little bit of Blotchiness just looks like weathering to me.
Joel
Your Aluminum NMF really looks quite good to me. The little bit of Blotchiness just looks like weathering to me.
Joel

WoodshedWings

Joined: October 11, 2012
KitMaker: 141 posts
AeroScale: 139 posts

Posted: Tuesday, September 22, 2015 - 07:50 AM UTC
I was dreading doing the checker decals on the nose of the Mustang but I needn't have worried. The decals by Cartograph performed well over a gloss finish, helped along with Micro Set and Sol.
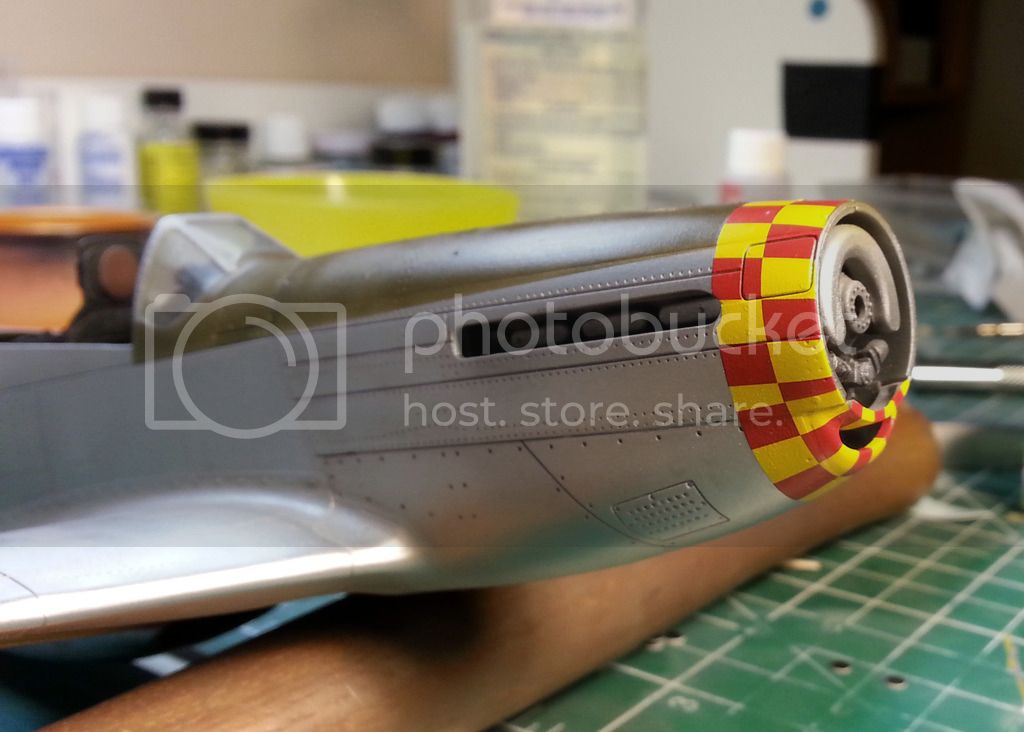
I carefully pushed and teased while adding more Micro Sol until the decals conformed to the complex contours of the nose and chin intake.
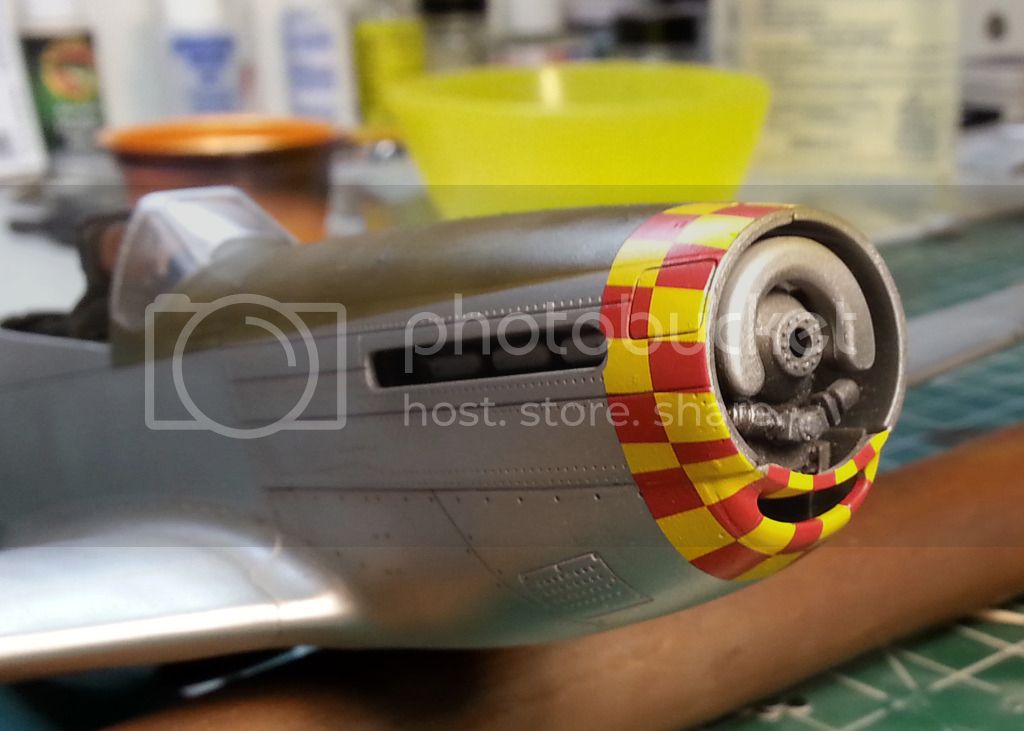
At last, something positive to report.

I carefully pushed and teased while adding more Micro Sol until the decals conformed to the complex contours of the nose and chin intake.

At last, something positive to report.
Joel_W

Joined: December 04, 2010
KitMaker: 11,666 posts
AeroScale: 7,410 posts

Posted: Tuesday, September 22, 2015 - 10:14 PM UTC
Mike,
Now that's impressive. I'm the 1st to admit failure with nose wrap around decals on more then one occasion.
Joel
Now that's impressive. I'm the 1st to admit failure with nose wrap around decals on more then one occasion.
Joel
Posted: Wednesday, September 23, 2015 - 07:53 AM UTC
Great work on that nose decal! Looks flawless.
Gary
Gary

WoodshedWings

Joined: October 11, 2012
KitMaker: 141 posts
AeroScale: 139 posts

Posted: Wednesday, October 07, 2015 - 08:22 PM UTC
Thanks Joel and Gary
Continuing to get the decals on. These need a bit of persuasion to conform to the panel lines but helped along with a scalpel and some micro sol, they are bedding in nicely. The carrier film virtually disappears. Not looking forward to doing the kill markings though,as each one is made of 3 tiny parts.
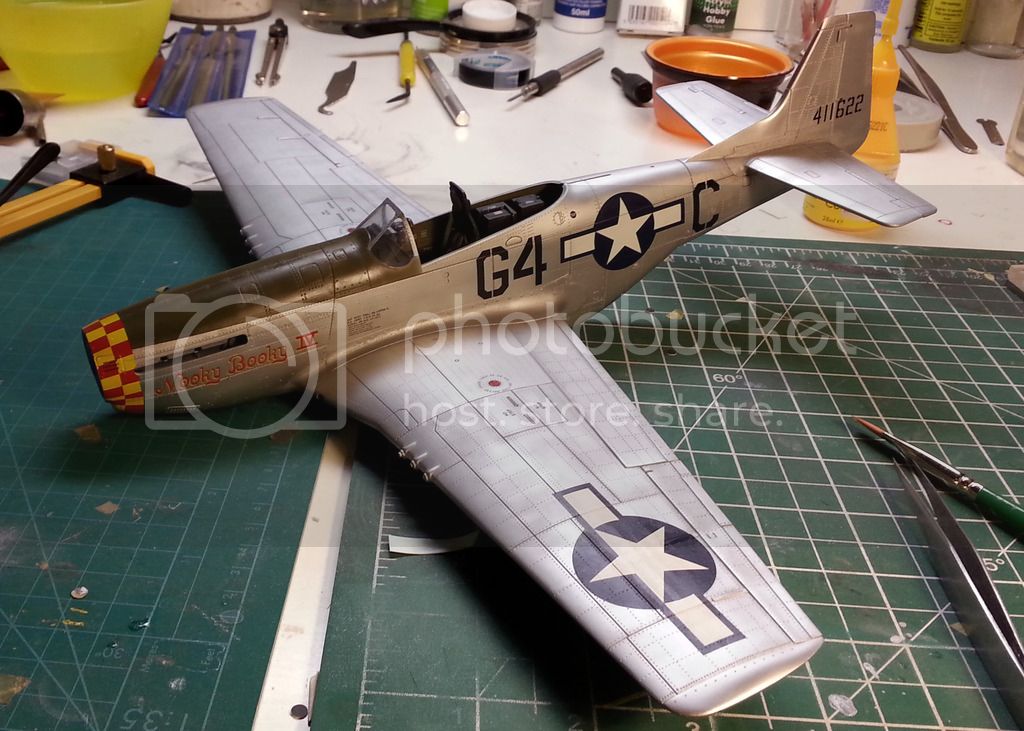
Continuing to get the decals on. These need a bit of persuasion to conform to the panel lines but helped along with a scalpel and some micro sol, they are bedding in nicely. The carrier film virtually disappears. Not looking forward to doing the kill markings though,as each one is made of 3 tiny parts.

Joel_W

Joined: December 04, 2010
KitMaker: 11,666 posts
AeroScale: 7,410 posts

Posted: Thursday, October 08, 2015 - 01:14 AM UTC
Mike,
The decaling really looks quite impressive. Looking forward to seeing those kill markings.
Joel
The decaling really looks quite impressive. Looking forward to seeing those kill markings.
Joel

WoodshedWings

Joined: October 11, 2012
KitMaker: 141 posts
AeroScale: 139 posts

Posted: Thursday, November 26, 2015 - 03:43 AM UTC
Not much time for modelling lately as my time has been taken up with a 1:1 scale kitchen reno, but managed to get a bit done over the last couple of days.
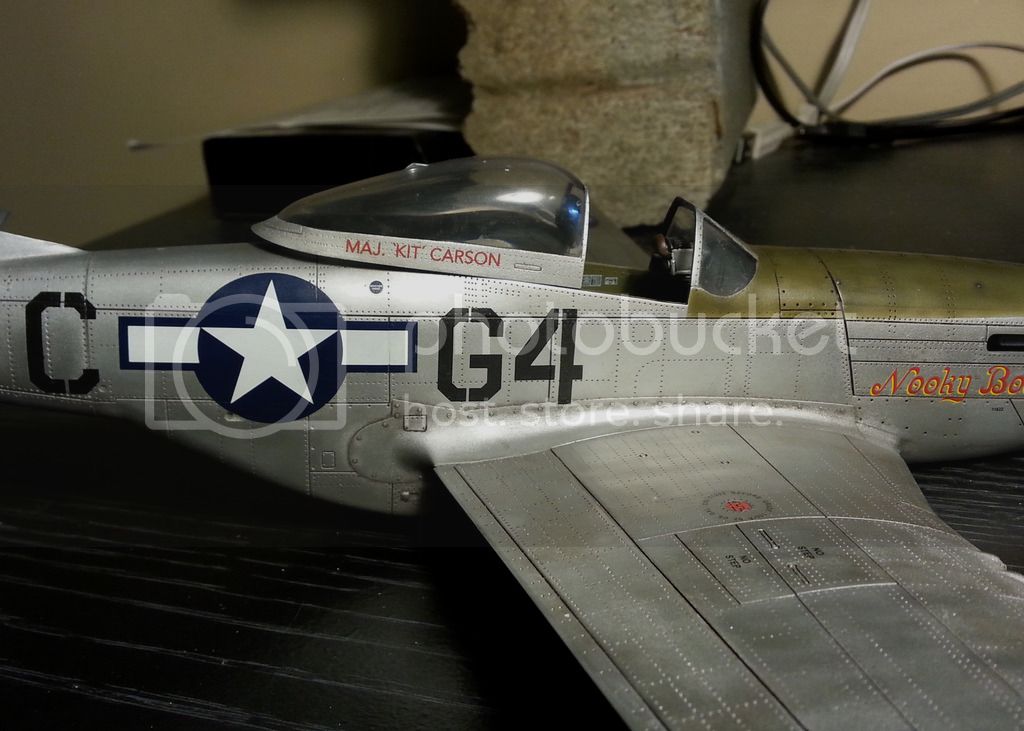
Those kill markings. Fiddly, fiddly, fiddly. Honestly! 3 tiny decals for each one! I managed to remove a couple of them accidentaly but luckily have spares.
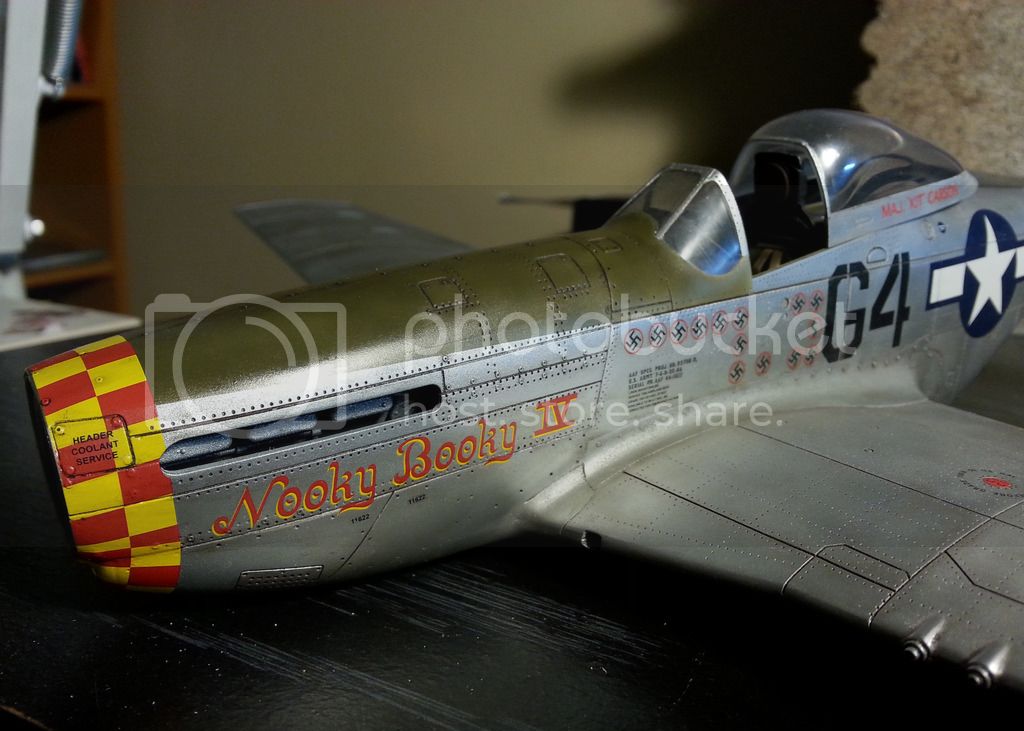
I began the weathering process by applying a dark wash. I am going to try some hot metal effects around the exhausts and top off with exhaust and cordite stains.
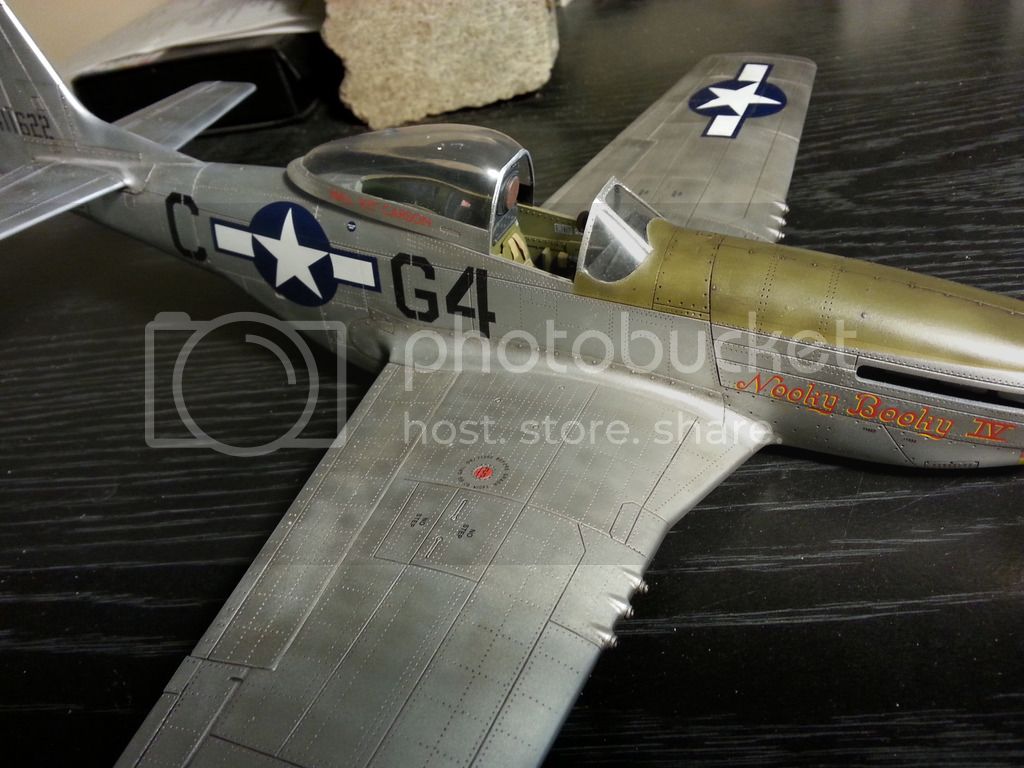
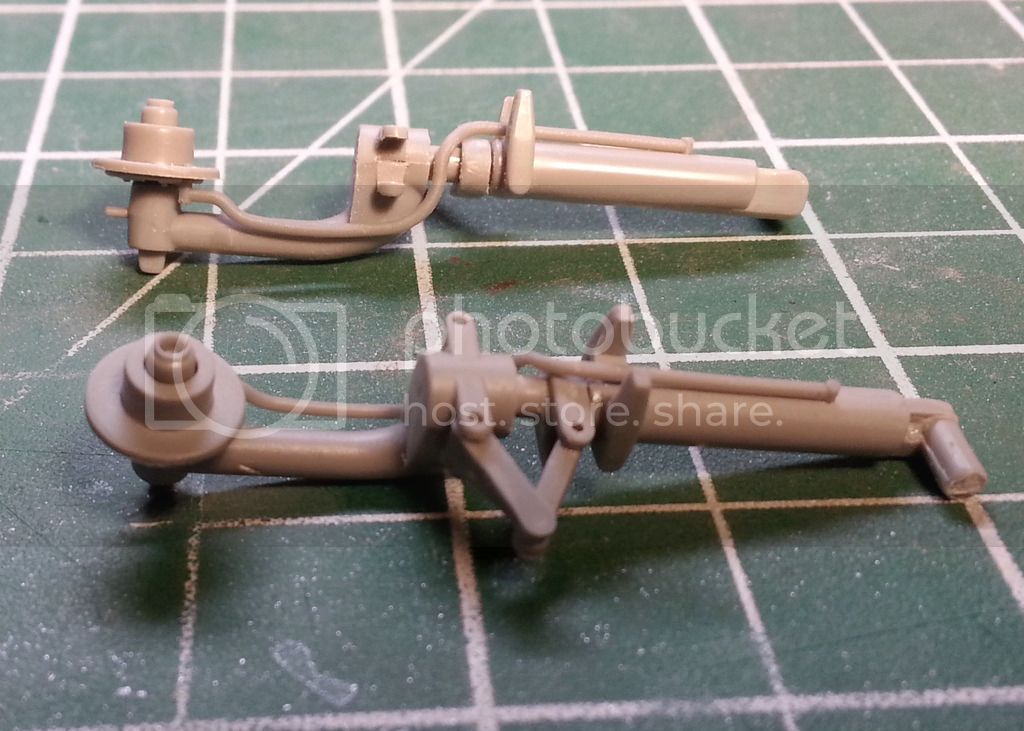
The landing gear was assembled next which proved to be another fiddly job. They are over complex and the instructions are hopeless. There are multiple parts on the sprue with some parts duplicated so I spent a long time ensuring I had everything aligned and oriented the correct way before committing to glue. They don't look bad when assembled. Unfortunately though, you can't fit them into the holes in the gear bay without trimming some material off the ends of the attachment points.
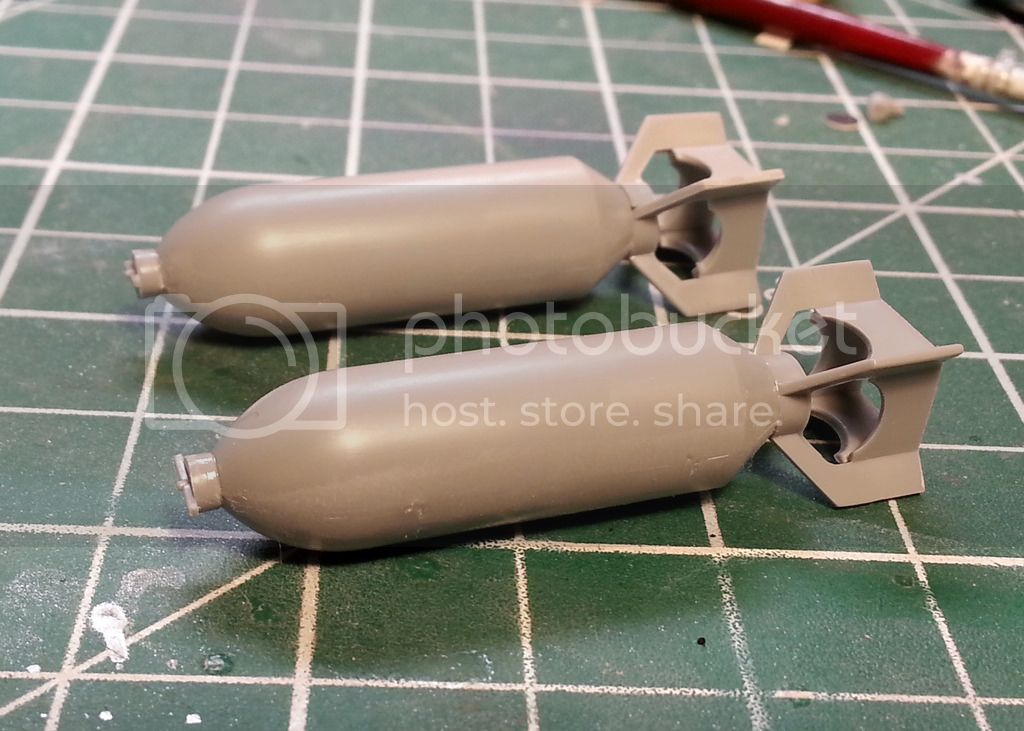
I'm going to deviate from the instructions and hang bombs under the wings as these are included as parts marked 'not for use'. These should look ok when painted and bashed around a bit.
Those kill markings. Fiddly, fiddly, fiddly. Honestly! 3 tiny decals for each one! I managed to remove a couple of them accidentaly but luckily have spares.

I began the weathering process by applying a dark wash. I am going to try some hot metal effects around the exhausts and top off with exhaust and cordite stains.


The landing gear was assembled next which proved to be another fiddly job. They are over complex and the instructions are hopeless. There are multiple parts on the sprue with some parts duplicated so I spent a long time ensuring I had everything aligned and oriented the correct way before committing to glue. They don't look bad when assembled. Unfortunately though, you can't fit them into the holes in the gear bay without trimming some material off the ends of the attachment points.

I'm going to deviate from the instructions and hang bombs under the wings as these are included as parts marked 'not for use'. These should look ok when painted and bashed around a bit.

Twentecable

Joined: September 13, 2003
KitMaker: 339 posts
AeroScale: 244 posts

Posted: Thursday, November 26, 2015 - 09:26 PM UTC
Hi Mike,
from what I see this will be a very nice model to look at. Must make you proud at the end of the day to know you made this nice thing from the dreadfull Dragon kit :-).
I reallt will be looking for interior decals on my next project, I like the look of that.
gr TC
from what I see this will be a very nice model to look at. Must make you proud at the end of the day to know you made this nice thing from the dreadfull Dragon kit :-).
I reallt will be looking for interior decals on my next project, I like the look of that.
gr TC
Joel_W

Joined: December 04, 2010
KitMaker: 11,666 posts
AeroScale: 7,410 posts

Posted: Thursday, November 26, 2015 - 09:38 PM UTC
Mike,
Nice to see another update. Even though progress is slow at times, you've crossed the hump of the build, and should be seeing the finish line off in the distant.
The decaling really looks excellent, especially the nose checker board chin strip.
It's hard to believe that even the landing gear struts need trimming and dry fitting to get them to fit correctly in this day and age. But the struts do look good, and should really look all that much better once painted and weathered.
Joel

WoodshedWings

Joined: October 11, 2012
KitMaker: 141 posts
AeroScale: 139 posts

Posted: Thursday, January 14, 2016 - 07:58 AM UTC
Recent progress has been a case of 2 steps forward, 1 step back, culminating in me managing to tear off the Nooky Booky decals. My feeling is that this may be the final nail in the coffin of this build but more of this later.
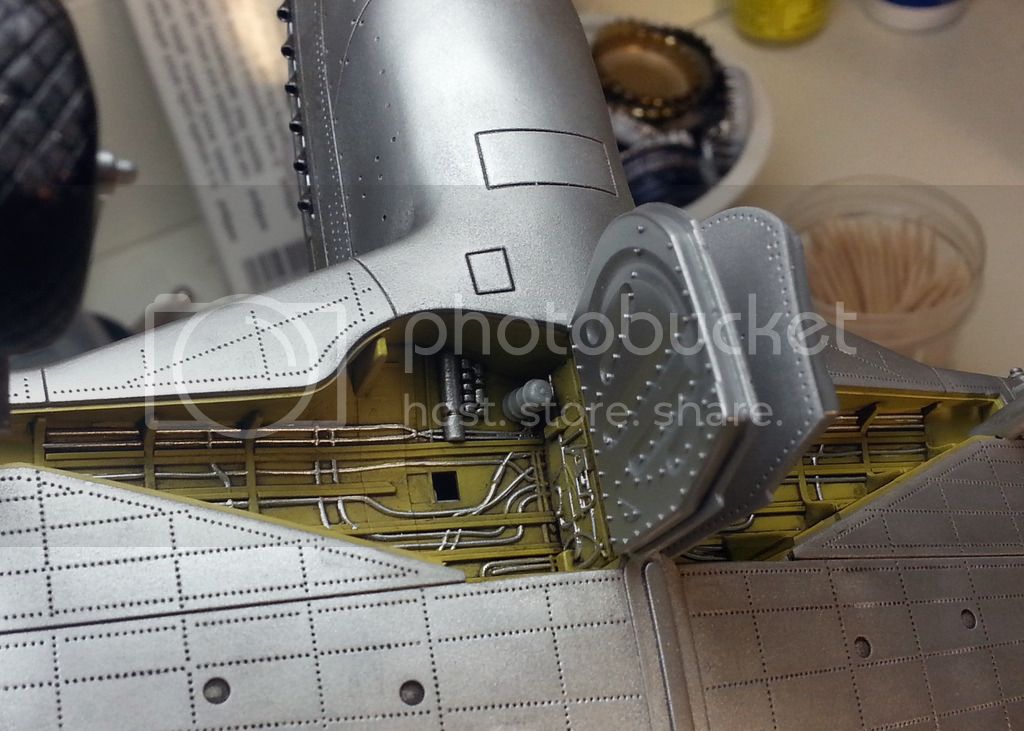
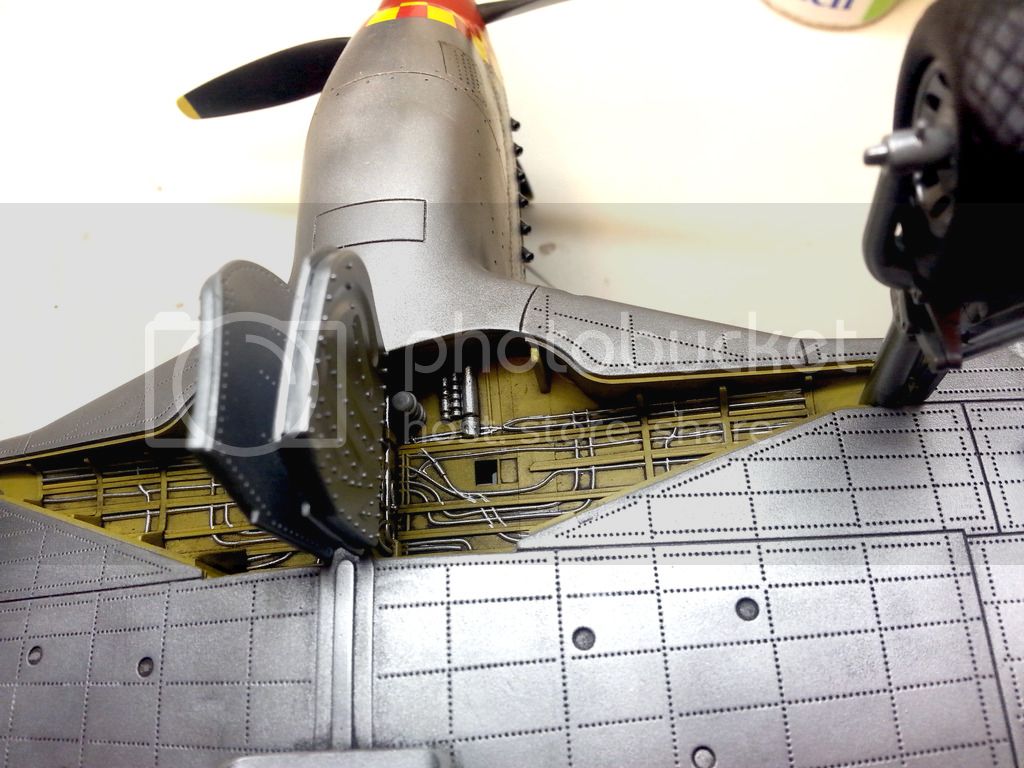
I wanted to add some interest to the gear bays, so using a fine brush and some silver enamel , I painted all the piping. This took some time and care, but certainly livens up this area.
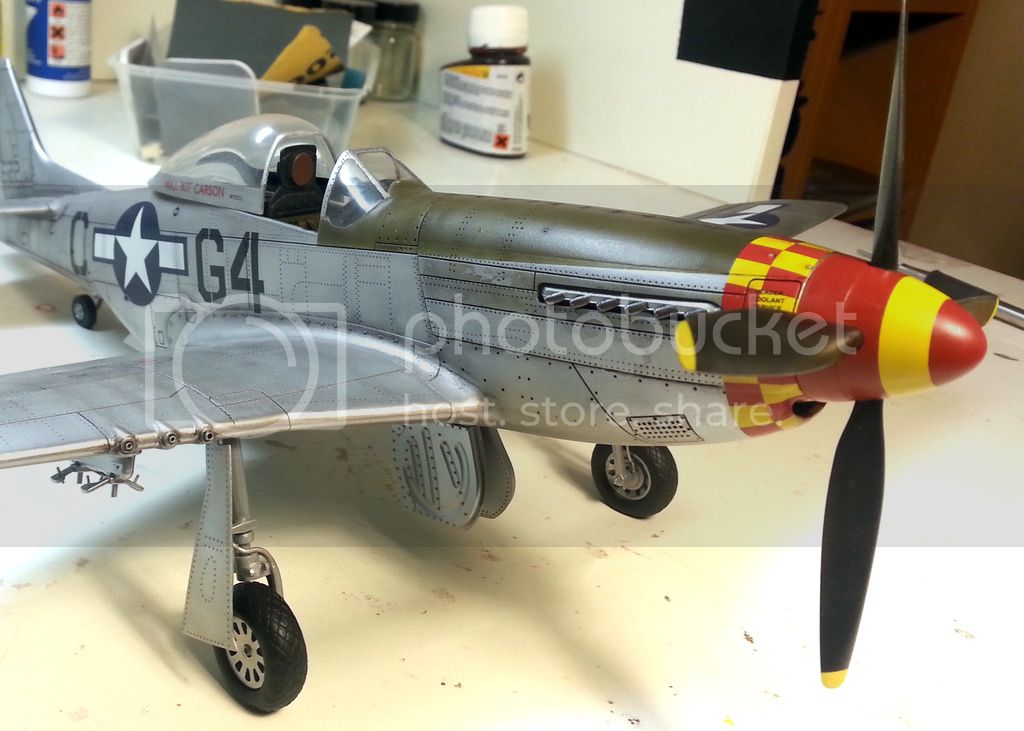
Having built the gear struts in the previous installment, these were treated to a coat of Alclad aluminium. I decided to build up the wheels and fit the flesh coloured (really Dragon?) rubbery tires before painting, as I wasn't convinced that the tires would hold onto a coat of paint during the rough handling required to get them on to the hubs. I sprayed the hubs aluminium before masking them and spraying the tires dark grey.
After painting the component parts, I built up the propeller and was treated to another example of the fine engineering on this kit (if you have been following this build you will know that I'm being sarcastic). Once you've figured out how it goes together, the whole thing is the most floppy, un-positive (is that a word?), assembly in the kit, not what you want from the prop. I spent quite some time aligning and checking and re-checking that everything was lined up as the glue dried. Quite horrible for a modern kit.
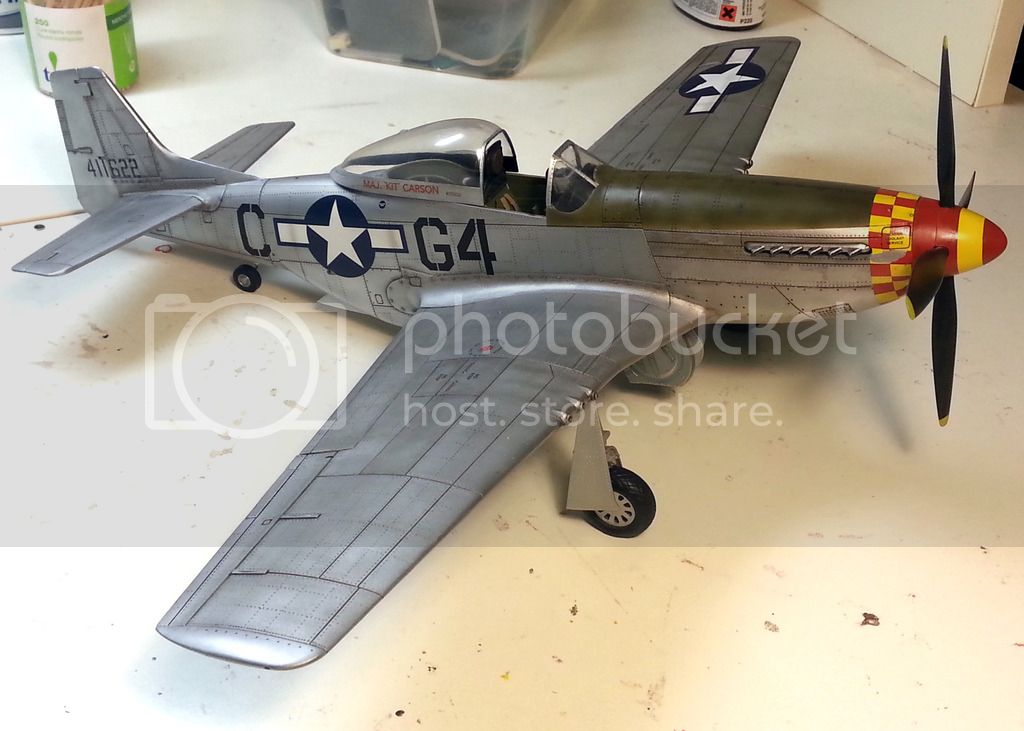
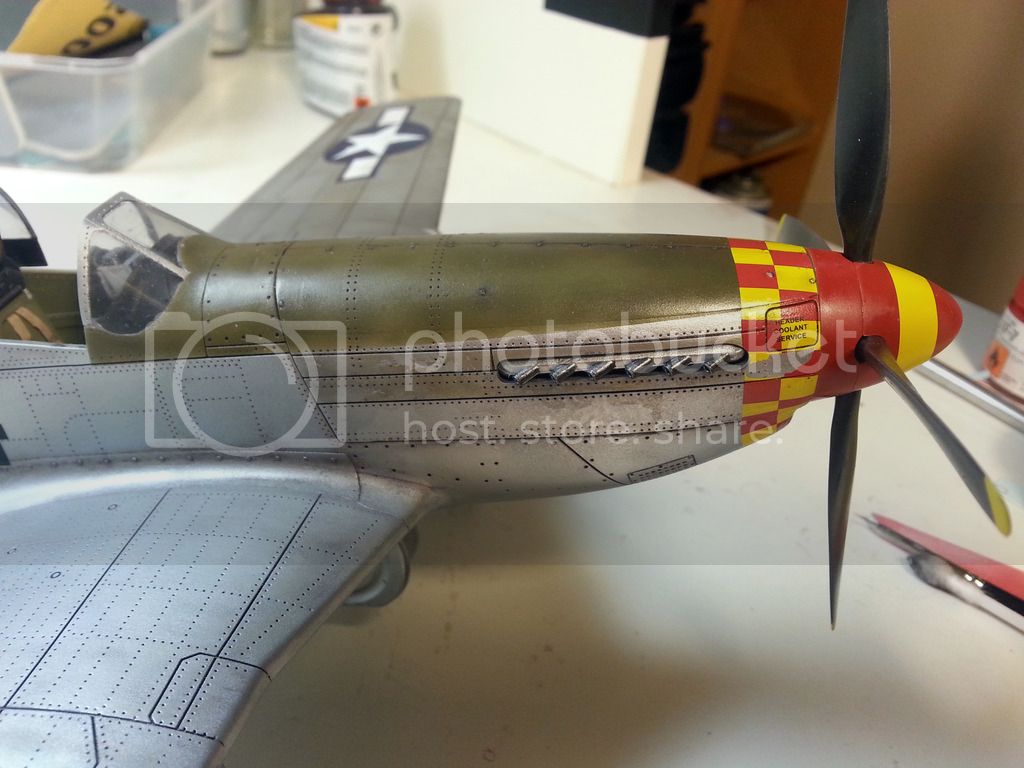
I wanted to try and emulate the hot metal discolouration on the panel around the exhausts so decided to mottle it with some Tamiya smoke, clear blue and clear red. I know I should have done this before the decalling, but thought that if I seal the decals in with some future, I would be able to mask off this area. Did that, then sprayed on the Tamiya smoke. Went to remove the masking and off came the decals with it.
Along with some of the nose chequers
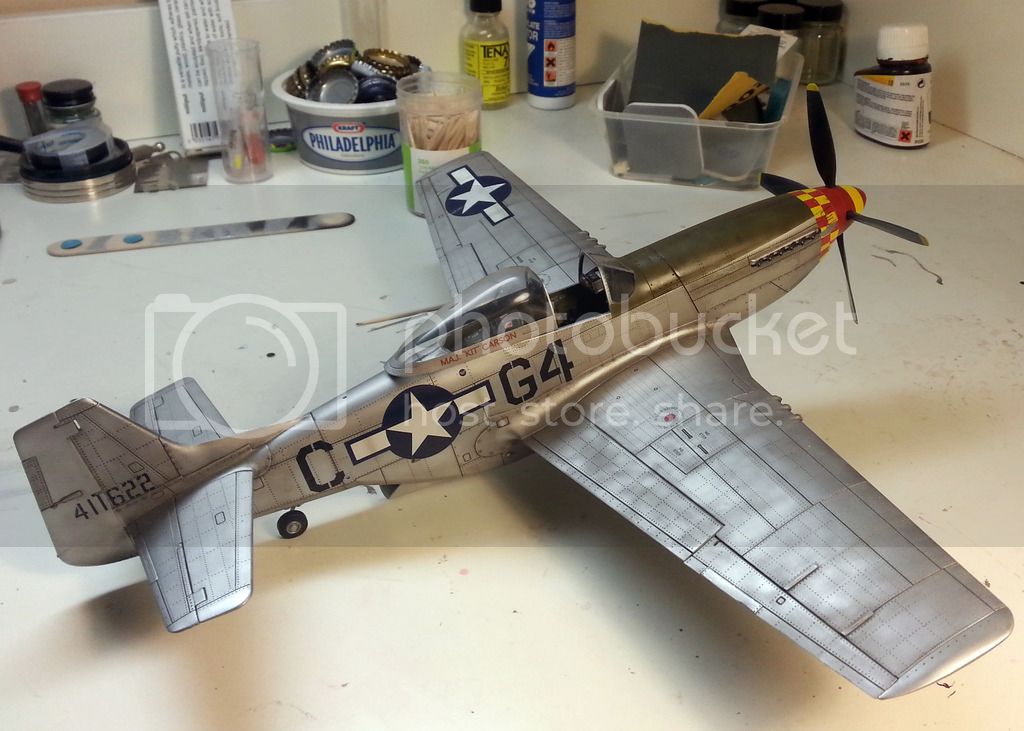
After this disaster it was all I could do to fit the landing gear and doors. It looks like this one is done, unless anyone has a spare set of decals they wouldn't mind parting with. Shame really, as I was quite keen to cross the finishing line, having done so much work on it.
I wanted to add some interest to the gear bays, so using a fine brush and some silver enamel , I painted all the piping. This took some time and care, but certainly livens up this area.


Having built the gear struts in the previous installment, these were treated to a coat of Alclad aluminium. I decided to build up the wheels and fit the flesh coloured (really Dragon?) rubbery tires before painting, as I wasn't convinced that the tires would hold onto a coat of paint during the rough handling required to get them on to the hubs. I sprayed the hubs aluminium before masking them and spraying the tires dark grey.
After painting the component parts, I built up the propeller and was treated to another example of the fine engineering on this kit (if you have been following this build you will know that I'm being sarcastic). Once you've figured out how it goes together, the whole thing is the most floppy, un-positive (is that a word?), assembly in the kit, not what you want from the prop. I spent quite some time aligning and checking and re-checking that everything was lined up as the glue dried. Quite horrible for a modern kit.


I wanted to try and emulate the hot metal discolouration on the panel around the exhausts so decided to mottle it with some Tamiya smoke, clear blue and clear red. I know I should have done this before the decalling, but thought that if I seal the decals in with some future, I would be able to mask off this area. Did that, then sprayed on the Tamiya smoke. Went to remove the masking and off came the decals with it.
Along with some of the nose chequers


After this disaster it was all I could do to fit the landing gear and doors. It looks like this one is done, unless anyone has a spare set of decals they wouldn't mind parting with. Shame really, as I was quite keen to cross the finishing line, having done so much work on it.
Posted: Thursday, January 14, 2016 - 12:21 PM UTC
That is looking so good Mike that it would be a shame not to finish it, I could produce a paint mask for the script? I have 2 of these kits, the early and late D, but from your experience it looks like I should bin them and get another Tamiya kit?

greif8

Joined: January 17, 2006
KitMaker: 673 posts
AeroScale: 492 posts

Posted: Thursday, January 14, 2016 - 12:29 PM UTC
That is one sweet build Mike. I really like your work on the cockpit.
Ernest
Ernest

WoodshedWings

Joined: October 11, 2012
KitMaker: 141 posts
AeroScale: 139 posts

Posted: Thursday, January 14, 2016 - 06:18 PM UTC
Quoted Text
I could produce a paint mask for the script? I have 2 of these kits, the early and late D, but from your experience it looks like I should bin them and get another Tamiya kit?
Hey Mal, what would a set of masks set me back for this? I am a paint mask virgin but have always fancied a go.
The kit is not a pleasure to build. The poor fit and engineering are to blame for this. Not sure who Dragon were aiming this one at. Having said that, it actually doesn't look too bad built up.

WoodshedWings

Joined: October 11, 2012
KitMaker: 141 posts
AeroScale: 139 posts

Posted: Thursday, January 14, 2016 - 06:18 PM UTC
Quoted Text
That is one sweet build Mike. I really like your work on the cockpit.
Ernest
Thanks for the support Ernest.
Joel_W

Joined: December 04, 2010
KitMaker: 11,666 posts
AeroScale: 7,410 posts

Posted: Thursday, January 14, 2016 - 09:26 PM UTC
Mike,
I learned my lesson of never masking over decals even after sealing the hard way. on my A6-E build I had to mask over just a portion of the tail marking, and I used Tamiya tape de-tacked. I ruined the decals, and had to buy another AM sheet from Fightertown. Needless to say, I feel your pain.
If Mal can make you a mask at what ever the cost, I say go for it. You've put so much time and effort into this build, and have brought it to this stage, as many of us would have long ago tossed it.
Joel
Posted: Friday, January 15, 2016 - 12:28 PM UTC
Quoted Text
Hey Mal, what would a set of masks set me back for this? I am a paint mask virgin but have always fancied a go.
The kit is not a pleasure to build. The poor fit and engineering are to blame for this. Not sure who Dragon were aiming this one at. Having said that, it actually doesn't look too bad built up.
They would only cost you the postage, which is £2.25
 It would take me a while to draw this up as I have quite a bit on and I am not sure if I have a reference for it. I would do this as a 2 part mask fo each of the colours and that works well and this method is quite easy to use and I will produce a specific set of instructions; there will also be plenty of them so that you will be able to practice. The only issue is the NMF, but as you have already masked over it then I guess that it will be fine.
 Totally up to you Mike, as I said it will take a while for me to do but I'm happy to do it if you wish

thegirl

Joined: January 19, 2008
KitMaker: 6,743 posts
AeroScale: 6,151 posts

Posted: Saturday, January 16, 2016 - 07:52 AM UTC
Mike , for a kit with a few issues you turned into a beautiful looking model 
Terri

Terri

WoodshedWings

Joined: October 11, 2012
KitMaker: 141 posts
AeroScale: 139 posts

Posted: Saturday, January 16, 2016 - 09:41 PM UTC
[quote]
That would be awesome Mal. I'll D.M. you my address and you can reply with your payment details. Cheers!
Quoted Text
They would only cost you the postage, which is £2.25It would take me a while to draw this up as I have quite a bit on and I am not sure if I have a reference for it. I would do this as a 2 part mask fo each of the colours and that works well and this method is quite easy to use and I will produce a specific set of instructions; there will also be plenty of them so that you will be able to practice. The only issue is the NMF, but as you have already masked over it then I guess that it will be fine.
Totally up to you Mike, as I said it will take a while for me to do but I'm happy to do it if you wish
That would be awesome Mal. I'll D.M. you my address and you can reply with your payment details. Cheers!
Posted: Sunday, January 17, 2016 - 01:20 AM UTC
Mike,
Despite all of your suffering, the result looks great. I've also ruined decals in the same way.
Gary
Despite all of your suffering, the result looks great. I've also ruined decals in the same way.
Gary

WoodshedWings

Joined: October 11, 2012
KitMaker: 141 posts
AeroScale: 139 posts

Posted: Monday, January 18, 2016 - 03:07 AM UTC
Quoted Text
Mike , for a kit with a few issues you turned into a beautiful looking model
Terri
Thanks Terri, I've never been called a beautiful model before


WoodshedWings

Joined: October 11, 2012
KitMaker: 141 posts
AeroScale: 139 posts

Posted: Monday, January 18, 2016 - 03:08 AM UTC
Quoted Text
Mike,
Despite all of your suffering, the result looks great. I've also ruined decals in the same way.
Gary
Thanks Gary, hopefully my decal woes have been solved.
 |


