Hi Magnus!
That blue colour makes it look like a bar of soap! It's not until there is some, more reasonable, colour on it that I can get past the feeling of... toyishness?! I suppose it looks a bit different IRL?!
Great work though! Looking forward to seeing the rest of the build!
/Fredrik
Hosted by Rowan Baylis
High Planes 1/72 Me 262 V3
FredrikA

Joined: January 09, 2008
KitMaker: 92 posts
AeroScale: 90 posts

Posted: Thursday, May 21, 2015 - 01:29 PM UTC
Joel_W

Joined: December 04, 2010
KitMaker: 11,666 posts
AeroScale: 7,410 posts

Posted: Thursday, May 21, 2015 - 09:52 PM UTC
After reading Fredrik's comment, I had to wonder why they would choose a pale blue for the color of the plastic? Just seams rather odd to me. 
Joel

Joel

magnusf

Joined: May 02, 2006
KitMaker: 1,953 posts
AeroScale: 1,902 posts

Posted: Saturday, May 23, 2015 - 11:33 PM UTC
Rowan! Boomerang: I have one in 1/72. Same style. Anyone for a double-build  ?
?
Fredrik and Joel! No, I'm sorry to say that it looks rather toyish IRL as well !
!

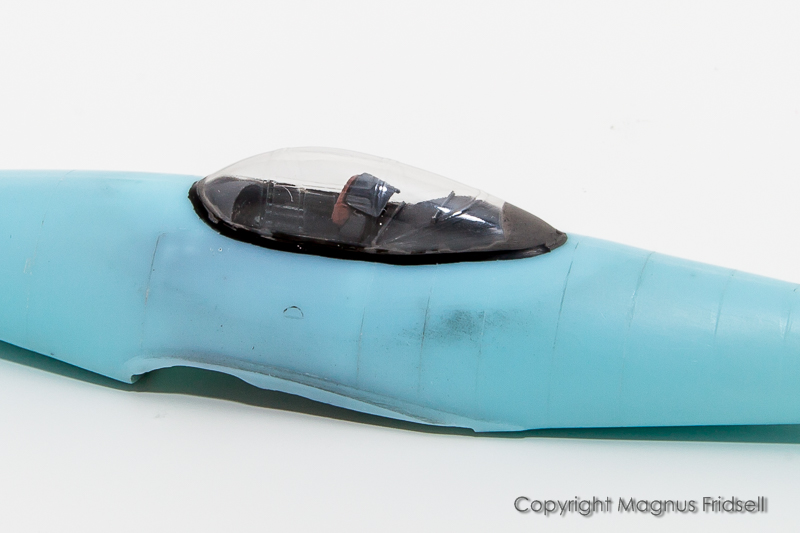
Seat painted. I went for a bit of contrast since I will leave the canopy closed! Red leather headrest felt right! The buckles were painted silver using W&N silver pencils, easy and safe.

Seat installed!

Canopy attached using JB Kwik epoxy. It doesn't fog the clear parts, it's strong and it can be sanded. It is also dark grey in colour rendering a rather discrete seam when seen through the canopy.

Magnus
 ?
?Fredrik and Joel! No, I'm sorry to say that it looks rather toyish IRL as well
 !
!
Seat painted. I went for a bit of contrast since I will leave the canopy closed! Red leather headrest felt right! The buckles were painted silver using W&N silver pencils, easy and safe.

Seat installed!

Canopy attached using JB Kwik epoxy. It doesn't fog the clear parts, it's strong and it can be sanded. It is also dark grey in colour rendering a rather discrete seam when seen through the canopy.

Magnus
Joel_W

Joined: December 04, 2010
KitMaker: 11,666 posts
AeroScale: 7,410 posts

Posted: Sunday, May 24, 2015 - 04:02 AM UTC
Magnus,
I've been using Tamiya Extra thin to glue on Windscreens. As long as there is a good fit, I've never had any issues with fogging.
Joel
I've been using Tamiya Extra thin to glue on Windscreens. As long as there is a good fit, I've never had any issues with fogging.
Joel
Posted: Sunday, May 24, 2015 - 09:08 AM UTC
Quoted Text
Rowan! Boomerang: I have one in 1/72. Same style. Anyone for a double-build?
BOOMERANG MANIA !!!
Great update Magnus, the detailing on the seat looks really nice.
Cheers, D
thegirl

Joined: January 19, 2008
KitMaker: 6,743 posts
AeroScale: 6,151 posts

Posted: Sunday, May 24, 2015 - 09:01 PM UTC
Been silently following your build and this is turning out to be a neat little project 
Terri

Terri
Joel_W

Joined: December 04, 2010
KitMaker: 11,666 posts
AeroScale: 7,410 posts

Posted: Monday, May 25, 2015 - 02:42 AM UTC
Quoted Text
Quoted TextRowan! Boomerang: I have one in 1/72. Same style. Anyone for a double-build?
BOOMERANG MANIA !!!
Great update Magnus, the detailing on the seat looks really nice.
Cheers, D
Damian,
I just checked out your link, you don't have enough Boomerangs


Joel
Posted: Monday, May 25, 2015 - 07:34 AM UTC
Quoted Text
Damian,
I just checked out your link, you don't have enough Boomerangs

Joel
I totally agree Joel! I am gathering funds (and courage) to invest in the Alley Cat 1/32 resin kit, then I suppose I should pick up a few 1/72 kits to complete the collection.
Cheers, D
Joel_W

Joined: December 04, 2010
KitMaker: 11,666 posts
AeroScale: 7,410 posts

Posted: Monday, May 25, 2015 - 07:36 PM UTC
Quoted Text
Quoted TextDamian,
I just checked out your link, you don't have enough Boomerangs

Joel
I totally agree Joel! I am gathering funds (and courage) to invest in the Alley Cat 1/32 resin kit, then I suppose I should pick up a few 1/72 kits to complete the collection.
Cheers, D
Damian,
Great plan. Have you run it by your wife as yet?

Joel

magnusf

Joined: May 02, 2006
KitMaker: 1,953 posts
AeroScale: 1,902 posts

Posted: Saturday, May 30, 2015 - 11:55 AM UTC
Joel! Tamiya glue works fine as long as the canopy is styrene, in this case it is vacformed (probably some kind of PET) and totally inert to solvent based glues (at least the ones you generally use in this hobby  ). That's the reason for the epoxy!
Terri! Thanks for silently keeping me company !
!
Damian! I had no idea that you had this Boomerang-thing going! I would be tempted but I am too busy to join and apart from that I think that the 262 is more than enough of short-run for the foreseeable future. My Boomerang is a Tasman kit, bought cheaply labelled "flood salvage, missing decals" (Yes, it's true, I'm not making it up!). It smells a bit funny but the plastic is OK !
!
Joel! What the wife doesn't know doesn't hurt her. I had a conversation yesterday with mine regarding some modelling-oriented interesting stuff she found in the mail this week where I ensured her that I only buy things that I REALLY need, nothing else... She smiled knowingly and probably expects a nice present for Mother's Day (today here in Sweden) as compensation...
After some rather tedious (and risky) sanding around the canopy things are now finally moving forward again.


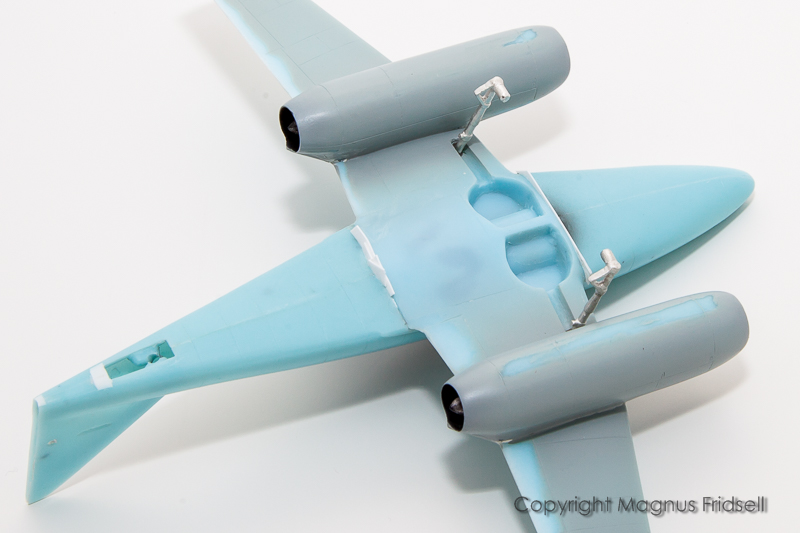
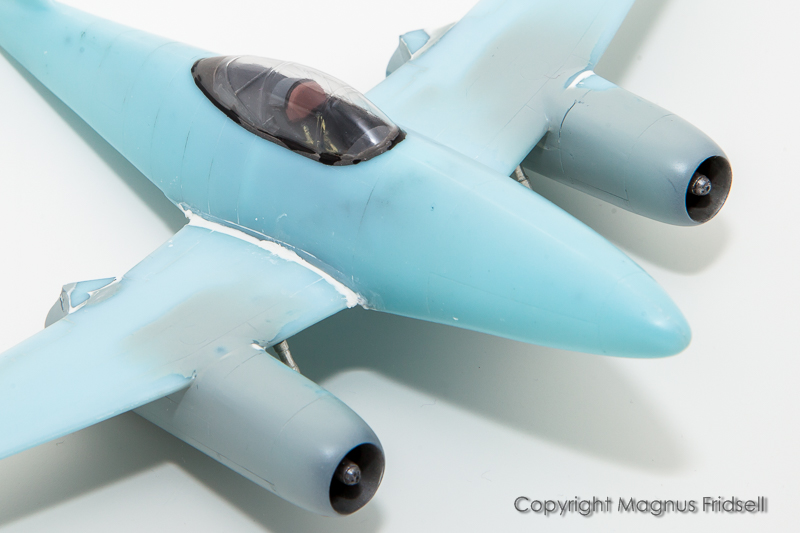
Canopy epoxied in place and carefully faired in using CA glue where there wasn't enough of the epoxy to get an even seam. Using epoxy, ensuring that the gap between canopy and fuselage is thoroughly sealed, enables using CA to level the seam later on since the fogging caused by the CA will be restricted to the outside, which can be easily cleaned and polished.

While I was at it, I installed the landing gear using epoxy as well. It gives a strong joint and can be adjusted but I will try to get myself a faster brand for this kind of job! I went to bed before it had set thoroughly so this morning I had to use another of the handy white-metal properties: it can be bent and twisted slightly for adjustment !
!


And finally, an ill-fitting wing was attached to the fuselage with some of the gaps filled in using plasticard scraps. The upper wing roots will be filled and sculpted using Milliput later today.

Magnus
 ). That's the reason for the epoxy!
Terri! Thanks for silently keeping me company
 !
!Damian! I had no idea that you had this Boomerang-thing going! I would be tempted but I am too busy to join and apart from that I think that the 262 is more than enough of short-run for the foreseeable future. My Boomerang is a Tasman kit, bought cheaply labelled "flood salvage, missing decals" (Yes, it's true, I'm not making it up!). It smells a bit funny but the plastic is OK
 !
!Joel! What the wife doesn't know doesn't hurt her. I had a conversation yesterday with mine regarding some modelling-oriented interesting stuff she found in the mail this week where I ensured her that I only buy things that I REALLY need, nothing else... She smiled knowingly and probably expects a nice present for Mother's Day (today here in Sweden) as compensation...
After some rather tedious (and risky) sanding around the canopy things are now finally moving forward again.


Canopy epoxied in place and carefully faired in using CA glue where there wasn't enough of the epoxy to get an even seam. Using epoxy, ensuring that the gap between canopy and fuselage is thoroughly sealed, enables using CA to level the seam later on since the fogging caused by the CA will be restricted to the outside, which can be easily cleaned and polished.

While I was at it, I installed the landing gear using epoxy as well. It gives a strong joint and can be adjusted but I will try to get myself a faster brand for this kind of job! I went to bed before it had set thoroughly so this morning I had to use another of the handy white-metal properties: it can be bent and twisted slightly for adjustment
 !
!

And finally, an ill-fitting wing was attached to the fuselage with some of the gaps filled in using plasticard scraps. The upper wing roots will be filled and sculpted using Milliput later today.

Magnus
Posted: Saturday, May 30, 2015 - 01:39 PM UTC
Looking great Magnus! After seeing video of this bird on test flights, I'll be interested to see how you do it.
Gary
Gary

goodn8

Joined: October 12, 2008
KitMaker: 709 posts
AeroScale: 651 posts

Posted: Saturday, May 30, 2015 - 02:04 PM UTC
Now it's getting in shape! 
Very nice work and progress. I've never tried a resin kit especially because of that poisonous dust and scrap when sanding/scribing and because of the glue-factor
Keep on, Thomas

Very nice work and progress. I've never tried a resin kit especially because of that poisonous dust and scrap when sanding/scribing and because of the glue-factor

Keep on, Thomas

Joel_W

Joined: December 04, 2010
KitMaker: 11,666 posts
AeroScale: 7,410 posts

Posted: Saturday, May 30, 2015 - 08:29 PM UTC
Magnus,
very impressive work installing the canopy. Looks like you'll get a perfect fit when it's painted.
Looking forward to your update on those wing roots. Those gaps are really nasty looking.
Joel
very impressive work installing the canopy. Looks like you'll get a perfect fit when it's painted.
Looking forward to your update on those wing roots. Those gaps are really nasty looking.
Joel

magnusf

Joined: May 02, 2006
KitMaker: 1,953 posts
AeroScale: 1,902 posts

Posted: Sunday, May 31, 2015 - 10:55 PM UTC
Gary! I was a bit worried about references but it turned out that this aircraft probably is the single most photographed 262 that was ever built  !
!
Thomas! Kit is actually injection moulded so the material is perfectly ordinary styrene! So no health-issues, at least none worse than you get from an ordinary Airfix-kit !
!
Joel! I've tried keeping it tidy, see below...

Once again, using Milliput and the magic little rubber-tipped sculpting tool, I managed to fill the rather substantial seams along the wing roots. Final tidying was done using a Q-tip dipped in water, resulting in a slightly concave seam but I'll do a final fine-filling tonight instead of over-filling it in one go!

Magnus
 !
!Thomas! Kit is actually injection moulded so the material is perfectly ordinary styrene! So no health-issues, at least none worse than you get from an ordinary Airfix-kit
 !
!Joel! I've tried keeping it tidy, see below...

Once again, using Milliput and the magic little rubber-tipped sculpting tool, I managed to fill the rather substantial seams along the wing roots. Final tidying was done using a Q-tip dipped in water, resulting in a slightly concave seam but I'll do a final fine-filling tonight instead of over-filling it in one go!

Magnus

goodn8

Joined: October 12, 2008
KitMaker: 709 posts
AeroScale: 651 posts

Posted: Sunday, May 31, 2015 - 11:22 PM UTC
Quoted Text
Thomas! Kit is actually injection moulded so the material is perfectly ordinary styrene! So no health-issues, at least none worse than you get from an ordinary Airfix-kit!
Ok, my fault. Thought it's Resin - must be a result of my likewise myopic problem, should wear my glasses regularly

Thomas

Joel_W

Joined: December 04, 2010
KitMaker: 11,666 posts
AeroScale: 7,410 posts

Posted: Monday, June 01, 2015 - 01:44 AM UTC
Magnus,
Nicely done especially considering the size of those gaps for 1/72 scale.
Joel
Nicely done especially considering the size of those gaps for 1/72 scale.
Joel

magnusf

Joined: May 02, 2006
KitMaker: 1,953 posts
AeroScale: 1,902 posts

Posted: Tuesday, June 16, 2015 - 12:23 AM UTC
Friends! Sorry for late reply and lazy posting but I've been doing all this small stuff that doesn't show up in photos very well...
Thomas! I am also myopic: without my glasses I wouldn't find my way to the modelling table!
Joel! Thanks! It turned out quite well!

Canopy masked using Bare-Metal foil.

Rudder with an added trimtab and actuator and stabilizers with dropped elevators and new "endplates" where they attach to the fin!


Magnus
Thomas! I am also myopic: without my glasses I wouldn't find my way to the modelling table!
Joel! Thanks! It turned out quite well!

Canopy masked using Bare-Metal foil.

Rudder with an added trimtab and actuator and stabilizers with dropped elevators and new "endplates" where they attach to the fin!


Magnus
Joel_W

Joined: December 04, 2010
KitMaker: 11,666 posts
AeroScale: 7,410 posts

Posted: Tuesday, June 16, 2015 - 09:21 PM UTC
Magnus,
Very nice work on those wing roots. I've got a brand new box of Milliput that I just never seem to use, even though I bought it for tough filling jobs like on the F2A-3. Will try your technique next time, then final blend with Bondo. Should be perfect for me.
I really like your masking with Bare Metal Foil. I'm still doing it the old fashion way with strips of Tamiya tape, then fill in between the lines.
Joel

Emeritus

Joined: March 30, 2004
KitMaker: 2,845 posts
AeroScale: 1,564 posts

Posted: Tuesday, June 16, 2015 - 10:14 PM UTC
Shaping up really nicely 
I've seen quite some people use Bare-Metal for masking canopies but haven't tried it myself, at least yet. I presume it's quite thin, isn't it hard to remove neatly, let alone see under a couple of coats of paint?
I'm also a long-time fan of Tamiya's masking tape. Thin strips for the borders, bigger pieces for centers, cut overlapping strips, done.

magnusf

Joined: May 02, 2006
KitMaker: 1,953 posts
AeroScale: 1,902 posts

Posted: Wednesday, June 17, 2015 - 03:51 PM UTC
Joel and Eetu! I've standardised on foil for my canopies during the last few years even if it has its drawbacks as well... It does give a very sharp demarcation line and if burnished down there is no risk at all of paint seepage. The drawbacks you have all figured out already: it has to be cut when already in place (risky!) and can sometimes both be hard to remove and leave residue (that can be removed using a mild solvent like Humbrol thinner but not without risking removing the paint). God gives and God takes!

Magnus

Magnus

magnusf

Joined: May 02, 2006
KitMaker: 1,953 posts
AeroScale: 1,902 posts

Posted: Tuesday, September 01, 2015 - 11:19 PM UTC
I've been rather into summer stuff for the last two months but with the onset of autumn I've found the urge to do some plastic again  !
!

A bit of a soft start, simply painting the wings to get into airbrushing mood once again. After the rest of the splinter stuff I think I can graduate to mottling level soon!

Magnus
 !
!
A bit of a soft start, simply painting the wings to get into airbrushing mood once again. After the rest of the splinter stuff I think I can graduate to mottling level soon!

Magnus
Joel_W

Joined: December 04, 2010
KitMaker: 11,666 posts
AeroScale: 7,410 posts

Posted: Wednesday, September 02, 2015 - 12:52 AM UTC
Magnus,
It's really nice to see you're back at the bench again. Looking forward to watching your painting turn that toyish Blue into a 1/72 scale replica.
Joel
It's really nice to see you're back at the bench again. Looking forward to watching your painting turn that toyish Blue into a 1/72 scale replica.
Joel
Posted: Wednesday, September 02, 2015 - 06:11 AM UTC
Looking good Magnus, great to see this one back on the progress page!
Cheers, D
Cheers, D

magnusf

Joined: May 02, 2006
KitMaker: 1,953 posts
AeroScale: 1,902 posts

Posted: Thursday, September 03, 2015 - 01:14 AM UTC
Joel and Damian! I was worried I had lost my fanclub over the summer... Thanks for keeping an eye on the thread for me while I haven't been around  !
!

Lots of masking for very little painting... Fuselage next (tomorrow maybe?)!

Magnus
 !
!
Lots of masking for very little painting... Fuselage next (tomorrow maybe?)!

Magnus
Antilles

Joined: March 22, 2015
KitMaker: 671 posts
AeroScale: 614 posts

Posted: Thursday, September 03, 2015 - 01:36 AM UTC
Magnus , we are all here, waiting for the next steps  ! After the summer, next comes harvest, I guess. So, Your swallow grows and looks very nice!
Oliver
 ! After the summer, next comes harvest, I guess. So, Your swallow grows and looks very nice!
Oliver

 |


