Messerschmitt Me 262A-1a - HobbyBoss 1/48
Germany
Joined: September 07, 2005
KitMaker: 5,609 posts
AeroScale: 5,231 posts
Posted: Tuesday, August 04, 2015 - 07:50 PM UTC
Hi all,
another late Campaign entry, this time for the Schwalbe-Campaign. Hope I can make it... the kit is pretty correct and easy to build so I will just add minor things.
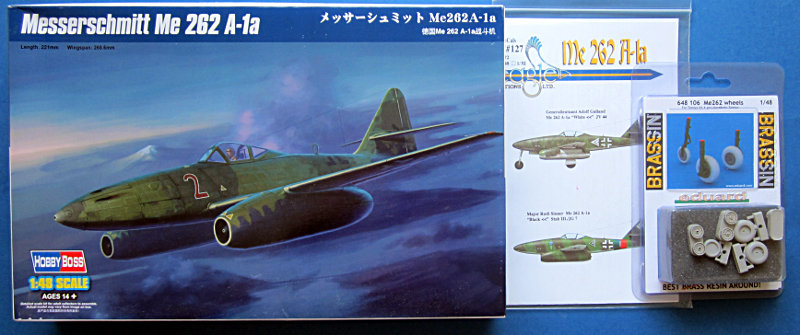
I already have the Eduard Brassin wheels and I ordered a Zoom set to spice up the cockpit. For camo I want to make Rudi Sinners striped machine with decals from Eagle Editions (not sure which of the two striped machines I will build ... probably the other one

)
While waiting for the cockpit set I just started glueing a few things together...
all the best
Steffen
DULCE ET DECORUM EST PRO HOBBY MORI
AussieReg
 Associate Editor
#007
Victoria, Australia
Joined: June 09, 2009
KitMaker: 8,156 posts
AeroScale: 3,756 posts
Posted: Wednesday, August 05, 2015 - 02:13 AM UTC
Nice start Steffen, looking forward to seeing what the etch and resin items add to the build.
Cheers, D
ON the bench
Revell 1/24 '53 Corvette (building as '54)
Revell 1/24 BMW 507 Coupe and Cabrio
Italeri 1/48 Me262 B-1a/U1 Nightfighter
Monogram 1/24 '57 Chevy Nomad
Dragon 1/350 USS Frank Knox DD-742
Germany
Joined: September 07, 2005
KitMaker: 5,609 posts
AeroScale: 5,231 posts
Posted: Wednesday, August 05, 2015 - 04:25 PM UTC
Thanks Damian!
do not expect too much it is just the wheels (resin) and teh Zoom set for the cockpit. I am still undecided if I will add wires and piping in the main wheel bay/fuselage.
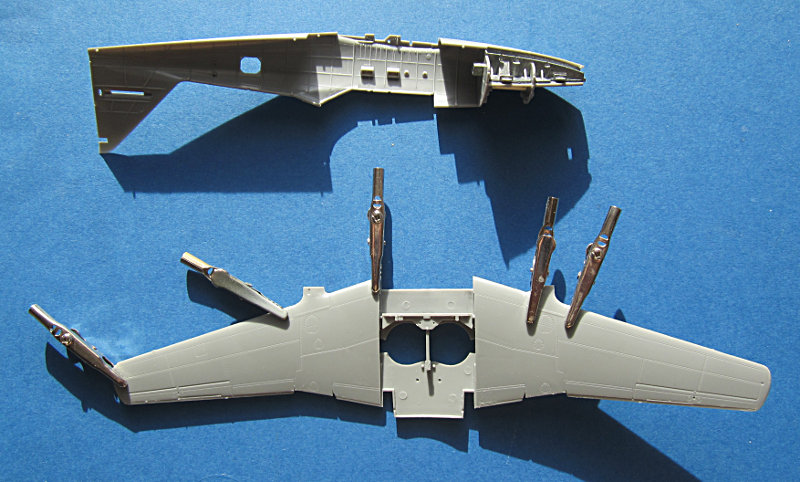
BTW the wing assembly is not as per instructions. This way I will have to bend the wing a bit to get it fit at the fuselage
joint.
all the best
Steffen
DULCE ET DECORUM EST PRO HOBBY MORI
Germany
Joined: September 07, 2005
KitMaker: 5,609 posts
AeroScale: 5,231 posts
Posted: Thursday, August 06, 2015 - 07:09 PM UTC
The engine nacelles are together and mounted to the wing

BTW the picture of this machine shows the leading edge slats only slightly dropped out, so I think I can get away with not cuttting them out...
The parcel from Hannants still did not arrive, hopefully tomorrow...
all the best
Steffen
DULCE ET DECORUM EST PRO HOBBY MORI
Germany
Joined: September 07, 2005
KitMaker: 5,609 posts
AeroScale: 5,231 posts
Posted: Saturday, August 15, 2015 - 08:40 PM UTC
This week the PE set finally arrived so I lost a weekend for my build .. we'll see how things go as i hurried a bit to close the fuselage.
Here is what I did this weekend. Cockpit alway take all my motivation away so I am just glad it is done.
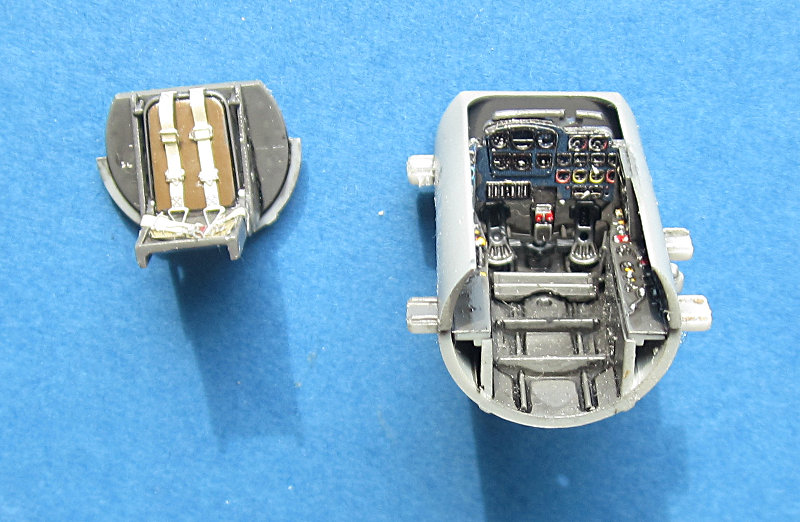
I only used the instrument panel and the seat belts. The side consoles are easier done painting plastic... The rudder controls can hardly be seen and look o.k. from the box.
Next I will try to put everything together. Fit is thight and I might have to use some force and putty at the nose.
all the best
Steffen
DULCE ET DECORUM EST PRO HOBBY MORI
Joel_W
Associate Editor New York, United States
Joined: December 04, 2010
KitMaker: 11,666 posts
AeroScale: 7,410 posts
Posted: Sunday, August 16, 2015 - 01:10 AM UTC
Steffen,
An excellent start. You're really cranking them out now.
Joel
On my Workbench:
Monogram 1/24 scale 427 Shelby Cobra
Just Completed:
Beemax 1/24 scale BMW M3 E30 1992 Evolution II
Germany
Joined: September 07, 2005
KitMaker: 5,609 posts
AeroScale: 5,231 posts
Posted: Sunday, August 16, 2015 - 01:41 AM UTC
Cheers Joel!
I wish I would be a bit more productive, but all in all it is pretty good at the moment,
BTW while I waited, I was not idle ... a dog of a kit but I already have some decals on. I'll probably send Rowan some pix once it is done (better not praise the day...)
all the best
Steffen
DULCE ET DECORUM EST PRO HOBBY MORI
Germany
Joined: September 07, 2005
KitMaker: 5,609 posts
AeroScale: 5,231 posts
Posted: Monday, August 17, 2015 - 09:48 PM UTC
As announced I glued the fuselage together. The fit especially at the nose is not very good. Probably a misalignment of the metal part (I thought twice if I should use it .. .obviously the wrong decision. Lots of sanding to follow as the nose tip won't fit either.
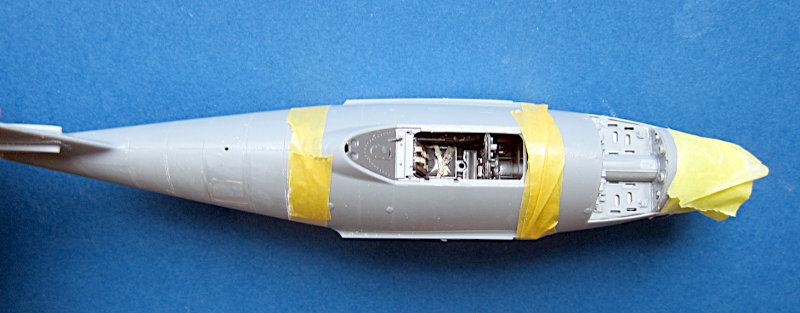
The access hatch to the radio compartment sunk in while the glue set as did the Gun covers, which I attached meanwhile. I won't change that as the surface of the "Silber" (German code name of the Me262 project) had a very rough surface. I will sand a bit more on the fuselage though ...
all the best
Steffen
DULCE ET DECORUM EST PRO HOBBY MORI
Merlin
Senior Editor #017
United Kingdom
Joined: June 11, 2003
KitMaker: 17,582 posts
AeroScale: 12,795 posts
Posted: Tuesday, August 18, 2015 - 12:35 AM UTC
Nice going Steffen
I bought a Hobby Boss '262 a while ago and I have to admit it went straight into the Stash after little more than a cursory glance. Shame on me - but I'll rescue it one day.

It's nice to see one being built.

All the best
Rowan
BEWARE OF THE FEW...
As I grow older, I regret to say that a detestable habit of thinking seems to be getting a hold of me. - H. Rider Haggard
Germany
Joined: September 07, 2005
KitMaker: 5,609 posts
AeroScale: 5,231 posts
Posted: Tuesday, August 18, 2015 - 08:03 PM UTC
Thanks Rowan,
the HB kit is the most accurate in TOTS, still they did not manage to give us teh LE slats as separate parts.
There is a lot of discussion about the rivets. The fuselage panel lines (at least) were puttied on the original BUT the whole thing was done pretty crude and there should be wrinkles and "stress marks" showing all over the airframe. Personally I do not care. I do like models that have rivets to show some structure of the a/c and I like models without them... Also I lost some of the structures due to sanding.
SO here is the actual state. The u/c bay is just painted alu and given a black wash (these were not RLM 02 as I have seen in other builds over at the Me 262 thread) As there is few to be seen once the u/c is on I did not spend time on further details...

I did spend some effort to get a very good wing to fuselage joint. It is much better than the pictures show after some dryfitting and sanding ... this is time well spent.

Still the weekend lost due to the cockpit set will make it hard to finish in time.
all the best
Steffen
DULCE ET DECORUM EST PRO HOBBY MORI
Germany
Joined: September 07, 2005
KitMaker: 5,609 posts
AeroScale: 5,231 posts
Posted: Friday, August 21, 2015 - 05:55 PM UTC
Well, the missing Weekend starts to show.
I still have some parts to add in the cockpit/canopy area, but I wanted to get some paint on so I started with RLM 76 (Gunze) on the lower side.

The model will have paint on all outer surfaces as Sinner's machines had a special paint scheme and (I suppose) would not have been bare metal when the wholce upper side was painted in that Zebra Camo.
all the best
Steffen
DULCE ET DECORUM EST PRO HOBBY MORI
United States
Joined: October 30, 2011
KitMaker: 84 posts
AeroScale: 81 posts
Posted: Saturday, August 22, 2015 - 02:38 AM UTC
How does the kit rate compared to the Tamiya 262?
Germany
Joined: September 07, 2005
KitMaker: 5,609 posts
AeroScale: 5,231 posts
Posted: Saturday, August 22, 2015 - 11:20 AM UTC
Hi Winston,
the HB kit has slightly better shapes than the Tamiya kit, while the Tamiya is the slightly better engineered kit. Fit of the HB kit is not bad but you have to be careful and dryfit the parts.
In future I either use the plastic noseframe or perfectly dryfit the metal part, which is not that easy as the nose is a multipart assembly. I had another problem with the very thin edges of the hatches that can be posed open. This is good if you open them but better not used plastic glue when you close these (they melt easily).
Both kits lack separate slats which is bad as these are normally open because they are spring driven and just pop out when the airflow stops. In this case I did not correct it as the photo shows the slats only slightly dropped out.
The Tamiya costs around 35-40 Euro here in Germany the HB kit is 15-20... make your choice.
all the best
Steffen
DULCE ET DECORUM EST PRO HOBBY MORI
Germany
Joined: September 07, 2005
KitMaker: 5,609 posts
AeroScale: 5,231 posts
Posted: Saturday, August 22, 2015 - 01:42 PM UTC
Hi again,
this is what kept me busy for quite a while.
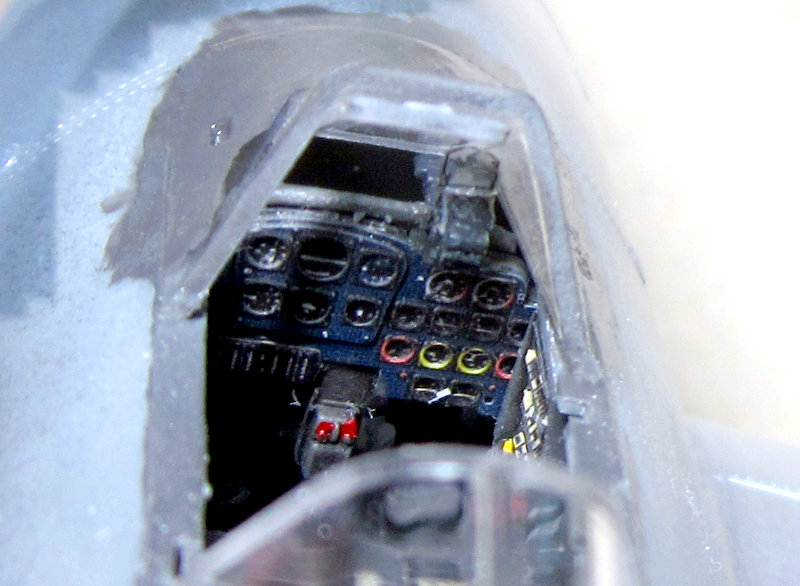

Eduard offers a "folding box" Revi (short for Reflexvisier = reflector gun sight), but I cannot get that thing together. So I updated the kits Revi with some of the PE and the clear parts. This is difficult to photograph and the pix are close to macroscopic...
all the best
Steffen
DULCE ET DECORUM EST PRO HOBBY MORI
Germany
Joined: September 07, 2005
KitMaker: 5,609 posts
AeroScale: 5,231 posts
Posted: Saturday, August 22, 2015 - 11:41 PM UTC
I am really lacking the weekend I waited for the cockpitset.
Only got the first upper side color onto the model this week end and there is still a lot work on the camo, not to mention decals and weathering.

all the best
Steffen
DULCE ET DECORUM EST PRO HOBBY MORI
AussieReg
Associate Editor #007
Victoria, Australia
Joined: June 09, 2009
KitMaker: 8,156 posts
AeroScale: 3,756 posts
Posted: Sunday, August 23, 2015 - 05:02 AM UTC
Looking good Steffen, and some very useful information regarding the kit as well. There are a lot of HB kits in people's stashes due to the price point, so any tips on construction are great!
Looking forward to the next update.
Cheers, D
ON the bench
Revell 1/24 '53 Corvette (building as '54)
Revell 1/24 BMW 507 Coupe and Cabrio
Italeri 1/48 Me262 B-1a/U1 Nightfighter
Monogram 1/24 '57 Chevy Nomad
Dragon 1/350 USS Frank Knox DD-742
Joel_W
Associate Editor New York, United States
Joined: December 04, 2010
KitMaker: 11,666 posts
AeroScale: 7,410 posts
Posted: Sunday, August 23, 2015 - 06:51 PM UTC
Steffen,
Just great progress. The IP looks outstanding, especially for someone who hates cockpits. While I don't hate them, I rather just keep 'em on the basic side, and spend my time on the exterior as my models are all display pieces in a cabinet.
top color looks smooth as silk.
Joel
On my Workbench:
Monogram 1/24 scale 427 Shelby Cobra
Just Completed:
Beemax 1/24 scale BMW M3 E30 1992 Evolution II
Germany
Joined: September 07, 2005
KitMaker: 5,609 posts
AeroScale: 5,231 posts
Posted: Monday, August 24, 2015 - 12:16 AM UTC
Hi again
Many thanks Damian and Joel!
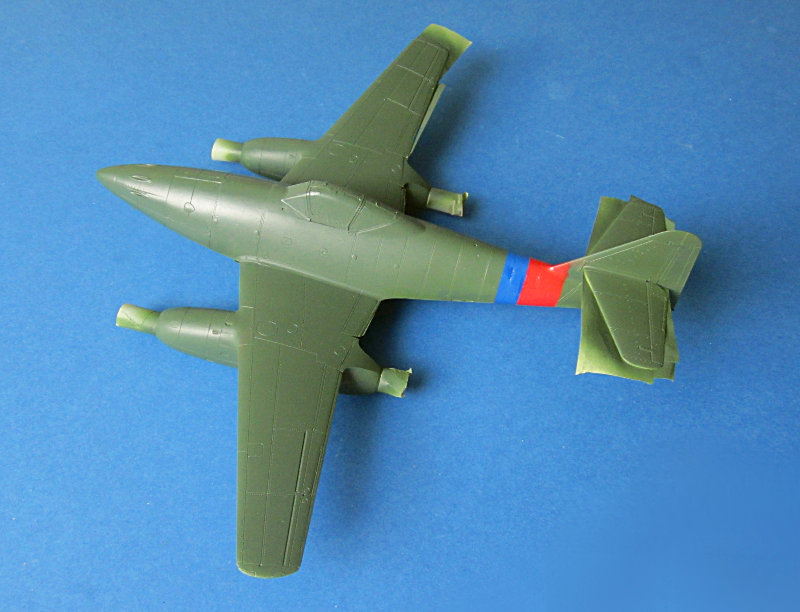
Here is my first try at the fuselage bands. Sadly the panel line layout is slightly different to the drawing I have so I have to add a mm to the blue band...
all the best
Steffen
DULCE ET DECORUM EST PRO HOBBY MORI
Joel_W
Associate Editor New York, United States
Joined: December 04, 2010
KitMaker: 11,666 posts
AeroScale: 7,410 posts
Posted: Monday, August 24, 2015 - 07:40 PM UTC
Steffen,
Very nice job on the fuselage bands. The Red band up the tail must have been somewhat challenging to keep the line straight especially when it rolls over to the other side.
Joel
On my Workbench:
Monogram 1/24 scale 427 Shelby Cobra
Just Completed:
Beemax 1/24 scale BMW M3 E30 1992 Evolution II
Germany
Joined: September 07, 2005
KitMaker: 5,609 posts
AeroScale: 5,231 posts
Posted: Monday, August 24, 2015 - 09:46 PM UTC
Hi Joel,
not quite. The tailend of teh band is just freehand. It will be norrowed and run around the rudder fin (actually that's already masked). Then I will touch up the RLM 76 and 82 and proceed with 83 bands... (see e.g. Claes Sundins site:
http://luftwaffeinprofile.se/Rudolf%20Sinner%20Me%20262.htmlthanks for watching and
all the best
Steffen
DULCE ET DECORUM EST PRO HOBBY MORI
Germany
Joined: September 07, 2005
KitMaker: 5,609 posts
AeroScale: 5,231 posts
Posted: Tuesday, August 25, 2015 - 10:46 PM UTC
Well.
the camo scheme proves to be more difficult than I though. It has to fit from several angles and I onlyhave one photo and side profile. The top view of the decal set is no help. I am not sure if I leave the left wing (seen in flight direction) or redo it.

(the whole effect will be seen in the final 10 view WA)
all the best
Steffen
DULCE ET DECORUM EST PRO HOBBY MORI
North Carolina, United States
Joined: June 06, 2006
KitMaker: 4,691 posts
AeroScale: 238 posts
Posted: Wednesday, August 26, 2015 - 12:57 AM UTC
Nice looking bird Steffen,that pit is outstanding,too bad it had to get closed up,that camo should be nice also.
Germany
Joined: September 07, 2005
KitMaker: 5,609 posts
AeroScale: 5,231 posts
Posted: Wednesday, August 26, 2015 - 10:14 PM UTC
Thanks Anthony!
I decided I wil.l live with the left wing camo and demasked the kit. This is it before gloss coating with Klear:
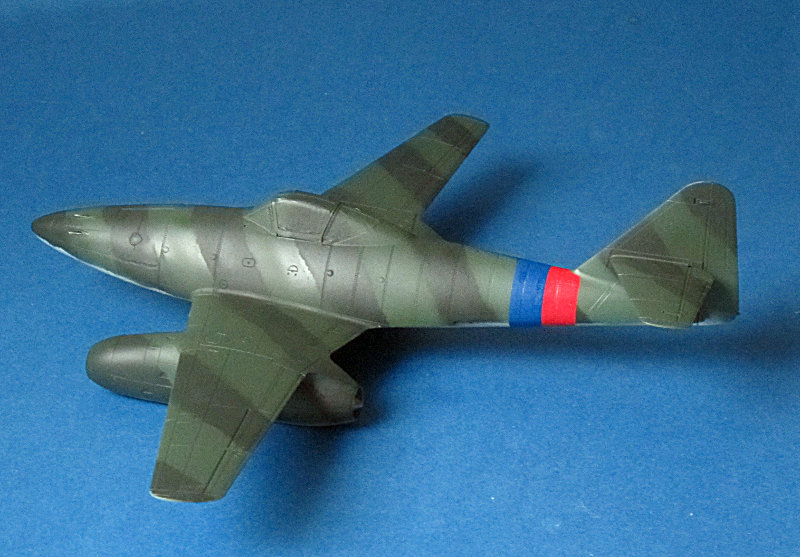
The fuselage band turned out quite good. BTW I used "flying" paper masks for the stripes. All in all not a bad camo.
all the best
Steffen
DULCE ET DECORUM EST PRO HOBBY MORI
Joel_W
Associate Editor New York, United States
Joined: December 04, 2010
KitMaker: 11,666 posts
AeroScale: 7,410 posts
Posted: Thursday, August 27, 2015 - 10:46 PM UTC
Steffen,
The camo paint scheme looks quite good. But the fuselage bands just look that much better, especially the red band how you worked it around the tail.
Joel
On my Workbench:
Monogram 1/24 scale 427 Shelby Cobra
Just Completed:
Beemax 1/24 scale BMW M3 E30 1992 Evolution II
Germany
Joined: September 07, 2005
KitMaker: 5,609 posts
AeroScale: 5,231 posts
Posted: Saturday, August 29, 2015 - 07:45 PM UTC
Thanks Joel!
Progress is slim at the moment as the decals take some time

all the best
Steffen
DULCE ET DECORUM EST PRO HOBBY MORI


