

Recommended on another forum:
71-016 US Dark Green too brown
71-047 US Grey too dark
If you must use Vallejo Model Air then I suggest
71-114 US Blue Grey
71-012 Dark Green (with reservations - Vallejo don't really have a good RAF Dark Green equivalent)
71-046 Pale Grey Blue*
*NB 71-049 is Medium Sea Grey, do not know why 71-046 is recommended instead of 71-049
Hosted by Rowan Baylis
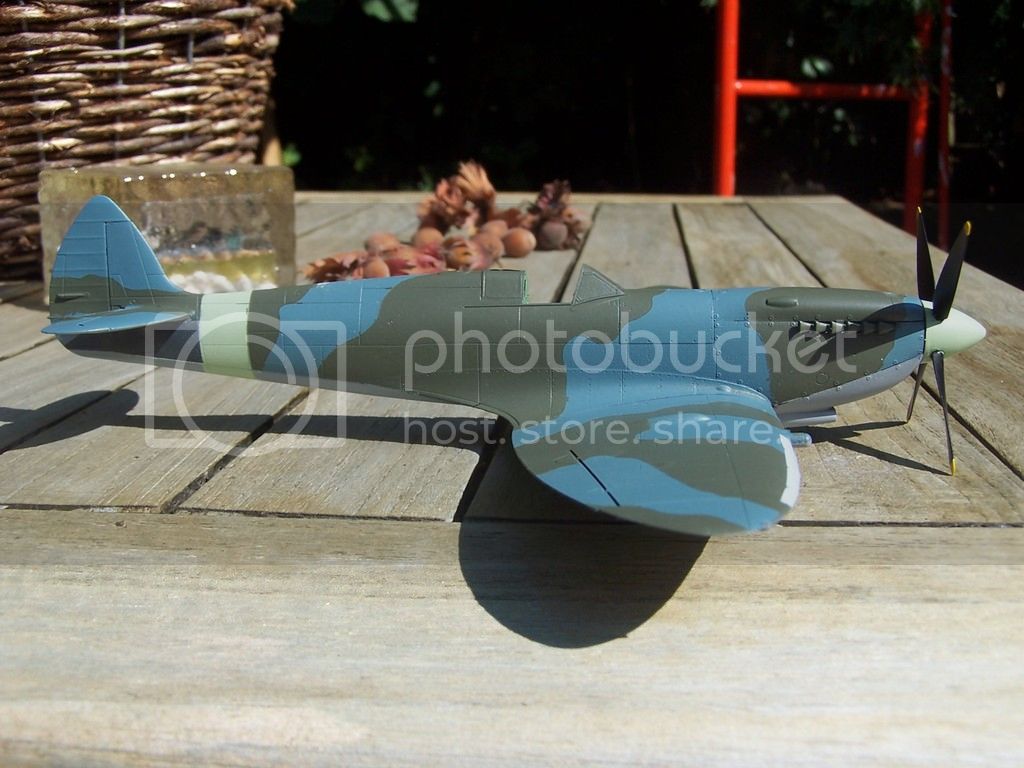
Armor guy doing a Spitfire Mk.IX

Antoni

Joined: June 03, 2006
KitMaker: 574 posts
AeroScale: 573 posts
Posted: Sunday, September 06, 2015 - 06:53 PM UTC
Stoottroeper

Joined: June 10, 2007
KitMaker: 1,107 posts
AeroScale: 38 posts

Posted: Sunday, September 06, 2015 - 08:03 PM UTC
Thanks Antoni,
I'll go shoping tomorrow for the Dark Green, but I will take a bottle of the Blue Grey as well
Peter.
I'll go shoping tomorrow for the Dark Green, but I will take a bottle of the Blue Grey as well
Peter.

Emeritus

Joined: March 30, 2004
KitMaker: 2,845 posts
AeroScale: 1,564 posts

Posted: Sunday, September 06, 2015 - 11:36 PM UTC
If the shop(s) you're going to has Xtracrylix paints, those are definitely worth trying out too. They have a range of RAF colors in their lineup. Just one caveat though: in my experience their brand thinner is less than optimal for thinning (at least when used as the only thinner), it makes dry paint accumulation on the airbrush needle occur rather quickly.
I've found plain tap water (or battery water, if tap water where you live leaves mineral residue when drying) or LifeColor acrylics thinner to work much better.
I've found plain tap water (or battery water, if tap water where you live leaves mineral residue when drying) or LifeColor acrylics thinner to work much better.
Stoottroeper
Joined: June 10, 2007
KitMaker: 1,107 posts
AeroScale: 38 posts
Posted: Monday, September 07, 2015 - 12:05 AM UTC
Sorry Eetu,
We have 3 modelshops in Eindhoven, sadly one is closing at the end of this year (they retiring)
All I can choose from is Vallejo, Tamiya and Humbrol.
But thanks for the advise.
Peter
We have 3 modelshops in Eindhoven, sadly one is closing at the end of this year (they retiring)
All I can choose from is Vallejo, Tamiya and Humbrol.
But thanks for the advise.
Peter
Stoottroeper
Joined: June 10, 2007
KitMaker: 1,107 posts
AeroScale: 38 posts
Posted: Monday, September 07, 2015 - 08:37 PM UTC
Good day y'all,
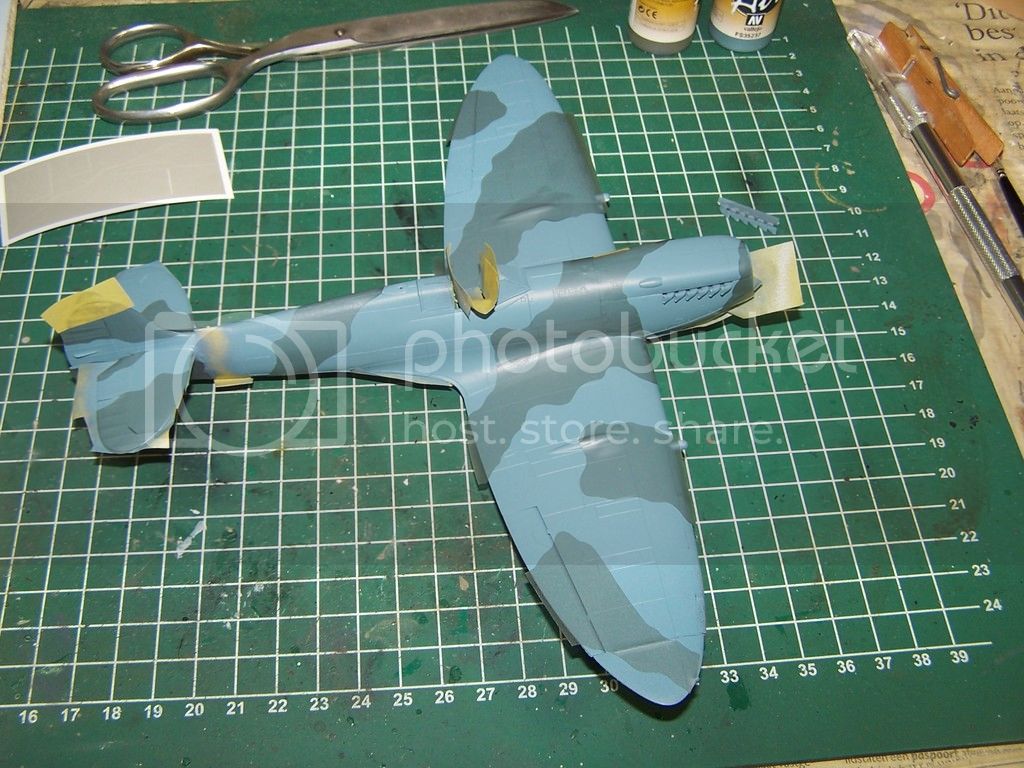
I did't do much of modelling today, but I bought the 71-114 US Blue Grey and the 71-012 Dark Green.
Here's the proof:

Yesterday I thought it was a little to dark but close, but this morning I saw it was way too dark, though US Blue Grey might be too light.
I will see how it turns out after the green.
@ Antoni:The 71-049 Medium Sea Grey is in lieu of the 71-114 US Blue Grey. The 71-046 Pale Grey Blue is for the undersurface.
Peter
I did't do much of modelling today, but I bought the 71-114 US Blue Grey and the 71-012 Dark Green.
Here's the proof:
Yesterday I thought it was a little to dark but close, but this morning I saw it was way too dark, though US Blue Grey might be too light.
I will see how it turns out after the green.
@ Antoni:The 71-049 Medium Sea Grey is in lieu of the 71-114 US Blue Grey. The 71-046 Pale Grey Blue is for the undersurface.
Peter
Antoni
Joined: June 03, 2006
KitMaker: 574 posts
AeroScale: 573 posts
Posted: Monday, September 07, 2015 - 09:13 PM UTC
No it is not. Medium Sea Grey is the correct colour for the undesuraces.
Stoottroeper
Joined: June 10, 2007
KitMaker: 1,107 posts
AeroScale: 38 posts
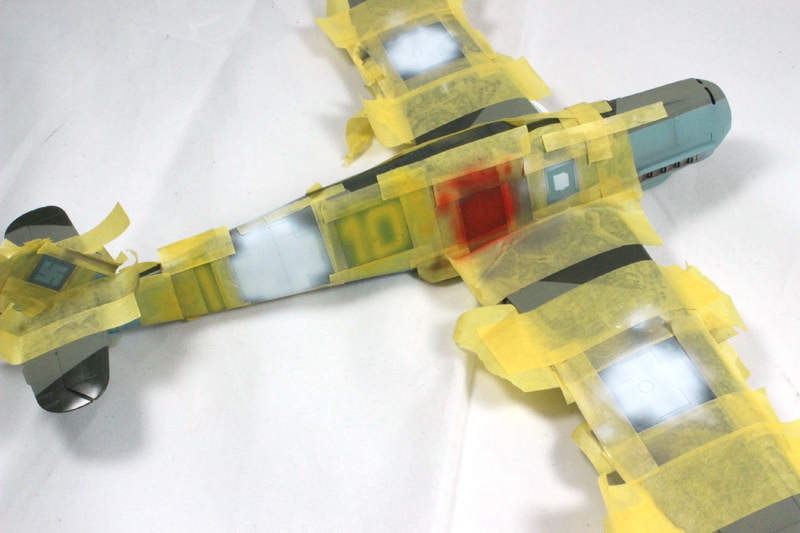
Posted: Tuesday, September 08, 2015 - 01:00 AM UTC
Good evening,
@Antoni: that sounds too dark, but you could be right.
The paint has dried, so I have placed the masks:
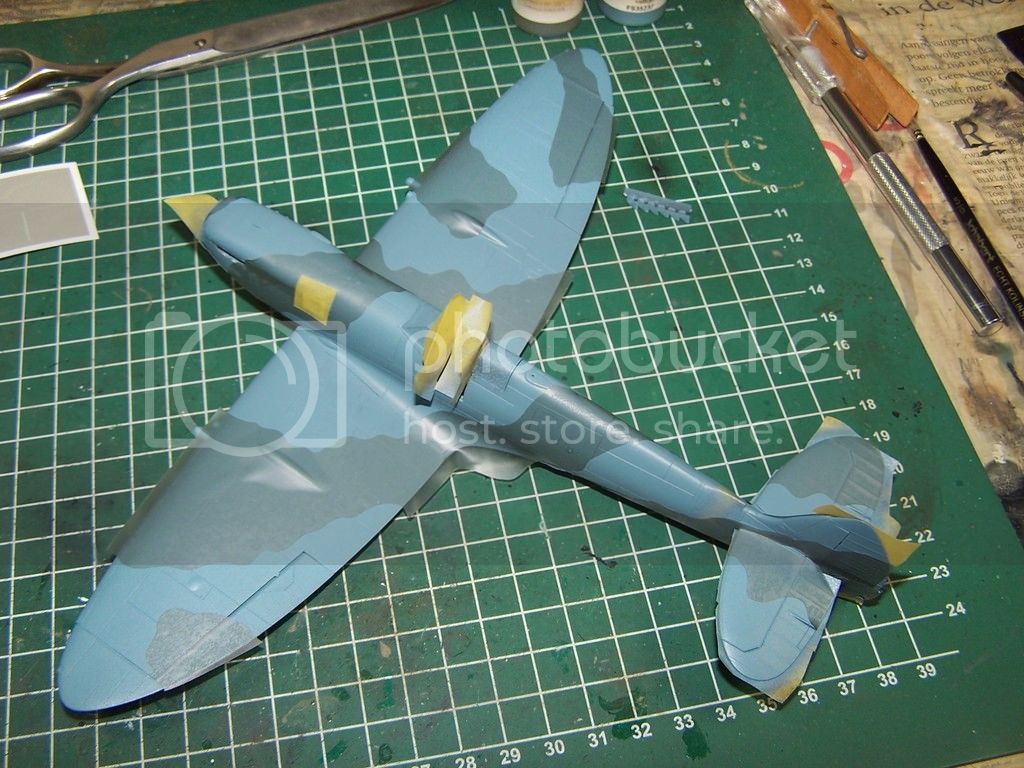
As I'm building the version with the pointed tail, I had to use an extra piece of tape for the top.
Green paint following soon
Peter
@Antoni: that sounds too dark, but you could be right.
The paint has dried, so I have placed the masks:
As I'm building the version with the pointed tail, I had to use an extra piece of tape for the top.
Green paint following soon
Peter

Merlin

#017


Joined: June 11, 2003
KitMaker: 17,582 posts
AeroScale: 12,795 posts

Posted: Tuesday, September 08, 2015 - 01:18 AM UTC
Quoted Text
Good evening,
@Antoni: that sounds too dark, but you could be right.
Peter
Hi Peter
Looking really good, but don't go purely by the name to judge whether something's dark or light to the eye - it can be misleading (i.e. Dark Earth isn't a dark brown
 ). Antoni's quite correct- Medium Sea Grey was the official underside colour for Spits of this period.
All the best
Rowan


Joel_W

Joined: December 04, 2010
KitMaker: 11,666 posts
AeroScale: 7,410 posts
Posted: Tuesday, September 08, 2015 - 10:45 PM UTC
Peter,
Your top color looks good to me. And the masking is perfect. Since I don't use that brand of paint, the color names nor what the actual color looks like is an unknown factor to me it's it right or wrong.
Joel
Your top color looks good to me. And the masking is perfect. Since I don't use that brand of paint, the color names nor what the actual color looks like is an unknown factor to me it's it right or wrong.
Joel

Stoottroeper
Joined: June 10, 2007
KitMaker: 1,107 posts
AeroScale: 38 posts
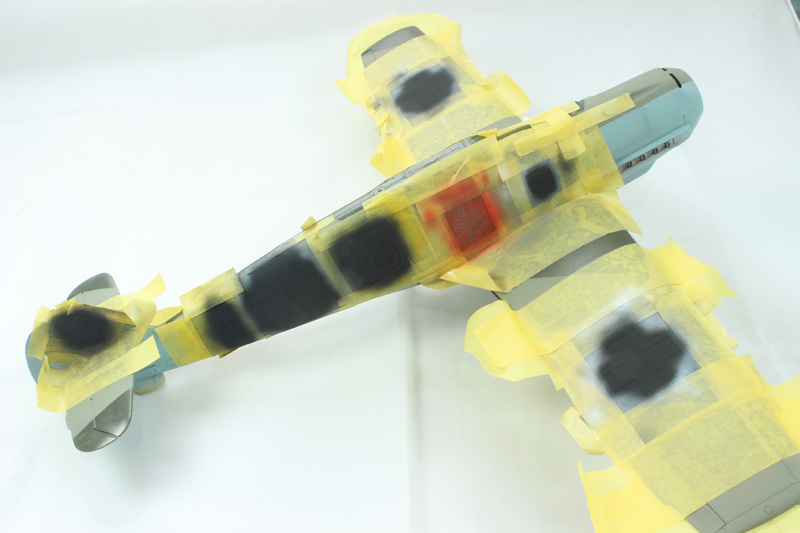
Posted: Thursday, September 10, 2015 - 05:03 PM UTC
The moment of truth:
Time to remove the masks:
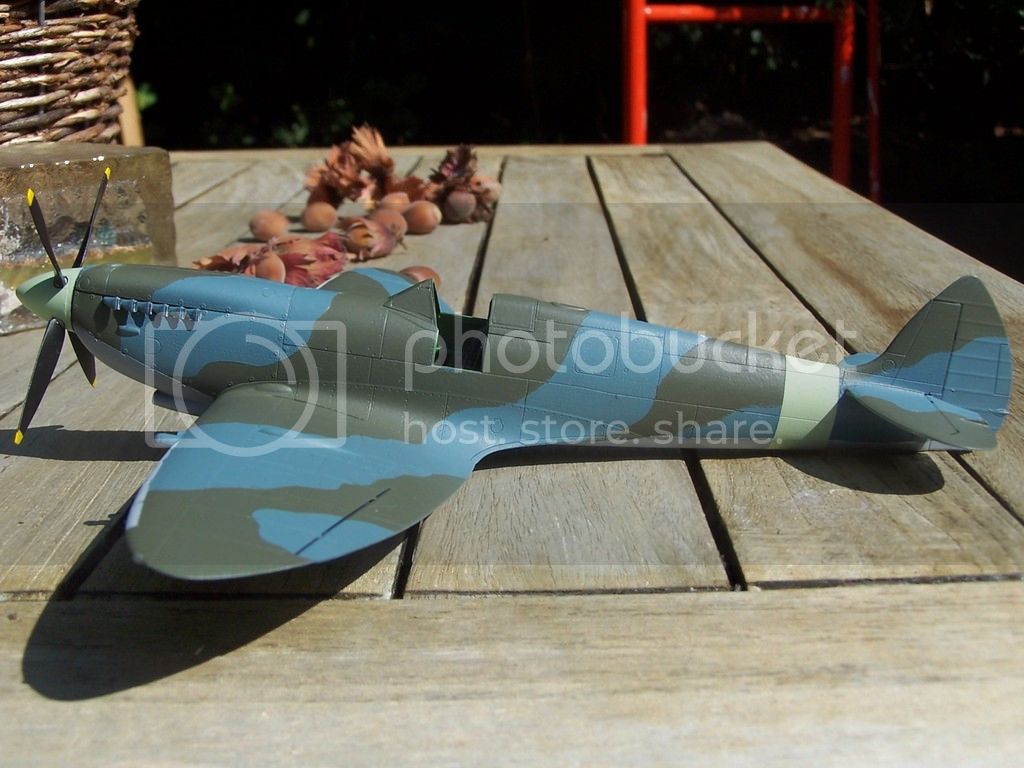

(the pieces of white is putty, I discovered 2 holes after the grey )
)
The white on the front of the wings, is primer, i don't think I can get it from grey to yellow.
Thanks again for the sample, Mal! (I reckon you have read my PM)
Peter
Time to remove the masks:
(the pieces of white is putty, I discovered 2 holes after the grey
)The white on the front of the wings, is primer, i don't think I can get it from grey to yellow.
Thanks again for the sample, Mal! (I reckon you have read my PM)
Peter
Joel_W
Joined: December 04, 2010
KitMaker: 11,666 posts
AeroScale: 7,410 posts
Posted: Thursday, September 10, 2015 - 06:38 PM UTC
Peter,
The masking came out perfect, but the colors now look wrong in the daylight. These are the accepted colors Ocean Grey and Dark Green. What you used for the Ocean Gray looks bluish, and the Dark Green looks brownish. I'm just wondering if it's your camera/editing program. Both Mal and I posted pictures with our models using different brands of paint, but the colors are very similar.
Joel
Stoottroeper
Joined: June 10, 2007
KitMaker: 1,107 posts
AeroScale: 38 posts
Posted: Friday, September 11, 2015 - 12:12 AM UTC
Hi Joel,
I used the recommended colors, which are the closest Vallejo's to the original, but they are a bit of. But as long as I don't make a collection of Spitfires in the right colors, it looks good enouh to me.
I am just happy that my first airplane comes out so good.
Also, modelling is my hobby, not photography, so I have no idea how to change those settings.
Peter
Joel_W
Joined: December 04, 2010
KitMaker: 11,666 posts
AeroScale: 7,410 posts
Posted: Friday, September 11, 2015 - 02:17 AM UTC
Quoted Text
Hi Joel,
I used the recommended colors, which are the closest Vallejo's to the original, but they are a bit of. But as long as I don't make a collection of Spitfires in the right colors, it looks good enouh to me.
I am just happy that my first airplane comes out so good.
Also, modelling is my hobby, not photography, so I have no idea how to change those settings.
Peter
Peter,
Your Spit looks fine as is. I was only trying to suggest that the camera settings and or your editing program shifted the colors somewhat.
The bottom line is that if you're ok with the results, that's all that counts. And even if you do eventually have a collection of Spitfires, whose to say that batch to batch of paints weren't off back then.
All and all I think that you did a rock solid build.
Joel
Holdfast
#056

Joined: September 30, 2002
KitMaker: 8,581 posts
AeroScale: 4,913 posts
Posted: Friday, September 11, 2015 - 11:06 AM UTC
Hi Peter,
Yes the colours do look a bit off but, as Joel suggest it might be the colour balance in your camera. No worries though as you are happy with the outcome, which is all that is needed.
Just for information; I also produce masks for the yellow leading edges those yellow leading edges where part of the recognition "system" and were only meant to be visible from head on. They tapered from 6" inboard (3" above and below the centre line of the leading edge), to 3" at the tip end.
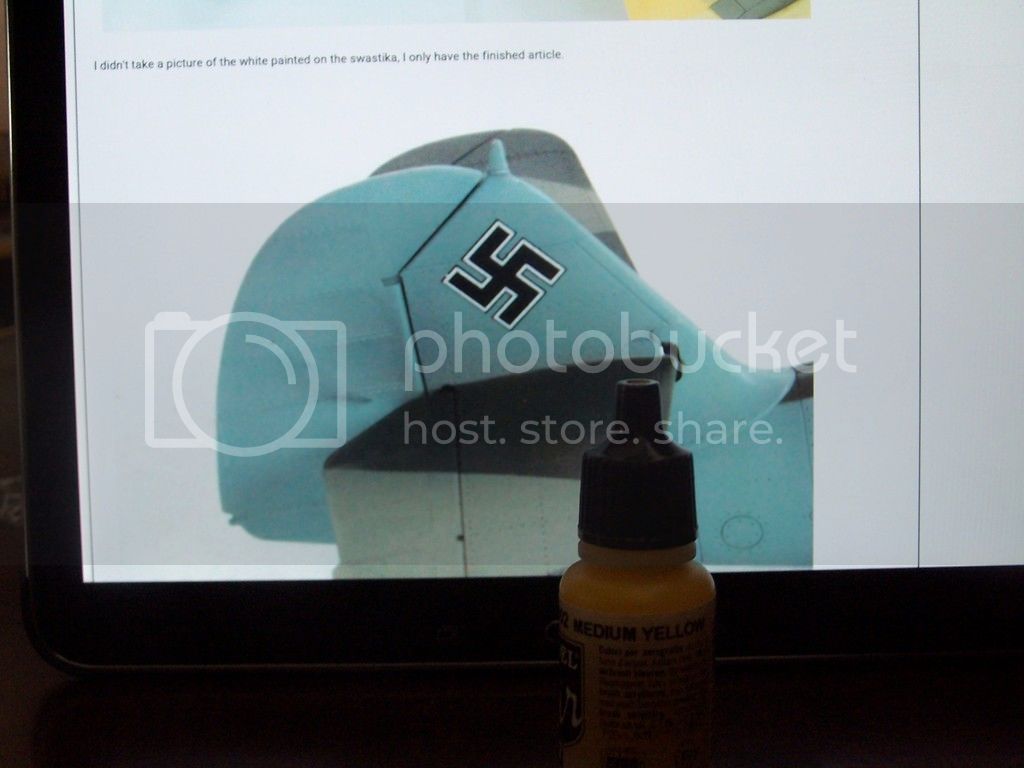
As the yellow edges were painted over the camouflage then a light undercoat isn't really necessary. It is an easy matter to even paint white over black. (I'll upload a photo as I have just painted a swastika with a thin black outline which required the white to be painted over the black The light undercoat doesn't really matter, unless you plan on weathering through the yellow edge.
Yes the colours do look a bit off but, as Joel suggest it might be the colour balance in your camera. No worries though as you are happy with the outcome, which is all that is needed.
Just for information; I also produce masks for the yellow leading edges
those yellow leading edges where part of the recognition "system" and were only meant to be visible from head on. They tapered from 6" inboard (3" above and below the centre line of the leading edge), to 3" at the tip end.As the yellow edges were painted over the camouflage then a light undercoat isn't really necessary. It is an easy matter to even paint white over black. (I'll upload a photo as I have just painted a swastika with a thin black outline which required the white to be painted over the black
The light undercoat doesn't really matter, unless you plan on weathering through the yellow edge.
Holdfast
#056
Joined: September 30, 2002
KitMaker: 8,581 posts
AeroScale: 4,913 posts
Posted: Tuesday, September 15, 2015 - 12:16 PM UTC
Sorry for the delay in posting this but here are the pics showing the swastika on my 109 with the black painted first:
Here you see that all the crosses have the white painted, but the swastika has no paint on yet.
Here the black is painted, after the yelow and white elements are masked off.
I didn't take a picture of the white painted on the swastika, I only have the finished article.
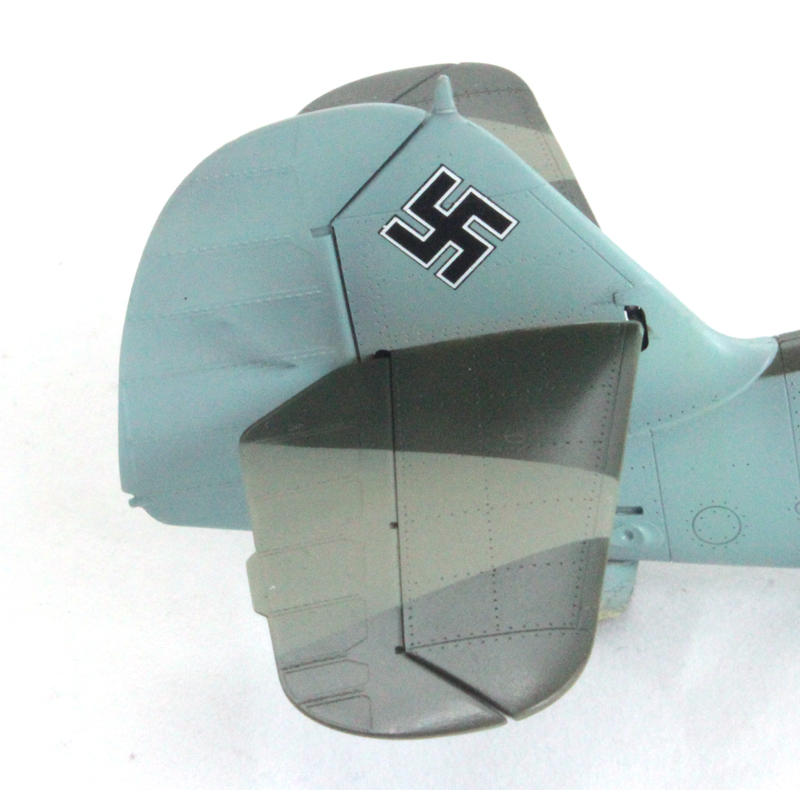
So you can paint light colours over dark ones
Here you see that all the crosses have the white painted, but the swastika has no paint on yet.
Here the black is painted, after the yelow and white elements are masked off.
I didn't take a picture of the white painted on the swastika, I only have the finished article.
So you can paint light colours over dark ones
Stoottroeper
Joined: June 10, 2007
KitMaker: 1,107 posts
AeroScale: 38 posts
Posted: Thursday, September 17, 2015 - 05:29 PM UTC
Goodafternoon,
Sorry for the delay, but I had to spent some time to look for a new job, but I did do something:
First: I had my yellow study Mal's last reply to show it that it IS possible:
While my yellow was busy, I made myself useful with placing the masks for the squadroncodes and the taping:
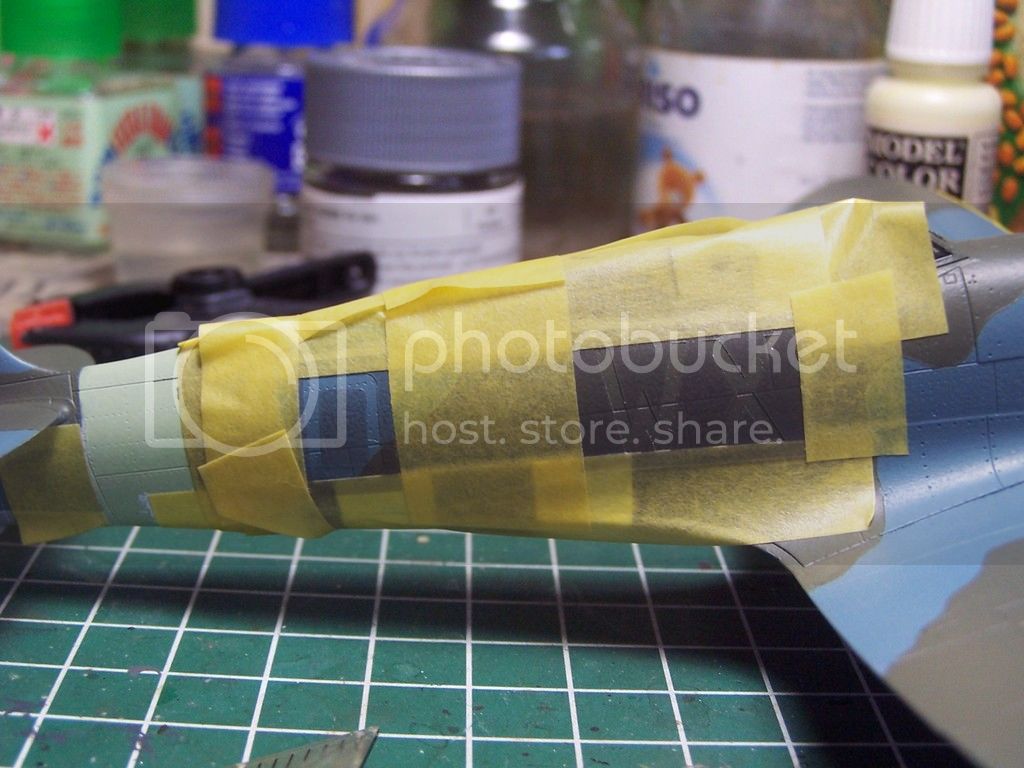
Which is naturally followed by the painting:
(I must admit: they work terrific)
When "Yellow" was finally finished, we tried to get an edge:

And I did a little weathering on the exhausts:

See you on the next update,
Peter
Sorry for the delay, but I had to spent some time to look for a new job, but I did do something:
First: I had my yellow study Mal's last reply to show it that it IS possible:
While my yellow was busy, I made myself useful with placing the masks for the squadroncodes and the taping:
Which is naturally followed by the painting:
(I must admit: they work terrific)
When "Yellow" was finally finished, we tried to get an edge:
And I did a little weathering on the exhausts:
See you on the next update,
Peter
Holdfast
#056
Joined: September 30, 2002
KitMaker: 8,581 posts
AeroScale: 4,913 posts
Posted: Sunday, September 20, 2015 - 10:38 AM UTC
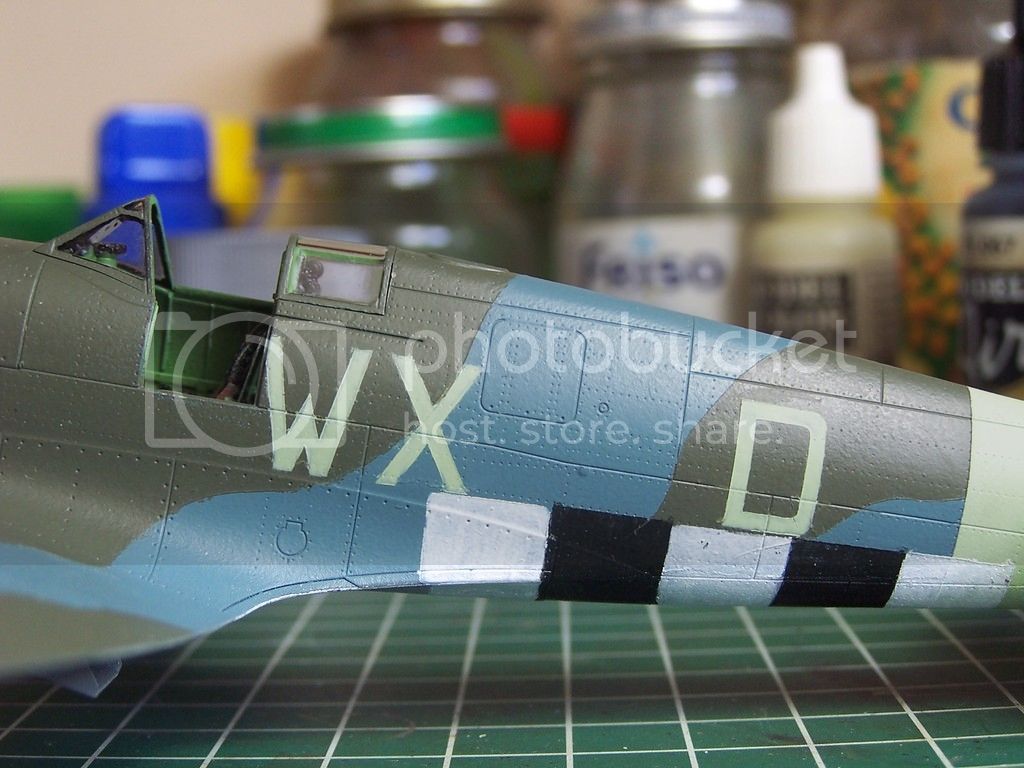
Hi Peter, did you hand paint the codes?
Stoottroeper
Joined: June 10, 2007
KitMaker: 1,107 posts
AeroScale: 38 posts
Posted: Sunday, September 20, 2015 - 11:51 AM UTC
Hi Mal,
no, I airbushed them. Though I must admit I had some trouble with the paint, which was either too thin or not sticking on the left "Wx" and the bottom of the "D".
I did have to repair a little of the code and the surrounding area (mainly in the panellines).
The other side is much better.
Peter
no, I airbushed them. Though I must admit I had some trouble with the paint, which was either too thin or not sticking on the left "Wx" and the bottom of the "D".
I did have to repair a little of the code and the surrounding area (mainly in the panellines).
The other side is much better.
Peter
Joel_W
Joined: December 04, 2010
KitMaker: 11,666 posts
AeroScale: 7,410 posts
Posted: Sunday, September 20, 2015 - 07:03 PM UTC
Peter,
Hard line masking and stenciling can lead to bleed through if you air brush at to high of a psi pressure with to much of a paint flow rate. The air pressure will force a little bit of the paint under the leading edge of the mask. If you mist the 1st few coat or two, it will seal those edges. Then apply the color coats in light even passes, building up the color slowly. That will also help to reduce the raised hardline edge.
Joel
 |

WEB HOSTING BY


Copyright ©2021 AeroScale and Kitmaker Network, a subsidiary of Silver Star Enterprises
All Rights Reserved. Please read our Conditions of Use and Privacy Policy.
All Rights Reserved. Please read our Conditions of Use and Privacy Policy.